Removal Procedure
- Disable the SIR system. Refer to Disabling the SIR System .
- Remove the end caps. Refer to Instrument Panel Outer Trim Cover Replacement .
- Remove the sound insulators. Refer to Instrument Panel Insulator Panel Replacement - Right Side and Instrument Panel Insulator Panel Replacement - Left Side .
- Remove the instrument panel compartment. Refer to Instrument Panel Compartment Replacement .
- Remove the passenger inflator module. Refer to Inflatable Restraint Instrument Panel Module Replacement in SIR.
- Remove the tilt steering lever. Refer to Tilt Lever Replacement - On Vehicle in Steering Wheel and Column - Tilt.
- Remove the upper and the lower steering column covers. Refer to Steering Column Trim Cover Replacement - On Vehicle in Steering Wheel and Column - Tilt.
- Remove the hazard warning switch. Refer to Hazard Warning Switch Replacement in Instrument Panel, Gauges and Console.
- Remove the instrument panel cluster trim plate. Refer to Instrument Cluster Trim Panel Replacement and Instrument Cluster Trim Panel Replacement .
- Remove the instrument panel cluster. Refer to Instrument Cluster Replacement .
- Remove the driver inflator module. Refer to Inflatable Restraint Steering Wheel Module Replacement in SIR.
- Remove the steering wheel. Refer to Steering Wheel Replacement in Steering Wheel and Column -- Tilt.
- Remove the multifunction lever. Refer to Multifunction Turn Signal Lever Replacement - On Vehicle in Steering Wheel and Column - Tilt.
- Remove the accessory trim plate. Refer to Instrument Panel Accessory Trim Plate Replacement .
- Remove the radio. Refer to Radio Replacement in Entertainment.
- Remove the cup holder. Refer to Front Floor Console Cup Holder Replacement .
- Remove the gearshift handle.
- Remove the gearshift trim plate. Refer to Console Trim Plate Replacement .
- Remove the console. Refer to Console Replacement .
- Remove the ignition switch bolts.
- Remove the instrument panel upper bolt covers.
- Disconnect the electrical connections from the electrical junction box.
- Remove the fog lamp switch.
- Remove the windshield side upper garnish molding. Refer to Upper Pillar Garnish Molding Replacement .
- Loosen the center console.
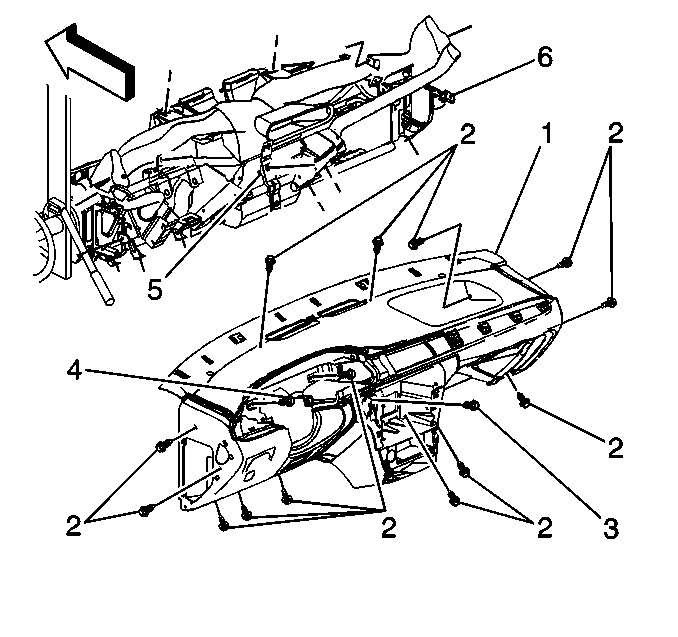
- Remove the screws (2,3,4) connecting the instrument panel (1) to the tie bar (6).
- Remove the instrument panel (1) from the tie bar (6).
Caution: This vehicle is equipped with a Supplemental Inflatable Restraint (SIR) System. Failure to follow the correct procedure could cause the following conditions:
• Air bag deployment • Personal injury • Unnecessary SIR system repairs • Refer to SIR Component Views in order to determine if you are performing service on or near the SIR components or the SIR wiring. • If you are performing service on or near the SIR components or the SIR wiring, disable the SIR system. Refer to Disabling the SIR System.
Pull the console rearward in order to disengage the console from the instrument panel (1).
Installation Procedure
- Install the instrument panel (1) to the tie bar (6).
- Install the screws (2,3,4) connecting the instrument panel (1) to the tie bar (6).
- Install the windshield side upper garnish molding. Refer to Upper Pillar Garnish Molding Replacement .
- Install the fog lamp switch.
- Install the electrical connectors junction box.
- Install the instrument panel upper bolt covers.
- Install the ignition switch bolts.
- Install the gearshift trim plate. Refer to Console Trim Plate Replacement .
- Install the gearshift handle.
- Install the cup holder. Refer to Front Floor Console Cup Holder Replacement .
- Install the radio. Refer to Radio Replacement in Entertainment.
- Install the accessory trim plate. Refer to Instrument Panel Accessory Trim Plate Replacement .
- Install the multifunction switch. Refer to Multifunction Turn Signal Lever Replacement - On Vehicle in Steering Wheel and Column - Tilt.
- Install the steering wheel. Refer to Steering Wheel Replacement in Steering Wheel and Column - Tilt.
- Install the driver inflator module. Refer to Inflatable Restraint Steering Wheel Module Replacement in SIR.
- Install the instrument panel cluster. Refer to Instrument Cluster Replacement .
- Install the instrument panel cluster trim plate. Refer to Instrument Cluster Trim Panel Replacement .
- Install the hazard warning switch. Refer to Hazard Warning Switch Replacement in Instrument Panel, Gauges and Console.
- Install the steering column upper and lower covers. Refer to Steering Column Trim Cover Replacement - On Vehicle in Steering Wheel and Column - Tilt.
- Install the tilt steering lever. Refer to Tilt Lever Replacement - On Vehicle in Steering Wheel and Column -- Tilt.
- Install the passenger inflator module. Refer to Inflatable Restraint Instrument Panel Module Replacement in SIR.
- Install the compartment. Refer to Instrument Panel Compartment Replacement .
- Install the sound insulators. Refer to Instrument Panel Insulator Panel Replacement - Right Side and to Instrument Panel Insulator Panel Replacement - Left Side .
- Install the end caps. Refer to Instrument Panel Outer Trim Cover Replacement .
- Enable the SIR system. Refer to Enabling the SIR System .
Important: When installing the instrumental panel carrier to the vehicle, ensure that the cowl seal is seated properly to the cowl. Failure to do so may cause a vibration rattle between the carrier and the cowl.
