Back Body Pillar Inner Upper Panel Assembly Replacement SWB
Removal Procedure
- Disable the SIR system. Refer to SIR Disabling and Enabling .
- Disconnect the negative battery cable. Refer to Battery Negative Cable Disconnection and Connection.
- Remove the battery. Refer to Battery Replacement.
- Remove the battery tray. Refer to Battery Tray Replacement.
- Remove the deck lid. Refer to Rear Compartment Lid Replacement.
- Remove the front doors. Refer to Front Side Door Replacement.
- Remove the rear doors. Refer to Rear Door Replacement.
- Remove the rear door seals. Refer to Rear Door Opening Weatherstrip Replacement.
- Remove the inner rear quarter trims. Refer to Quarter Upper Trim Panel Replacement .
- Remove the roof lining. Refer to Headlining Trim Panel Replacement.
- Remove the rear seat back. Refer to Rear Seat Back Replacement.
- Remove the rear seats. Refer to Rear Seat Cushion Cover and Pad Replacement.
- Remove the rear parcel shelf. Refer to Rear Window Shelf Trim Panel Replacement.
- Remove the deck lid release cable. Refer to Rear Compartment Lid Latch Release Cable Replacement.
- Raise and support the vehicle. Refer to Lifting and Jacking the Vehicle.
- Remove the rear wheels. Refer to Tire and Wheel Removal and Installation.
- Remove the rear bumper fascia. Refer to Rear Bumper Fascia Replacement.
- Remove the rear pressure relief valves. Refer to Pressure Relief Valve Replacement.
- Remove the rocker panel moulds. Refer to Rocker Panel Molding Replacement.
- Remove the rear wheelhouse liners. Refer to Rear Inner Wheelhouse Replacement.
- Remove the rear exhaust assembly. Refer to Exhaust Muffler Replacement - Left Side or Exhaust Muffler Replacement - Right Side.
- Remove the rear exhaust muffler heat shields. Refer to Exhaust Muffler Heat Shield Replacement - Left Side or Exhaust Muffler Heat Shield Replacement - Right Side.
- Remove the rear frame. Refer to Rear Frame Replacement.
- Remove the rear brake lines. Refer to Brake Pipe Replacement.
- Remove the fuel tank. Refer to Fuel Tank Replacement or Fuel Tank Replacement.
- Remove the fuel lines. Refer to Filler Tube Replacement or Filler Tube Replacement.
- Lower the vehicle.
- Remove the roof moulding. Refer to Body Side Roof Drip Molding Replacement.
- Remove the rear windshield. Refer to Rear Window Replacement.
- Remove the rear roof drain tubes. Refer to Sunroof Housing Rear Drain Hose Replacementand Sunroof Housing Rear Drain Hose Replacement.
- Remove the tail lights. Refer to Parking and Turn Signal Lamp Replacement.
- Remove the quarter panel. Refer to Quarter Panel Replacement.
- Repair as much of the damage as possible.
- Remove sound deadeners as necessary and note their location.
- Remove the sealers and anti-corrosion materials from the repair area, as necessary. Refer to Anti-Corrosion Treatment and Repair.
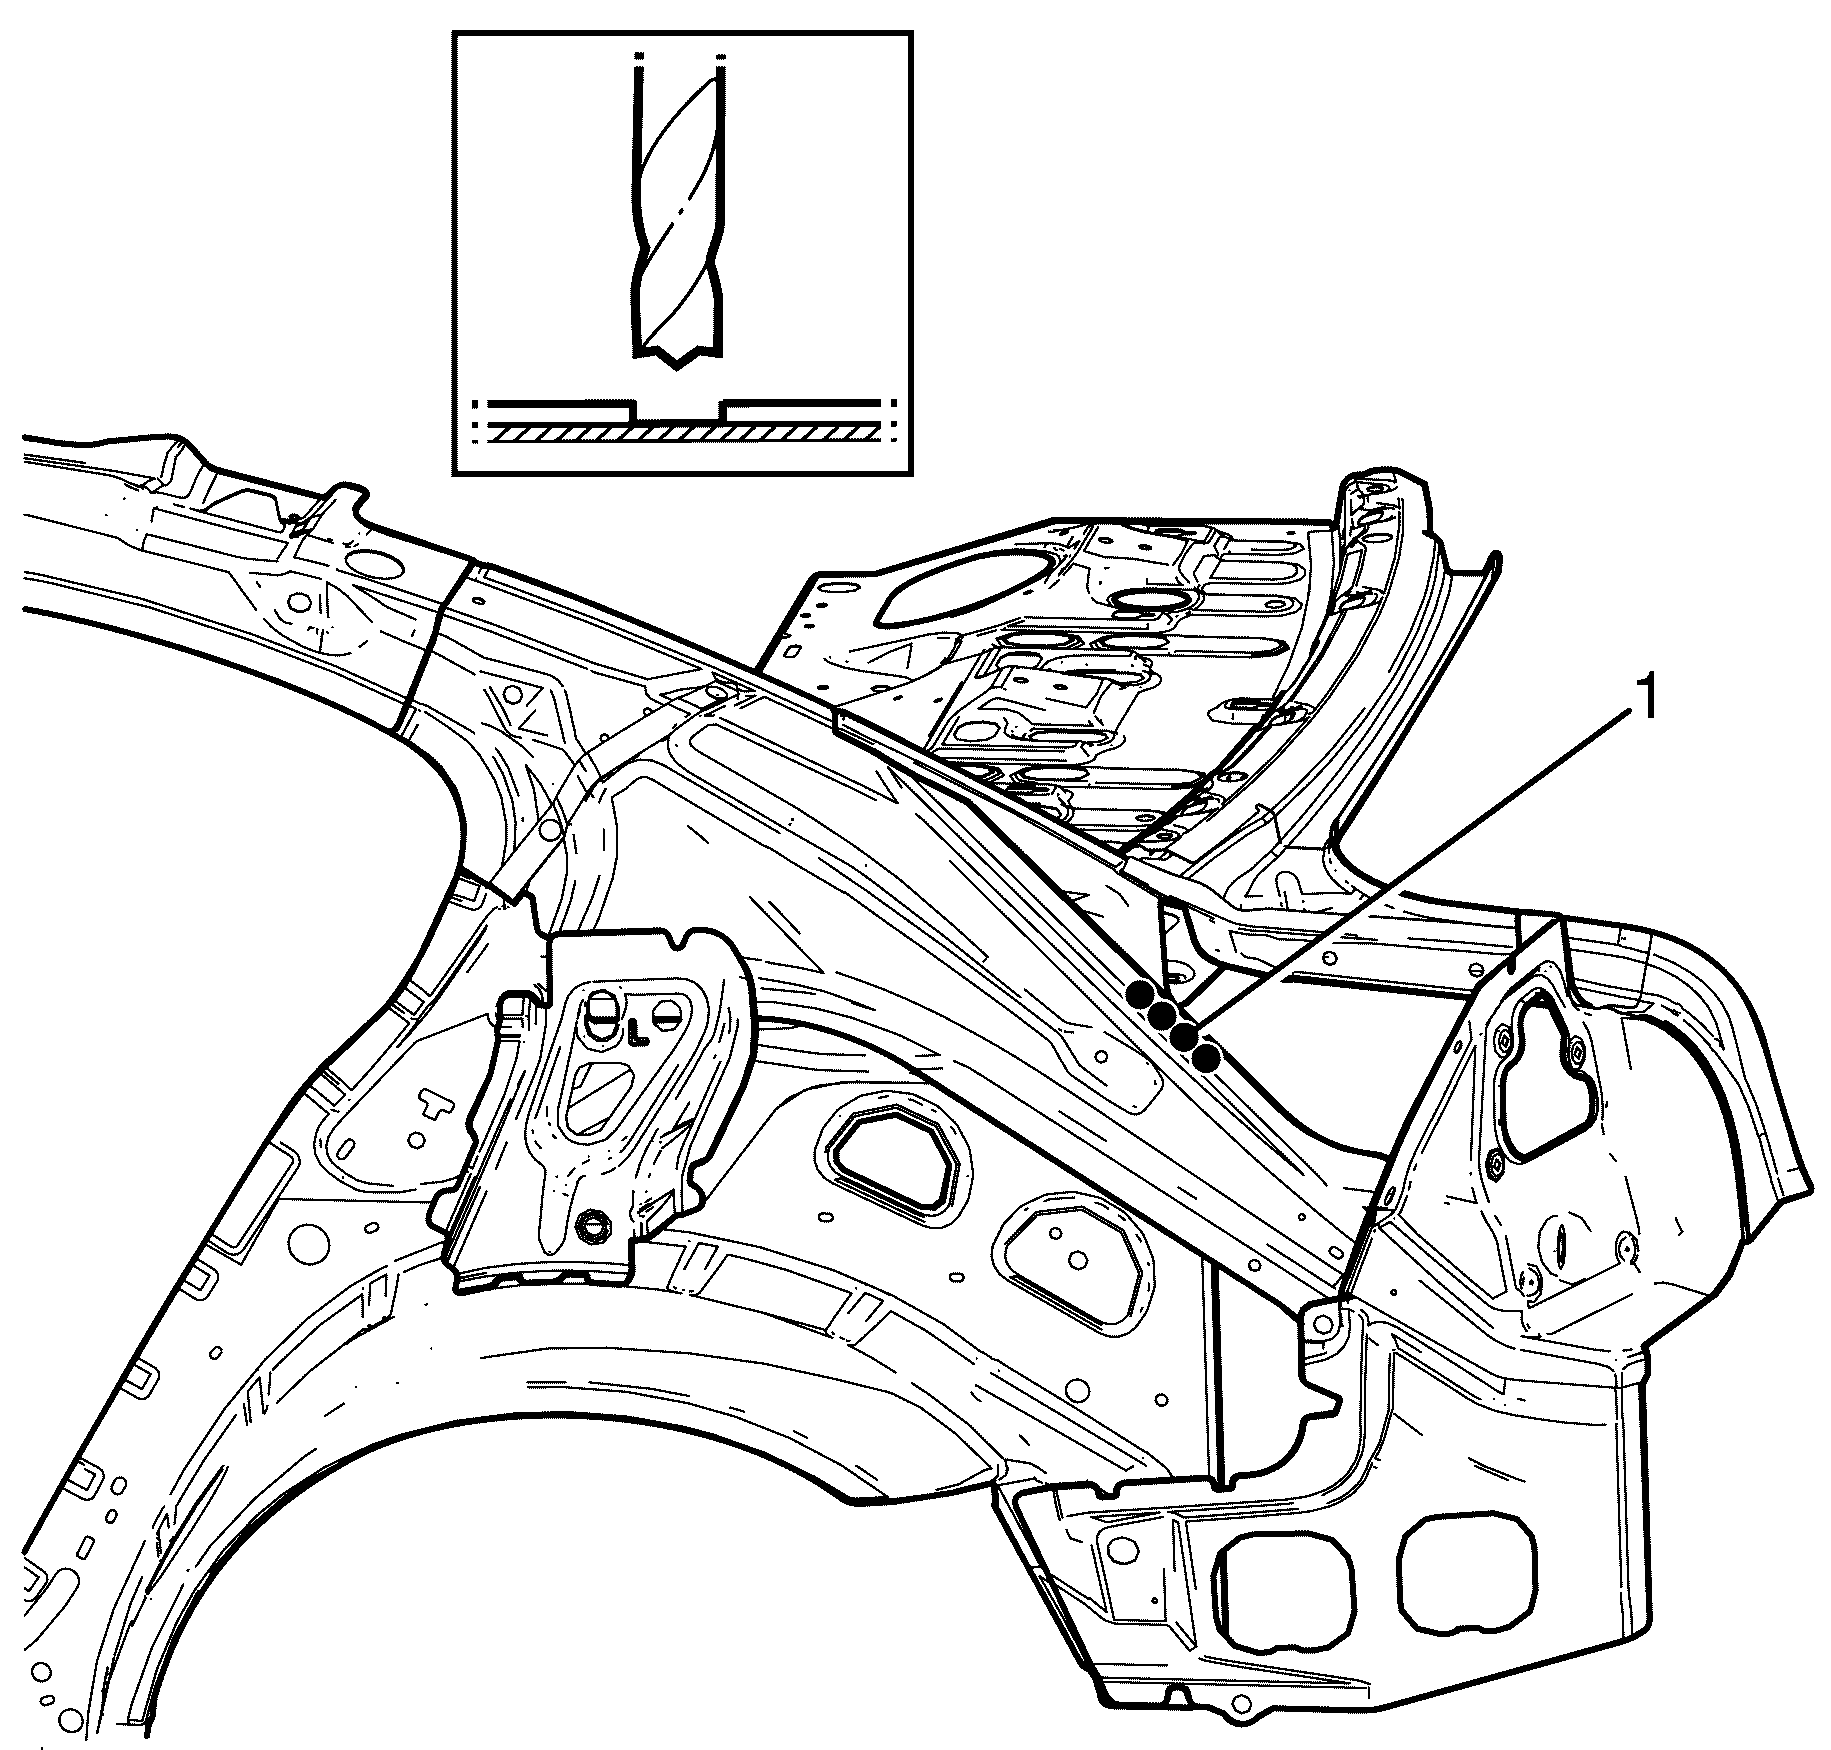
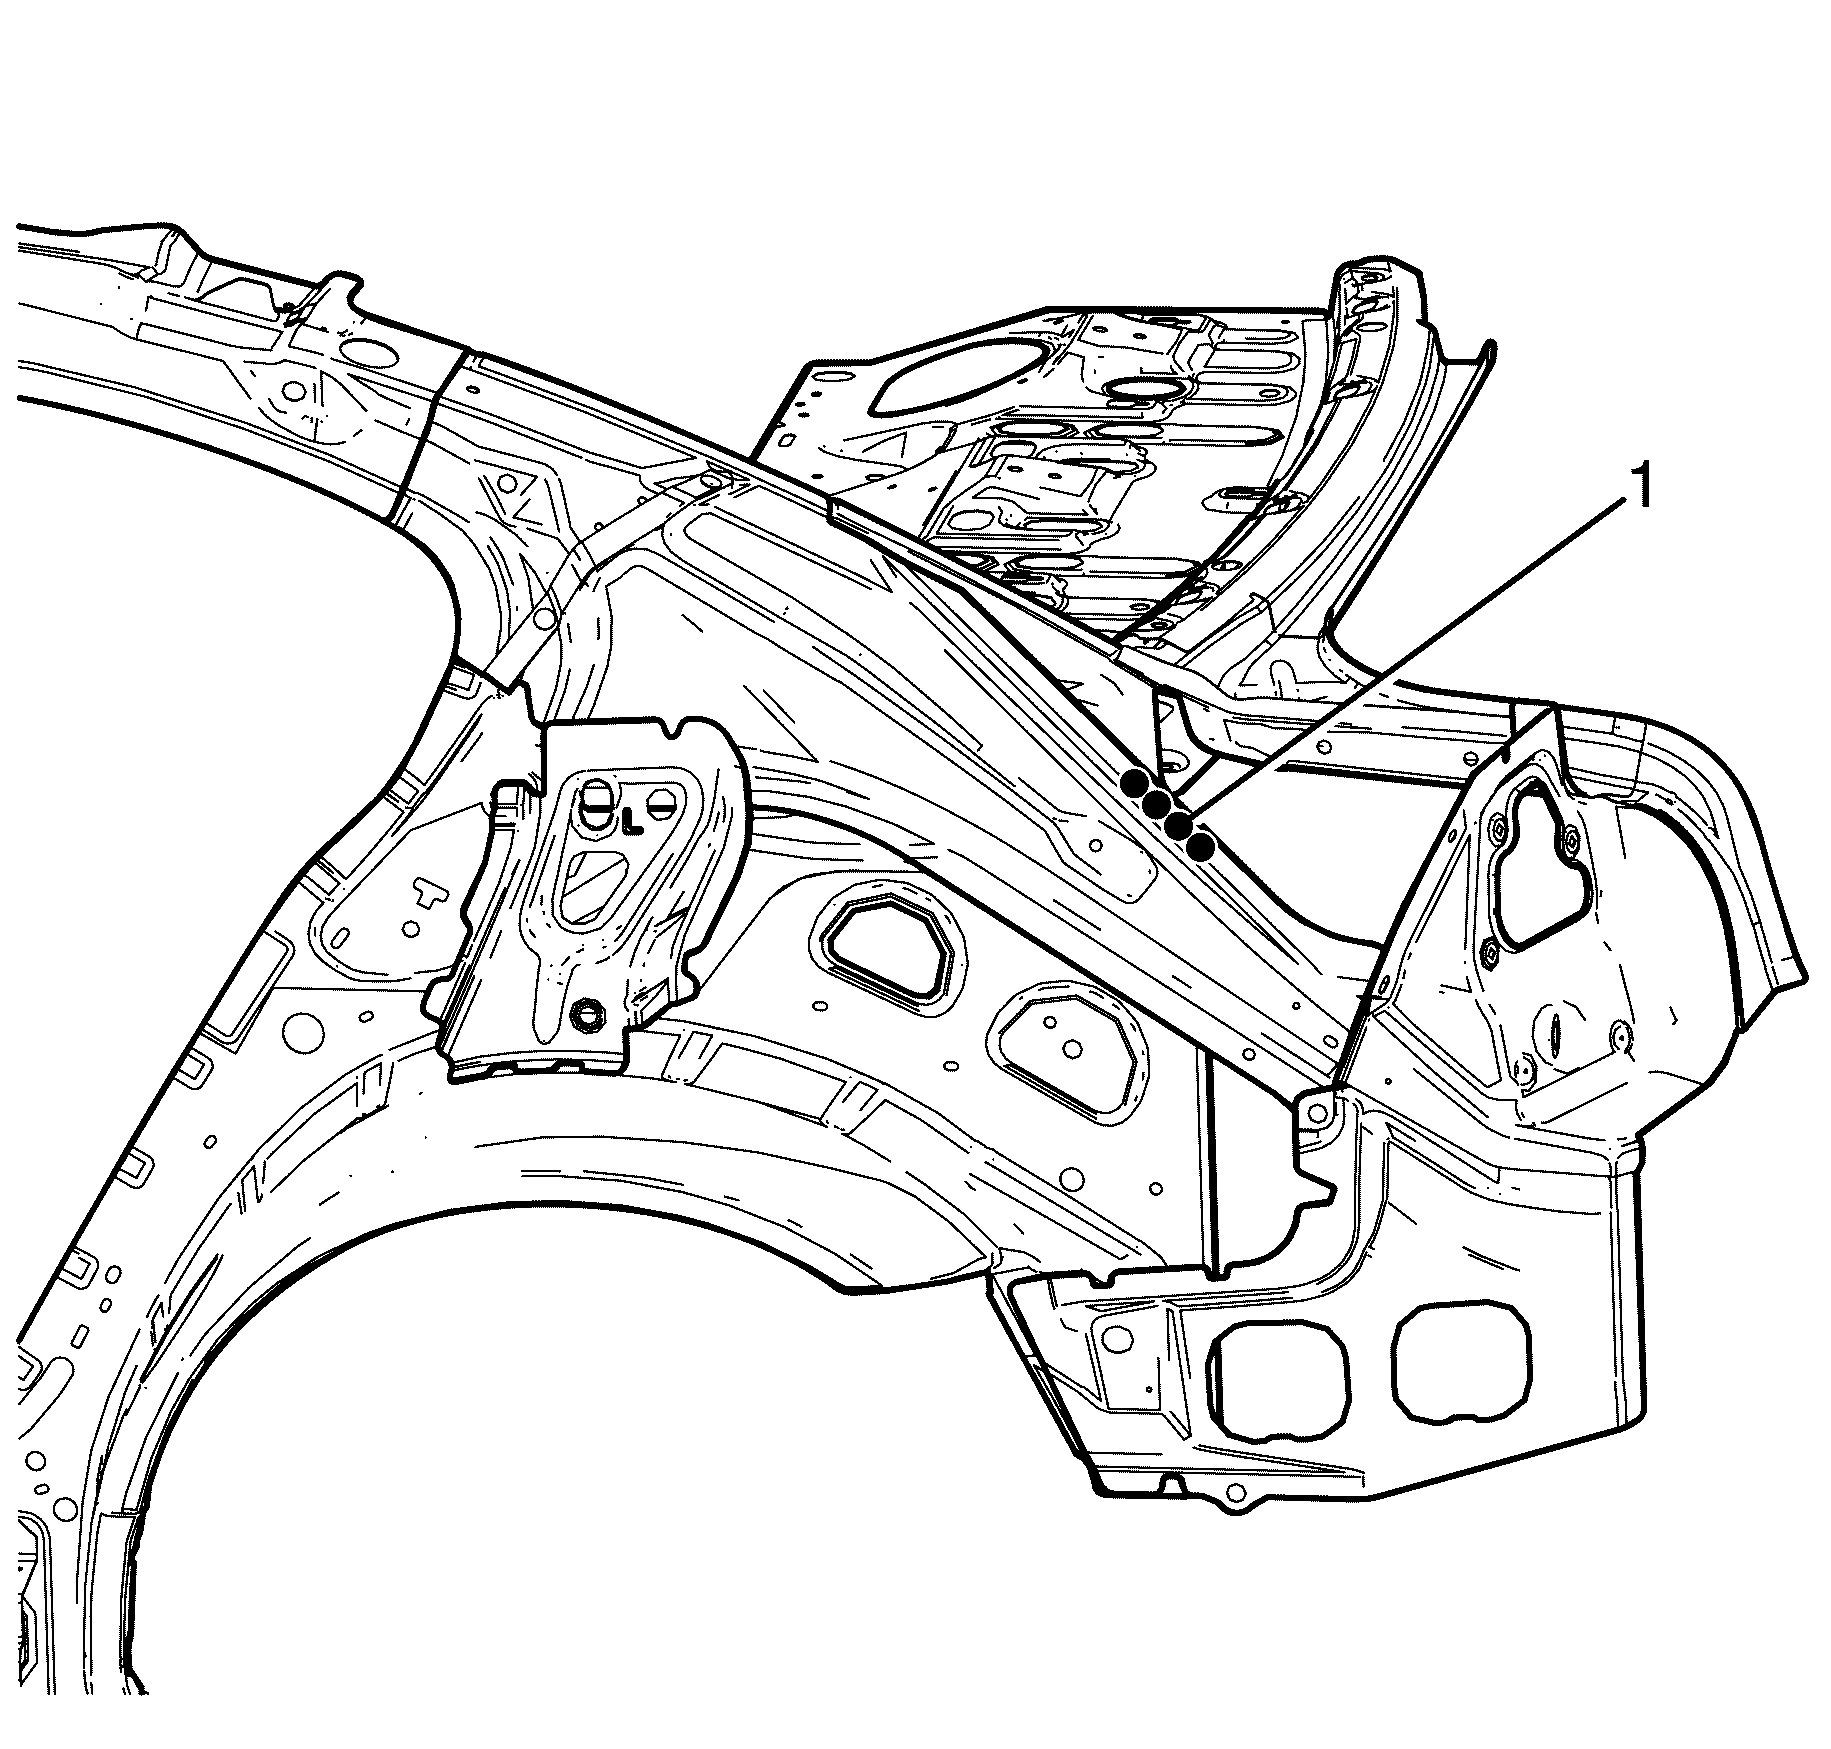
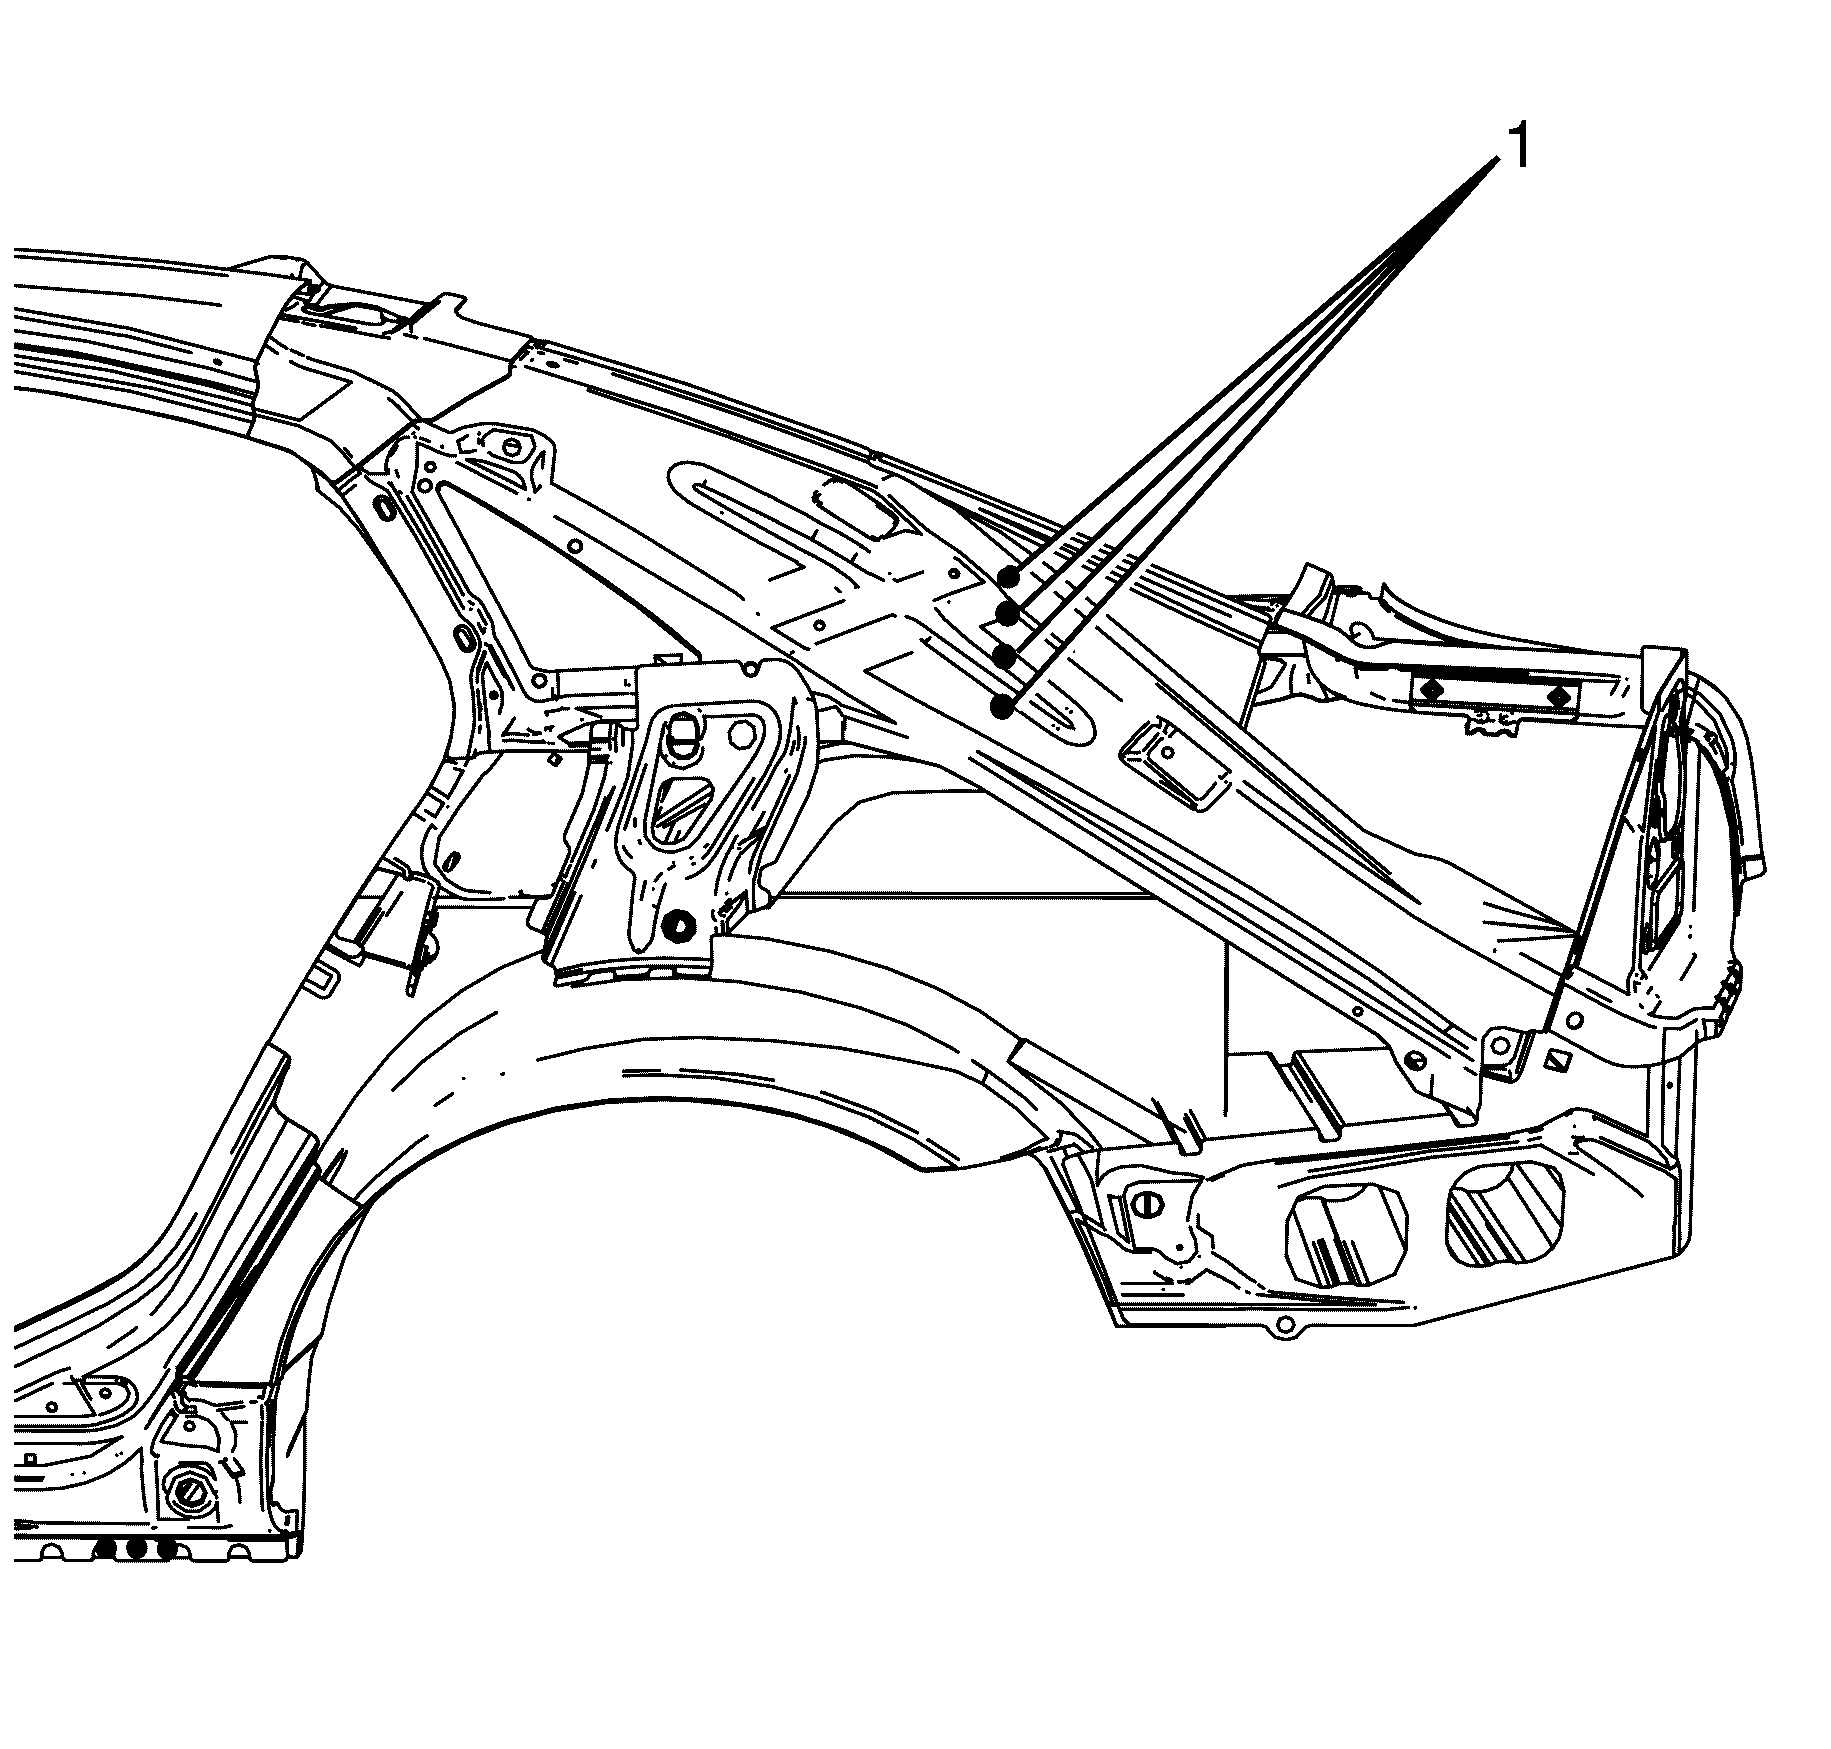
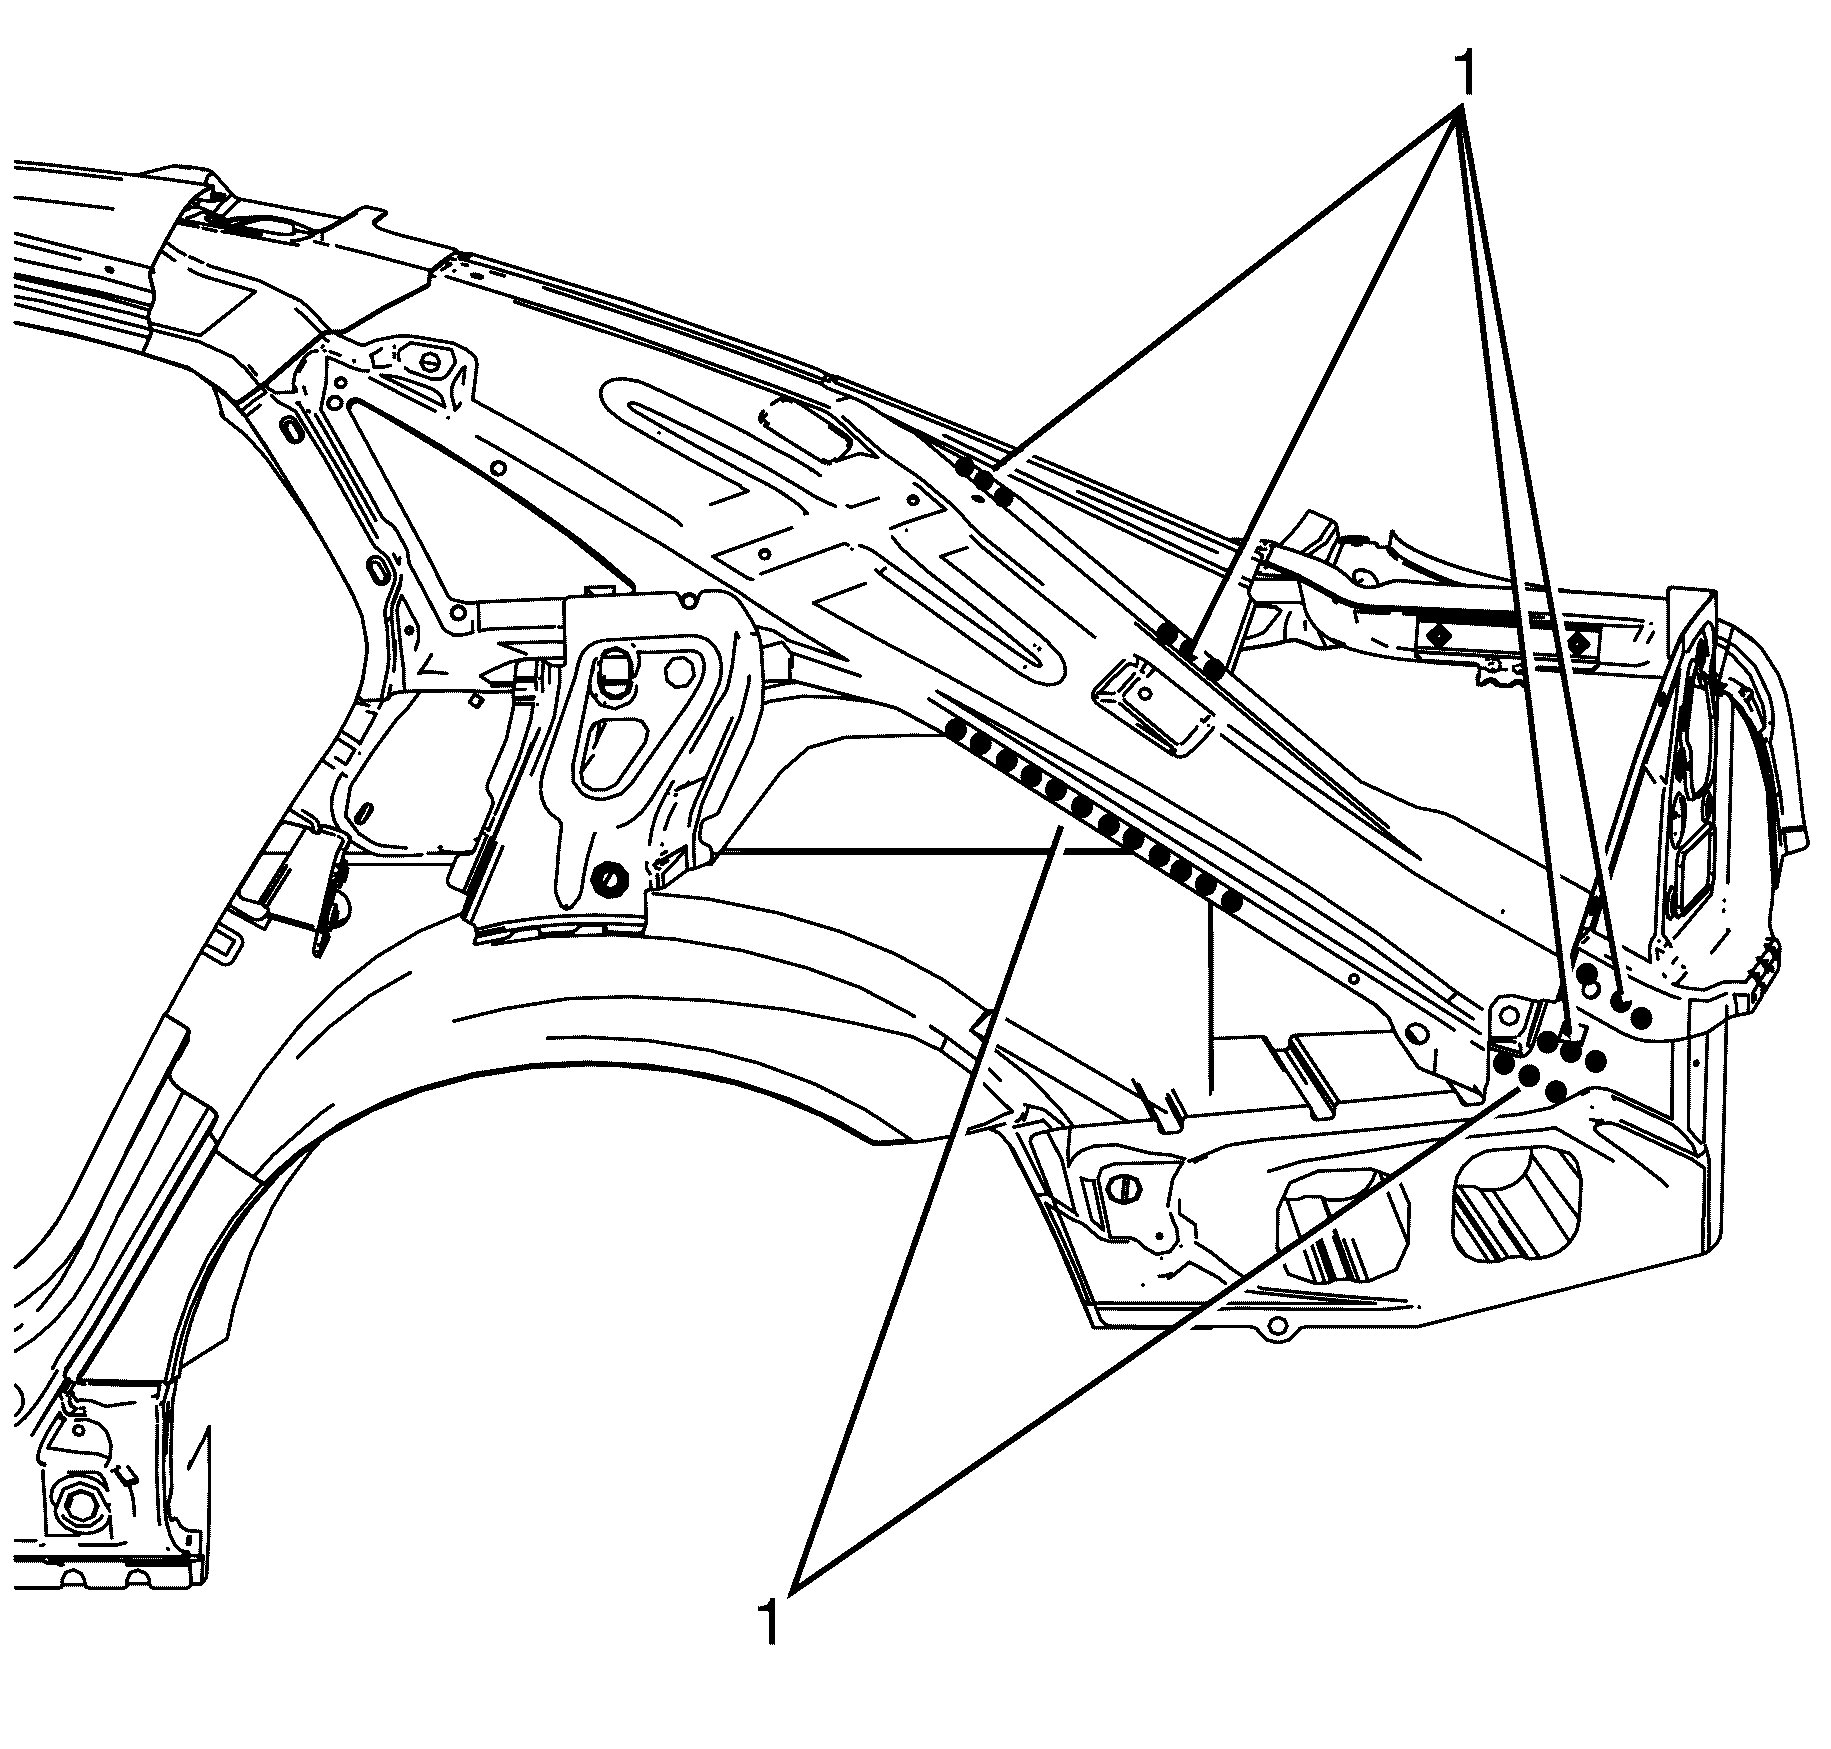
- Locate, mark and carefully drill out the rear lower panel extension to rear window panel spot welds (1).
- Locate, mark and drill out the rear lower panel extension to body ring spot welds.
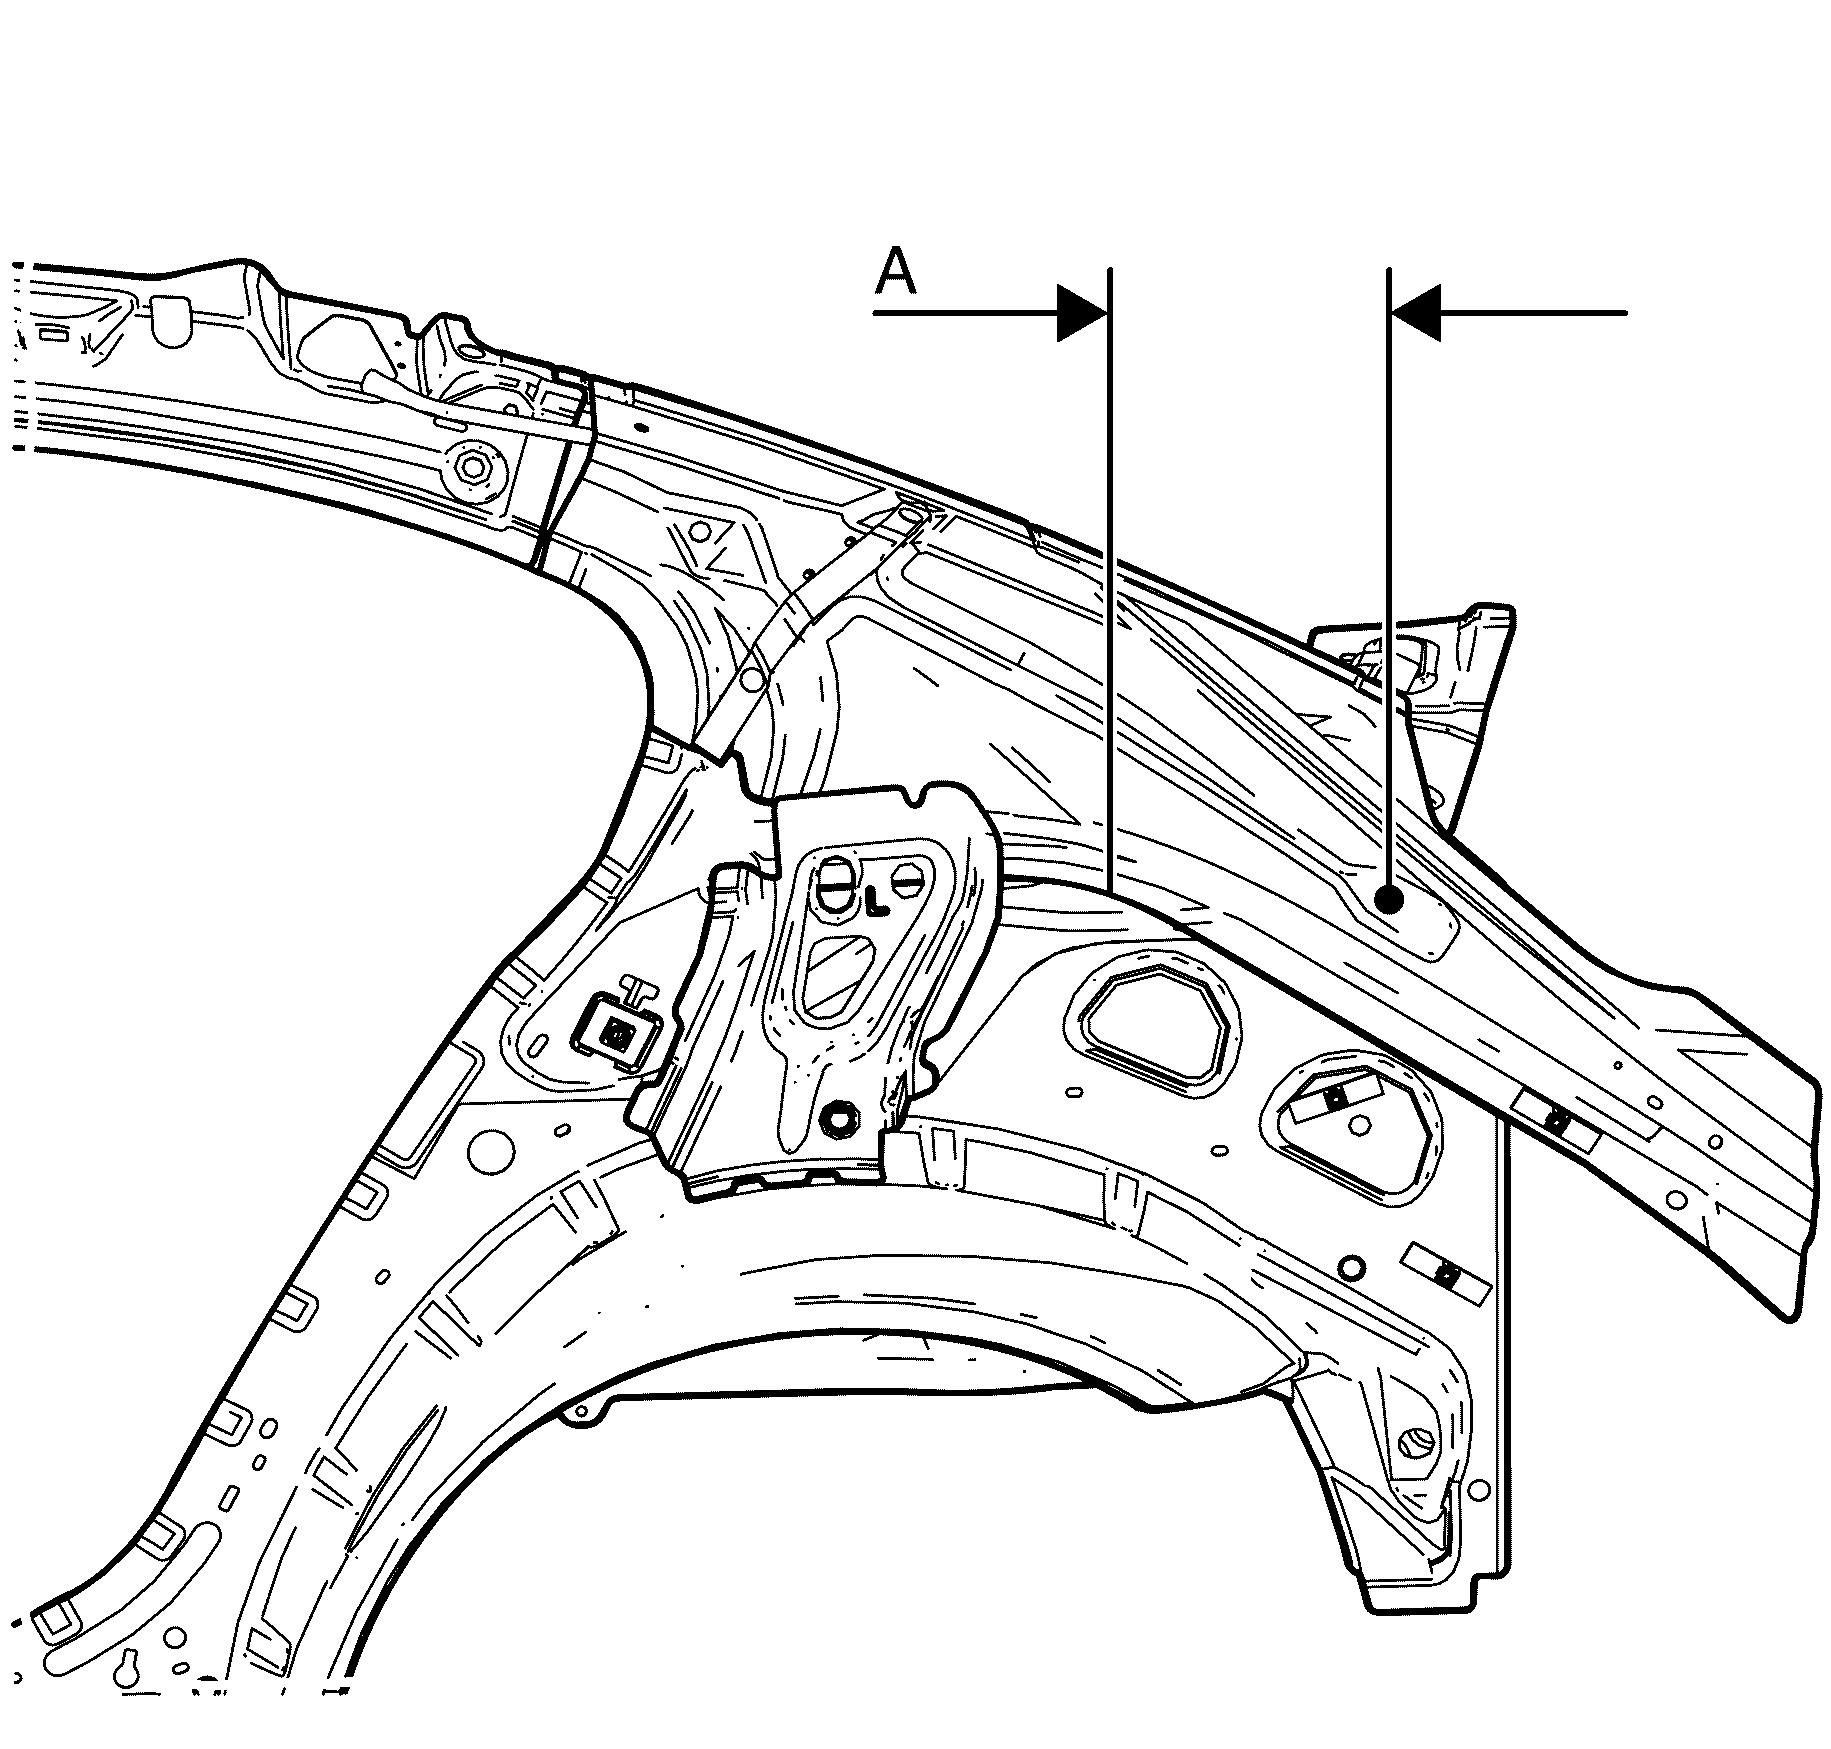
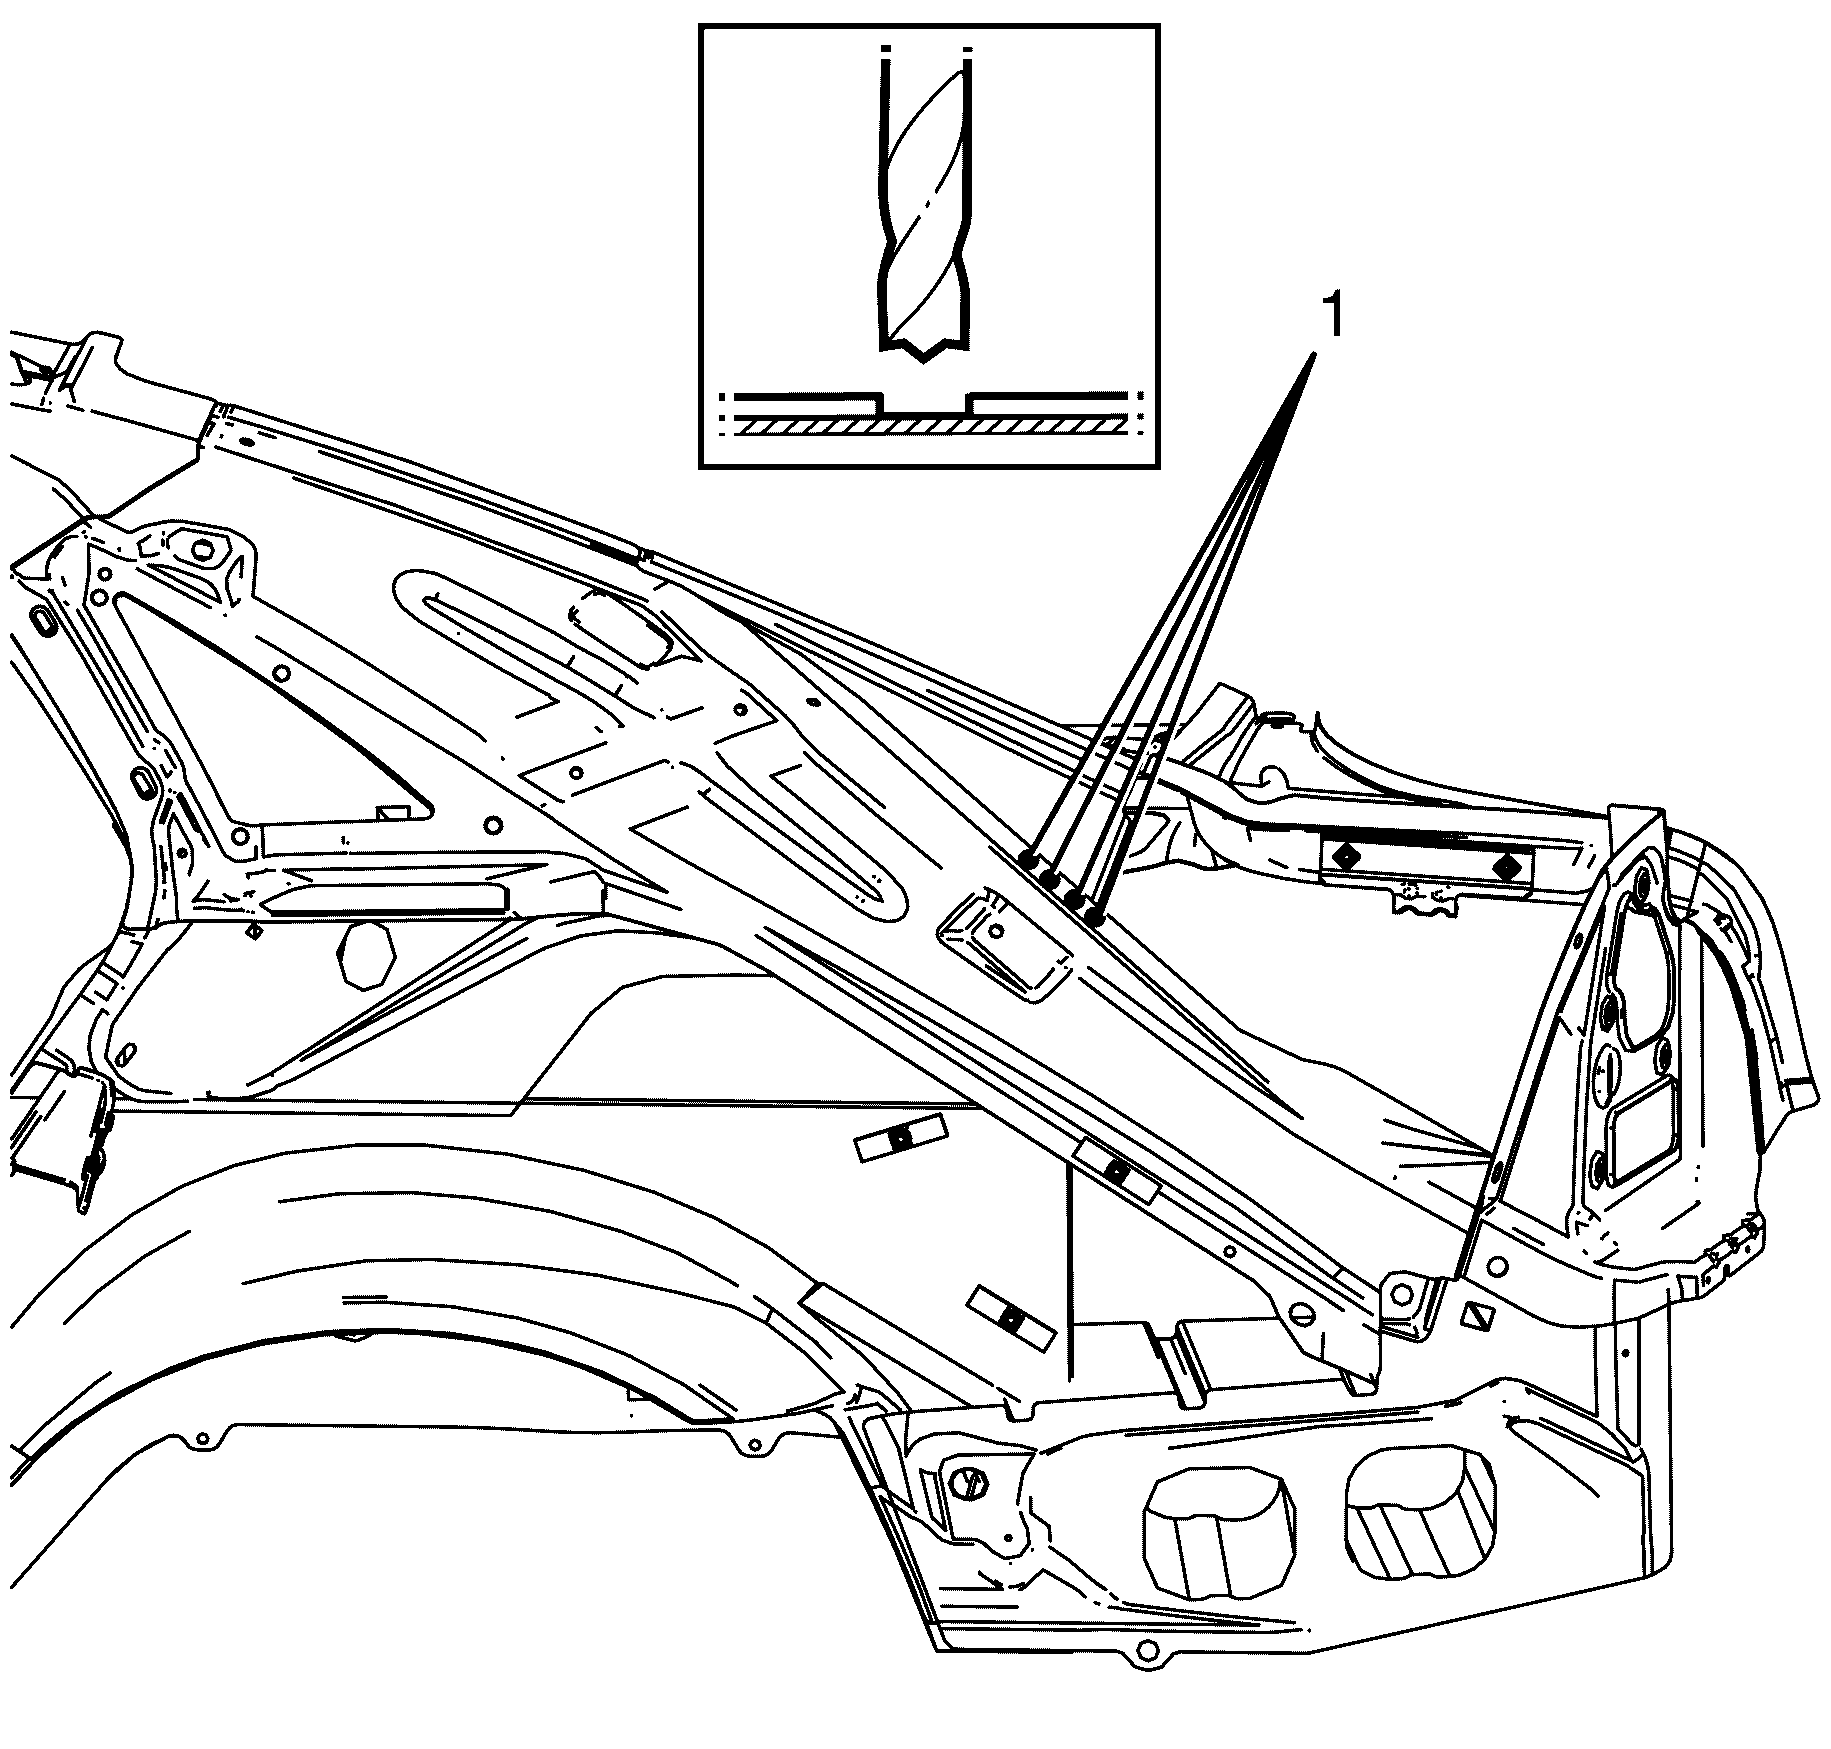
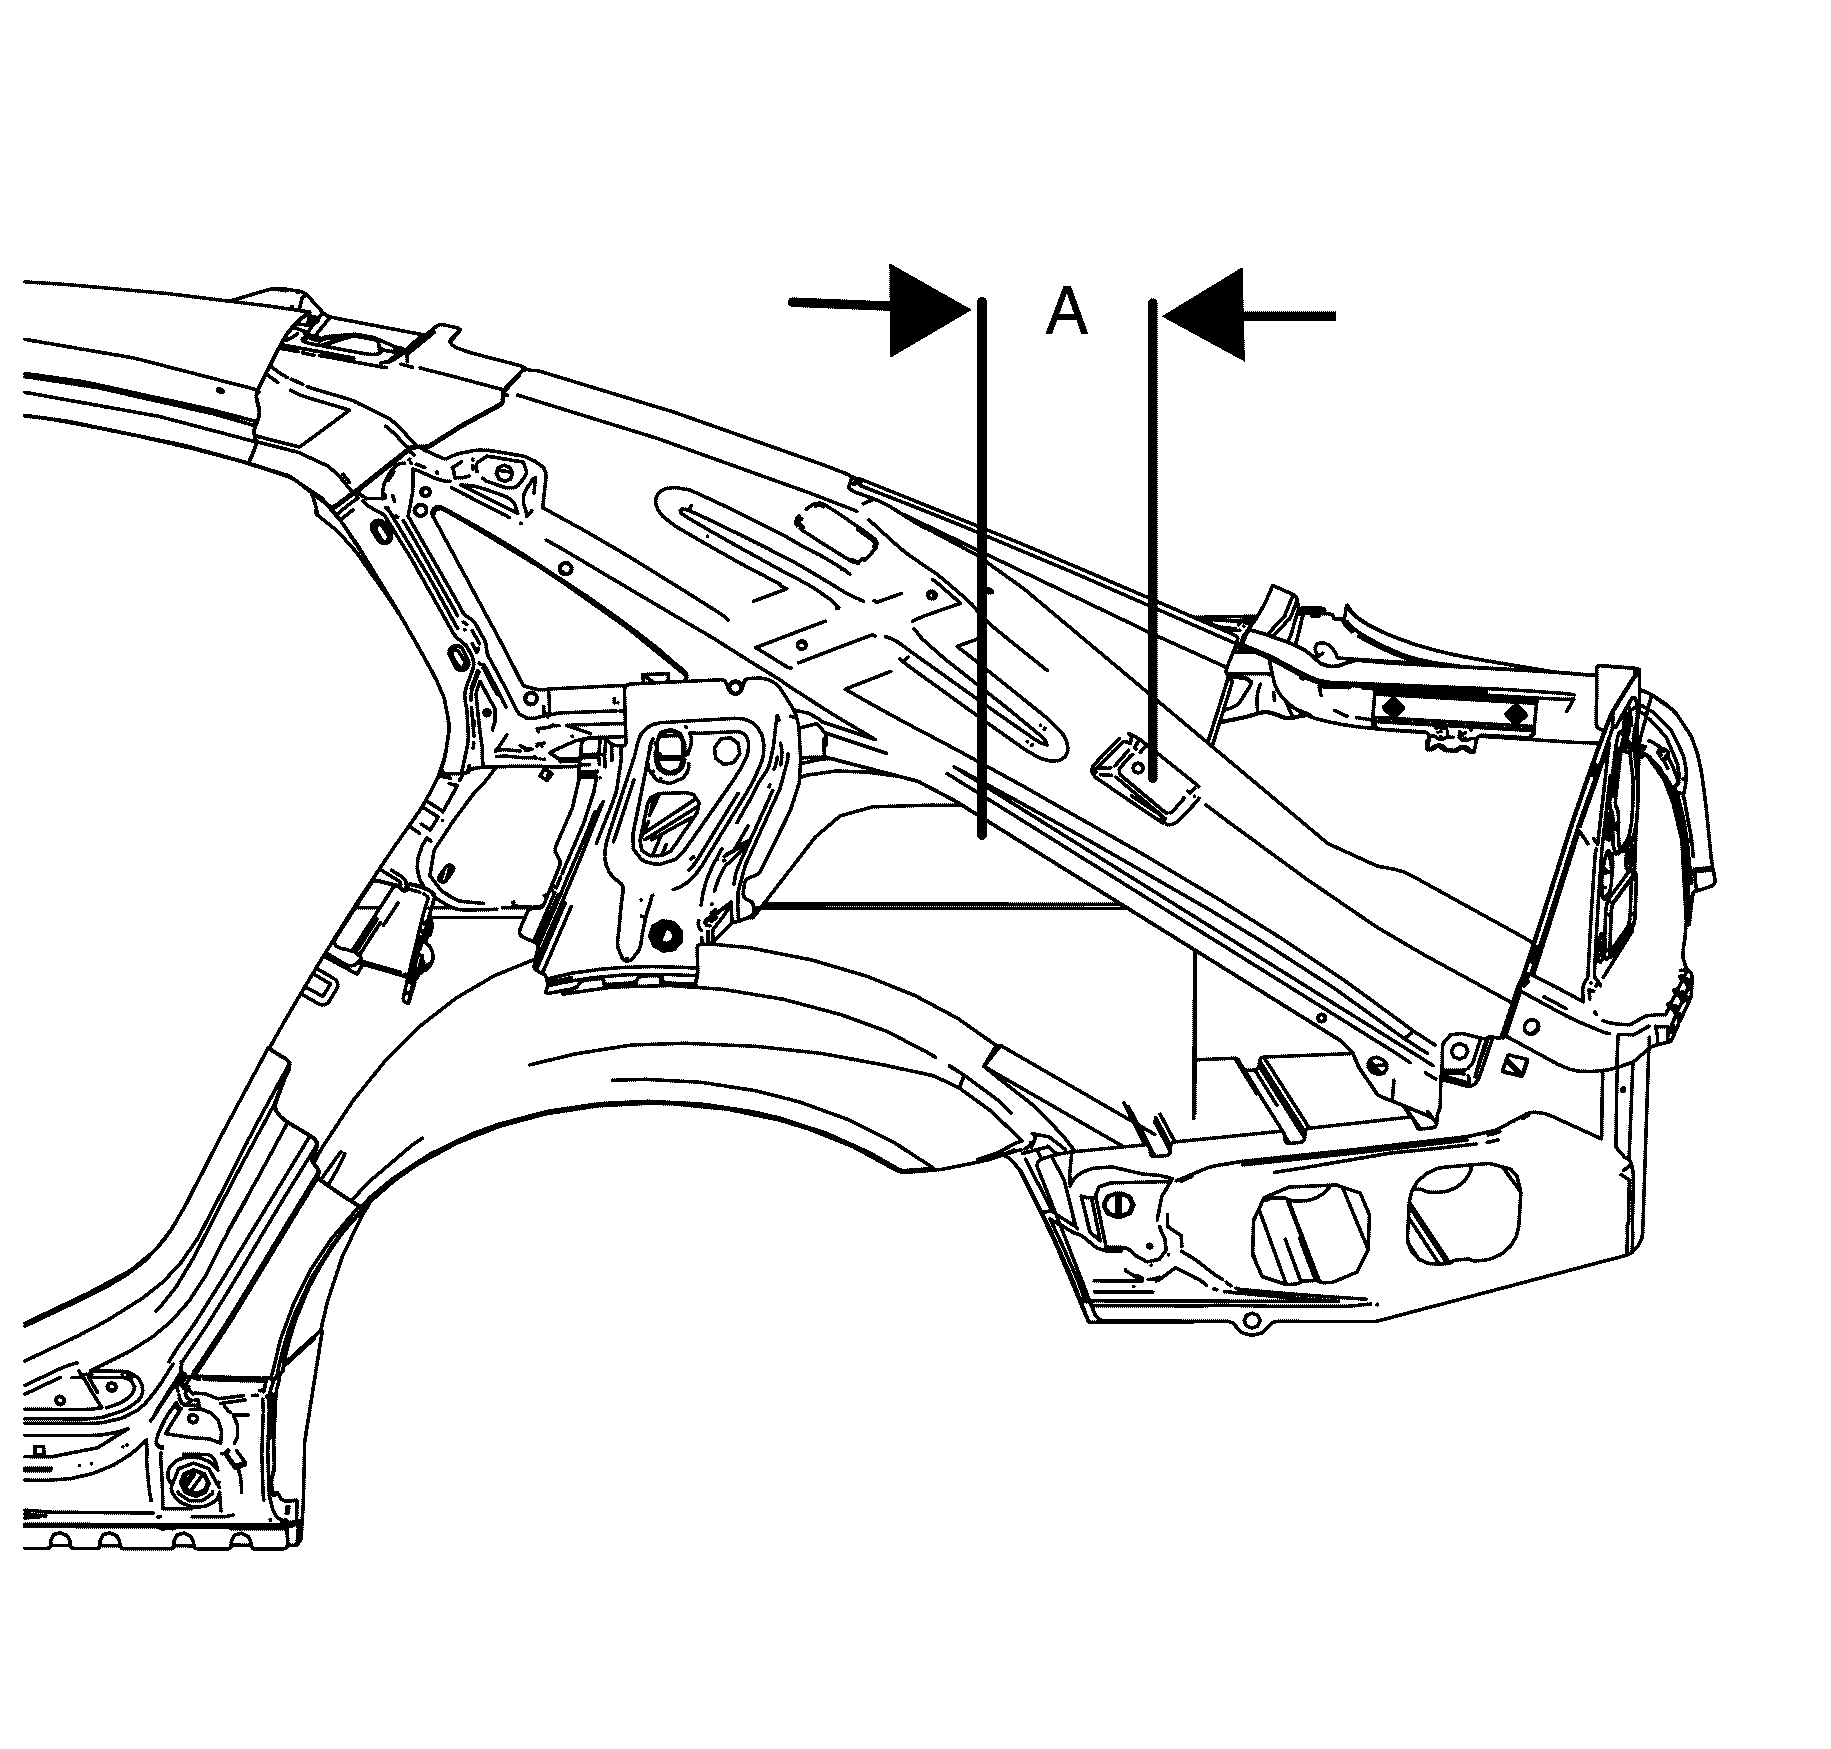
- Measure forward from the datum hole to cut point 250 mm (9.84 in) (A).
- Using a suitable tool cut through the rear lower panel extension at the measurement point.
- Remove the rear lower panel extension from the vehicle.
Caution: Refer to Approved Equipment for Collision Repair Caution in the Preface section.
Caution: Refer to Foam Sound Deadeners Caution in the Preface section.
Caution: Refer to Glass and Sheet Metal Handling Caution in the Preface section.
Caution: Refer to Battery Disconnect Caution in the Preface section.
Caution: Refer to Vehicle Lifting Caution in the Preface section.
Important: When replacing panels that involve servicing of stationary glass, refer to Rear Window Replacement and Windshield Replacement, before performing any priming or refinishing. Sectioning should be performed only in the recommended areas. Failure to do so may compromise the structural integrity of the vehicle.
Important: The full body-side outer panel comes as a complete assembly and can be replaced after the removal of the fixed glass and roof. Any one of these service procedures can be performed separately or in any combination, dependent upon the extent of damage to the vehicle. Sectioning must take place in specified areas only.
Important: This step is unique to the sunroof module.
Important: Take care not to damage the rear window panel.

Discard the rear lower panel extension.
Installation Procedure
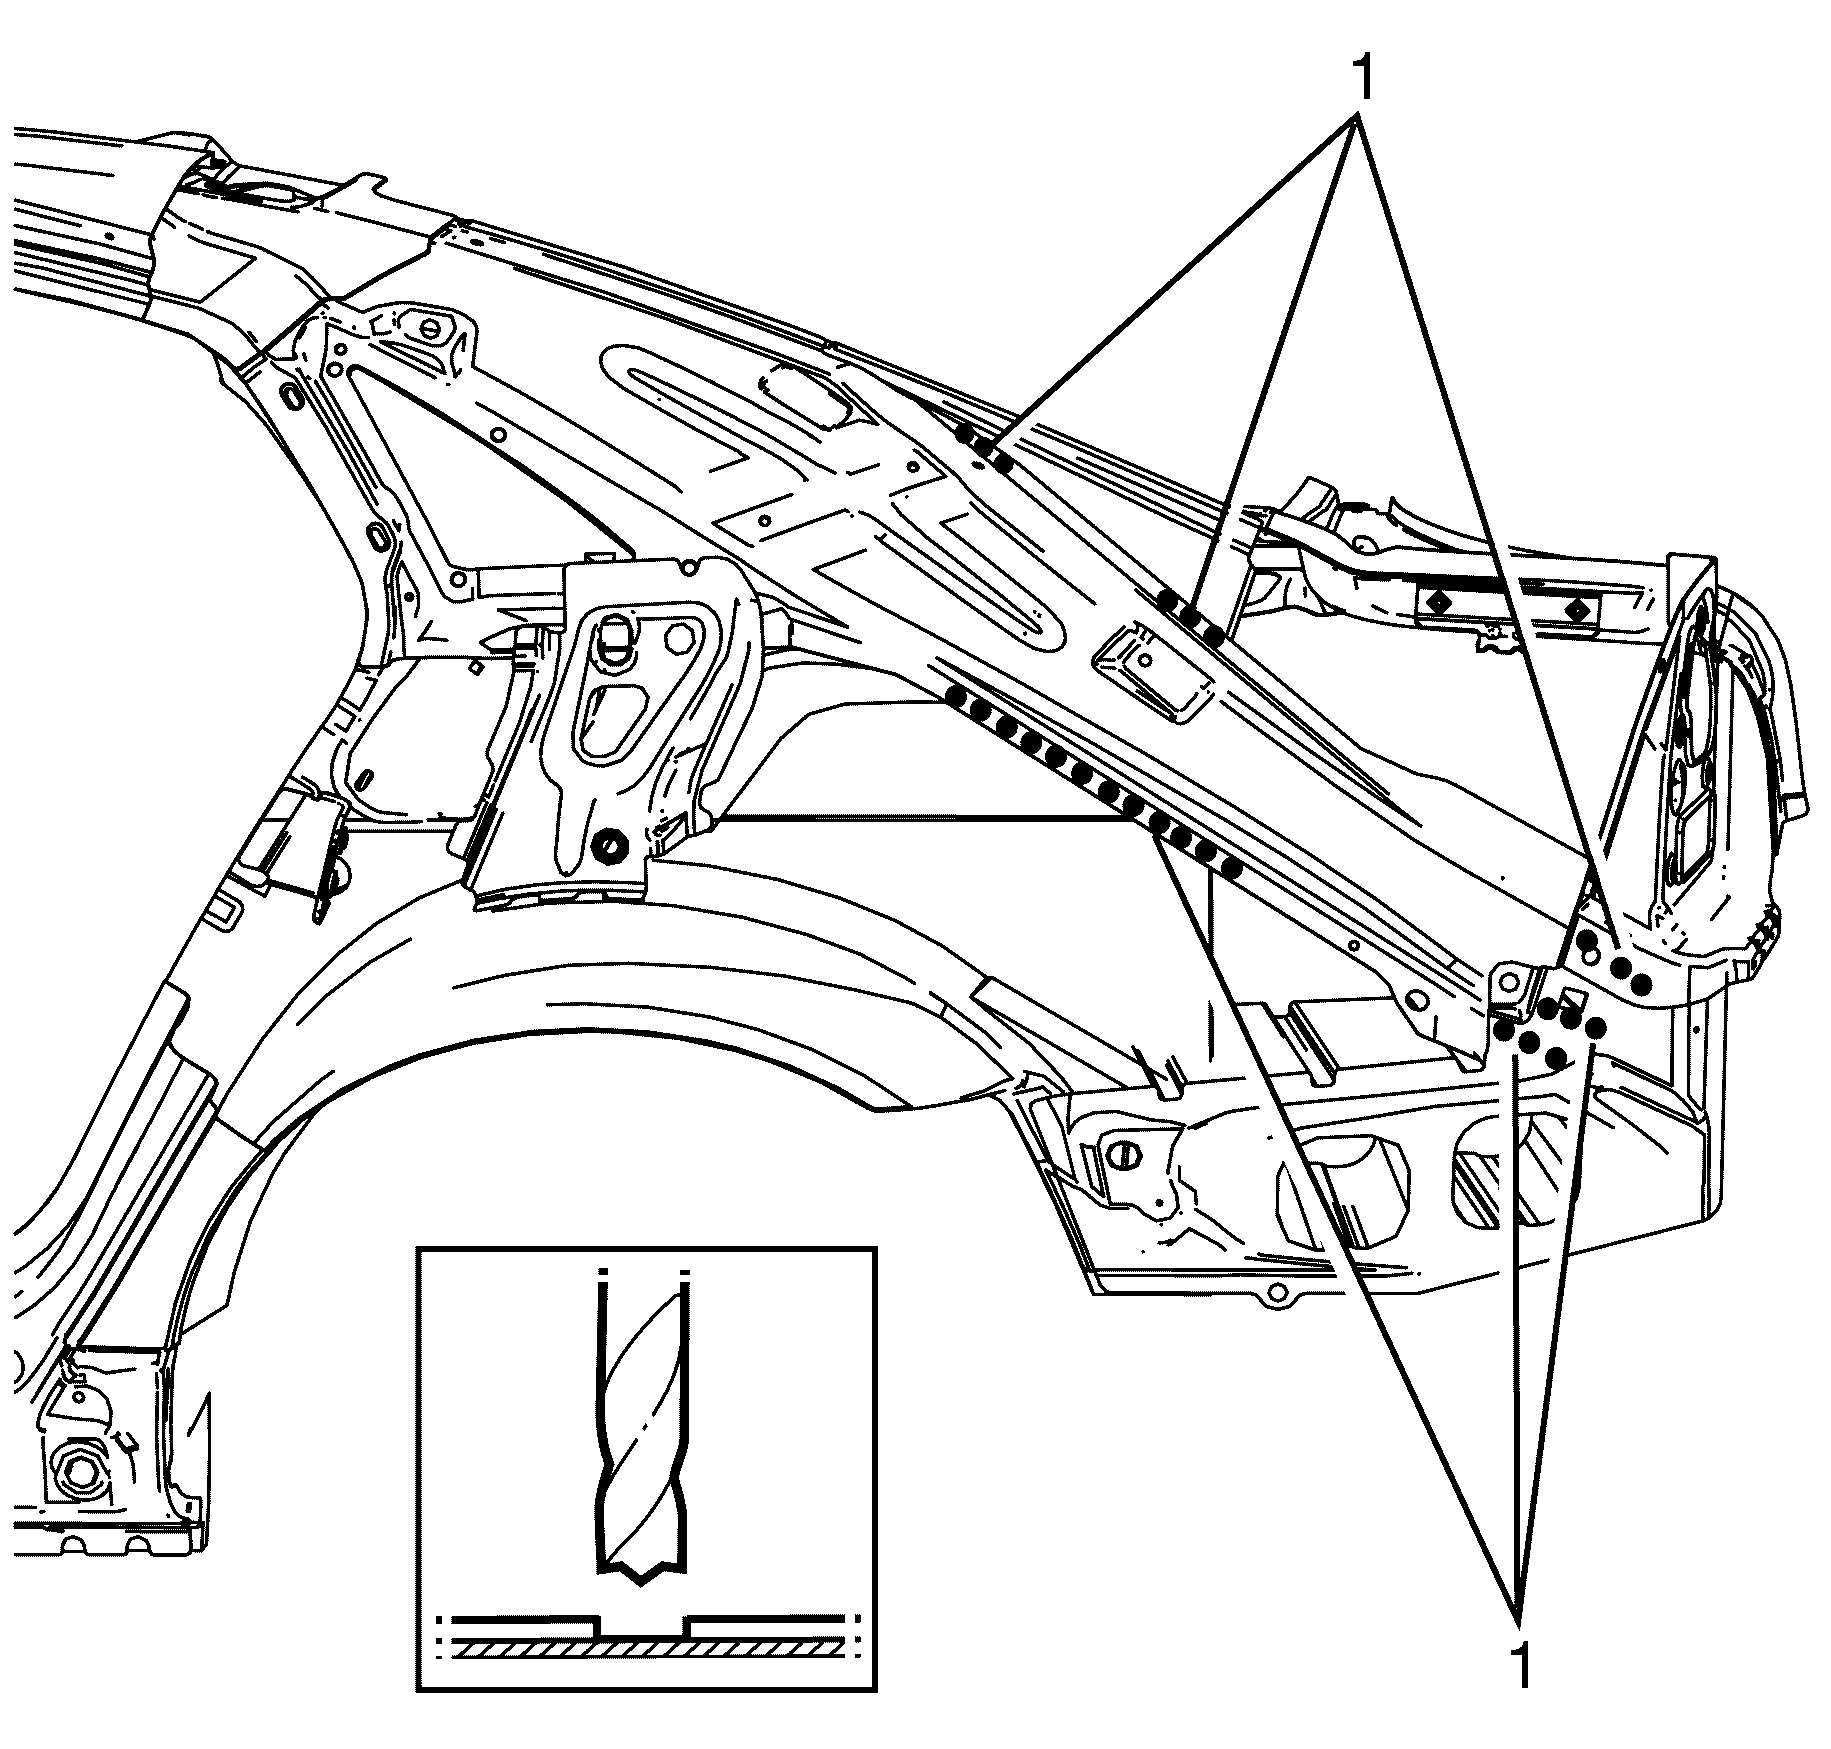
- Drill 8 millimetres (5/16 in) plug weld holes as necessary in the locations noted from the original assembly.
- Clean and prepare the mating surfaces of both parts of the front chassis rail.
- Measure forward from the datum hole to cut point 250 mm (9.84 in) (A) on the replacement panel.
- Position the rear lower panel extension to the vehicle.
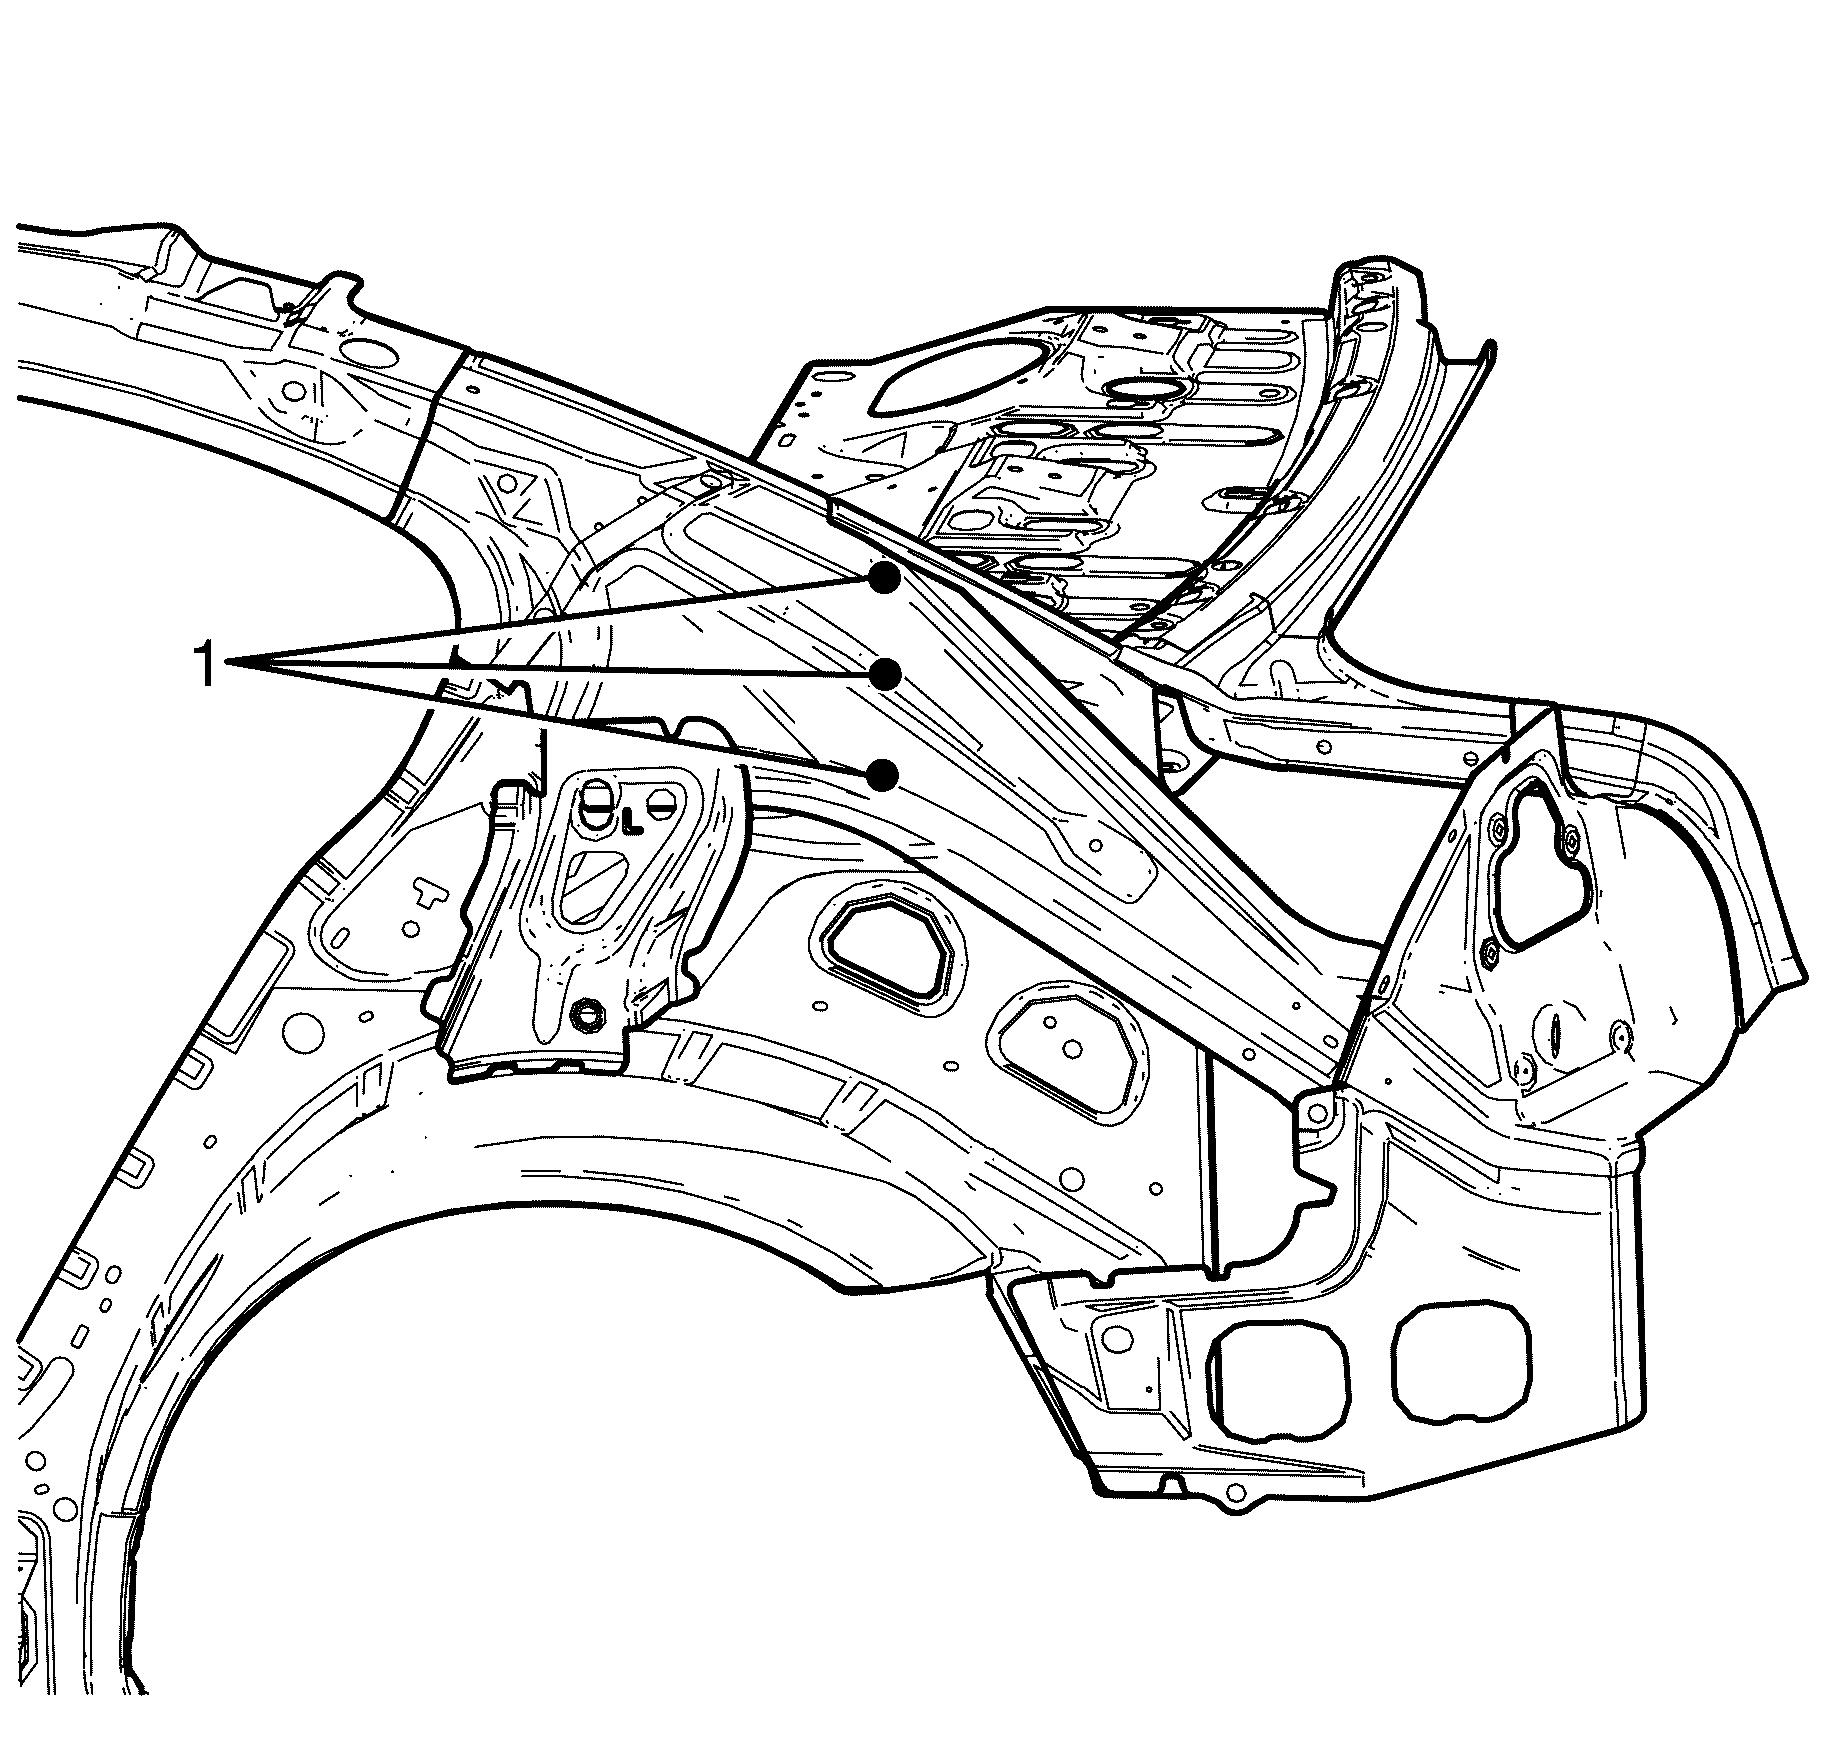
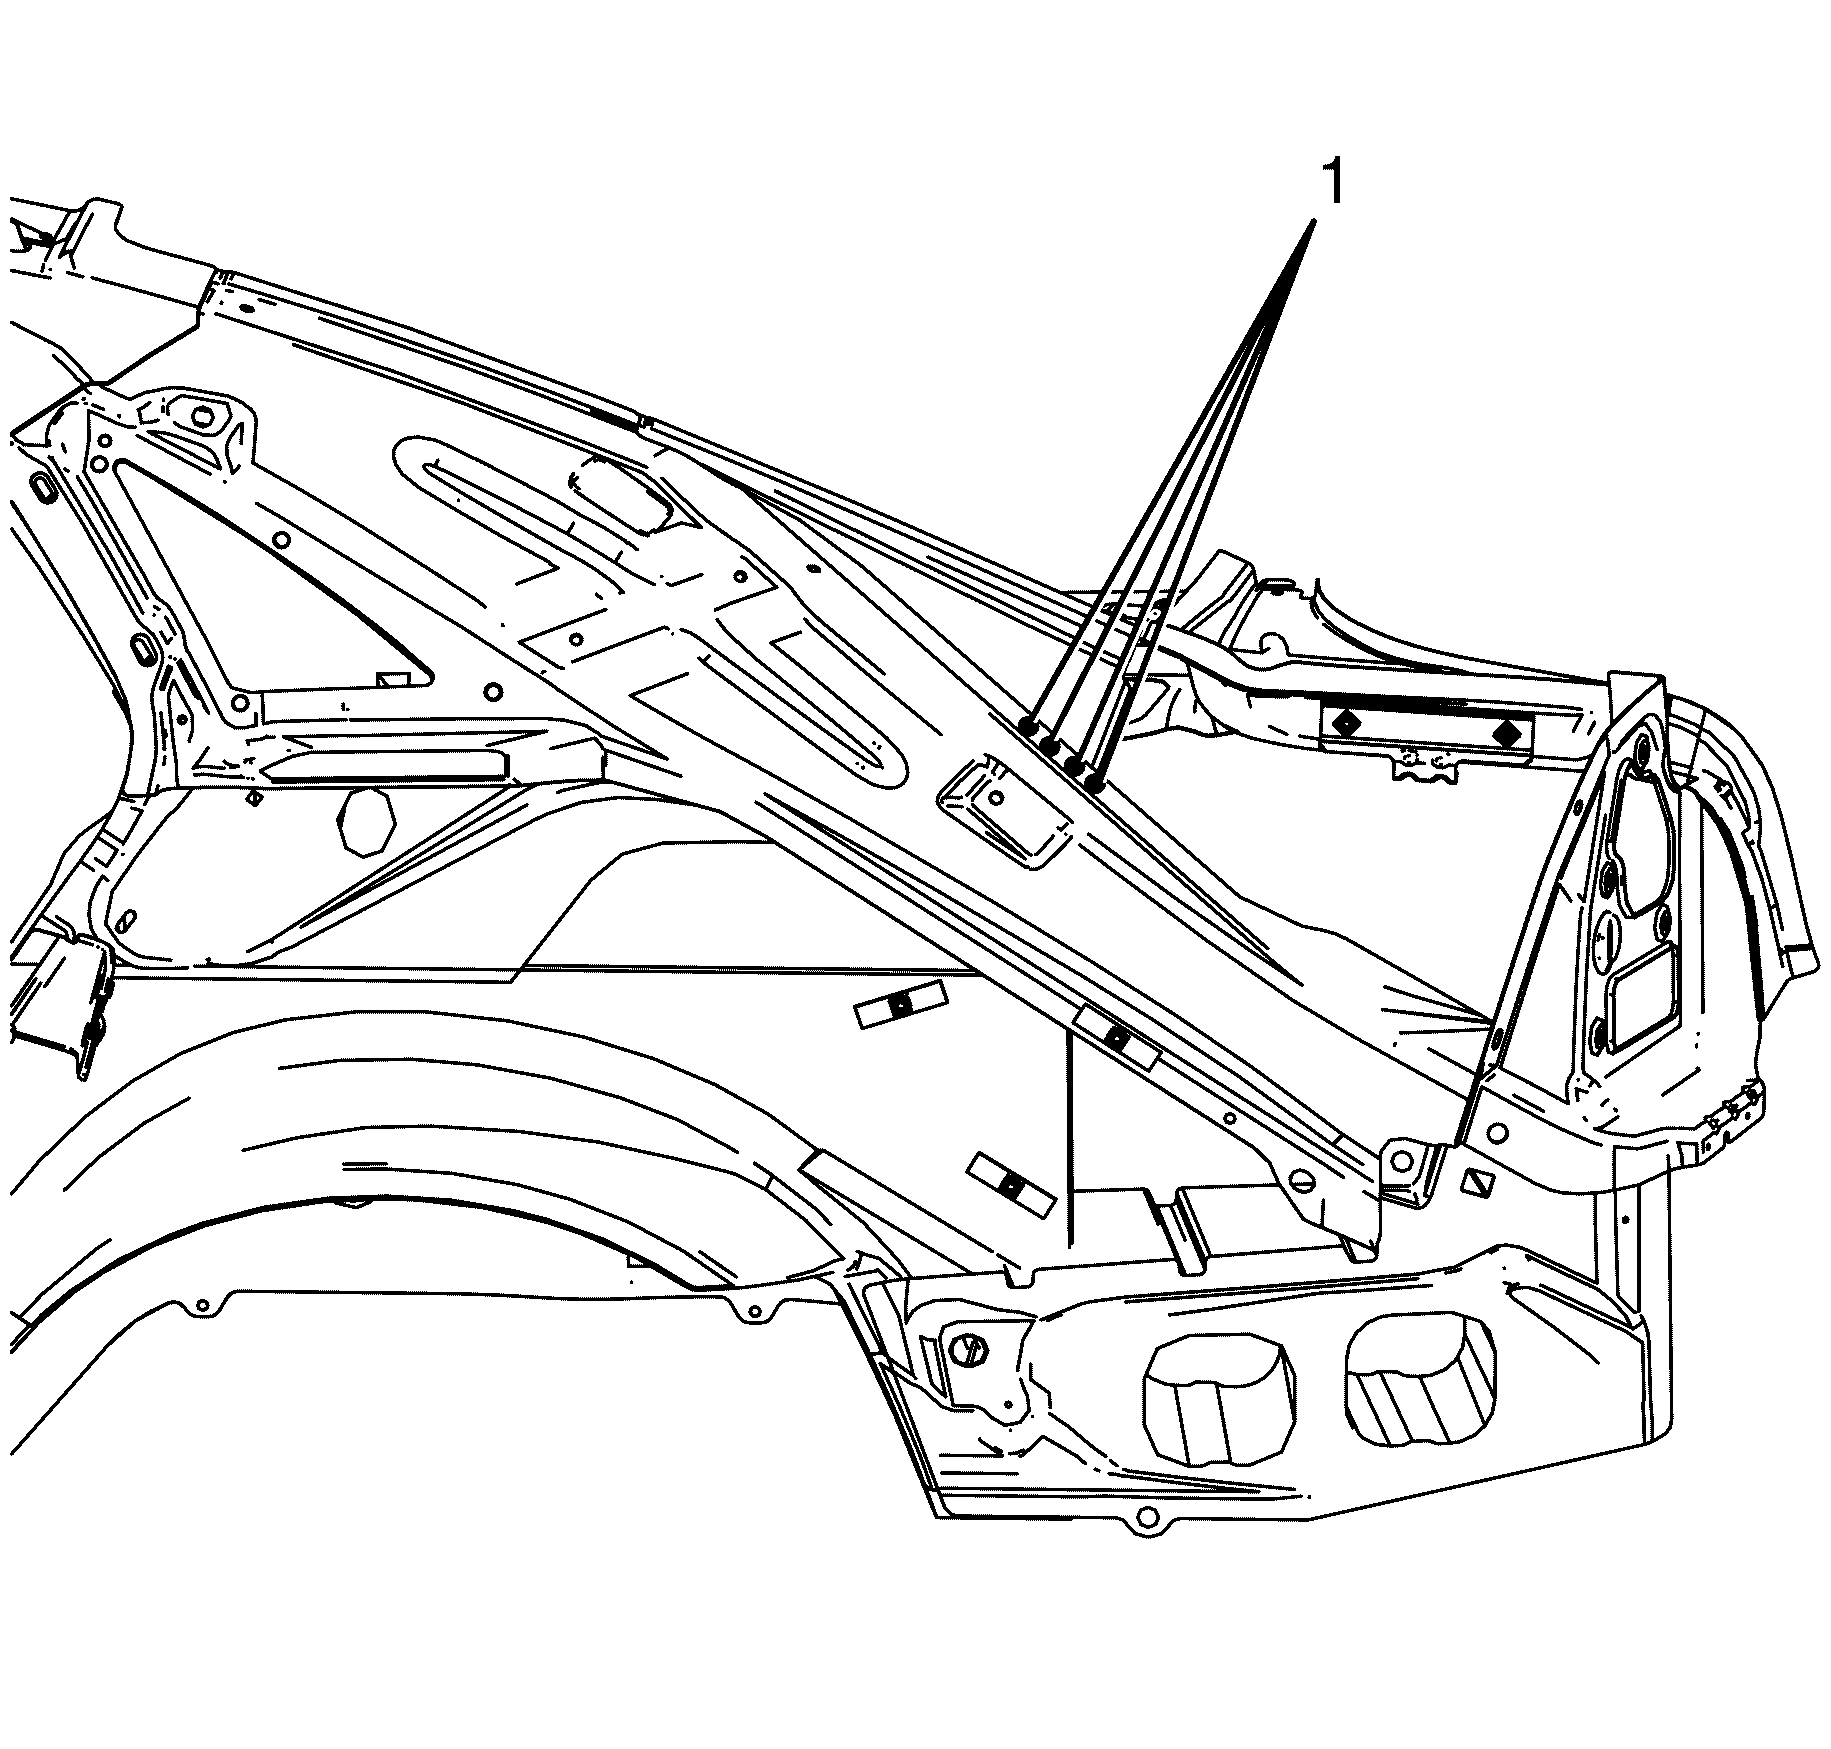
- Temporarily tack weld (1) the rear lower extension panel to the remaining part of the rear lower extension panel
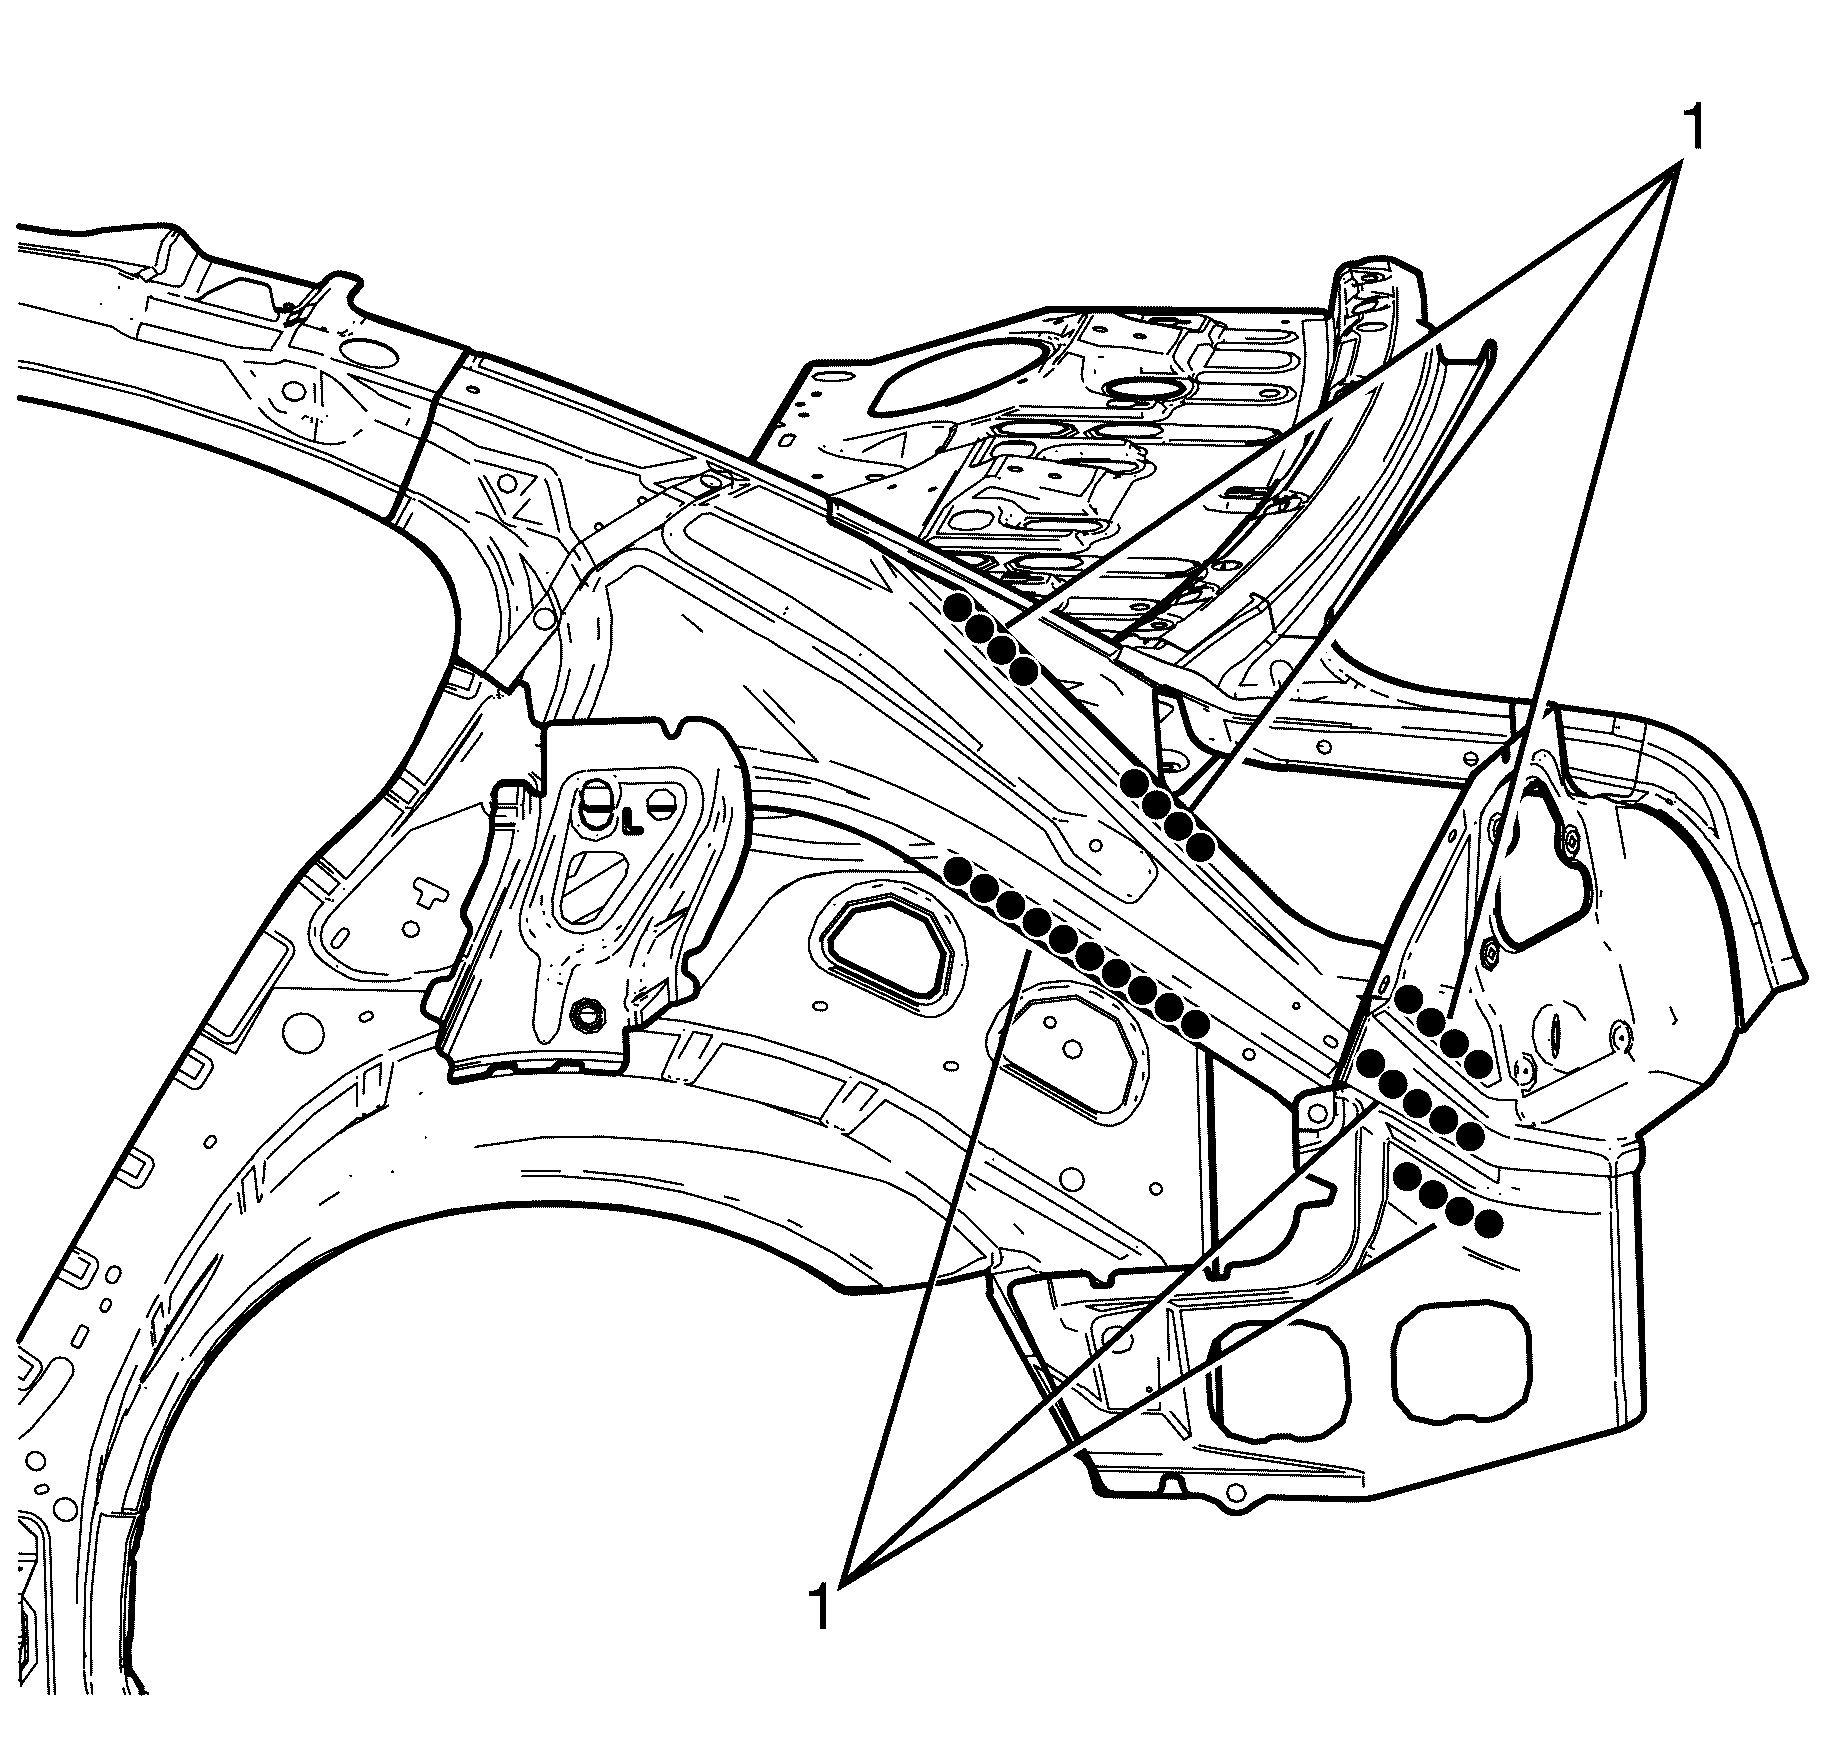
- Weld the rear lower extension panel to the vehicle.
- Weld the rear lower panel extension to rear window panel spot welds (1).
- Apply the sealers and anti-corrosion materials to the repair area, as necessary. Refer to Anti-Corrosion Treatment and Repair.
- Paint the repaired area. Refer to Basecoat/Clearcoat Paint Systems.
- Install the quarter panel. Refer to Quarter Panel Replacement.
- Install the tail lights. Refer to Parking and Turn Signal Lamp Replacement.
- Install the rear roof drain tubes. Refer to Sunroof Housing Rear Drain Hose Replacement.
- Install the rear windshield. Refer to Rear Window Replacement.
- Install the roof moulding. Refer to Body Side Roof Drip Molding Replacement.
- Raise and support the vehicle. Refer to Lifting and Jacking the Vehicle.
- Install the fuel lines. Refer to Filler Tube Replacement or Filler Tube Replacement.
- Install the fuel tank. Refer to Fuel Tank Replacement or Fuel Tank Replacement.
- Install the rear brake lines. Refer to Brake Pipe Replacement.
- Install the rear frame. Refer to Rear Frame Replacement.
- Install the rear exhaust muffler heat shields. Refer to Exhaust Muffler Heat Shield Replacement - Left Side and Exhaust Muffler Heat Shield Replacement - Right Side.
- Install the rear exhaust assembly. Refer to Exhaust Muffler Replacement - Left Side and Exhaust Muffler Replacement - Right Side.
- Install the rear wheel house liners. Refer to Rear Inner Wheelhouse Replacement.
- Install the rocker panel moulds. Refer to Rocker Panel Molding Replacement.
- Install the rear pressure relief valves. Refer to Pressure Relief Valve Replacement.
- Install the rear bumper fascia. Refer to Rear Bumper Fascia Replacement.
- Install the rear wheels. Refer to Tire and Wheel Removal and Installation.
- Lower the vehicle.
- Install the deck lid release cable. Refer to Rear Compartment Lid Latch Release Cable Replacement.
- Install the rear parcel shelf. Refer to Rear Window Shelf Trim Panel Replacement.
- Install the rear seats. Refer to Rear Seat Cushion Cover and Pad Replacement.
- Install the rear seat back. Refer to Rear Seat Back Replacement.
- Install the roof lining. Refer to Headlining Trim Panel Replacement.
- Install the rear interior trims. Refer to Quarter Upper Trim Panel Replacement.
- Install the rear door seals. Refer to Rear Door Opening Weatherstrip Replacement.
- Install the deck lid. Refer to Rear Compartment Lid Replacement.
- Install the front doors. Refer to Front Side Door Replacement.
- Install the rear doors. Refer to Rear Door Replacement.
- Install the battery tray. Refer to Battery Tray Replacement
- Install the battery. Refer to Battery Replacement.
- Connect the negative battery cable. Refer to Battery Negative Cable Disconnection and Connection.
- Enable the SIR system. Refer to SIR Disabling and Enabling.
- If re-programming is required. Refer to Control Module References.
Important: If the location of the original plug weld holes can not be determined, or if structural weld-thru adhesive is present, space the plug weld holes every 32 millimetres (1¼ in).
Important: This step is unique to the sunroof module.
Back Body Pillar Inner Upper Panel Assembly Replacement LWB
Removal Procedure
- Disable the SIR system. Refer to SIR Disabling and Enabling .
- Disconnect the negative battery cable. Refer to Battery Negative Cable Disconnection and Connection.
- Remove the battery. Refer to Battery Replacement.
- Remove the battery tray. Refer to Battery Tray Replacement.
- Remove the deck lid. Refer to Rear Compartment Lid Replacement.
- Remove the front doors. Refer to Front Side Door Replacement.
- Remove the rear doors. Refer to Rear Door Replacement.
- Remove the rear door seals. Refer to Rear Door Opening Weatherstrip Replacement.
- Remove the inner rear quarter trims. Refer to Quarter Upper Trim Panel Replacement.
- Remove the roof lining. Refer to Headlining Trim Panel Replacement.
- Remove the rear seat back. Refer to Rear Seat Back Replacement.
- Remove the rear seats. Refer to Rear Seat Cushion Cover and Pad Replacement.
- Remove the rear parcel shelf. Refer to Rear Window Shelf Trim Panel Replacement.
- Remove the deck lid release cable. Refer to Rear Compartment Lid Latch Release Cable Replacement.
- Raise and support the vehicle. Refer to Lifting and Jacking the Vehicle.
- Remove the rear wheels. Refer to Tire and Wheel Removal and Installation.
- Remove the rear bumper fascia. Refer to Rear Bumper Fascia Replacement.
- Remove the rear pressure relief valves. Refer to Pressure Relief Valve Replacement.
- Remove the rocker panel moulds. Refer to Rocker Panel Molding Replacement.
- Remove the rear wheelhouse liners. Refer to Rear Inner Wheelhouse Replacement.
- Remove the rear exhaust assembly. Refer to Exhaust Muffler Replacement - Left Side and/or Exhaust Muffler Replacement - Right Side
- Remove the rear exhaust muffler heat shields. Refer to Exhaust Muffler Heat Shield Replacement - Left Side and/or Exhaust Muffler Heat Shield Replacement - Right Side.
- Remove the rear frame. Refer to Rear Frame Replacement.
- Remove the rear brake lines. Refer to Brake Pipe Replacement.
- Remove the fuel tank. Refer to Fuel Tank Replacement or Fuel Tank Replacement.
- Remove the fuel lines. Refer to Filler Tube Replacement or Filler Tube Replacement.
- Lower the vehicle.
- Remove the roof moulding. Refer to Body Side Roof Drip Molding Replacement.
- Remove the rear windshield. Refer to Rear Window Replacement.
- Remove the rear roof drain tubes. Refer to Sunroof Housing Rear Drain Hose Replacement.
- Remove the tail lights. Refer to Parking and Turn Signal Lamp Replacement
- Remove the quarter panel. Refer to Quarter Panel Replacement.
- Repair as much of the damage as possible.
- Remove sound deadeners as necessary and note their location.
- Remove the sealers and anti-corrosion materials from the repair area, as necessary. Refer to Anti-Corrosion Treatment and Repair.
- Locate, mark and carefully drill out the rear lower panel extension to rear window panel spot welds (1).
- Locate, mark and drill out the rear lower panel extension to body ring spot welds (1).
- Measure forward from the datum hole to cut point 250 mm (9.84 in) (A).
- Using a suitable tool cut through the rear lower panel extension at the measurement point.
- Remove the rear lower panel extension from the vehicle.
Caution: Refer to Approved Equipment for Collision Repair Caution in the Preface section.
Caution: Refer to Foam Sound Deadeners Caution in the Preface section.
Caution: Refer to Glass and Sheet Metal Handling Caution in the Preface section.
Caution: Refer to Battery Disconnect Caution in the Preface section.
Caution: Refer to Vehicle Lifting Caution in the Preface section.
Important: When replacing panels that involve servicing of stationary glass, refer to Rear Window Replacement and Windshield Replacement, before performing any priming or refinishing. Sectioning should be performed only in the recommended areas. Failure to do so may compromise the structural integrity of the vehicle.
Important: The full body-side outer panel comes as a complete assembly and can be replaced after the removal of the fixed glass and roof. Any one of these service procedures can be performed separately or in any combination, dependent upon the extent of damage to the vehicle. Sectioning must take place in specified areas only.
Important: This step is unique to the sunroof module.
Important: Take care not to damage the rear window panel.
Discard the rear lower panel extension.
Installation Procedure
- Drill 8 millimetres (5/16 in) plug weld holes as necessary in the locations noted from the original assembly.
- Clean and prepare the mating surfaces of both parts of the front chassis rail.
- Measure forward from the datum hole to cut point 250 mm (9.84 in) (A) on the replacement panel.
- Position the rear lower panel extension to the vehicle.
- Temporarily tack weld (1) the rear lower extension panel to the remaining part of the rear lower extension panel.
- Weld (1) the rear lower extension panel to the vehicle.
- Weld the rear lower panel extension to rear window panel spot welds (1).
- Apply the sealers and anti-corrosion materials to the repair area, as necessary. Refer to Anti-Corrosion Treatment and Repair.
- Paint the repaired area. Refer to Basecoat/Clearcoat Paint Systems.
- Install the quarter panel. Refer to Quarter Panel Replacement.
- Install the tail lights. Refer to Parking and Turn Signal Lamp Replacement.
- Install the rear roof drain tubes. Refer to Sunroof Housing Rear Drain Hose Replacement.
- Install the rear windshield. Refer to Rear Window Replacement.
- Install the roof moulding. Refer to Body Side Roof Drip Molding Replacement.
- Raise and support the vehicle. Refer to Lifting and Jacking the Vehicle.
- Install the fuel lines. Refer to Filler Tube Replacement or Filler Tube Replacement.
- Install the fuel tank. Refer to Fuel Tank Replacement or Fuel Tank Replacement.
- Install the rear brake lines. Refer to Brake Pipe Replacement.
- Install the rear frame. Refer to Rear Frame Replacement.
- Install the rear exhaust muffler heat shields. Refer to Exhaust Muffler Heat Shield Replacement - Left Side and Exhaust Muffler Heat Shield Replacement - Right Side.
- Install the rear exhaust assembly. Refer to Exhaust Muffler Replacement - Left Side and Exhaust Muffler Replacement - Right Side.
- Install the rear wheel house liners. Refer to Rear Inner Wheelhouse Replacement.
- Install the rocker panel moulds. Refer to Rocker Panel Molding Replacement.
- Install the rear pressure relief valves. Refer to Pressure Relief Valve Replacement.
- Install the rear bumper fascia. Refer to Rear Bumper Fascia Replacement.
- Install the rear wheels. Refer to Tire and Wheel Removal and Installation.
- Lower the vehicle.
- Install the deck lid release cable. Refer to Rear Compartment Lid Latch Release Cable Replacement.
- Install the rear parcel shelf. Refer to Rear Window Shelf Trim Panel Replacement.
- Install the rear seats. Refer to Rear Seat Cushion Cover and Pad Replacement.
- Install the rear seat back. Refer to Rear Seat Back Replacement.
- Install the roof lining. Refer to Headlining Trim Panel Replacement.
- Install the rear interior trims. Refer to Quarter Upper Trim Panel Replacement.
- Install the rear door seals. Refer to Rear Door Opening Weatherstrip Replacement.
- Install the deck lid. Refer to Rear Compartment Lid Replacement.
- Install the front doors. Refer to Front Side Door Replacement.
- Install the rear doors. Refer to Rear Door Replacement.
- Install the battery tray. Refer to Battery Tray Replacement.
- Install the battery. Refer to Battery Replacement.
- Disconnect the negative battery cable. Refer to Battery Negative Cable Disconnection and Connection.
- Disable the SIR system. Refer to SIR Disabling and Enabling.
Important: If the location of the original plug weld holes can not be determined, or if structural weld-thru adhesive is present, space the plug weld holes every 32 millimetres (1¼ in).
Important: This step is unique to the sunroof module.
