Removal Procedure
Tools Required
J 28467-360 Engine Support Fixture
- Disconnect the negative battery cable.
- Drain the cooling system. Recover the cooling system. Refer to Cooling System Draining and Filling and Flushing in Engine Cooling.
- Install the J 28467-360 .
- Remove the engine mount assembly. Refer to Engine Mount Replacement .
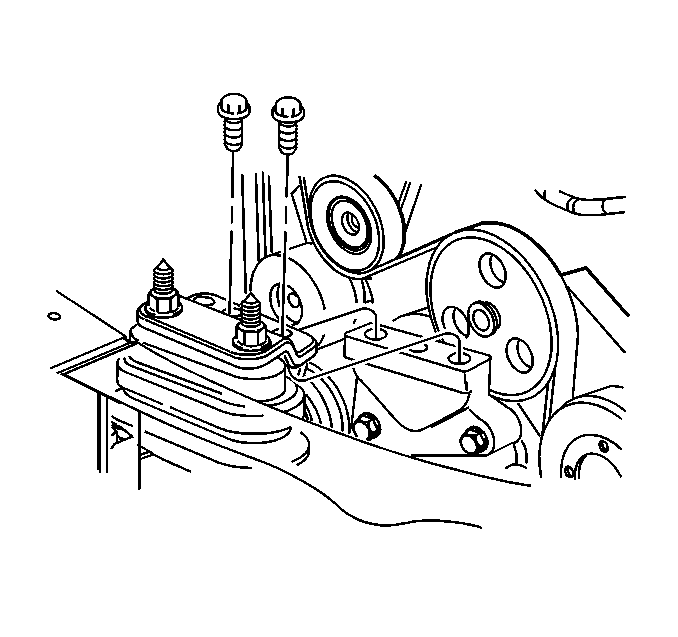
- Remove the engine mount bracket support.
- Remove the drive belt. Refer to Drive Belt Replacement .
- Remove the power steering pump. Refer to Power Steering Pump Replacement in Power Steering System.
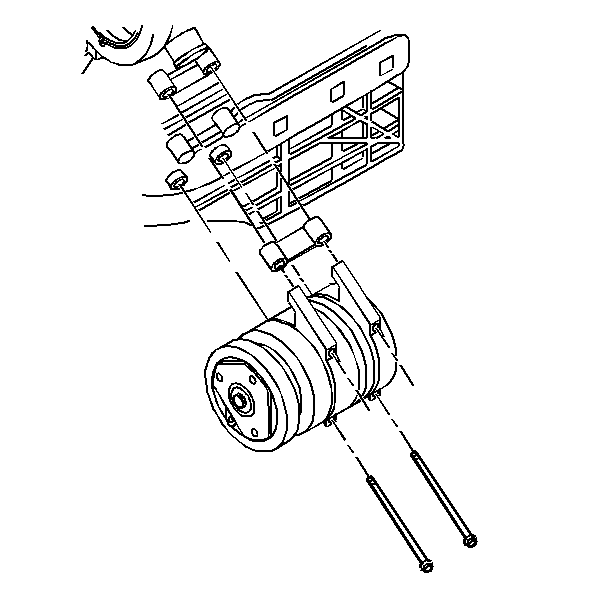
- Loosen the top two A/C compressor bolts.
- Raise and support the vehicle. Refer to Lifting and Jacking the Vehicle in General Information.
- Remove the right front tire and wheel assembly. Refer to Wheel Removal in Tires and Wheels.
- Remove the right front splash shield. Refer to Wheelhouse Splash Shield Replacement in Bumpers.
- Remove the flywheel inspection cover.
- Remove the crankshaft balancer. Refer to Crankshaft Balancer Replacement .
- Remove the drive belt tensioner. Refer to Drive Belt Tensioner Replacement .
- Remove the right wheel speed sensor connector and the wire harness from the suspension support.
- Remove the right ball joint. Refer to Lower Control Arm Ball Joint Replacement in Front Suspension.
- Remove the right stabilizer shaft from the right suspension support and the right control arm.
- Remove the right suspension support. Refer to Front Suspension Crossmember Replacement in Front Suspension.
- Remove the A/C compressor to oil pan bolts.
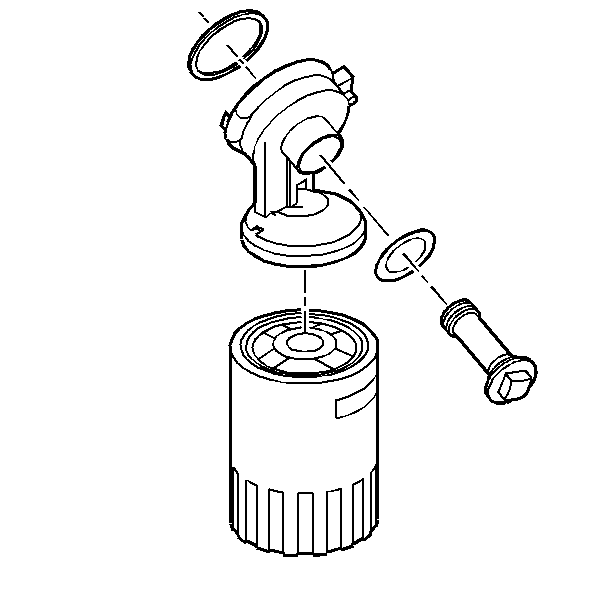
- Remove the oil filter.
- Remove the oil filter adapter. Refer to Oil Filter Adapter and Bypass Valve Assembly Replacement .
- Remove the engine to transmission brace.
- Drain the engine oil.
- Remove the starter motor. Refer to Starter Motor Replacement in Engine Electric.
- Remove the oil pan. Refer to Oil Pan Replacement .
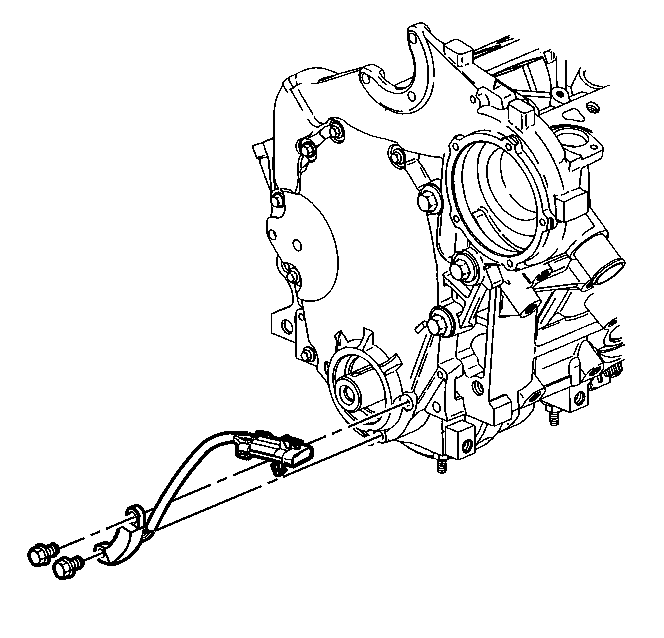
- Remove the crankshaft sensor.
- Remove the lower front cover bolts.
- Lower the vehicle.
- Remove the coolant bypass to the coolant pump and the manifold. Refer to Coolant Air Bleed Pipe Assembly Replacement in Engine Cooling.
- Remove the radiator hose to the coolant outlet housing.
- Remove the front cover bolts.
- Remove the front cover.
- Remove the front cover oil seal. Refer to Crankshaft Front Oil Seal Replacement .
- Clean the mating surfaces of the following items:
- Clean the sealing surfaces with degreaser.
Caution: Unless directed otherwise, the ignition and start switch must be in the OFF or LOCK position, and all electrical loads must be OFF before servicing any electrical component. Disconnect the negative battery cable to prevent an electrical spark should a tool or equipment come in contact with an exposed electrical terminal. Failure to follow these precautions may result in personal injury and/or damage to the vehicle or its components.

| 34.1. | The front cover |
| 34.2. | The oil pan |
| 34.3. | The cylinder block |
Installation Procedure
- Install the front cover gasket. Do not damage the sealing surfaces.
- Apply sealer to both sides of the lower tabs of the front cover gasket. Use GM RTV sealer GM P/N 1052080 or its equivalent.
- Install the front cover oil seal. Refer to Crankshaft Front Oil Seal Replacement .
- Place the front cover on the engine.
- Install the upper two front cover bolts.
- Install the radiator hose to the coolant housing.
- Install the coolant bypass pipe to the coolant pump and the manifold. Refer to Coolant Air Bleed Pipe Assembly Replacement in Engine Cooling.
- Raise and support the vehicle. Refer to Lifting and Jacking the Vehicle in General Information.
- Install the lower front cover bolts.
- Install the crankshaft sensor.
- Install the oil pan. Refer to Oil Pan Replacement .
- Install the starter motor. Refer to Starter Motor Replacement in Engine Electrical.
- Install the engine to transmission brace.
- Install the oil filter adapter.
- Install the oil filter.
- Install the A/C compressor to the oil pan bolts.
- Install the right suspension support. Refer to Front Suspension Crossmember Replacement in Front Suspension.
- Install the stabilizer shaft to the right suspension support and the control arm.
- Install the right ball joint. Refer to Lower Control Arm Ball Joint Replacement in Front Suspension.
- Install the right wheel speed sensor connector and the wire harness to the suspension support.
- Install the drive belt tensioner. Refer to Drive Belt Tensioner Replacement .
- Install the crankshaft balancer. Refer to Crankshaft Balancer Replacement
- Install the flywheel inspection cover.
- Install the right splash shield. Refer to Wheelhouse Splash Shield Replacement in Bumpers.
- Install the right front tire and wheel assembly. Refer to Wheel Installation in Tires and Wheels.
- Lower the vehicle.
- Install the A/C compressor top bolts.
- Install the power steering pump. Refer to Power Steering Pump Replacement in Power Steering Systems.
- Install the drive belt. Refer to Drive Belt Replacement .
- Install the engine mount bracket support and bolts.
- Install the engine mount assembly. Refer to Engine Mount Replacement
- Remove the engine support fixture.
- Fill the cooling system. Refer to Cooling System Draining and Filling and Flushing in Engine Cooling.
- Fill the oil.
- Connect the negative battery cable.
Notice: Use the correct fastener in the correct location. Replacement fasteners must be the correct part number for that application. Fasteners requiring replacement or fasteners requiring the use of thread locking compound or sealant are identified in the service procedure. Do not use paints, lubricants, or corrosion inhibitors on fasteners or fastener joint surfaces unless specified. These coatings affect fastener torque and joint clamping force and may damage the fastener. Use the correct tightening sequence and specifications when installing fasteners in order to avoid damage to parts and systems.
Tighten
Tighten the bolts to 21 N·m (15 lb ft).
Tighten
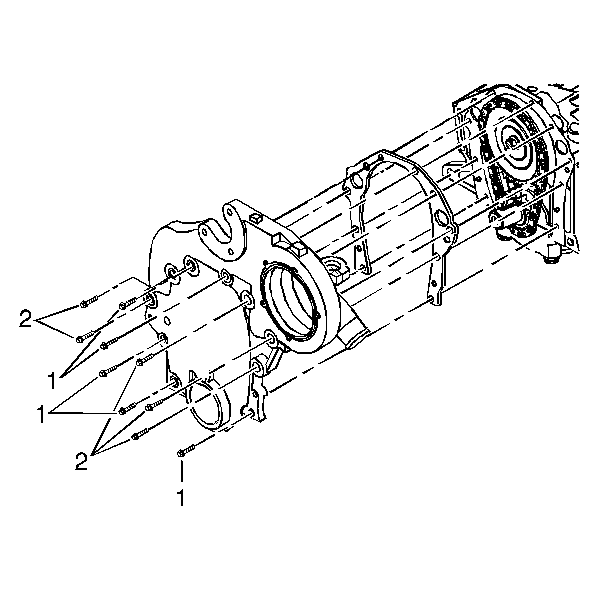
| • | Tighten the small bolts (1) to 21 N·m (15 lb ft). |
| • | Tighten the large bolts (2) to 47 N·m (35 lb ft). |
Tighten
| • | Tighten the 8 mm bolts to 20 N·m (15 lb ft). |
| • | Tighten the 12 mm bolts to 40 N·m (30 lb ft). |
