For 1990-2009 cars only
Removal Procedure
Tools Required
J 39549 Ball Joint/Tie Rod Separator
- If servicing the driver side upper control arm, perform the following:
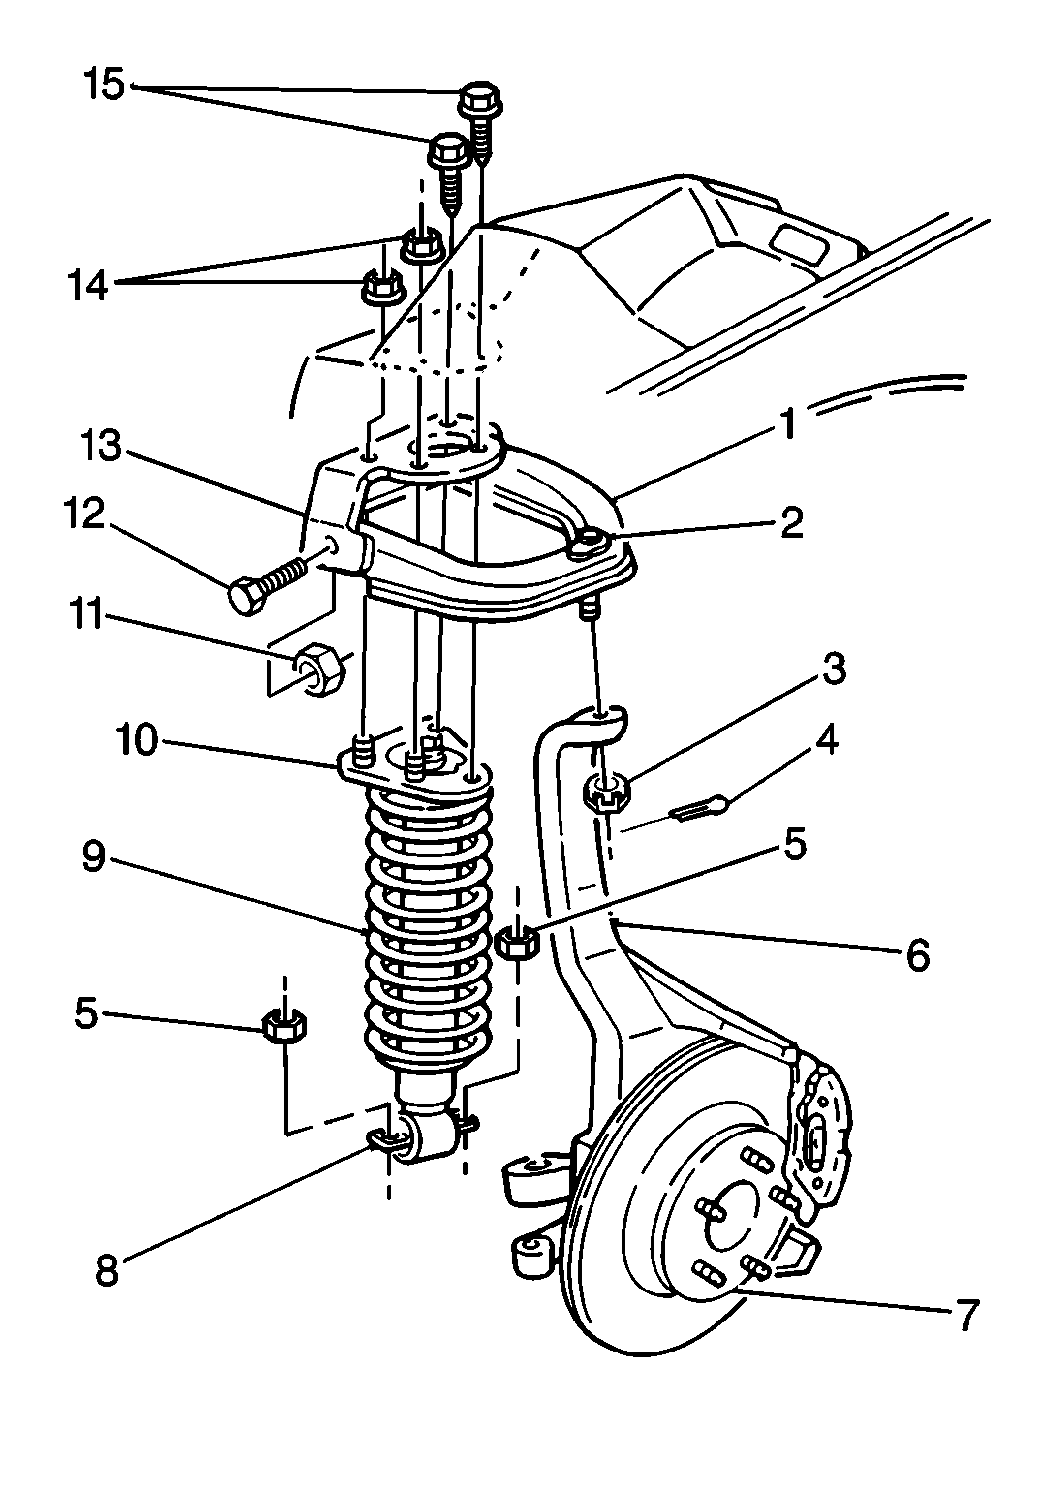
- Remove the shock absorber upper mounting bolts (15) and nuts (14).
- Raise and suitably support the vehicle. Refer to Lifting and Jacking the Vehicle in General Information.
- Remove the tire and wheel. Refer to Tire and Wheel Removal and Installation in Tires and Wheels.
- Remove the stabilizer shaft link. Refer to Stabilizer Shaft Link Replacement .
- Remove the shock absorber lower bolts and nuts (5).
- Remove and discard the upper control arm cotter pin (4).
- Remove the upper control arm nut (3).
- Support the steering knuckle (6) with a jack stand.
- Use J 39549 in order to separate the upper ball joint (2) from the steering knuckle (6).
- Remove the steering knuckle (6) and ball joint (2) from the upper control arm (1).
- Remove the upper control arm (1) and shock absorber (8) from the vehicle.
- Separate the shock absorber (8) from the upper control arm (1).
| 1.1. | Remove the brake master cylinder nuts. |
| 1.2. | Gently, reposition the brake master cylinder to the side. |
Installation Procedure
- Place the shock absorber (8) through the upper control arm (1).
- Install the upper control arm (1) and shock absorber (8) to the vehicle.
- Align and install the upper control arm (1) and upper ball joint (2) to the steering knuckle (6).
- Install the upper control arm nut (3).
- Install a new upper control arm cotter pin (4).
- Remove the jack stand supporting the lower control arm.
- Install the shock absorber lower bolts and nuts (5).
- Install the stabilizer shaft link. Refer to Stabilizer Shaft Link Replacement .
- Install the tire and wheel. Refer to Tire and Wheel Removal and Installation in Tires and Wheels.
- Lower the vehicle.
- Install the shock absorber upper mounting bolts (15) and nuts (14).
- If servicing the driver side upper control arm, perform the following:
Tighten
Tighten the upper control arm nut (3) to 53 N·m (39 lb ft).
Important: Never loosen the control arm nut in order to align the cotter pin slot, it is permissible to over torque the control arm nut 1/6 of a turn MAX.
Tighten
Tighten the shock absorber lower bolts or nuts (5) to 65 N·m
(48 lb ft).
Tighten
| • | Tighten the shock absorber upper mounting nuts (14) to 41 N·m (30 lb ft). |
| • | Tighten the shock absorber upper mounting bolts to 50 N·m (37 lb ft). |
| 12.1. | Gently, reposition the brake master cylinder into position. |
| 12.2. | Install the brake master cylinder nuts. |
Tighten
Tighten the brake master cylinder nuts to 29 N·m (21 lb ft).
