Radiator Replacement Diesel
Removal Procedure
Warning: Refer to Battery Disconnect Warning in the Preface section.
- Disconnect the battery ground cable from the battery. Refer to Battery Negative Cable Disconnection and Connection.
- Drain the cooling system, refer to Cooling System Draining and Filling.
- Remove the front bumper assembly, refer to Front Bumper Replacement.
- Release the condenser core from the charge air cooler and secure to the front bumper.
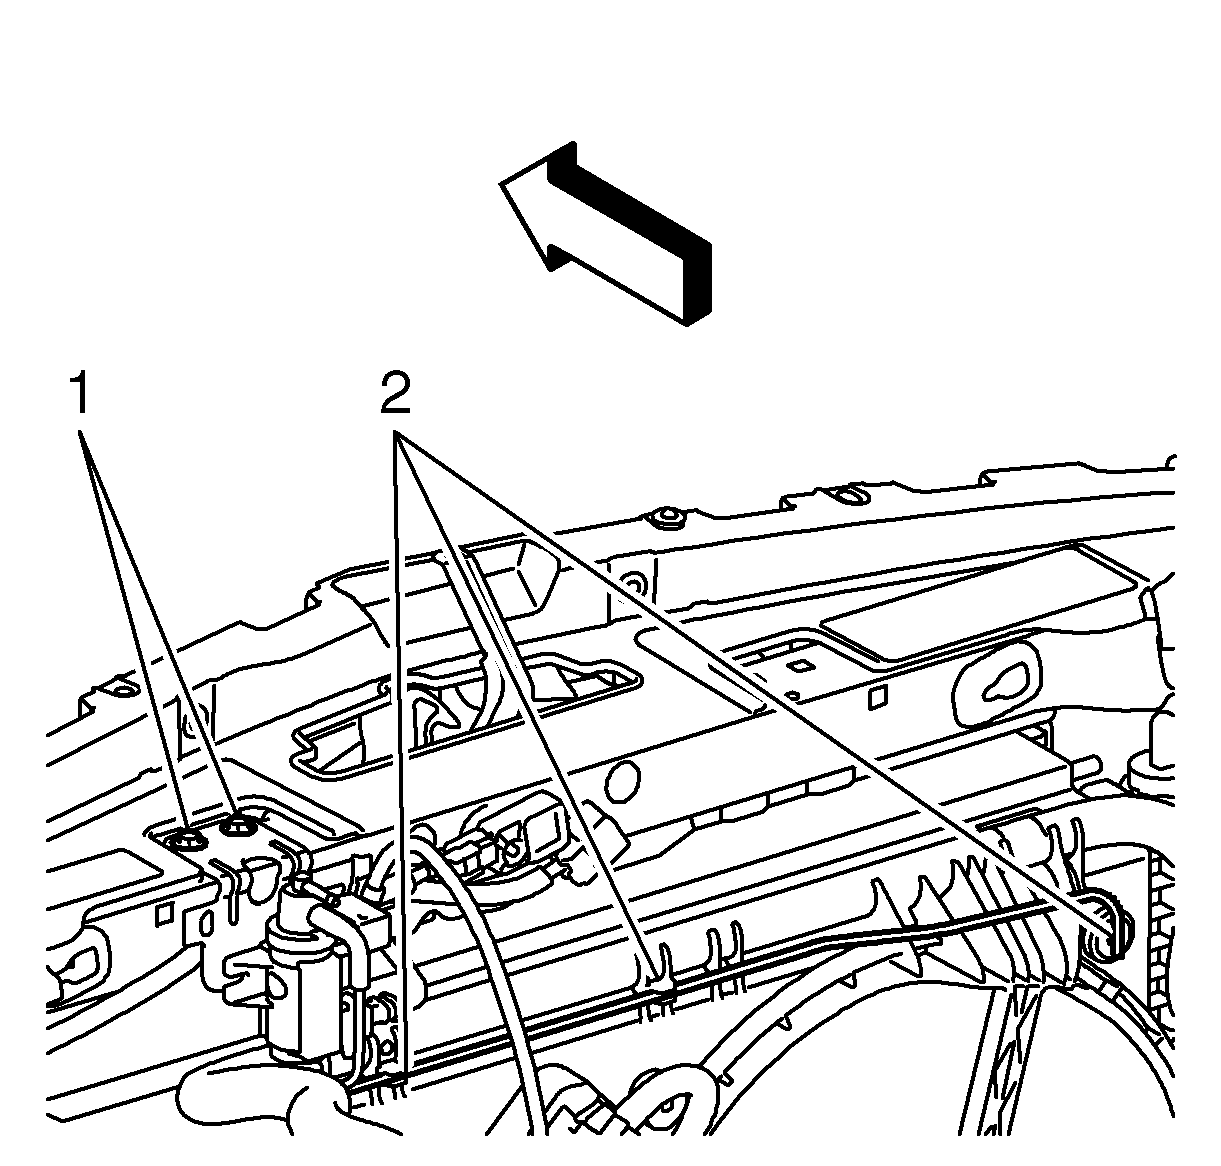
- Detach the turbocharger actuator (1), and release the vacuum hose from the fan shroud (2).
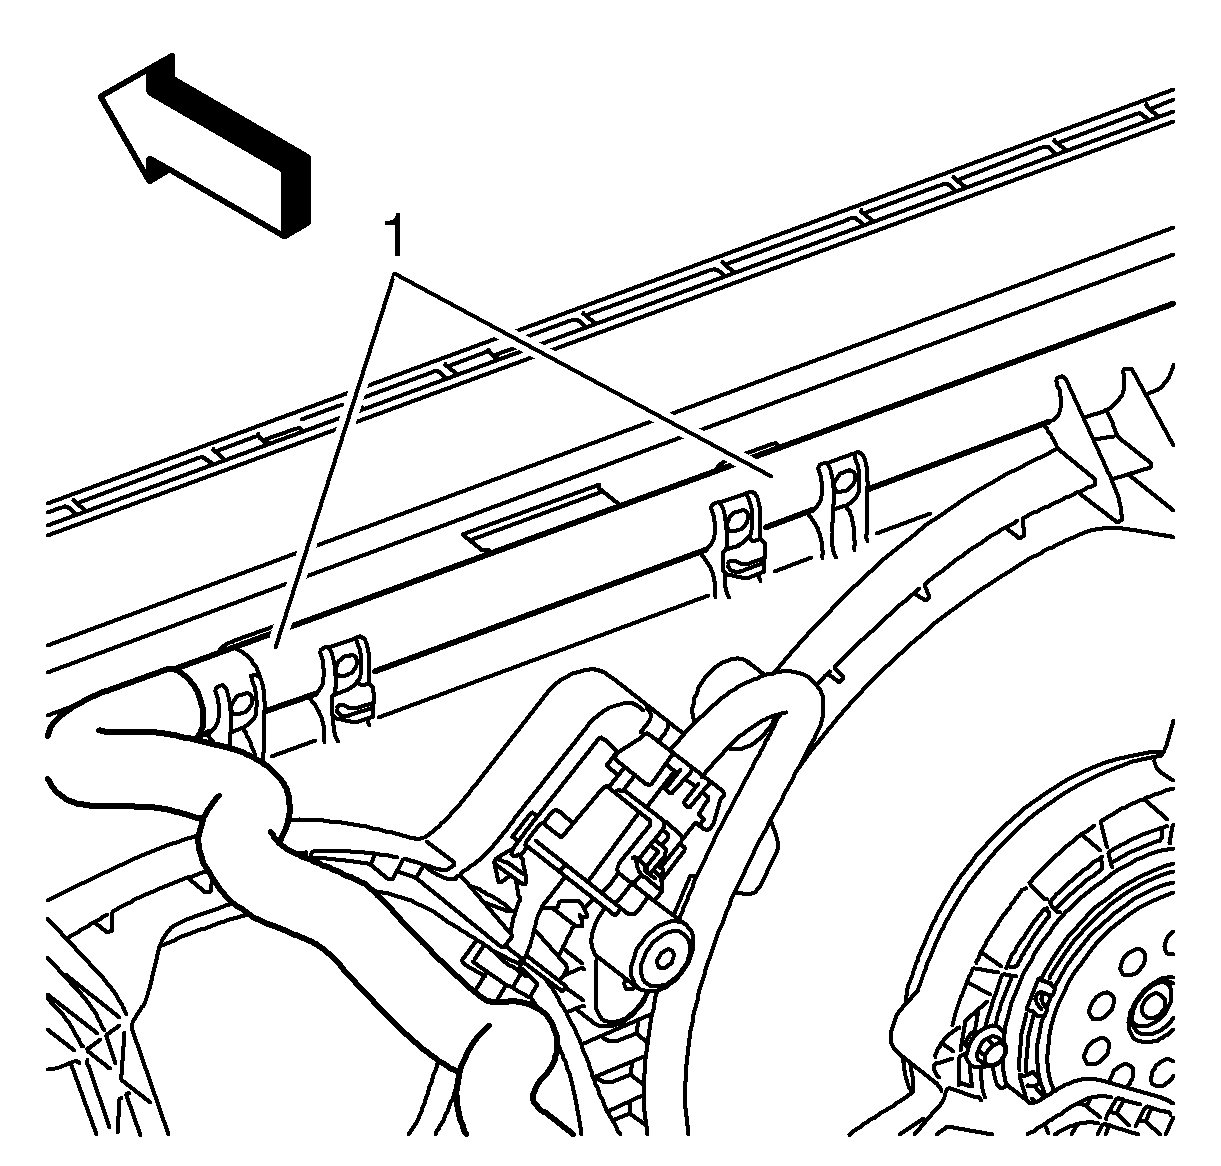
- Unclip (1) the coolant hose from the top of the fan shroud and place to one side for access.
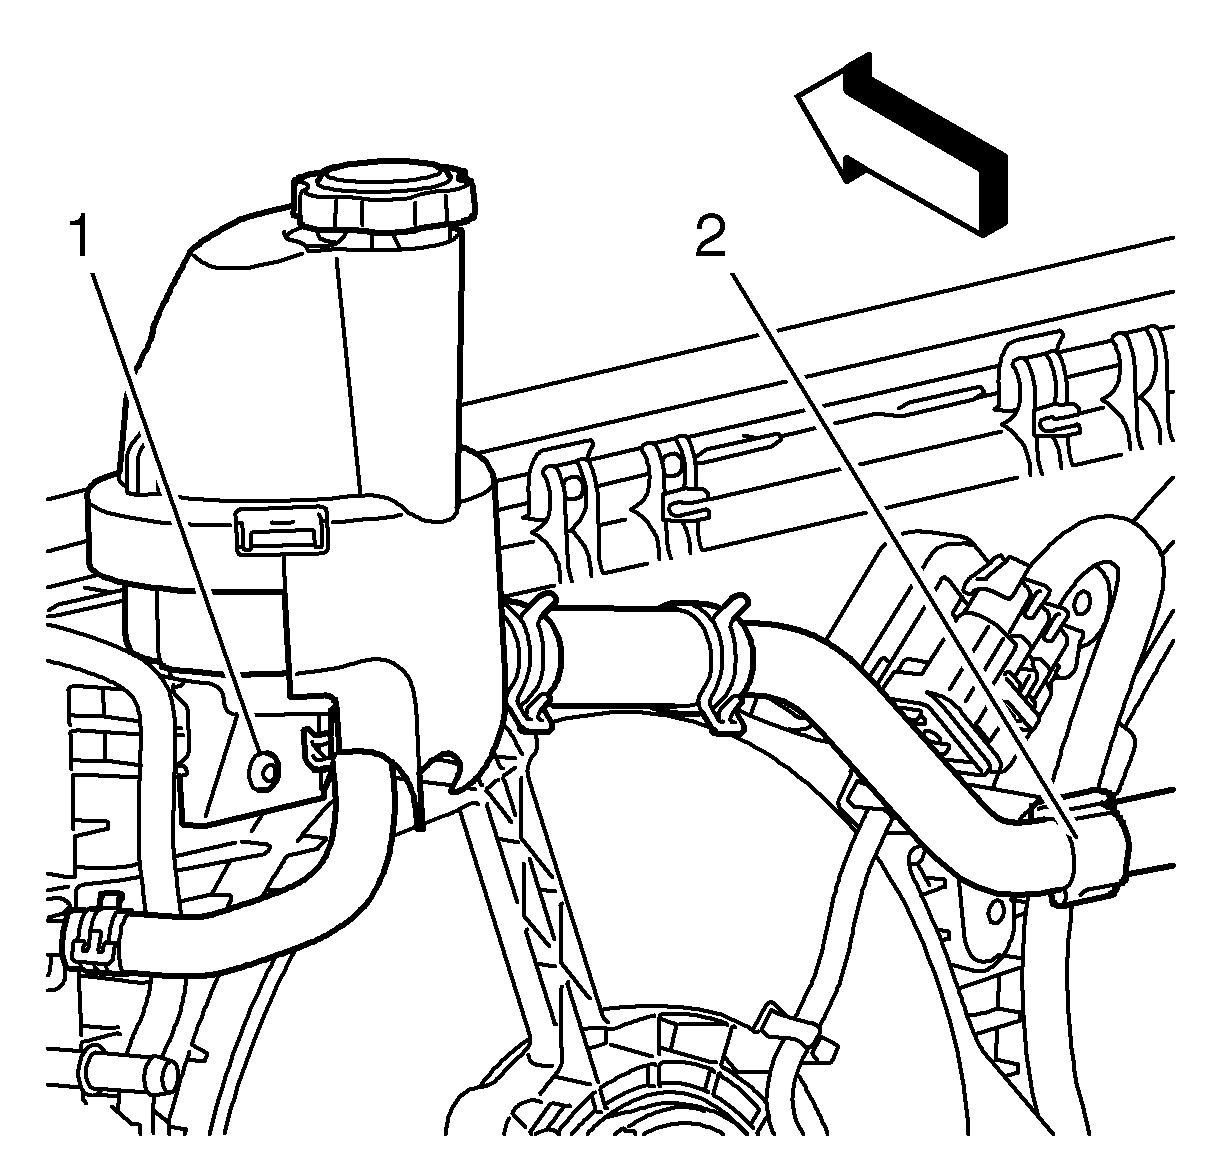
- Detach the power assisted steering fluid reservoir for access (1), and release the coolant hose from fan shroud (2).
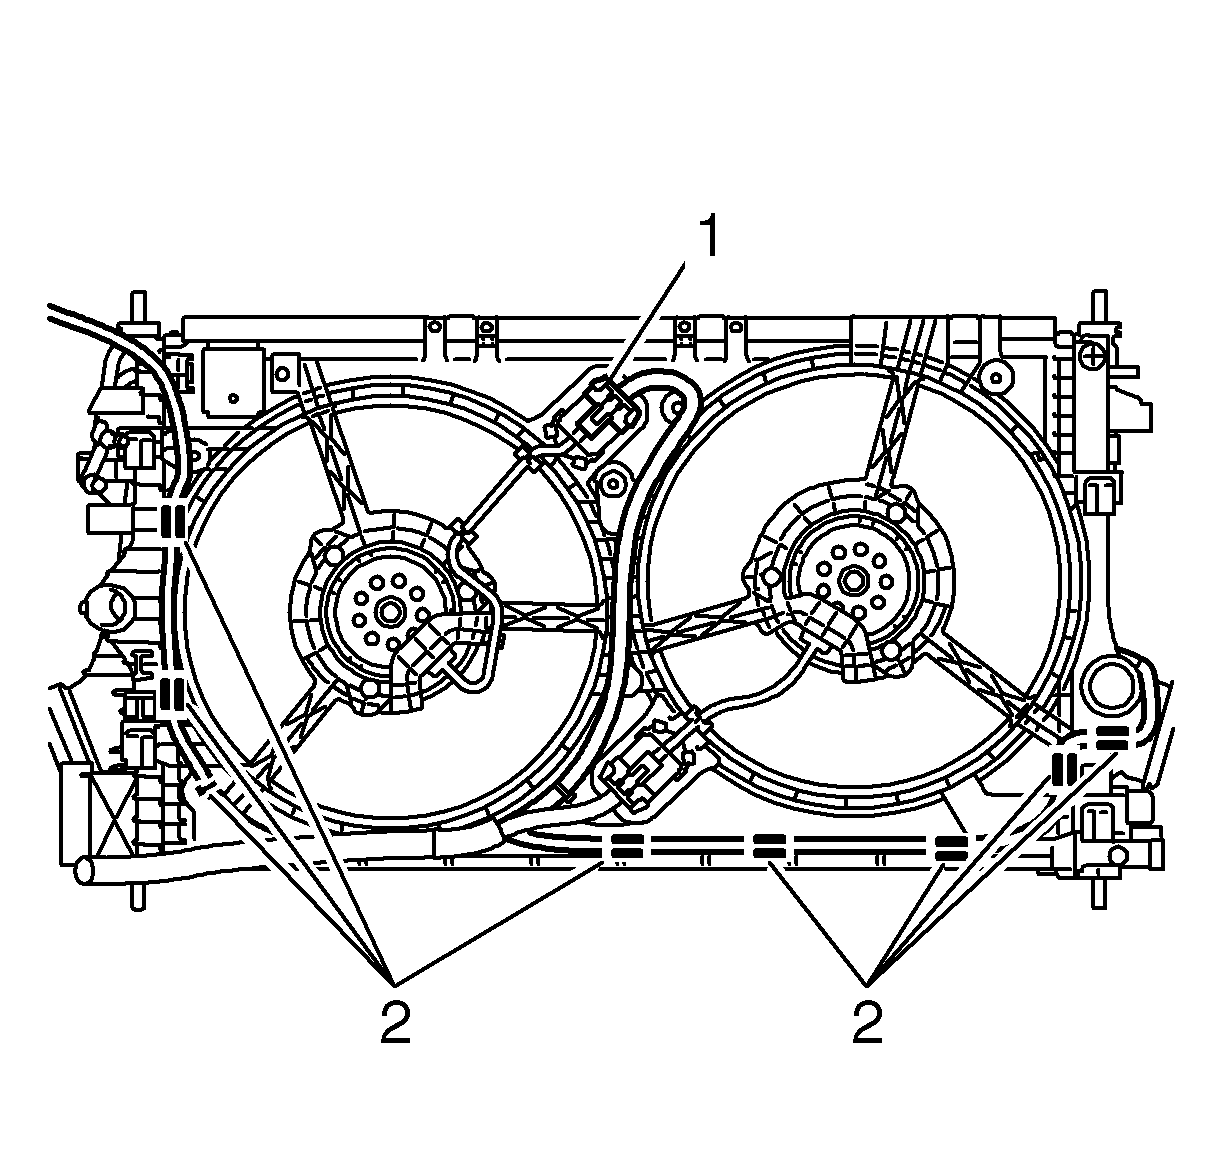
- Disconnect the two cooling fan electrical connectors (1) and detach the cooling fan wiring harness from the fan shroud (2).
- Detach radiator coolant inlet hose. Refer to Radiator Inlet Hose Replacement.
- Detach radiator coolant outlet hose. Refer to Radiator Outlet Hose Replacement.
- Remove the charge air cooler. Refer to Charge Air Cooler Replacement.
- Remove the radiator.
Note: Do not discharge the air conditioning system.
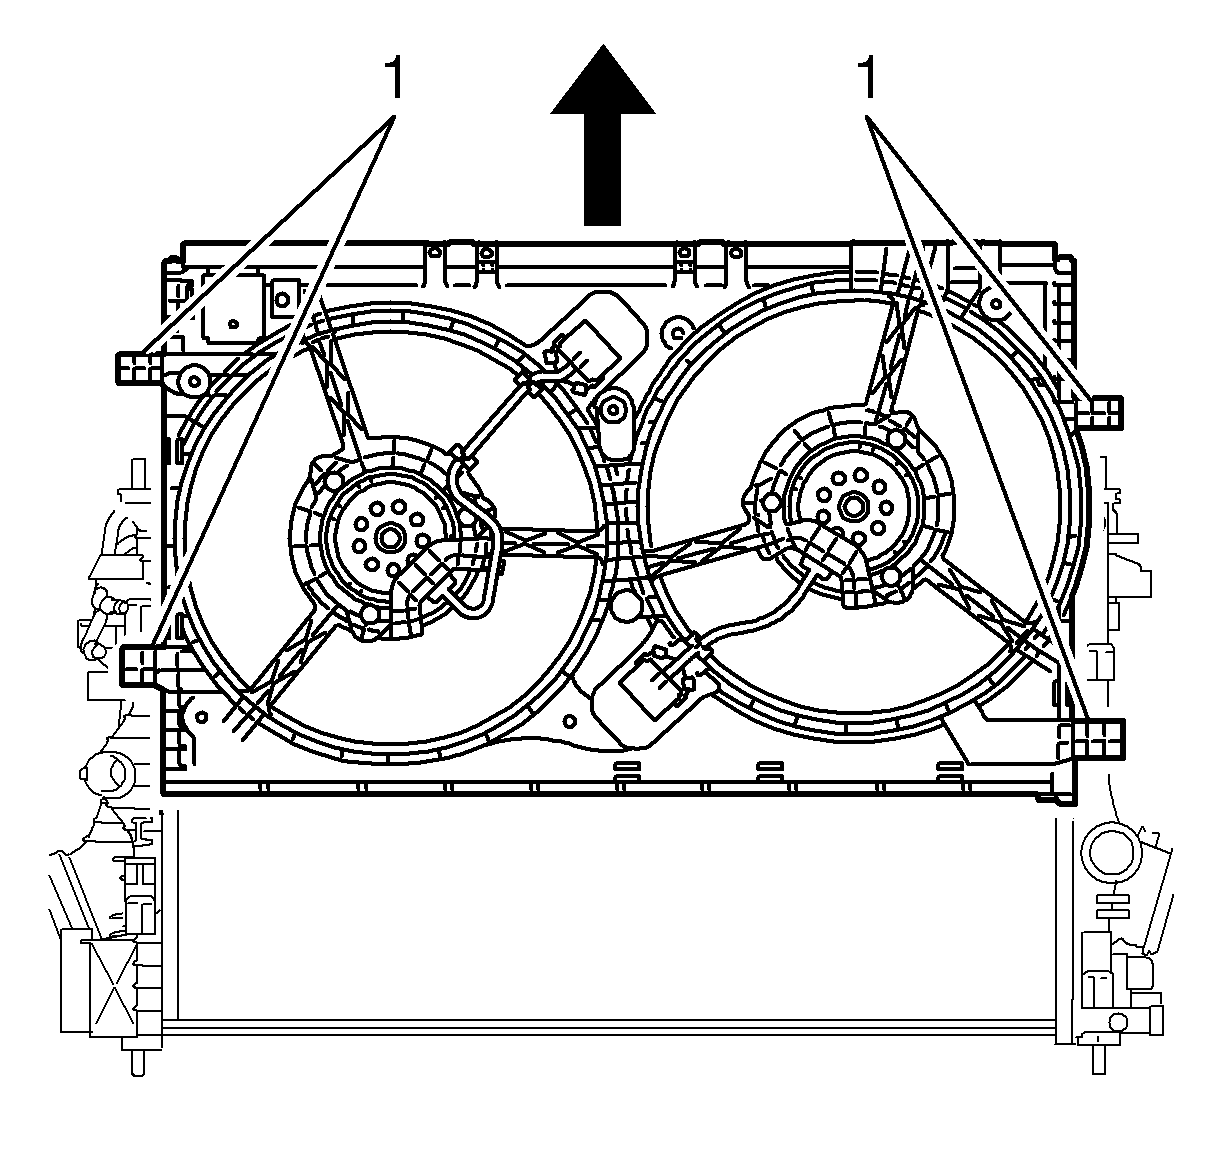
| • | Remove the radiator top brackets (1), and lift the radiator from the lower mounts. |
| • | Detach the fan shroud from the radiator, refer to Engine Coolant Fan Shroud Replacement. |
Installation Procedure
- Install the fan shroud assembly to the radiator, refer to Engine Coolant Fan Shroud Replacement.
- Install the radiator (2) into the lower radiator mounts and fasten the radiator top brackets (1).
- Install the charge air cooler. Refer to Charge Air Cooler Replacement.
- Attach radiator coolant outlet hose. Refer to Radiator Outlet Hose Replacement.
- Attach radiator coolant inlet hose. Refer to Radiator Inlet Hose Replacement.
- Connect the cooling fan electrical connectors (1) and attach the wiring harness (2).
- Fit the Power assisted steering (PAS) reservoir (1) and attach the coolant hose to the fan shroud (2).
- Attach the coolant hose to the top of the fan shroud.
- Fit the turbocharger wastegate actuator (1) and connect the vac hose to the fan shroud (2).
- Install the Condenser core. Refer to LINK.
- Install the front bumper assembly. Refer to Front Bumper Replacement.
- Install and fill the coolant reservoir to the fill level. Refer to Cooling System Draining and Filling.
- Connect the battery ground cable to the battery. Refer to Battery Negative Cable Disconnection and Connection.
- Inspect cooling system for leaks.
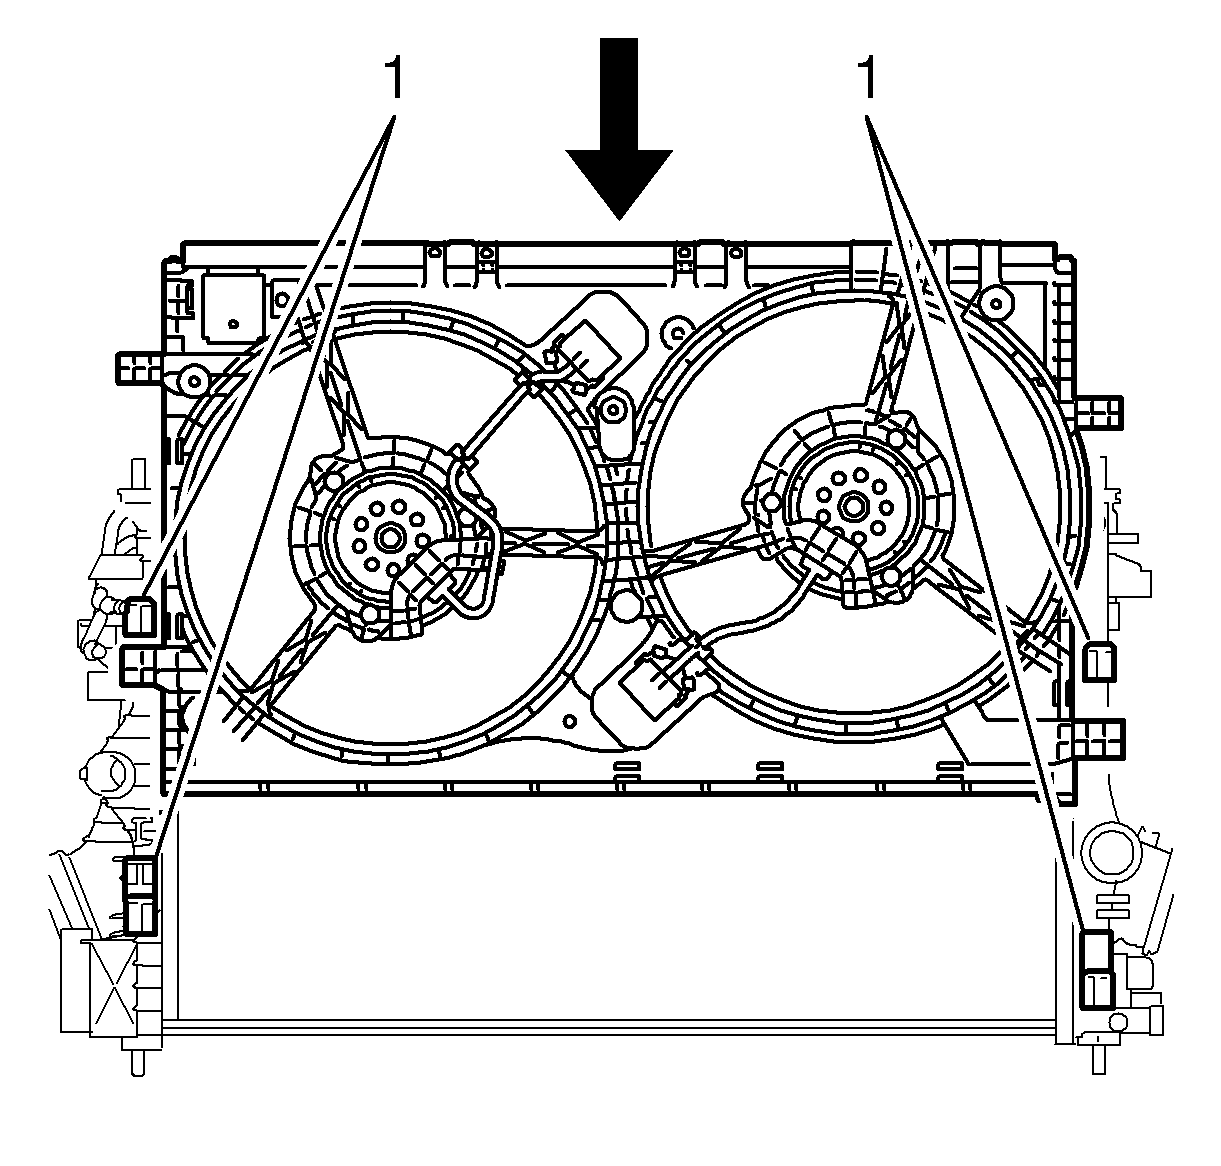


Radiator Replacement LBW/A28NET
Removal Procedure
- Turn the ignition OFF.
- Disconnect the battery negative cable. Refer to Battery Negative Cable Disconnection and Connection.
- Remove the front bumper fascia. Refer to Front Bumper Fascia Replacement.
- Drain the cooling system. Refer to Cooling System Draining and Filling.
- Remove the air cleaner outlet duct. Refer to Air Cleaner Outlet Duct Replacement.
- Remove the secondary air injection pipe. Refer to Secondary Air Injection Pump Replacement.
- Remove the radiator air side baffle and radiator air lower baffle. Refer to Radiator Air Side Baffle and Deflector Replacement and Radiator Air Lower Baffle and Deflector Replacement.
- Remove the air conditioning compressor and the condenser hose and the air conditioning evaporator hose. Refer to Air Conditioning Compressor and Condenser Hose Replacement.
- Remove the radiator inlet hose (1) from the radiator.
- Remove the engine coolant fan motor wiring harness from the radiator.
- Raise and support the vehicle. Refer to Lifting and Jacking the Vehicle.
- Remove the bracket of the power steering fluid cooler. Refer to Power Steering Fluid Cooler Replacement.
- Vehicles equipped with an automatic transmission, remove the upper transmission fluid cooler pipe and the lower transmission fluid cooler pipe from the radiator. Refer to Transmission Fluid Cooler Pipe Connector Replacement - Radiator.
- Remove the relay box (1).
- Remove the radiator wiring harness connectors.
- Remove the charge air cooler radiator. Refer to Charge Air Cooler Radiator Replacement.
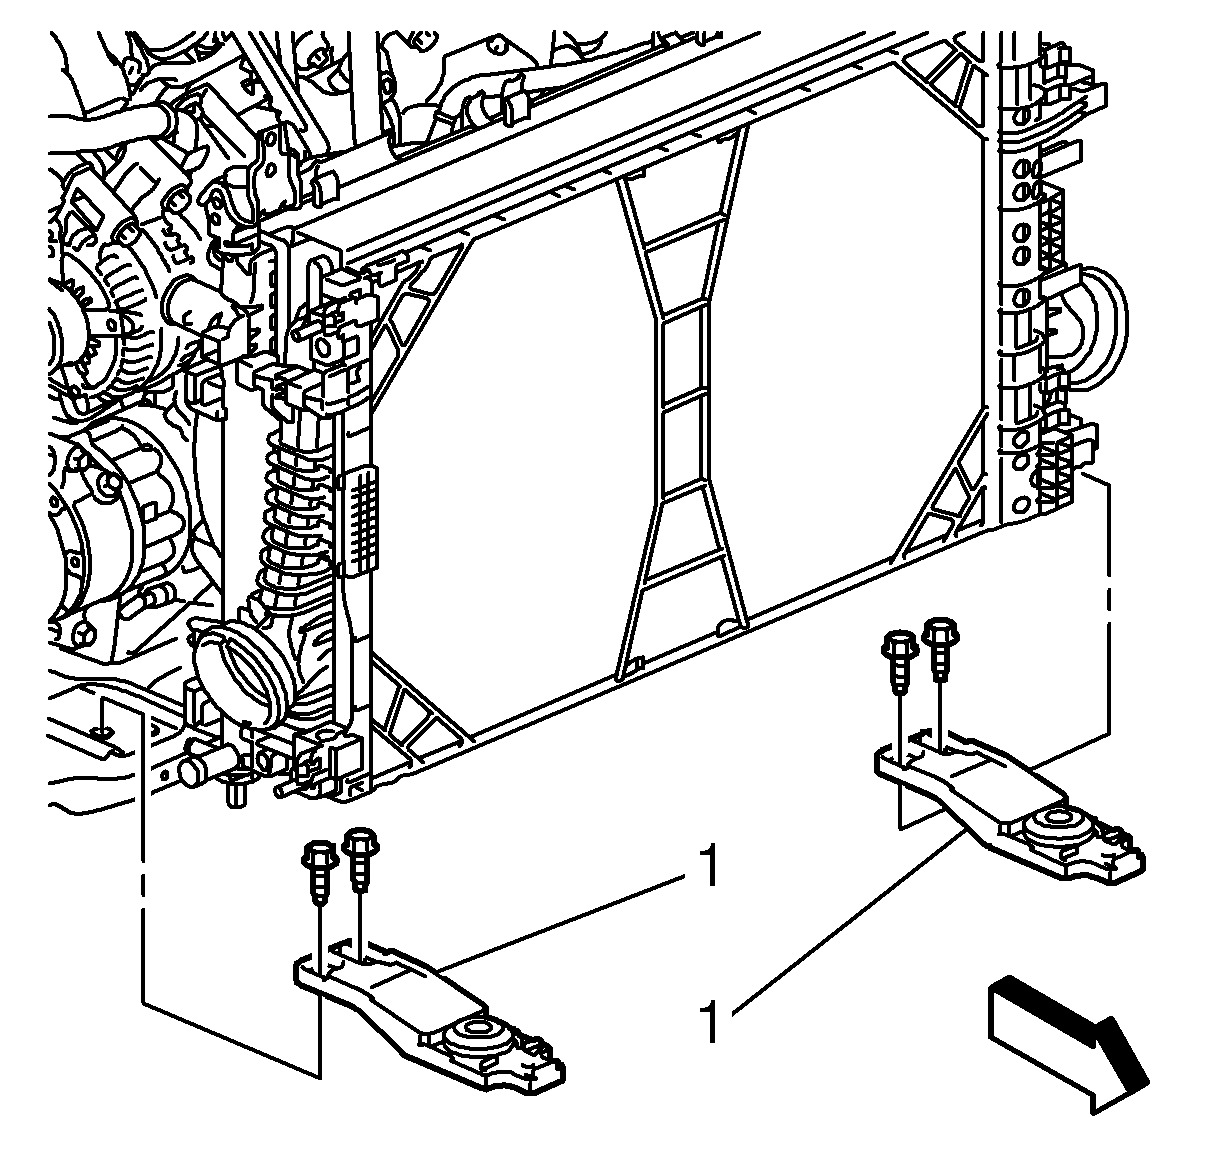
- With the aid of an assistant, remove the radiator support brackets (1).
- Remove the radiator.
- Remove the engine coolant fan shroud from the radiator. Refer to Engine Coolant Fan Shroud Replacement.
Warning: With a pressurized cooling system, the coolant temperature in the radiator can be considerably higher than the boiling point of the solution at atmospheric pressure. Removal of the surge tank cap, while the cooling system is hot and under high pressure, causes the solution to boil instantaneously with explosive force. This will cause the solution to spew out over the engine, the fenders, and the person removing the cap. Serious bodily injury may result.
Note: Secure the air conditioning condenser with cable ties.
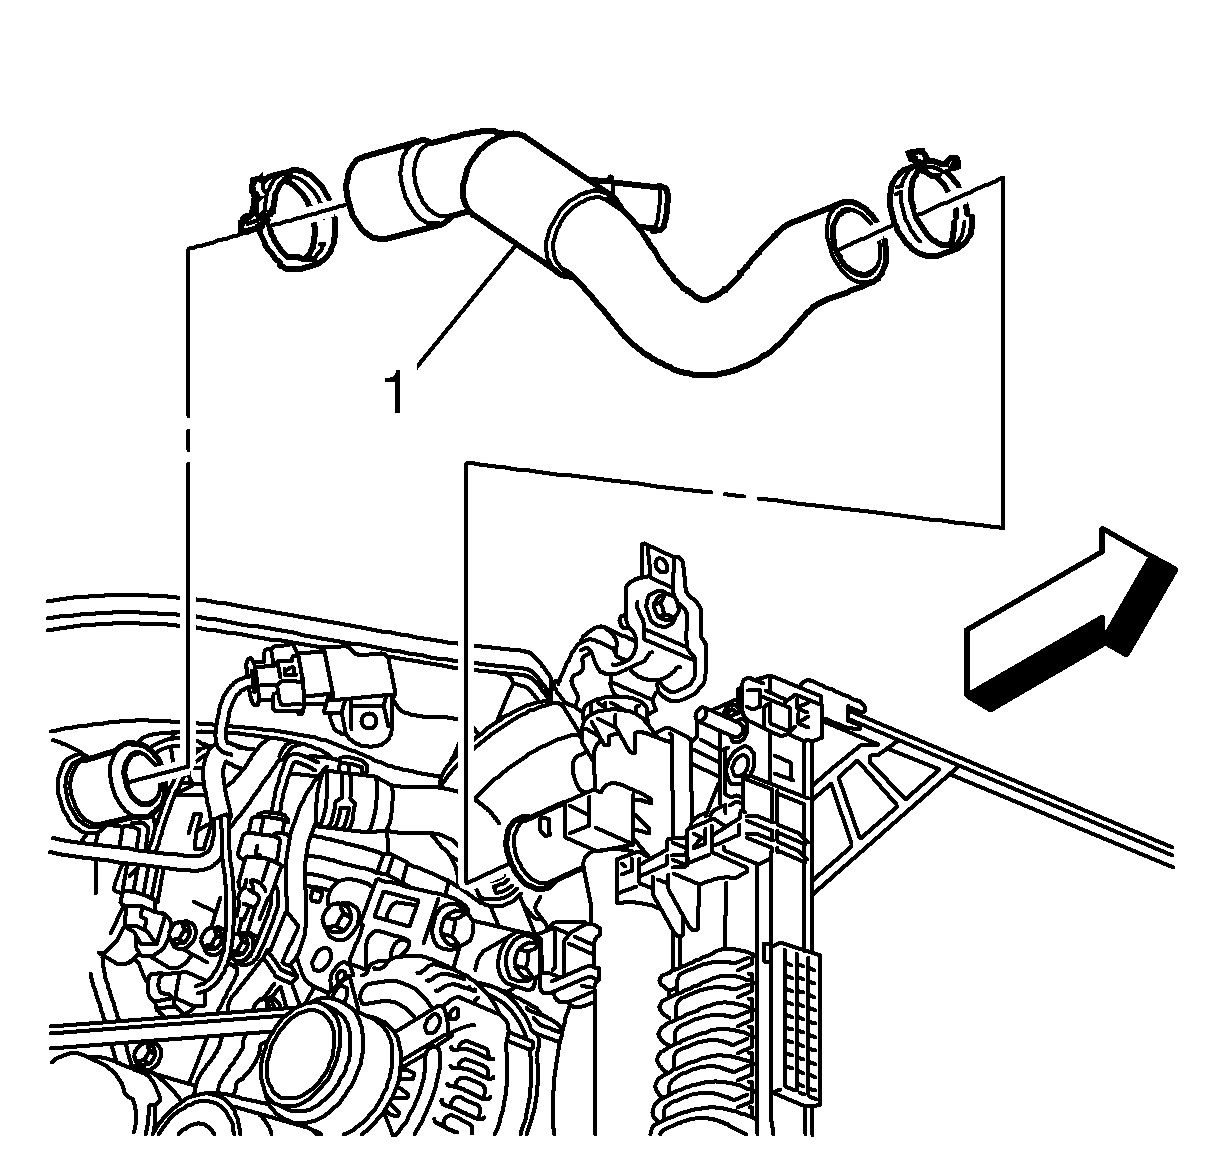
Note: Secure the power steering fluid cooler with cable ties.
Note: Secure the transmission fluid cooler pipe with cable ties.
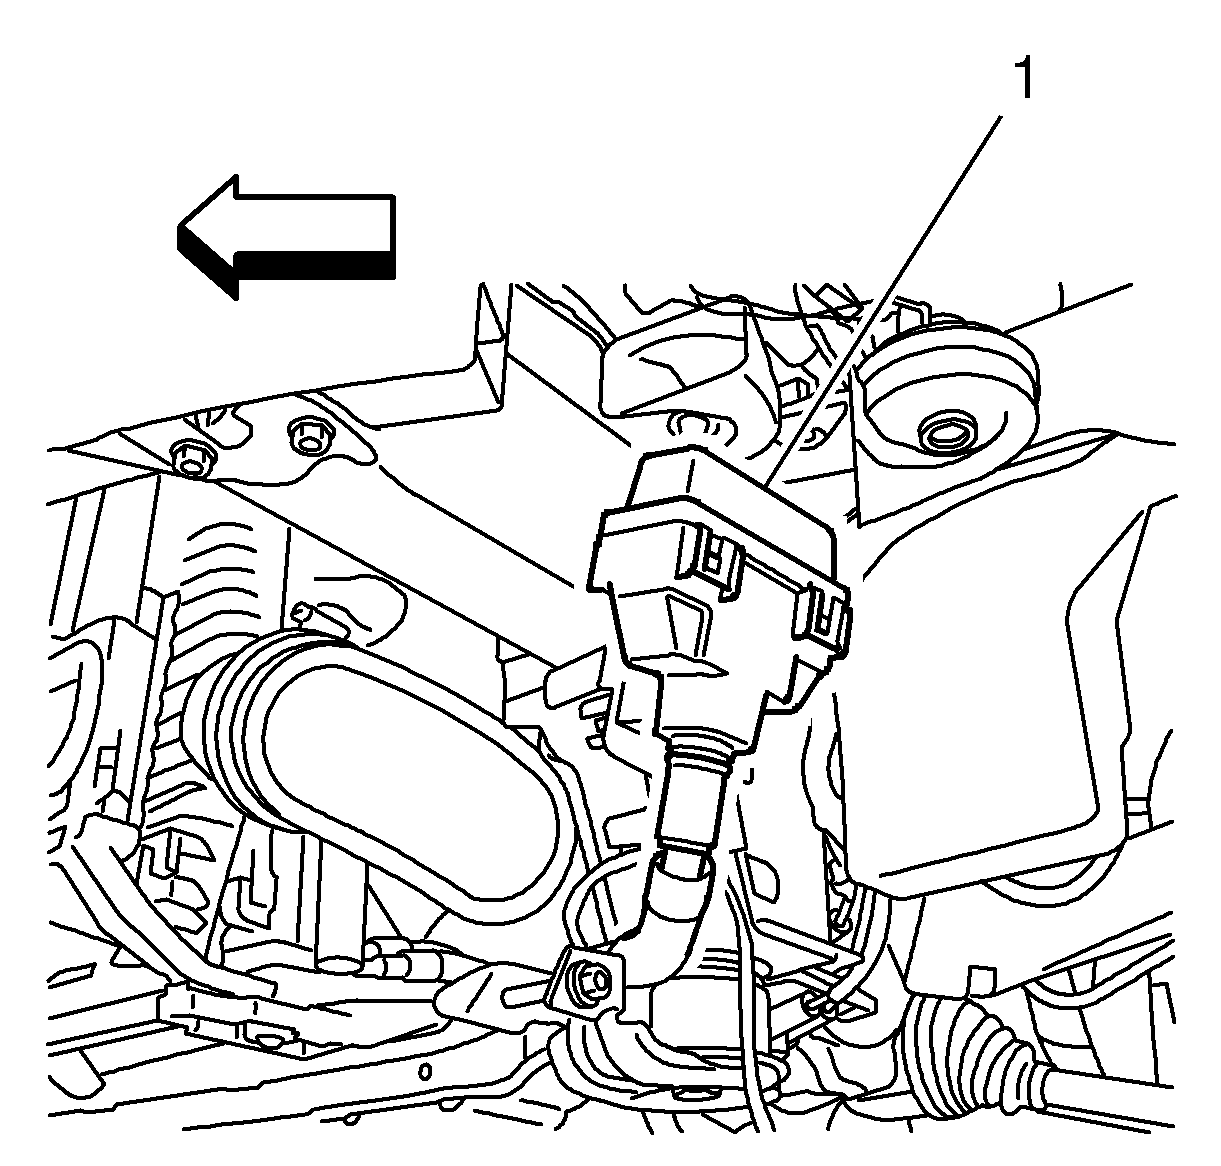
Installation Procedure
Note: Ensure that all the hoses, wires, pipes and shock modules clear the vehicle during the installation process.
- Install the engine coolant fan shroud to the radiator. Refer to Engine Coolant Fan Shroud Replacement.
- With the aid of an assistant, install the radiator.
- Install the radiator support bracket (1) and tighten to 25 N·m (18 lb ft).
- Install the radiator wiring harness connectors.
- Install the radiator outlet hose to the radiator.
- Install the relay box (1).
- Install the bracket of the power steering fluid cooler. Refer to Power Steering Fluid Cooler Replacement.
- Install the engine coolant fan motor wiring harness to the radiator.
- Install the charge air cooler radiator. Refer to Charge Air Cooler Radiator Replacement.
- Vehicles equipped with an automatic transmission, install the upper transmission fluid cooler pipe and the lower transmission fluid cooler pipe to the radiator. Refer to Transmission Fluid Cooler Pipe Connector Replacement - Radiator.
- Install the radiator ground cable and tighten to 10 N·m (89 lb in).
- Install the air conditioning compressor and the condenser hose and the air conditioning evaporator hose. Refer to Air Conditioning Compressor and Condenser Hose Replacement and Air Conditioning Evaporator Hose Assembly Replacement.
- Install the radiator air side baffle and the radiator air lower baffle. Refer to Radiator Air Side Baffle and Deflector Replacement and Radiator Air Lower Baffle and Deflector Replacement.
- Install the secondary air injection pipe. Refer to Secondary Air Injection Pump Replacement.
- Install the air cleaner outlet duct. Refer to Air Cleaner Outlet Duct Replacement.
- Install the radiator inlet hose (1) to the radiator.
- Install the front bumper fascia. Refer to Front Bumper Fascia Replacement.
- Connect the battery negative cable. Refer to Battery Negative Cable Disconnection and Connection.
- Fill the cooling system. Refer to Cooling System Draining and Filling.
Caution: Refer to Fastener Caution in the Preface section.


Radiator Replacement LDK/A20NHT
Removal Procedure
- Turn the ignition OFF.
- Disconnect the battery negative cable. Refer to Battery Negative Cable Disconnection and Connection.
- Remove the front bumper fascia. Refer to Front Bumper Fascia Replacement.
- Drain the cooling system. Refer to Cooling System Draining and Filling.
- Remove the air cleaner outlet duct. Refer to Air Cleaner Outlet Duct Replacement.
- Remove the radiator air side baffle and radiator air lower baffle. Refer to Radiator Air Side Baffle and Deflector Replacement and Radiator Air Lower Baffle and Deflector Replacement.
- Remove the air conditioning compressor and the condenser hose and the air conditioning evaporator hose. Refer to Air Conditioning Compressor and Condenser Hose Replacement and Air Conditioning Evaporator Hose Assembly Replacement.
- Remove the radiator inlet hose (1) from the radiator.
- Remove the engine coolant fan motor wiring harness from the radiator.
- Raise and support the vehicle. Refer to Lifting and Jacking the Vehicle.
- Remove the bracket of the power steering fluid cooler. Refer to Power Steering Fluid Cooler Replacement.
- Vehicles equipped with an automatic transmission, remove the upper transmission fluid cooler pipe and the lower transmission fluid cooler pipe from the radiator. Refer to Transmission Fluid Cooler Pipe Connector Replacement - Radiator.
- Remove the charge air cooler radiator. Refer to Charge Air Cooler Radiator Replacement.
- With the aid of an assistant, remove the radiator support brackets.
- Remove the radiator wiring harness connectors (1).
- Remove the radiator (1).
- Remove the engine coolant fan shroud from the radiator. Refer to Engine Coolant Fan Shroud Replacement.
Warning: With a pressurized cooling system, the coolant temperature in the radiator can be considerably higher than the boiling point of the solution at atmospheric pressure. Removal of the surge tank cap, while the cooling system is hot and under high pressure, causes the solution to boil instantaneously with explosive force. This will cause the solution to spew out over the engine, the fenders, and the person removing the cap. Serious bodily injury may result.
Note: Secure the air conditioning condenser with cable ties.
Note: Secure the power steering fluid cooler with cable ties.
Note: Secure the transmission fluid cooler pipe with cable ties.


Installation Procedure
Note: Ensure that all the hoses, wires, pipes and shock modules clear the vehicle during the installation process.
- Install the engine coolant fan shroud to the radiator. Refer to Engine Coolant Fan Shroud Replacement.
- With the aid of an assistant, install the radiator (1).
- Install the radiator support bracket (1) and tighten to 25 N·m (15 lb ft).
- Install the charge air cooler radiator. Refer to Charge Air Cooler Radiator Replacement.
- Install the radiator wiring harness connectors.
- Install the radiator outlet hose to the radiator.
- Install the radiator inlet hose to the radiator.
- Install the engine coolant fan motor wiring harness to the radiator.
- Vehicles equipped with an automatic transmission, install the upper transmission fluid cooler pipe and the lower transmission fluid cooler pipe to the radiator. Refer to Transmission Fluid Cooler Pipe Connector Replacement - Radiator.
- Install the air conditioning compressor and the condenser hose and the air conditioning evaporator hose. Refer to Air Conditioning Compressor and Condenser Hose Replacement and Air Conditioning Evaporator Hose Assembly Replacement.
- Install the radiator air side baffle and the radiator air lower baffle. Refer to Radiator Air Side Baffle and Deflector Replacement and Radiator Air Lower Baffle and Deflector Replacement.
- Install the air cleaner outlet duct. Refer to Air Cleaner Outlet Duct Replacement.
- Connect the battery negative cable. Refer to Battery Negative Cable Disconnection and Connection.
- Fill the cooling system. Refer to Cooling System Draining and Filling.

Caution: Refer to Fastener Caution in the Preface section.

Radiator Replacement LDE/A16XER, 2H0/A18XER
Removal Procedure
Warning: With a pressurized cooling system, the coolant temperature in the radiator can be considerably higher than the boiling point of the solution at atmospheric pressure. Removal of the surge tank cap, while the cooling system is hot and under high pressure, causes the solution to boil instantaneously with explosive force. This will cause the solution to spew out over the engine, the fenders, and the person removing the cap. Serious bodily injury may result.
- Turn the ignition OFF.
- Disconnect the battery negative cable. Refer to Battery Negative Cable Disconnection and Connection.
- Remove the front bumper fascia. Refer to Front Bumper Fascia Replacement.
- Drain the coolant.
- Remove the coolant temperature sensor. Refer to Engine Coolant Temperature Sensor Replacement.
- Remove the coolant hose from the engine coolant fan shroud.
- Remove the power steering fluid reservoir from the engine coolant fan shroud. Refer to Engine Coolant Fan Shroud Replacement.
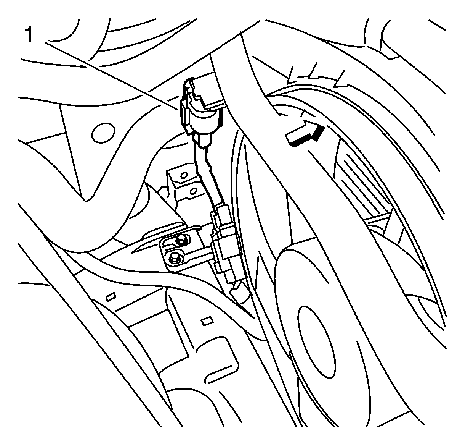
- Disconnect the engine coolant fan motor wiring harness connector (1).
- Remove the engine wiring harness from the engine coolant fan shroud.
- Remove the power steering fluid cooling pipe.
- Raise and support the vehicle. Refer to Lifting and Jacking the Vehicle.
- Remove the air conditioning condenser. Refer to LINK 48150.
- Remove the coolant hoses from the radiator.
- With the aid of an assistant remove the radiator brackets.
- Remove the radiator.
- Remove the engine coolant fan shroud from the radiator.
- Remove both rubber bearings off the radiator.
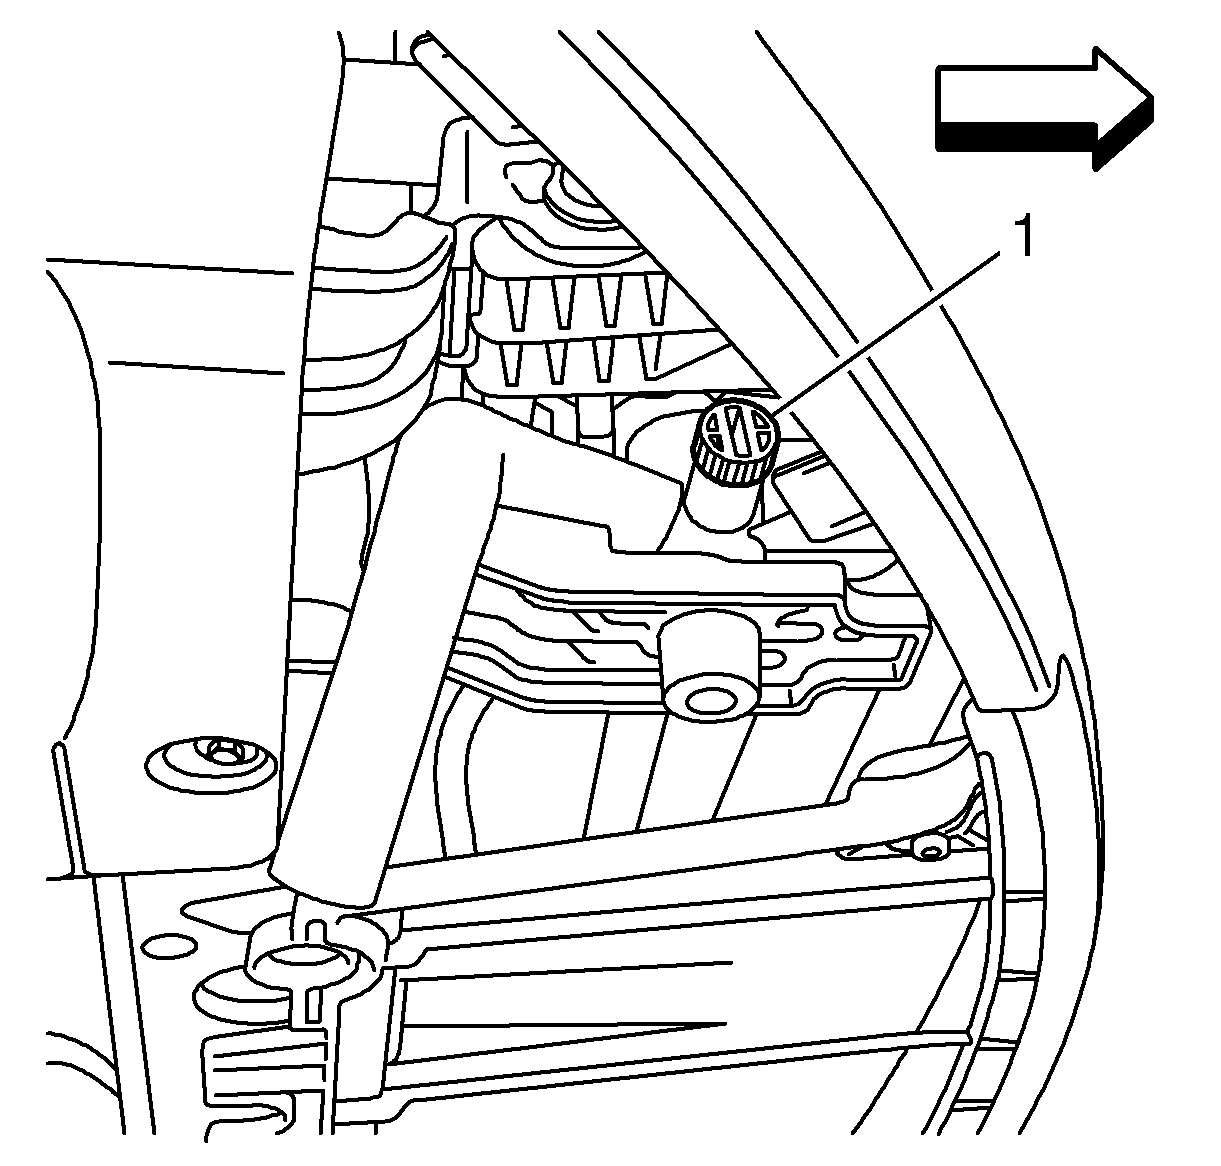
Note: Place collecting pan under the drain plug.
Open the drain plug (1) on the radiator.
Note: Secure the power steering fluid cooling pipe cable ties.
Note: Secure the air conditioning condenser with cable ties.
Installation Procedure
- Install both rubber bearings at the radiator.
- Install the coolant temperature sensor. Refer to Engine Coolant Temperature Sensor Replacement.
- Install the engine coolant fan shroud.
- With the aid of an assistant install the radiator.
- Install the radiator brackets.
- Tighten the two radiator bracket bolts to 25 N·m (18 lb in).
- Install radiator hoses.
- Install the air conditioning condenser. Refer to LINK 48150.
- Install the power steering fluid cooling pipe.
- Lower the vehicle.
- Connect the engine wiring harness electrical connector to the coolant temperature sensor.
- Install the power steering fluid reservoir to the engine coolant fan shroud. Refer to Engine Coolant Fan Shroud Replacement.
- Install the coolant hose at the engine coolant fan shroud.
- Connect the engine coolant fan motor wiring harness connector (1).
- Install the engine wiring harness to the engine coolant fan shroud.
- Close the drain plug (1) on the radiator.
- Install the front bumper fascia. Refer to Front Bumper Fascia Replacement.
- Fill the cooling system. Refer to Cooling System Draining and Filling.
- Connect the battery negative cable. Refer to Battery Negative Cable Disconnection and Connection.
Caution: Refer to Fastener Caution in the Preface section.


