Removal Procedure
- Remove the seat assembly. Refer to Seat Replacement in Seats.
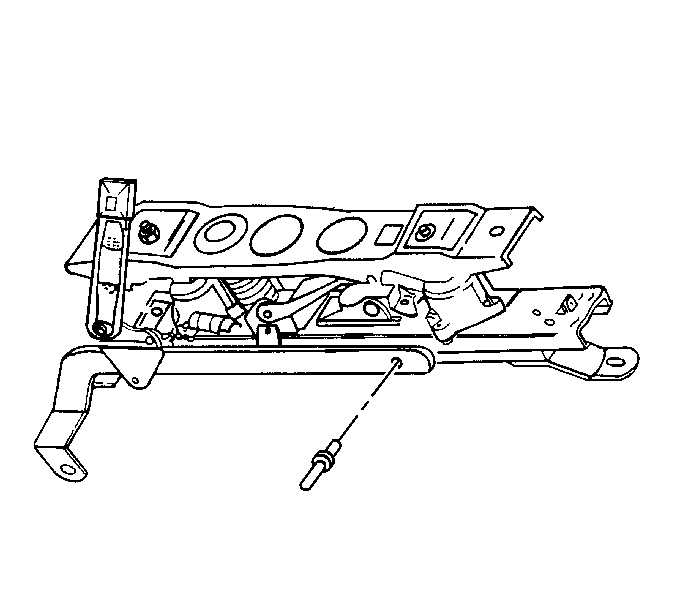
- Disconnect the load bar assembly from the tunnel and anchor nuts holding the seat adjusters to the floor.
- Disconnect the electrical connector at the buckle (drivers side only).
- Drill out the rivet using a 3/16-inch bit.
- Remove the load bar assembly.
- Remove the nut holding the buckle assembly to the load bar assembly.
- Remove the buckle assembly.
Caution: Load bar assembly must be replaced as a unit only. Do not substitute parts for any reason, or personal injury could result in the event of a collision.
Important: Driver and passenger buckle assemblies may be replaced separately if necessary, by removing the nut with the seats still installed.
Installation Procedure
- Connect the load bar assembly to the seat adjuster using a 3/16-inch rivet.
- Connect the buckle assembly to the load bar assembly and secure with a nut.
- Install the seat assembly. Secure the nuts to the seat adjuster and bolt for the center lap belt and the load bar assembly. Refer to Seat Replacement in Seats and Carpet.
- Connect the electrical connector to the seat harness (drivers side only).
Notice: Use the correct fastener in the correct location. Replacement fasteners must be the correct part number for that application. Fasteners requiring replacement or fasteners requiring the use of thread locking compound or sealant are identified in the service procedure. Do not use paints, lubricants, or corrosion inhibitors on fasteners or fastener joint surfaces unless specified. These coatings affect fastener torque and joint clamping force and may damage the fastener. Use the correct tightening sequence and specifications when installing fasteners in order to avoid damage to parts and systems.
Tighten
Tighten the nut to 28 N·m (21 lb ft).
Caution: Make sure bolt is through both parts. Failure to do so will result in system failure, leading to injury in the event of a collision.
