Removal Procedure
Important: Do not swap digital radio receivers between
vehicles. Swapping digital receivers between vehicles will activate the digital radio
Theftlock®, and "XM Theftlock®" will display.
- Remove the instrument panel (I/P) compartment. Refer to
Instrument Panel Compartment Replacement
in Instrument Panel,
Gages, and Console.
- Remove the right side outboard I/P insulator. Refer to
Instrument Panel Insulator Panel Replacement - Right Side
in Instrument Panel, Gages,
and Console.
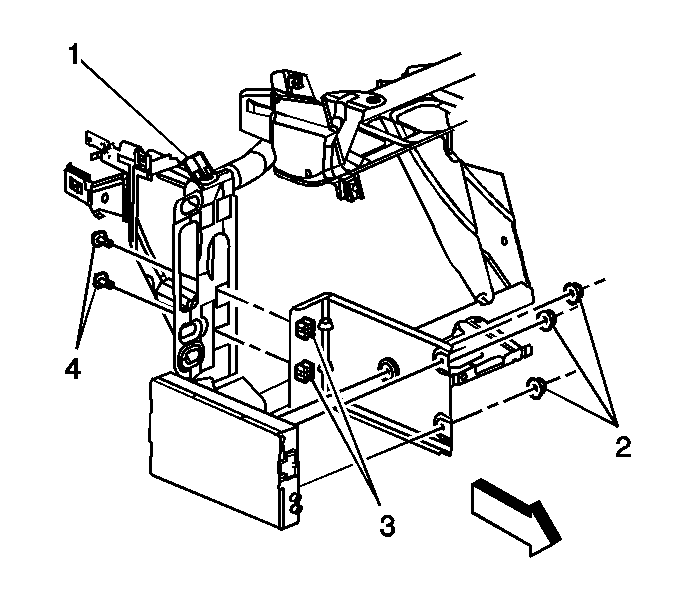
- Remove the digital radio receiver nuts (2).
- Remove the receiver from the bracket.
- Disengage the connector position assurance (CPA). Disconnect the I/P wiring
harness connector from the receiver.
- Disconnect the antenna cable from the receiver.
- Remove the digital radio receiver.
- To remove the digital radio receiver bracket, perform the following steps:
| 8.3. | Remove the bracket bolts (4). |
| 8.4. | Remove the bracket from the I/P reinforcement (1). |
Installation Procedure
- To install the digital radio receiver bracket,
perform the following steps:
| 1.1. | Align the bracket to the I/P reinforcement (1). |
Notice: Refer to Fastener Notice in the Preface section.
| 1.2. | Install the bracket bolts (4). |
Tighten
Tighten the bolts to 10 N·m (89 lb in).
- Connect the antenna cable to the digital radio receiver.
- Connect the I/P wiring harness connector to the receiver. Install the
CPA.
- Align the receiver to the bracket.
- Install the digital radio receiver nuts.
Tighten
Tighten the nuts to 6 N·m (53 lb in).
- Install the right side outboard I/P insulator. Refer to
Instrument Panel Insulator Panel Replacement - Right Side
in Instrument Panel, Gages,
and Console.
- Install the I/P compartment. Refer to
Instrument Panel Compartment Replacement
in Instrument Panel, Gages, and
Console.
- Perform the setup procedure for the digital radio receiver. Refer to
Digital Radio Receiver Setup
.
