Removal Procedure
Tools Required
J 28467-360 Engine
Support Fixture
Caution: Unless directed otherwise, the ignition and start switch must be in the OFF or LOCK position, and all electrical loads must be OFF before servicing
any electrical component. Disconnect the negative battery cable to prevent an electrical spark should a tool or equipment come in contact with an exposed electrical terminal. Failure to follow these precautions may result in personal injury and/or damage to
the vehicle or its components.
- Disconnect
the negative battery cable.
- Install the J 28467-360
. Refer to
Frame Replacement
in
Frame and Underbody.
- Remove the air intake duct. Refer to
Air Cleaner Inlet Duct Replacement
in Engine Controls - 3.8L.
- Remove the shift cable and bracket at the transaxle.
- Remove the acelerator and cruise control cables from the retainer
on the left strut tower.
- Unbolt but do not remove the ABS modulator.
- Raise the vehicle. Refer to
Lifting and Jacking the Vehicle
in General Information.
- Remove the left front tire and wheel assembly. Refer to
Tire and Wheel Removal and Installation
in Tires
and Wheels.
- Remove the inner splash shield.
- Remove the tie rod end from the knuckle assembly. Refer to
Rack and Pinion Outer Tie Rod End Replacement
in Power Steering
System.
- Remove the stabilizer shaft link from the lower control arm. Refer
to
Stabilizer Shaft Link Replacement
in
Front Suspension.
- Remove the ball joint from the steering knuckle. Refer to
Lower Control Arm Ball Joint Replacement
in Front Suspension.
- Remove the drive axle from the transmission. Refer to
Wheel Drive Shaft Replacement
in Driveline/Axle.
- Remove the pinch bolt from the steering gear intermediate shaft
at steering column. Refer to
Intermediate Steering Shaft Replacement
in Steering Wheel and Column - Tilt.
Caution: Failure to disconnect the intermediate shaft from the rack and pinion
steering gear stub shaft can result in damage to the steering gear or to the
intermediate shaft. This damage may cause loss of steering control, which
could result in an accident and possible personal injury.
- Remove the intermediate shaft from the steering gear. Refer to
Intermediate Steering Shaft Replacement
in Steering
Wheel and Column - Tilt.
- Remove the three frame-to-body bolts on the left side.
- Lossen but do not remove the bolts on the right side.
- Remove the transaxle oil cooler hoses at the case. Refer to
Automatic Transmission Oil Cooler Hose Replacement
.
- Lower the vehicle and loosen the engine support fixture adapters
until adequate clearance is available at the case side cover to frame rail
area.
- Raise the vehicle.

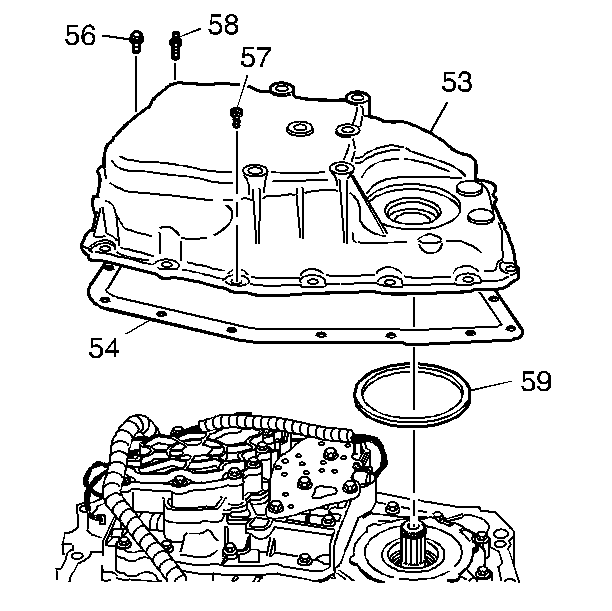
- Remove the case side cover
bolts.
- Remove the case side cover (53).
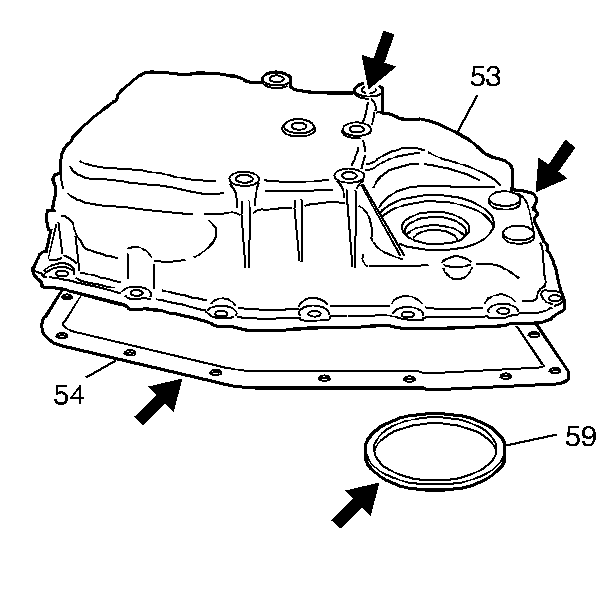
- Clean the case and side cover gasket surfaces.
Installation Procedure

- Inspect the case side
cover for the following conditions:
| • | Damaged or porous gasket sealing surfaces |
| • | Damaged or porous casting surfaces |
| • | Damaged or stripped bolt holes |
- Install the new gaskets (54 and 59) on the case (53).
- Install the case side cover.

Notice: Use the correct fastener in the correct location. Replacement fasteners
must be the correct part number for that application. Fasteners requiring
replacement or fasteners requiring the use of thread locking compound or sealant
are identified in the service procedure. Do not use paints, lubricants, or
corrosion inhibitors on fasteners or fastener joint surfaces unless specified.
These coatings affect fastener torque and joint clamping force and may damage
the fastener. Use the correct tightening sequence and specifications when
installing fasteners in order to avoid damage to parts and systems.
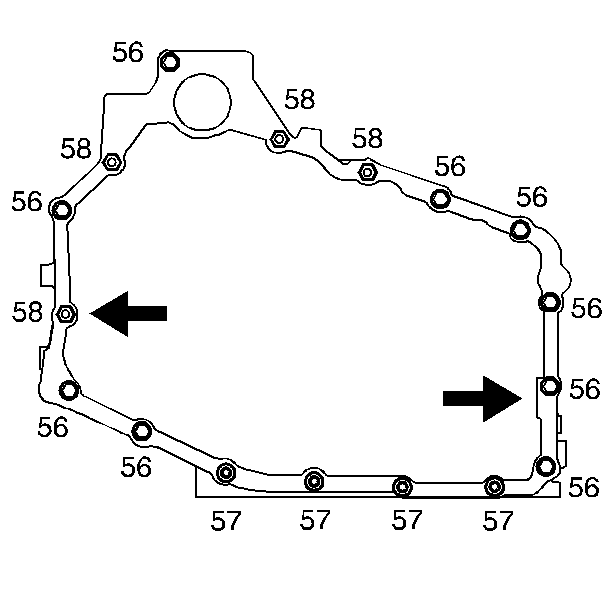
- Install the new
side cover bolts (56) and one side cover to case stud (58) in the locations
shown. These bolts will properly locate the case side cover to the case.
- Install the remaining bolts:
| • | Nine case side cover bolts (56) |
| • | Four side cover torx® bolts (57) |
| • | Four side cover to case stud bolts (58 |
Tighten
Tighten the side cover bolts to 25 N·m (18 lb ft).
- Install the transaxle oil cooler hoses to the transmission. Refer
to
Automatic Transmission Oil Cooler Hose Replacement
.
- Raise the transmission and frame using a transmission jack so
that the frame bolts can be installed.
- Install the three frame-to-body bolts and tight the right side
bolts. Refer to
Frame Replacement
in
Frame and Underbody.
- Remove the transmission jack.
- Install the intermediate shaft to the steering gear and the pinch
bolt at the intermediate shaft. Refer to
Intermediate Steering Shaft Replacement
in Steering Wheel and Column
- Tilt.
- Install the drive axle to the transmission. Refer to
Wheel Drive Shaft Replacement
in Driveline/Axle.
- Install the ball joint to the steering knuckle. Refer to
Lower Control Arm Ball Joint Replacement
in Front Suspension.
- Install the stabilizer shaft link to the lower control arm. Refer
to
Stabilizer Shaft Link Replacement
in
Front Suspension.
- Install the tie rod end to the knuckle. Refer to
Rack and Pinion Outer Tie Rod End Replacement
in Power Steering System.
- Install the inner splash shield.
- Install the left front tire and wheel assembly. Refer to
Tire and Wheel Removal and Installation
in Tires
and Wheels.
- Lower the vehicle.
- Remove the J 28467-360
. Refer to
Frame Replacement
in
Frame and Underbody.
- Install the shift cable and bracket at the transaxle.
- Install the acelerator and cruise control cables from the retainer
on the left strut tower.
- Install the ABS modulator.
- Install the air intake duct. Refer to
Air Cleaner Inlet Duct Replacement
in Engine Controls - 3.8L.
- Connect the negative battery cable.
- Check the fluid level. Refer to
Fluid Capacity Specifications
- Inspect for leaks.
- Check front end alignment.


