Circuit Description
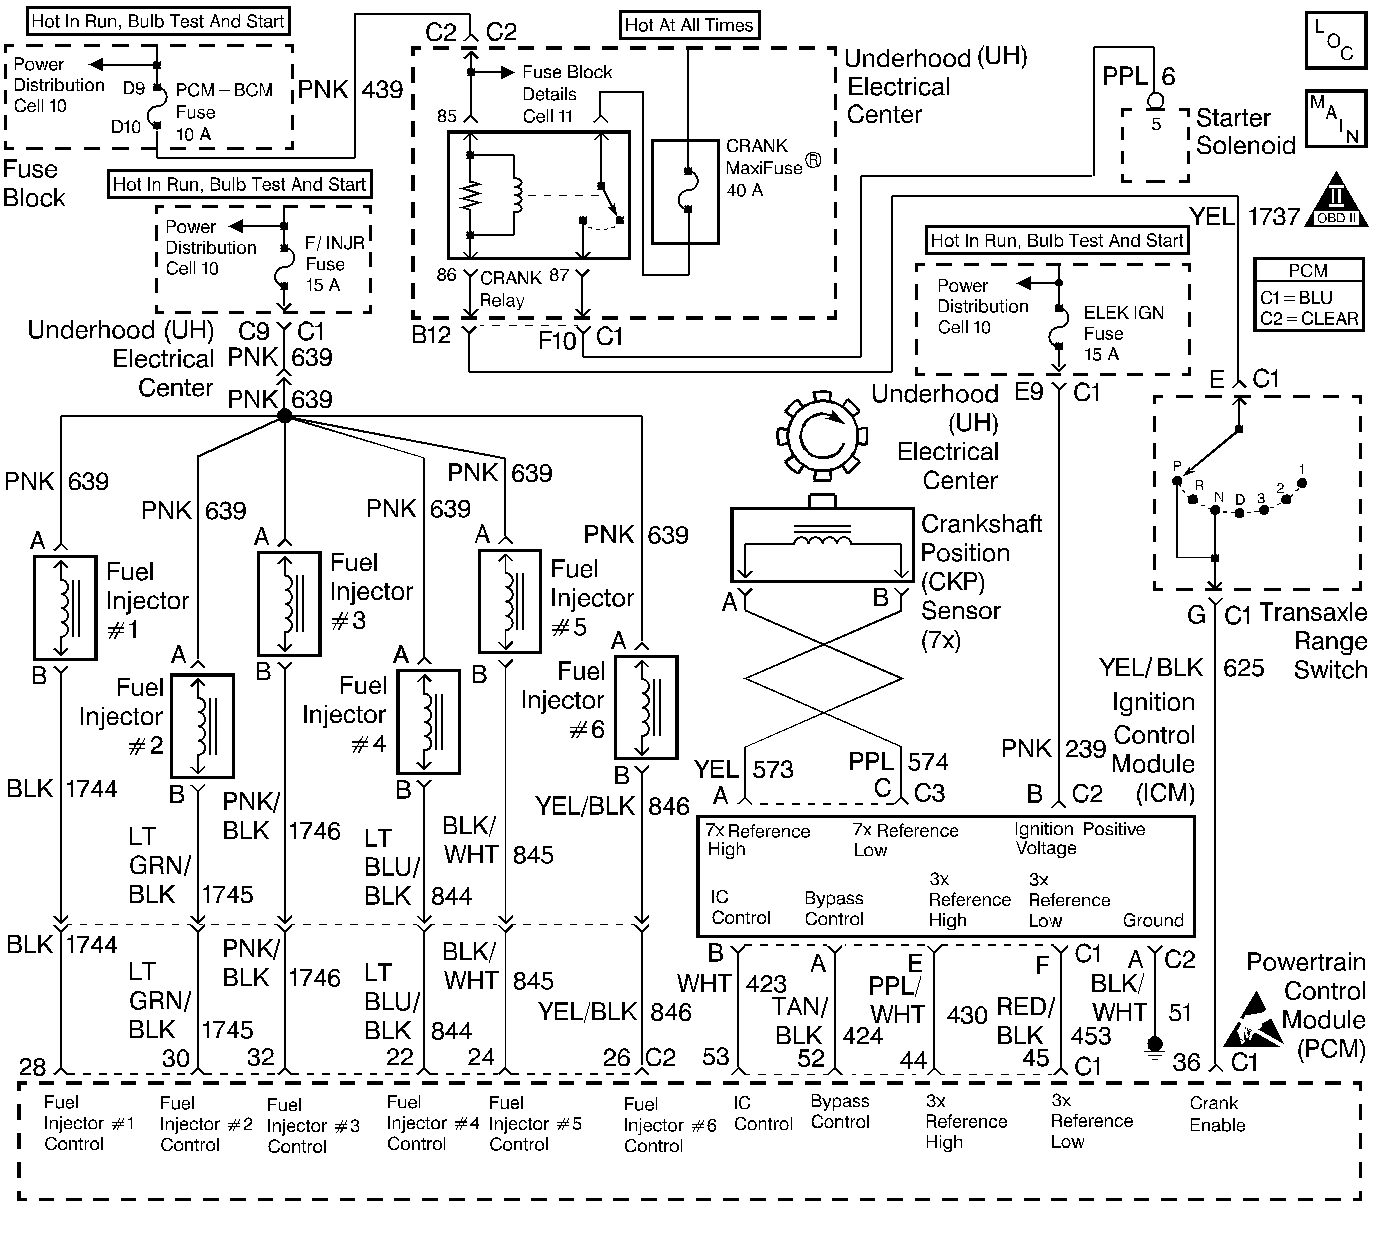
The Electronic Ignition system uses a waste spark method of spark distribution. In this type of ignition system, the ignition control module triggers the correct coil based on the 3X signal received from the crankshaft position sensor, resulting in both spark plugs connected to the coil firing at the same time. The spark plug for the cylinder on the exhaust stroke requires a lower energy requirement to fire, leaving the remaining high voltage to fire the spark plug for the cylinder on the compression stroke.
During cranking, the ignition control module monitors the crankshaft position sensor input for recognition of the sync signal. The sync signal is used to determine the correct cylinder pair to spark first. After the sync signal has been processed by the ignition control module, it sends a 3X reference signal to the PCM. When the PCM receives this signal it will command all six injectors to open for one priming shot of fuel in all cylinders. After the priming, the injectors are left on for the next six 3X reference signals from the ignition control module (two crankshaft revolutions). This allows each cylinder to use the fuel from the priming shot. During this waiting period, a cam signal will have been received by the PCM. After the true camshaft position is detected, the PCM operates the injectors sequentially. However, if the cam signal is not present at start-up, DTC P0341 will set and the PCM will start sequential fuel delivery in random pattern with a 1 in 6 chance that fuel delivery is correct.
The sync signal is used only by the ignition control module. It is used for spark synchronization at start-up only (not passed to the PCM).
Diagnostic Aids
An intermittent may be caused by a poor connection, rubbed through wire insulation or a wire broken inside the insulation. Check for the following items:
| • | Mass Air Flow is compared to a calculated Mass Air Flow based upon the MAP, TP, and engine RPM readings (speed density). A Skewed/unresponsive MAP sensor at Key on will cause the predicted air flow value to be inaccurate. Compare MAP and TP sensor to that of a normal operating vehicle. |
| • | Poor connection or damaged harness. Inspect the PCM harness and connectors for improper mating, broken locks, improperly formed or damaged terminals, poor terminal to wire connection, and damaged harness. |
| • | Faulty Engine Coolant Temperature Sensor. Using a scan tool, compare Engine Coolant Temperature with Intake Air Temperature on a completely cool engine. Engine Coolant Temperature should be within 10°C of Intake Air Temperature. If not, replace the ECT sensor. |
Test Description
The number(s) below refer to the step number(s) on the Diagnostic Table:
-
A skewed MAP sensor can cause the BARO reading to be incorrectly calculated. To check the MAP sensor, compare the MAP/BARO reading on the vehicle to the MAP/BARO reading on a normally operating vehicle. If there is a skewed or stuck map sensor vehicle may not start, compare the MAP reading with that of another vehicle.
-
This step checks the MAP sensor. By disconnecting the MAF sensor, the vehicle is forced into speed density, Speed density is based on the MAP, TP, and engine RPM readings. With a skewed/unresponsive MAP sensor, the speed density calculation is incorrect and vehicle may not start.
-
A blinking test light verifies that the PCM is capable of activating the injectors.
A non-blinking injector test light indicates a possible fault condition in the fuel injector circuits.
-
Checking for spark at an ignition wire will determine if the problem is with the 7X crankshaft position sensor input to the ICM. A blinking injector test light with no spark suggests a fault condition in the ignition system. By using J 26792 (ST 125) to test for spark at the ignition coil towers, each ignition coils ability to produce at least 25,000 volts is verified.
-
By testing the problem coils control circuit with a test light, a determination can be made as to the problem coil being faulty or the ignition control modules internal driver circuit for the affected coil being the cause of the complaint.
-
Before replacing the MAP sensor review Diagnostic Aids. Apply vacuum with hand held vacuum pump while monitoring scan tool, MAP reading should increment smoothly with each stroke of vacuum pump. Refer to Manifold Absolute Pressure Sensor Circuit Check for MAP Sensor diagnosis.
Step | Action | Value(s) | Yes | No | ||||||||||||||||
|---|---|---|---|---|---|---|---|---|---|---|---|---|---|---|---|---|---|---|---|---|
1 | Was the Powertrain On Board Diagnostic (OBD) System Check performed? | -- | ||||||||||||||||||
2 |
Important: : Before proceeding with this diagnostic table, ensure that the vehicle battery is fully charged. Important: : If any of the following DTC(s) are stored as failed since code clear, diagnose the DTC(s) before continuing with this table: DTC P0101, P0123, P0601/P0602, P1200, P1374, P1626, P1631.
Was a problem found? | -- | ||||||||||||||||||
3 |
Is the test light on? | -- | ||||||||||||||||||
4 |
Is the test light on? | -- | ||||||||||||||||||
5 |
Is the test light on? | -- | ||||||||||||||||||
6 |
Is the test light on? | -- | ||||||||||||||||||
7 | Check for poor terminal connections in the ignition main relay connector. If a problem is found, repair as necessary. Refer to Repair Procedures in Electrical Diagnosis. Was a problem found? | -- | ||||||||||||||||||
8 | Check for an open in the battery positive voltage feed from cavity 30 in the ignition main relay connector. Refer to Fuse Block Details in Electrical Diagnosis. If a problem is found, repair as necessary. Refer to Repair Procedures in Electrical Diagnosis. Was a problem found? | -- | ||||||||||||||||||
9 | Locate and repair open in the battery positive voltage feed to cavity 87 in the ignition main relay connector. Refer to Repair Procedures in Electrical Diagnosis. Is the action complete? | -- | -- | |||||||||||||||||
10 | Locate and repair the open in the ignition feed to cavity 86 in the ignition main relay connector. Refer to Repair Procedures in Electrical Diagnosis. Is the action complete? | -- | -- | |||||||||||||||||
11 | Repair the open in the ignition main relay ground (CKT 451). Refer to Repair Procedures in Electrical Diagnosis. Is the action complete? | -- | -- | |||||||||||||||||
12 | Replace the ignition main relay. Is the action complete? | -- | -- | |||||||||||||||||
Is MAP less than specified value? | 65 kPa | |||||||||||||||||||
Does engine start and continue to run? | -- | |||||||||||||||||||
15 |
Is the fuel pressure within the specified values and holding? | 284-325 kPa (41-47 psi | ||||||||||||||||||
16 | Is any fuel pressure indicated? | -- | ||||||||||||||||||
Does all of the LEDs for cylinders 1-6 flash? | -- | |||||||||||||||||||
Is adequate spark provided by the secondary coils? | -- | |||||||||||||||||||
19 |
Was a problem found? | -- | ||||||||||||||||||
20 | Check for the following conditions:
Was a repair made? | -- | ||||||||||||||||||
21 |
Was the fuse blown? | -- | ||||||||||||||||||
22 |
Was a problem found? | -- | ||||||||||||||||||
23 |
Is the resistance between the specified value? | 800-1,200 ohms | ||||||||||||||||||
24 |
Was a problem found? | -- | ||||||||||||||||||
25 |
Was a problem found? | -- | ||||||||||||||||||
26 |
Did the inspection reveal a problem? | -- | ||||||||||||||||||
27 |
Is the resistance outside the specified values? | 5K-7Kohms (5000-7000ohms | ||||||||||||||||||
Does the test light blink while the engine is being cranked? | -- | |||||||||||||||||||
29 |
Did the inspection reveal any faulty ignition wires? | -- | ||||||||||||||||||
30 |
Was a problem found? | 7,000ohms (7Kohms) | ||||||||||||||||||
31 |
Does your inspection reveal any spark plugs exhibiting excessive fouling? | -- | ||||||||||||||||||
32 |
Did inspection reveal any faulty ignition wires? | -- | ||||||||||||||||||
33 |
Was a problem found? | 7,000ohms (7K ohms) | ||||||||||||||||||
34 |
Does your inspection reveal any spark plugs exhibiting excessive fouling? | -- | ||||||||||||||||||
35 |
Was a problem found? | -- | Refer to Diagnostic Aids | |||||||||||||||||
36 | Repair engine mechanical problem. Refer to Engine Mechanical Diagnosis to diagnose the following conditions:
Is action complete? | -- | -- | |||||||||||||||||
Replace the MAP sensor. Refer to Manifold Absolute Pressure Sensor Replacement . Is the action complete? | -- | -- | ||||||||||||||||||
38 | Replace the 7X crankshaft position sensor. Refer to Crankshaft Position Sensor Replacement . Is the action complete? | -- | -- | |||||||||||||||||
39 | Replace the ignition coil(s) associated with the cylinders that did not have spark. Refer to Ignition Control Module Replacement . Is the action complete? | -- | -- | |||||||||||||||||
40 | Replace the electronic ignition control module. Refer to Ignition Control Module Replacement . Is the action complete? | -- | -- | |||||||||||||||||
41 | Replace the PCM. Refer to Powertrain Control Module Replacement/Programming . Important: : The replacement PCM must be programmed. Is the action complete? | -- | -- |
