- With the engine OFF, press on the brake pedal several times in order to remove vacuum from the vacuum brake booster.
- If the vehicle has an automatic transmission, shift into park.
- Apply the park brake.
- Place a clean shop cloth beneath the brake master cylinder in order to absorb brake fluid spills.
- Place a drain pan below the master cylinder.
Warning: Refer to Brake Fluid Warning in the Preface section.
Warning: Refer to Brake Fluid Irritant Warning in the Preface section.
Caution: Refer to Brake Fluid Effects on Paint and Electrical Components Caution in the Preface section.
Caution: Refer to Filling the Master Cylinder Caution in the Preface section.
- Remove the left side air inlet grill panel and fill the brake fluid reservoir up to the MAX line. Ensure the brake fluid level is between the MAX line and the MIN line during this bleeding procedure. Refer to
Master Cylinder Reservoir Filling.
Warning: Remove all the air from the hydraulic brake system anytime the hydraulic brake system is opened for repair. The entire bleeding procedure must be followed. Failure to remove all the air in the
hydraulic brake system will result in reduced braking performance and possible personal injury.
- If you disconnected the brake pipes from the master cylinder, perform the following steps:
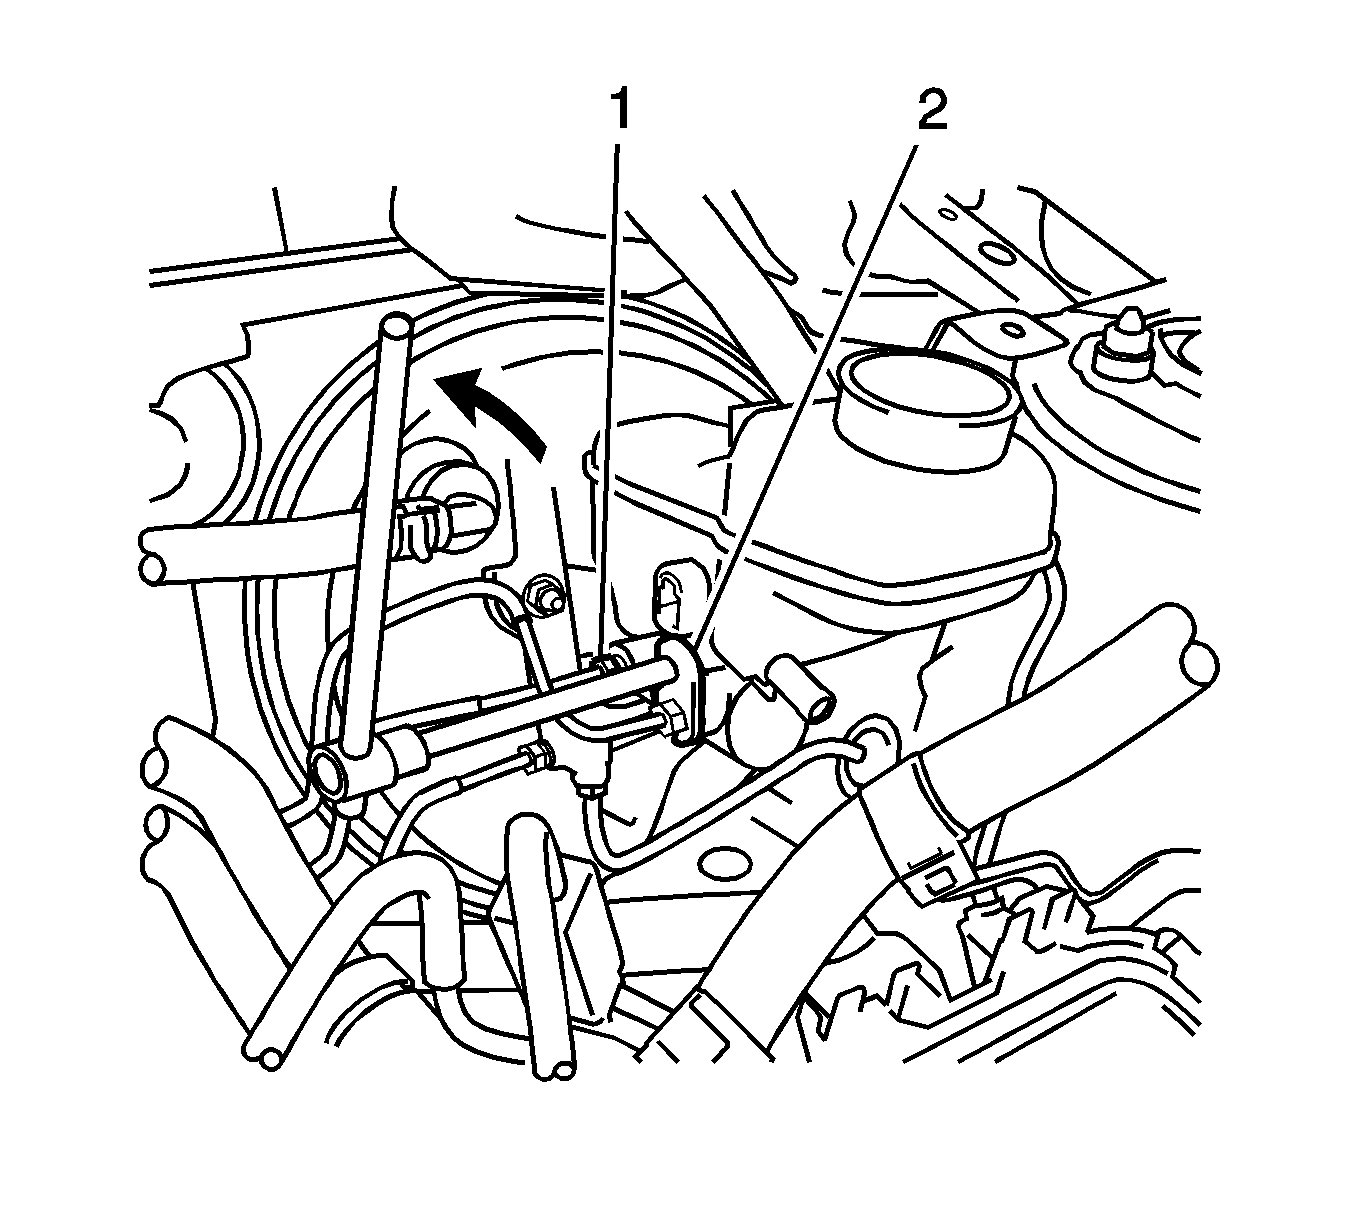
| 7.1. | Ensure the rear brake pipe (1) is installed to the master cylinder. |
| 7.2. | Remove the front brake pipe from the front port of the brake master cylinder. |
| 7.3. | Allow a small amount of brake fluid to gravity bleed from the open port of the master cylinder. |
Caution: Refer to Fastener Caution in the Preface section.
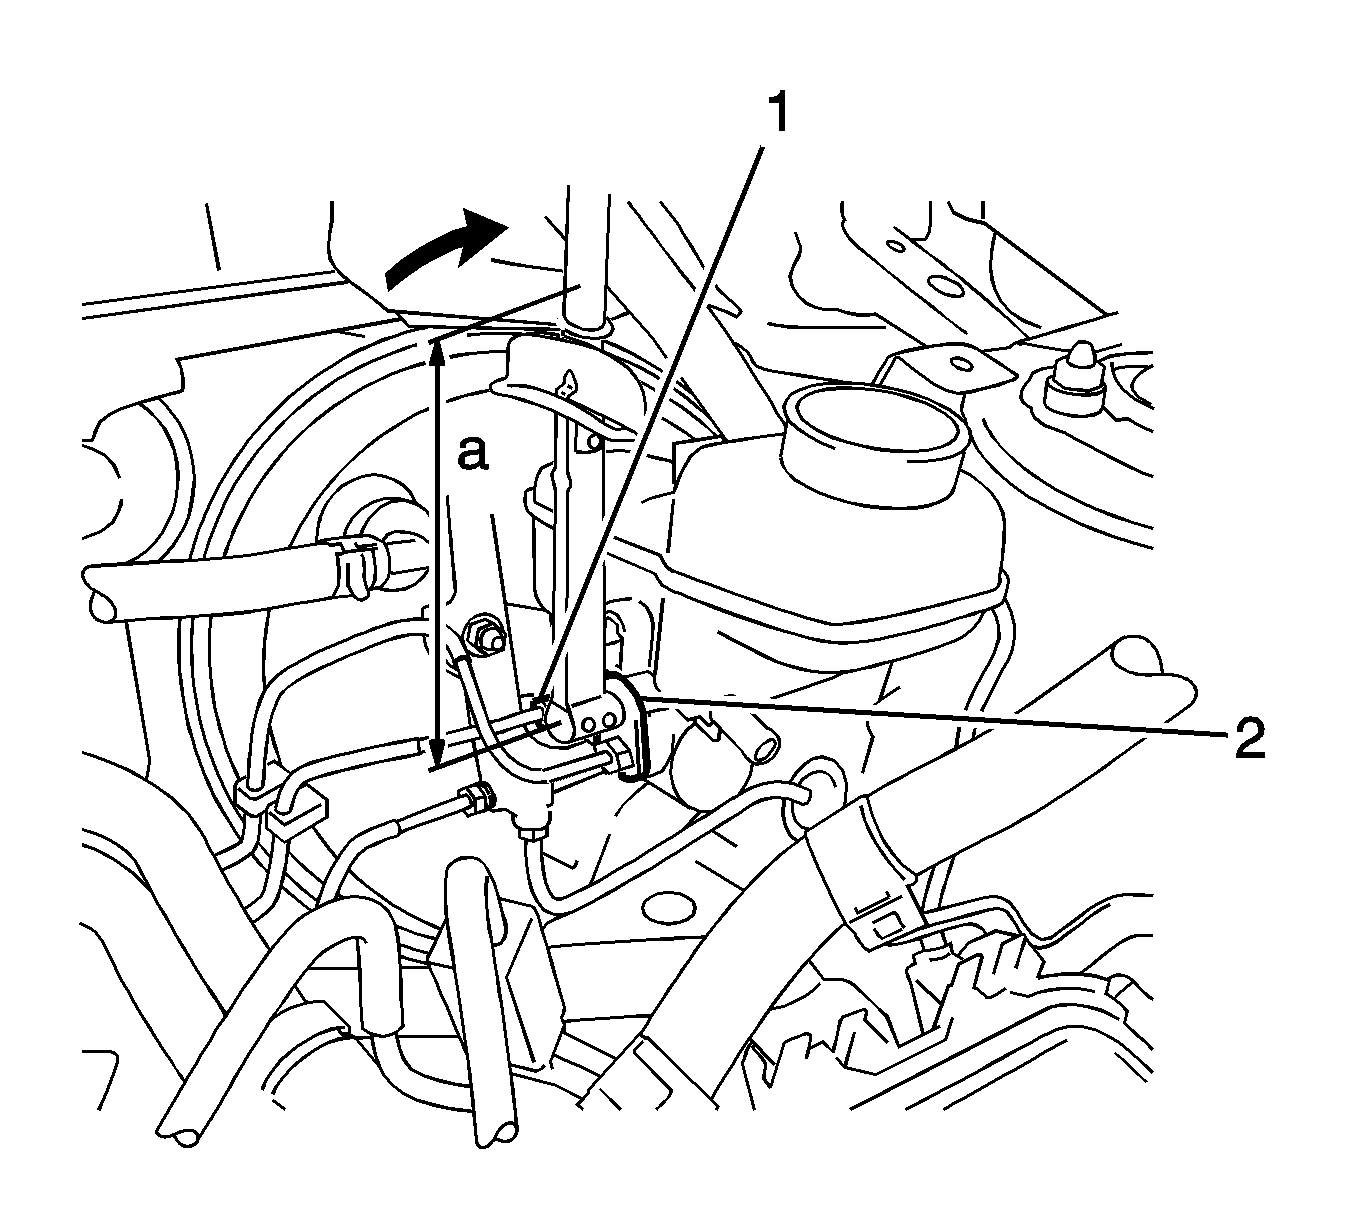
| 7.4. | Using a torque wrench with a fulcrum length (a) of 250 mm (9.84 in) and a union nut wrench, reconnect the front brake pipe to the master cylinder port and tighten to
14 N·m (124 lb in). |
| 7.5. | Have an assistant slowly press the brake pedal fully and maintain steady pressure on the pedal. |
| 7.6. | Loosen the front brake pipe in order to purge air from the open front port of the master cylinder. |
| 7.7. | Using a torque wrench with a fulcrum length (a) of 250 mm (9.84 in) and a union nut wrench, tighten the front brake pipe on the master cylinder to
14 N·m (124 lb in). |
| 7.8. | Have the assistant slowly release the brake pedal. |
| 7.10. | Ensure the brake fluid level is between the MAX line and the MIN line during this bleeding procedure. |
| 7.11. | Repeat this procedure until all air is purged from the front port of the master cylinder. |
| 7.12. | Using a torque wrench with a fulcrum length (a) of 250 mm (9.84 in) and a union nut wrench, tighten the front brake pipe on the master cylinder to
14 N·m (124 lb in). |
| 7.13. | With the front brake pipe installed securely to the master cylinder, remove the rear brake pipe from the master cylinder. |
| 7.14. | Allow a small amount of brake fluid to gravity bleed from the open port of the master cylinder. |
| 7.15. | Using a torque wrench with a fulcrum length (a) of 250 mm (9.84 in) and a union nut wrench, tighten the rear brake pipe on the master cylinder to
14 N·m (124 lb in). |
| 7.16. | Have an assistant slowly press the brake pedal fully and maintain steady pressure on the pedal. |
| 7.17. | Loosen the rear brake pipe in order to purge air from the open rear port of the master cylinder. |
| 7.18. | Using a torque wrench with a fulcrum length (a) of 250 mm (9.84 in) and a union nut wrench, tighten the rear brake pipe on the master cylinder to
14 N·m (124 lb in). |
| 7.19. | Have the assistant slowly release the brake pedal. |
| 7.21. | Ensure the brake fluid level is between the MAX line and the MIN line during this bleeding procedure. |
| 7.22. | Repeat this procedure until all air is purged from the rear port of the master cylinder. |
| 7.23. | Using a torque wrench with a fulcrum length (a) of 250 mm (9.84 in) and a union nut wrench, tighten the rear brake pipe on the master cylinder to
14 N·m (124 lb in). |
- Perform the following steps in order to bleed the RIGHT REAR wheel hydraulic brake circuit:

| 8.1. | Remove the valve cap from the wheel hydraulic circuit bleeder valve (2). |
| 8.2. | Use a proper wrench on the bleeder valve. |
| 8.3. | Install a transparent hose (1) over the end of the bleeder valve. |
| 8.4. | Submerge the open end of the transparent hose into a transparent container (5) partially filled with Delco Supreme 11®, GM P/N 12377967 (Canadian P/N 992667), or equivalent DOT-3 brake fluid from
a clean, sealed brake fluid container. |
| 8.5. | Have an assistant slowly press the brake pedal fully and maintain steady pressure on the pedal. |
| 8.6. | Loosen the bleeder valve in order to purge air (6) from the wheel hydraulic circuit. |
| 8.7. | If the vehicle has an independent rear suspension, tighten the rear bleeder valve to
8.3 N·m (73 lb in). |
If the vehicle has a twist beam rear suspension, tighten the rear bleeder
valve to
10 N·m (89 lb in).
| 8.8. | Have the assistant slowly release the brake pedal. |
| 8.10. | Ensure the brake fluid level is between the MAX line and the MIN line during this bleeding procedure. |
| 8.11. | Repeat this procedure until all air is purged from the wheel hydraulic circuit. |
| 8.12. | If the vehicle has an independent rear suspension, tighten the rear bleeder valve to
8.3 N·m (73 lb in). |
If the vehicle has a twist beam rear suspension, tighten the rear bleeder
valve to
10 N·m (89 lb in).
- Perform the following steps in order to bleed the LEFT REAR wheel hydraulic brake circuit:
| 9.1. | Remove the valve cap from the bleeder valve. |
| 9.2. | Use a proper wrench on the bleeder valve. |
| 9.3. | Install a transparent hose over the end of the bleeder valve. |
| 9.4. | Submerge the open end of the transparent hose into a transparent container partially filled with Delco Supreme 11®, GM P/N 12377967 (Canadian P/N 992667), or equivalent DOT-3 brake fluid from a clean,
sealed brake fluid container. |
| 9.5. | Have an assistant slowly press the brake pedal fully and maintain steady pressure on the pedal. |
| 9.6. | Loosen the bleeder valve in order to purge air from the wheel hydraulic circuit. |
| 9.7. | If the vehicle has an independent rear suspension, tighten the rear bleeder valve to
8.3 N·m (73 lb in). |
If the vehicle has a twist beam rear suspension, tighten the rear bleeder
valve to
10 N·m (89 lb in).
| 9.8. | Have the assistant slowly release the brake pedal. |
| 9.10. | Ensure the brake fluid level is between the MAX line and the MIN line during this bleeding procedure. |
| 9.11. | Repeat this procedure until all air is purged from the wheel hydraulic circuit. |
| 9.12. | If the vehicle has an independent rear suspension, tighten the rear bleeder valve to
8.3 N·m (73 lb in). |
If the vehicle has a twist beam rear suspension, tighten the rear bleeder
valve to
10 N·m (89 lb in).
- Perform the following steps in order to bleed the RIGHT FRONT wheel hydraulic brake circuit:
| 10.1. | Remove the valve cap from the bleeder valve. |
| 10.2. | Use a proper wrench on the bleeder valve. |
| 10.3. | Install a transparent hose over the end of the bleeder valve. |
| 10.4. | Submerge the open end of the transparent hose into a transparent container partially filled with Delco Supreme 11®, GM P/N 12377967 (Canadian P/N 992667), or equivalent DOT-3 brake fluid from a clean,
sealed brake fluid container. |
| 10.5. | Have an assistant slowly press the brake pedal fully and maintain steady pressure on the pedal. |
| 10.6. | Loosen the bleeder valve in order to purge air from the wheel hydraulic circuit. |
| 10.7. | Tighten the front bleeder valve to
8.3 N·m (73 lb in). |
| 10.8. | Have the assistant slowly release the brake pedal. |
| 10.10. | Ensure the brake fluid level is between the MAX line and the MIN line during this bleeding procedure. |
| 10.11. | Repeat this procedure until all air is purged from the wheel hydraulic circuit. |
| 10.12. | Tighten the front bleeder valve to
8.3 N·m (73 lb in). |
- Perform the following steps in order to bleed the LEFT FRONT wheel hydraulic brake circuit:
| 11.1. | Remove the valve cap from the bleeder valve. |
| 11.2. | Use a proper wrench on the bleeder valve. |
| 11.3. | Install a transparent hose over the end of the bleeder valve. |
| 11.4. | Submerge the open end of the transparent hose into a transparent container partially filled with Delco Supreme 11®, GM P/N 12377967 (Canadian P/N 992667), or equivalent DOT-3 brake fluid from a clean,
sealed brake fluid container. |
| 11.5. | Have an assistant slowly press the brake pedal fully and maintain steady pressure on the pedal. |
| 11.6. | Loosen the bleeder valve in order to purge air from the wheel hydraulic circuit. |
| 11.7. | Tighten the front bleeder valve to
8.3 N·m (73 lb in). |
| 11.8. | Have the assistant slowly release the brake pedal. |
| 11.10. | Ensure the brake fluid level is between the MAX line and the MIN line during this bleeding procedure. |
| 11.11. | Repeat this procedure until all air is purged from the wheel hydraulic circuit. |
| 11.12. | Tighten the front bleeder valve to
8.3 N·m (73 lb in). |
- Ensure the brake fluid level is between the MAX line and the MIN line.
- Slowly press and release the brake pedal. Observe the feel of the brake pedal.
Warning: Do not move the vehicle until a firm brake pedal is obtained. Failure to obtain a firm pedal before moving vehicle may result in personal injury.
- If the brake pedal feels spongy, repeat the bleeding procedure again. If the brake pedal still feels spongy after repeating the bleeding procedure, inspect the brake system for external leaks. Refer to
Brake System External Leak Inspection.
- Turn the ignition key ON, with the engine OFF. Verify if the brake system warning lamp remains illuminated.
Note: DO NOT allow the vehicle to be driven until the symptom is diagnosed and repaired.
- If the brake system warning lamp remains illuminated, refer to
Symptoms - Hydraulic Brakes.
