The coolant in the vehicle should last for five years or 150,000 miles (240 000 km), whichever occurs first. When coolant is added or changed, use DEX-COOL® coolant.
The following explains the cooling system and how to add coolant when it is low. If there is a problem with engine overheating, see Engine Overheating.
What to Use
Use a 50/50 mixture of clean, drinkable water and DEX-COOL® coolant, which will not damage aluminum parts. If this coolant mixture is used, nothing else needs to be added.
Caution: Adding only plain water to the cooling system can be dangerous. Plain water, or some other liquid such as alcohol, can boil before the proper coolant mixture will. The vehicle's coolant warning system is set for the proper coolant mixture. With plain water or the wrong mixture, the engine could get too hot but would not get the overheat warning. The engine could catch fire and you or others could be burned. Use a 50/50 mixture of clean, drinkable water and DEX-COOL® coolant.
Notice: If an improper coolant mixture is used, the engine could overheat and be badly damaged. The repair cost would not be covered by the vehicle warranty. Too much water in the mixture can freeze and crack the engine, radiator, heater core, and other parts.
Notice: If you use extra inhibitors and/or additives in your vehicle's cooling system, you could damage your vehicle. Use only the proper mixture of the engine coolant listed in this manual for the cooling system. See Part D: Recommended Fluids and Lubricants for more information.
| • | Gives freezing protection down to -34°F (- 38°C). |
| • | Gives boiling protection up to 265°F (129°C). |
| • | Protects against rust and corrosion. |
| • | Helps keep the proper engine temperature. |
| • | Lets the warning lights and gages work as they should. |
Notice: Using coolant other than DEX-COOL can cause premature engine, heater core or radiator corrosion. In addition, the engine coolant may require changing sooner, at 30,000 miles (50 000 km) or 24 months, whichever occurs first. Any repairs would not be covered by the vehicle warranty. Always use DEX-COOL (silicate-free) coolant in your vehicle.
Checking Coolant
The vehicle must be on a level surface. When the engine is cold, the coolant level should be at LOW, or a little higher. When the engine is warm, the level should be up to FULL, or a little higher. If it is not, there could be a leak at the pressure cap or in the radiator hoses, heater hoses, radiator, water pump, or somewhere else in the cooling system.
See Engine Compartment Overview for the location of the coolant recovery tank.
How to Add Coolant to the Coolant Recovery Tank
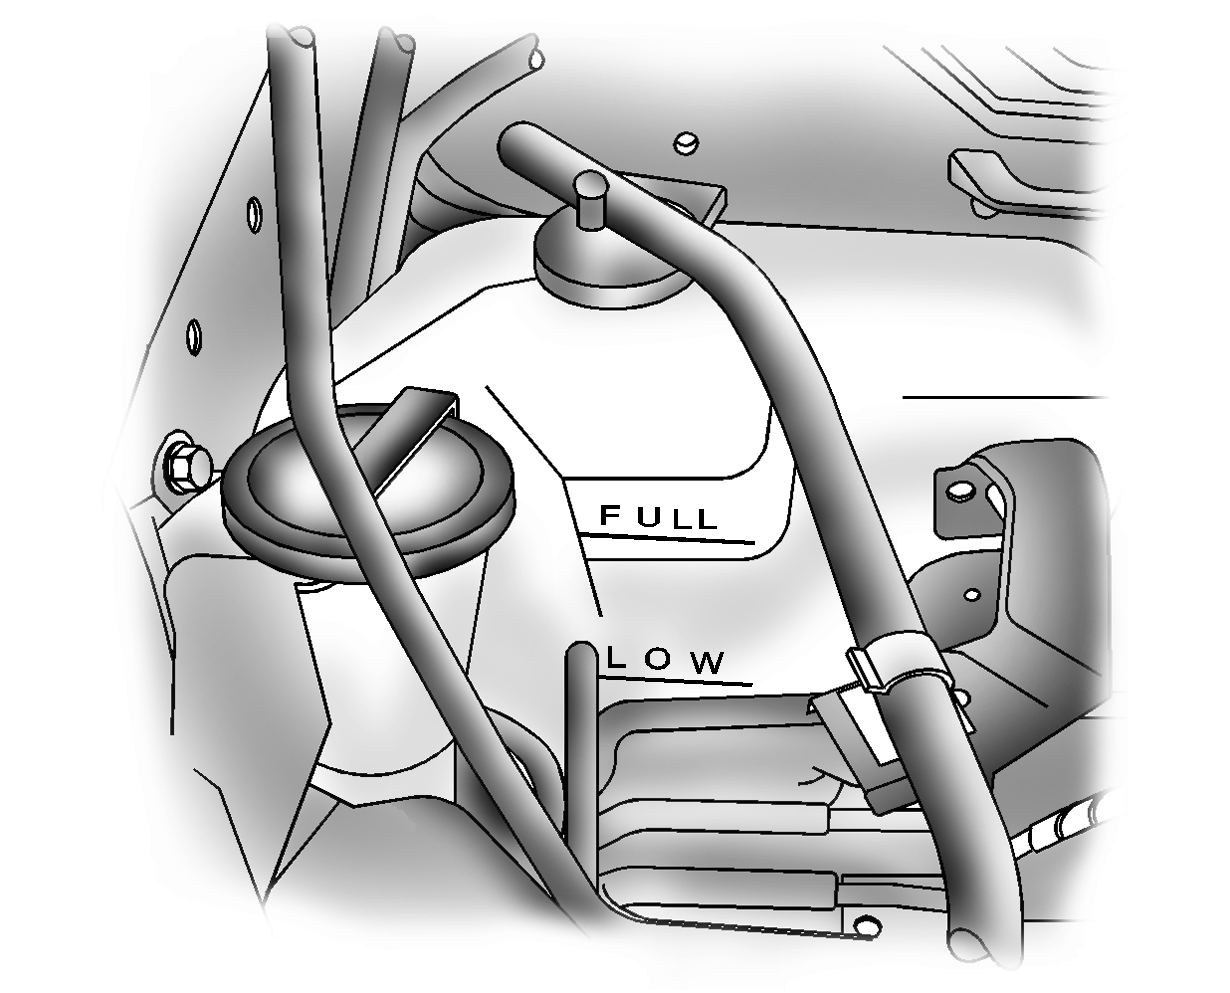
If you need more coolant, add the proper DEX-COOL® coolant mixture at the coolant recovery tank, but be careful not to spill it.
Occasionally check the coolant level in the radiator. For information on how to add coolant to the radiator, see Cooling System.
Caution: You can be burned if you spill coolant on hot engine parts. Coolant contains ethylene glycol, and it will burn if the engine parts are hot enough. Do not spill coolant on a hot engine.
Caution: Adding only plain water to your cooling system can be dangerous. Plain water, or some other liquid such as alcohol, can boil before the proper coolant mixture will. Your vehicle's coolant warning system is set for the proper coolant mixture. With plain water or the wrong mixture, your engine could get too hot but you would not get the overheat warning. Your engine could catch fire and you or others could be burned. Use a 50/50 mixture of clean, drinkable water and a proper coolant.
Notice: In cold weather, water can freeze and crack the engine, radiator, heater core and other parts. Use the recommended coolant and the proper coolant mixture.
How to Add Coolant to the Radiator
When the coolant in the coolant recovery tank is at the FULL mark, start the vehicle.
If the overheat warning continues, there is one more thing that can be done. Add the proper coolant mixture directly to the radiator but be sure the cooling system is cool before you do it.
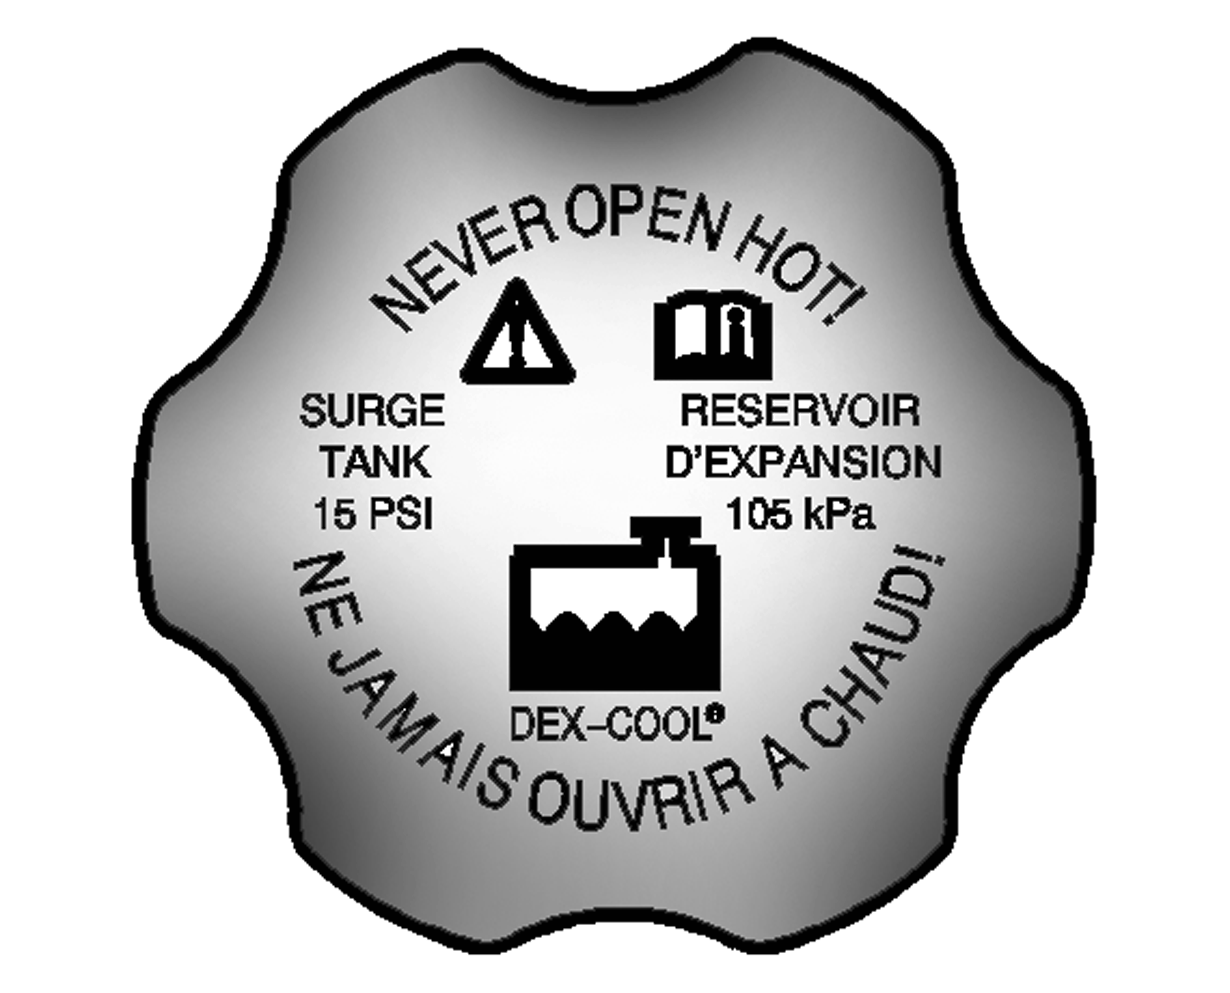
Caution: Steam and scalding liquids from a hot cooling system can blow out and burn you badly. They are under pressure, and if you turn the surge tank pressure cap -- even a little -- they can come out at high speed. Never turn the cap when the cooling system, including the surge tank pressure cap, is hot. Wait for the cooling system and surge tank pressure cap to cool if you ever have to turn the pressure cap.
Caution: Turning the radiator pressure cap when the engine and radiator are hot can allow steam and scalding liquids to blow out and burn you badly. With the coolant recovery tank, you will almost never have to add coolant at the radiator. Never turn the radiator pressure cap -- even a little -- when the engine and radiator are hot.
- Remove the pressure cap when the cooling system, including the pressure cap and upper radiator hose, is no longer hot. Turn the pressure cap slowly counterclockwise until it first stops. Do not press down while turning the pressure cap.
- If you hear a hiss, wait for that to stop. A hiss means there is still some pressure left.
- Keep turning the pressure cap, but now push down while turning. Remove the pressure cap.
- Fill the radiator with the proper coolant mixture, up to the base of the filler neck. For more information about the proper coolant mixture look earlier in this section.
- Then fill the coolant recovery tank to the FULL mark.
- Put the cap back on the coolant recovery tank, but leave the pressure cap off.
- Start the engine and let it run until you can feel the upper radiator hose getting hot. Watch out for the engine cooling fan.
- By this time, the coolant level inside the radiator filler neck may be lower. If the level is lower, add more of the proper coolant mixture through the filler neck until the level reaches the base of the filler neck.
- Then replace the pressure cap. At any time during this procedure if coolant begins to flow out of the filler neck, reinstall the pressure cap. Be sure the ears on the pressure cap are in line with the vent tube.