Product Safety - Front Door Glass Shatter - Replace Bolts

| Subject: | 07273A -- Front Door Glass Shatter - Replace Bolts |
| Models: | 2003-2004 Pontiac Vibe |
| Equipped with Power Windows |
The Parts Information section has been revised to include the Canadian window sealer P/N. Please discard bulletin 07273, issued May 2008.
Condition
General Motors has decided that a defect, which relates to motor vehicle safety, exists in all 2003-2004 model year Pontiac Vibe vehicles equipped with power windows. On some of these vehicles, bolts in the front door that attach the window to the window regulator may begin to loosen, resulting in a popping or clicking sound when the window is operated. If either bolt continues to loosen and separates from the window regulator, the glass may shatter during window operation, which could cause possible injury.
Correction
Dealers are to replace the window regulator bolts in both front doors.
Vehicles Involved
Involved are all 2003-2004 model year Pontiac Vibe vehicles equipped with power windows and built within these VIN breakpoints:
Year | Division | Model | From | Through |
|---|---|---|---|---|
2003 | Pontiac | Vibe | 3Z400002 | 3Z484274 |
2004 | Pontiac | Vibe | 4Z400001 | 4Z472044 |
Important: Dealers are to confirm vehicle eligibility prior to beginning repairs by using the GM Vehicle Information System (GMVIS). Not all vehicles within the above breakpoints may be involved.
For dealers with involved vehicles, a listing with involved vehicles containing the complete vehicle identification number, customer name, and address information has been prepared and will be provided through the applicable system listed below. Dealers will not have a report available if they have no involved vehicles currently assigned.
-- US dealers - GM DealerWorld Recall Information
-- Canadian dealers - GMinfoNet Recall Reports
The listing may contain customer names and addresses obtained from Motor Vehicle Registration Records. The use of such motor vehicle registration data for any purpose other than follow-up necessary to complete this recall is a violation of law in several states/provinces/countries. Accordingly, you are urged to limit the use of this report to the follow-up necessary to complete this recall.
Parts Information
Parts required to complete this recall are to be obtained from General Motors Service and Parts Operations (GMSPO). Please refer to your "involved vehicles listing" before ordering parts. Normal orders should be placed on a DRO = Daily Replenishment Order. In an emergency situation, parts should be ordered on a CSO = Customer Special Order.
Part Number | Description | Qty/ Vehicle |
|---|---|---|
94859512 | Bolt, Frt S/D Wdo | 4 |
Obtain Locally | 3M Windo-Weld (Window-Weld) Round Ribbon Sealer, ¼ in x 15 ft (6.4 mm x 4.6 m), 3M Part Number 08610 (US); 08620 (CN) | 2 m (79 in) (If Req'd) |
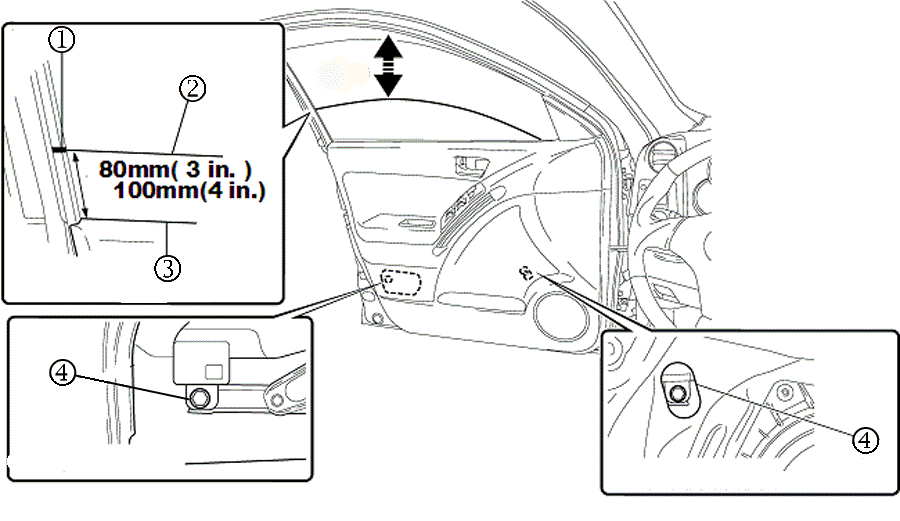
Service Procedure
Front Door Glass Bolt Replacement
Customer Reimbursement - For GM US
All customer requests for reimbursement of previously paid repairs for the recall condition will be handled by the Customer Assistance Center, not by dealers.
A General Motors Customer Reimbursement Procedure and Claim Form is included with the customer letter.
Important: (For GM US Only) Refer to the GM Service Policies and Procedures Manual, section 6.1.12, for specific procedures regarding customer reimbursement and the form.
Customer Reimbursement - For Canada and Export
Customer requests for reimbursement of previously paid repairs for the recall condition are to be submitted to the dealer by May 31, 2009.
All reasonable customer paid receipts should be considered for reimbursement. The amount to be reimbursed will be limited to the amount the repair would have cost if completed by an authorized General Motors dealer.
When a customer requests reimbursement, they must provide the following:
| • | Proof of ownership at time of repair. |
| • | Original paid receipt confirming the amount of repair expense(s) that were not reimbursed, a description of the repair, and the person or entity performing the repair. |
Claims for customer reimbursement on previously paid repairs are to be submitted as required by WINS.
Important: Refer to the GM Service Policies and Procedures Manual, section 6.1.12, for specific procedures regarding customer reimbursement verification.
Claim Information
Submit a Product Recall Claim with the information indicated below:
Repair Performed | Part Count | Part No. | Parts Allow | CC-FC | Labor Op | Labor Hours | Net Item |
|---|---|---|---|---|---|---|---|
Replace Window Regulator Bolts | 4 | -- | * | MA-96 | V1811 | 0.9 | N/A |
Add: Install New Butyl Tape | 0.1 | ||||||
Customer Reimbursement (Canadian & Export Dealers/US CAC) | N/A | N/A | N/A | MA-96 | V1812 | 0.2 | *** |
* The "Parts Allowance" should be the sum total of the current GMSPO Dealer net price plus applicable Mark-Up or Landed Cost Mark-Up (for Export) for bolts needed to complete the repair. ** The amount identified in the "Net Item" column should represent the actual total of the butyl tape needed to perform the required repairs, not to exceed $4.74 USD, $4.83 CAD. *** The amount identified in the "Net Item" column should represent the dollar amount reimbursed to the customer. | |||||||
Refer to the General Motors WINS Claims Processing Manual for details on Product Recall Claim Submission.
Customer Notification - For US and Canada
General Motors will notify customers of this recall on their vehicle (see copy of customer letter included with this bulletin).
Customer Notification - For Export
Letters will be sent to known owners of record located within areas covered by the US National Traffic and Motor Vehicle Safety Act. For owners outside these areas, dealers should notify customers using the attached sample letter.
Dealer Recall Responsibility - For US (US States, Territories, and Possessions)
The US National Traffic and Motor Vehicle Safety Act provides that each vehicle that is subject to a recall of this type must be adequately repaired within a reasonable time after the customer has tendered it for repair. A failure to repair within sixty days after tender of a vehicle is prima facie evidence of failure to repair within a reasonable time. If the condition is not adequately repaired within a reasonable time, the customer may be entitled to an identical or reasonably equivalent vehicle at no charge or to a refund of the purchase price less a reasonable allowance for depreciation. To avoid having to provide these burdensome remedies, every effort must be made to promptly schedule an appointment with each customer and to repair their vehicle as soon as possible. In the recall notification letters, customers are told how to contact the US National Highway Traffic Safety Administration if the recall is not completed within a reasonable time.
Dealer Recall Responsibility - All
All unsold new vehicles in dealers' possession and subject to this recall must be held and inspected/repaired per the service procedure of this recall bulletin before customers take possession of these vehicles.
Dealers are to service all vehicles subject to this recall at no charge to customers, regardless of mileage, age of vehicle, or ownership, from this time forward.
Customers who have recently purchased vehicles sold from your vehicle inventory, and for which there is no customer information indicated on the dealer listing, are to be contacted by the dealer. Arrangements are to be made to make the required correction according to the instructions contained in this bulletin. A copy of the customer letter is provided in this bulletin for your use in contacting customers. Recall follow-up cards should not be used for this purpose, since the customer may not as yet have received the notification letter.
In summary, whenever a vehicle subject to this recall enters your vehicle inventory, or is in your dealership for service in the future, you must take the steps necessary to be sure the recall correction has been made before selling or releasing the vehicle.
May 2008Dear General Motors Customer:
This notice is sent to you in accordance with the requirements of the National Traffic and Motor Vehicle Safety Act.
General Motors has decided that a defect that relates to motor vehicle safety exists in all 2003 and 2004 model year Pontiac Vibe vehicles equipped with power windows. As a result, GM is conducting a safety recall. We apologize for this inconvenience. However, we are concerned about your safety and continued satisfaction with our products.
Important:
• Your vehicle is involved in safety recall 07273. • Schedule an appointment with your GM dealer. • This service will be performed for you at no charge.
Why is your vehicle being recalled? The bolts in the front door that attach the window to the window regulator may begin to loosen, resulting in a popping or clicking sound when the window is operated. If either bolt continues to loosen and separates from the window regulator, the glass may shatter during window operation, which could cause possible injury.
What will we do? Your GM dealer will replace the window regulator bolts in both front doors. This service will be performed for you at no charge . Because of service scheduling requirements, it is likely that your dealer will need your vehicle longer than the actual service correction time of approximately 1 hour.
What should you do? You should contact your GM dealer to arrange a service appointment as soon as possible. If you have had repairs for this condition in the past, you will still need to have the new bolts installed on your vehicle. Bring the enclosed customer reply form with you when you visit your dealer. The form identifies the repairs required. If you no longer own this vehicle, please let us know by completing the form and mailing it back to us.
Did you already pay for this repair? The enclosed form explains what reimbursement is available and how to request reimbursement if you have paid for repairs for the recall condition.
Do you have questions? If you have questions or concerns that your dealer is unable to resolve, please contact the appropriate Customer Assistance Center at the number listed below. More information about this recall can be found at the Owner Center at MyGMLink, http://www.gm.com/recall
Division | Number | Text Telephones (TTY) |
|---|---|---|
Pontiac | 1-800-620-7668 | 1-800-833-7668 |
Guam | 1-671-648-8450 |
|
Puerto Rico - English | 1-800-496-9992 |
|
Puerto Rico - Español | 1-800-496-9993 |
|
Virgin Islands | 1-800-496-9994 |
|
If after contacting your dealer and the Customer Assistance Center, you are still not satisfied we have done our best to remedy this condition without charge and within a reasonable time, you may wish to write the Administrator, National Highway Traffic Safety Administration, 1200 New Jersey Avenue, SE, Washington DC 20590, or call the toll-free Vehicle Safety Hotline at 1.888.327.4236 (TTY 1.800.424.9153), or go to http://www.safercar.gov.
Federal regulation requires that any vehicle lessor receiving this recall notice must forward a copy of this notice to the lessee within ten days.
Scott Lawson
General Director,
Customer and Relationship Services
Enclosure
07273
