Transmission Slips in 4th Gear, Stuck in 2nd Gear or SES/TCS Light On, DTCs P0753, P0758, P1860, C1223, C1224, C1275 Set (Repair Conduit Splice/Reposition Conduit or Inspect/Reinstall Solenoid)

| Subject: | Transmission Slips in 4th Gear, Stuck in 2nd Gear or SES/TCS Light Illuminated, DTCs P0753, P0758, P1860, C1223, C1224 or C1275 May be Set (Repair Conduit Splice/Reposition Conduit or Inspect/Reinstall Evap Emission Vent Solenoid or Replace, if Necessary) |
| Models: | 2002-2004 Chevrolet Cavalier |
| 2002-2004 Pontiac Sunfire |
| with 2.2L Engine (VIN F -- RPL L61) |
Condition
Some customers may comment on an SES/TCS tell-tale light illuminated, the transmission slipping in 4th gear, or the transmission stuck in second gear. DTCs P0753, P0758, P1860, C1223, C1224 or C1275 may be set.
Cause
There are 2 separate causes that may create the above conditions. Both should be examined when a vehicle is brought in for the above concern.
| • | Cause #1 is possible water intrusion at the transmission to front end vehicle harness. This harness located near the transmission breakout is protected by plastic split tube type conduit and electrical tape. In some cases, the split may be facing upward which will increase the tendency of the conduit to hold water. Eventually, the #107 splice to the transmission may become corroded and become non-conductive. |
| • | Cause #2 can be quickly identified by a visual inspection under the vehicle at the passenger side of the rear axle. The Evaporative Emissions Canister Vent Solenoid retainer may have come loose allowing the associated wire harness to contact the rear axle. Abrasion of the wire against the rear axle may rub through the insulation creating a short. |
Correction
Use one of the two following procedures to correct the above condition.
Correction #1
- Raise the vehicle.
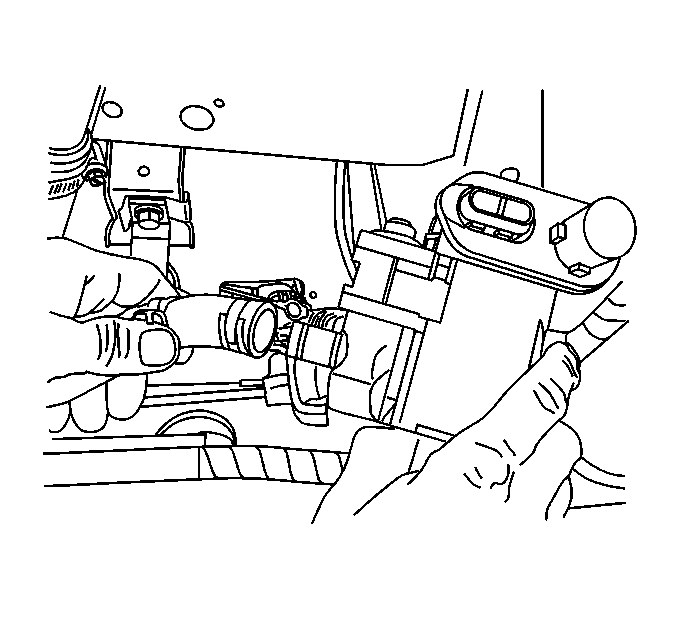
- Locate the conduit for the transmission breakout directly above the transmission oil cooler lines.
- Remove the electrical tape wrap from the plastic conduit and peel the conduit open.
- With the conduit open, examine the splices inside for signs of corrosion. Splice #107 (part of circuit 439, PINK) is located approximately 33 cm (13 in) forward of the transmission breakout point.
- Examine the splice for signs of corrosion. If corrosion is found, repair the splice. Use only a GM Crimp and Seal Splice.
- Strip back the wire until clean non-corroded wire is available.
- To resplice the wires, use GM crimp and seal splice, P/N 12089189, only. These connectors are equipped with crimpable joints and heat shrink tubes.
- Insert the bare wires fully into the body of the connector.
- Using the J 389125 electrical crimping tool, fully crimp the body of the connector.
- Using the J 38125-5 Ultratorch, or equivalent, progressively heat the center of the connector and work left until the sealer begins to ooze out. Starting at the center again, work right until sealer oozes out that end.
- Re-orient the conduit, positioning the split toward the bottom. By repositioning the conduit, you will create a drainage path for the water and eliminate the possibility of the splice corroding again. Retape the conduit.
- Lower the vehicle.
- Using the Tech 2® Diagnostic Scan Tool, clear all DTCs.
Correction #2
- The Evaporative Emissions Vent Solenoid is retained by a molded in, plastic extension. The retainer has molded in ridges that create an interference fit to the underbody. Under some instances, the retainer may have not been fully seated when installed.
- Remove the jumper harness from the Evaporative Emissions Vent Solenoid.
- Inspect the retainer for damage. Additionally, examine the solenoid body for any signs of damage. If the retainer and solenoid body appear in good condition, reinstall to the underbody cut out. Verify that the fastener holds properly by pulling on the solenoid body to check that it is retained. If the fastener will not retain properly or there are signs of damage, replace the Evap Vent Solenoid.
- Discard and replace the jumper harness with P/N 12101858.
- Lower the vehicle.
- Using the Tech 2® Diagnostic Scan Tool, clear all DTCs.
Important:
• The fastener style used to retain the Evap Vent Solenoid does not provide
feedback to the technician in the form of a "click" or detente when properly
installed. You should seat the fastener as deeply as possible without using excessive
or damaging force. • The vent solenoid will not be retained rigidly even when properly installed.
Parts Information
Part Number | Description |
|---|---|
12101858 | Connector, Body Harness Extension |
12089189 | Connector, GM Crimp n' Seal Butt End Electrical Connector |
22622022 | Valve, Evap Canister Vent |
Parts are currently available at GMSPO.
Warranty Information
For vehicles repaired under warranty, use:
Labor Operation | Description | Labor Time |
|---|---|---|
J6441 | Valve, Evap Emission Cnstr Solenoid -- Replace | 0.3 hr |
N6630 | Wiring And/Or Connector -Transmission -- Repair Or Replace | 0.1-0.5 hr |
