For 1990-2009 cars only
Inspection Procedure
Tools Required
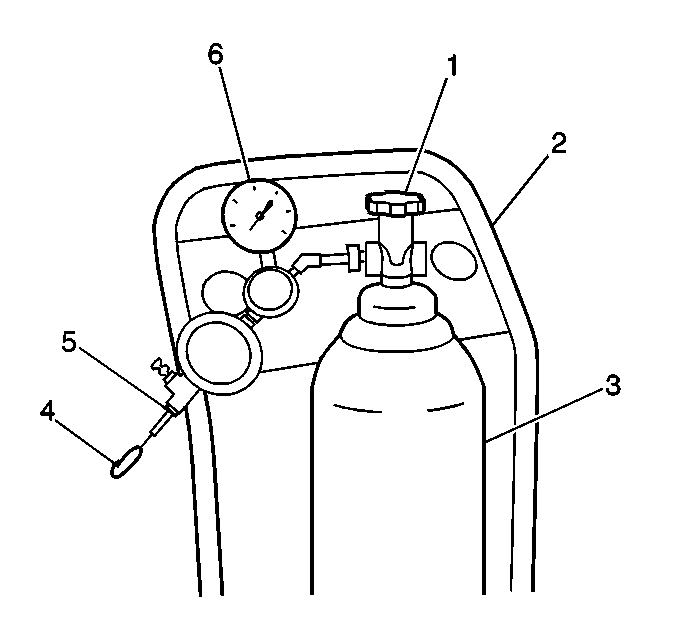
J 41413 EVAP Pressure/Purge Diagnostic Station
Whenever the DTC diagnostics lead to a no trouble found or a purge solenoid valve replacement, proceed with the following charcoal canister diagnostics.
Notice: Use the EVAP Pressure/Purge Diagnostic Station J 41413 in order to provide a clean, dry, low pressure gas source. Do not substitute any other pressurized gas source. Damage may result to the EVAP system.
- Turn OFF the ignition.
- Remove the EVAP canister purge solenoid valve from the vehicle. Refer to Evaporative Emission Canister Purge Solenoid Valve Replacement .
- Lightly tap the EVAP canister purge solenoid valve on a clean work area.
- Look for carbon particles exiting from either of the vacuum ports.
- If no carbon release is evident, reinstall the components. Continue with the published service manual DTC procedures.
- If carbon is being released from either component, continue with this service procedure.
- Remove the charcoal canister from the vehicle. Refer to Evaporative Emission Canister Replacement .
- Turn OFF the main cylinder valve (1) on the EVAP purge/pressure diagnostic station.
- Disconnect the black hose (4) that connects the nitrogen cylinder to the EVAP purge/pressure diagnostic station at the pressure regulator (5).
- Using a section of the vacuum hose, connect one end onto the open fitting of the EVAP purge/pressure diagnostic station pressure regulator (5).
- Connect the other end of the vacuum line side of the EVAP purge solenoid valve line at the vehicle.
- Turn ON the main nitrogen cylinder valve (1).
- Continue to blow any debris from the purge line for 15 seconds.
- Return the EVAP purge/pressure diagnostic station to its original condition by re-installing the black hose (4) that was disconnected in step 9.
- Replace the EVAP purge solenoid valve and the charcoal canister with the new components.
- Connect the EVAP purge/pressure diagnostic station to the vehicle EVAP service port. Turn the four-position switch to purge.
- Start the engine. Allow the engine to reach the operating temperature.
- Open the throttle until the engine speed reaches 2,000 RPM.
- Note the H2O vacuum gauge on the EVAP purge/pressure diagnostic station. The vacuum should read greater than 15 in H2O.
- If the vacuum is less than 15 in H2O, perform a complete throttle body service including a cleaning of the purge ports as outlined in the service manual. Go to step 1.
- If the vacuum is greater than 15 in H2O, continue with the published service manual diagnostics.