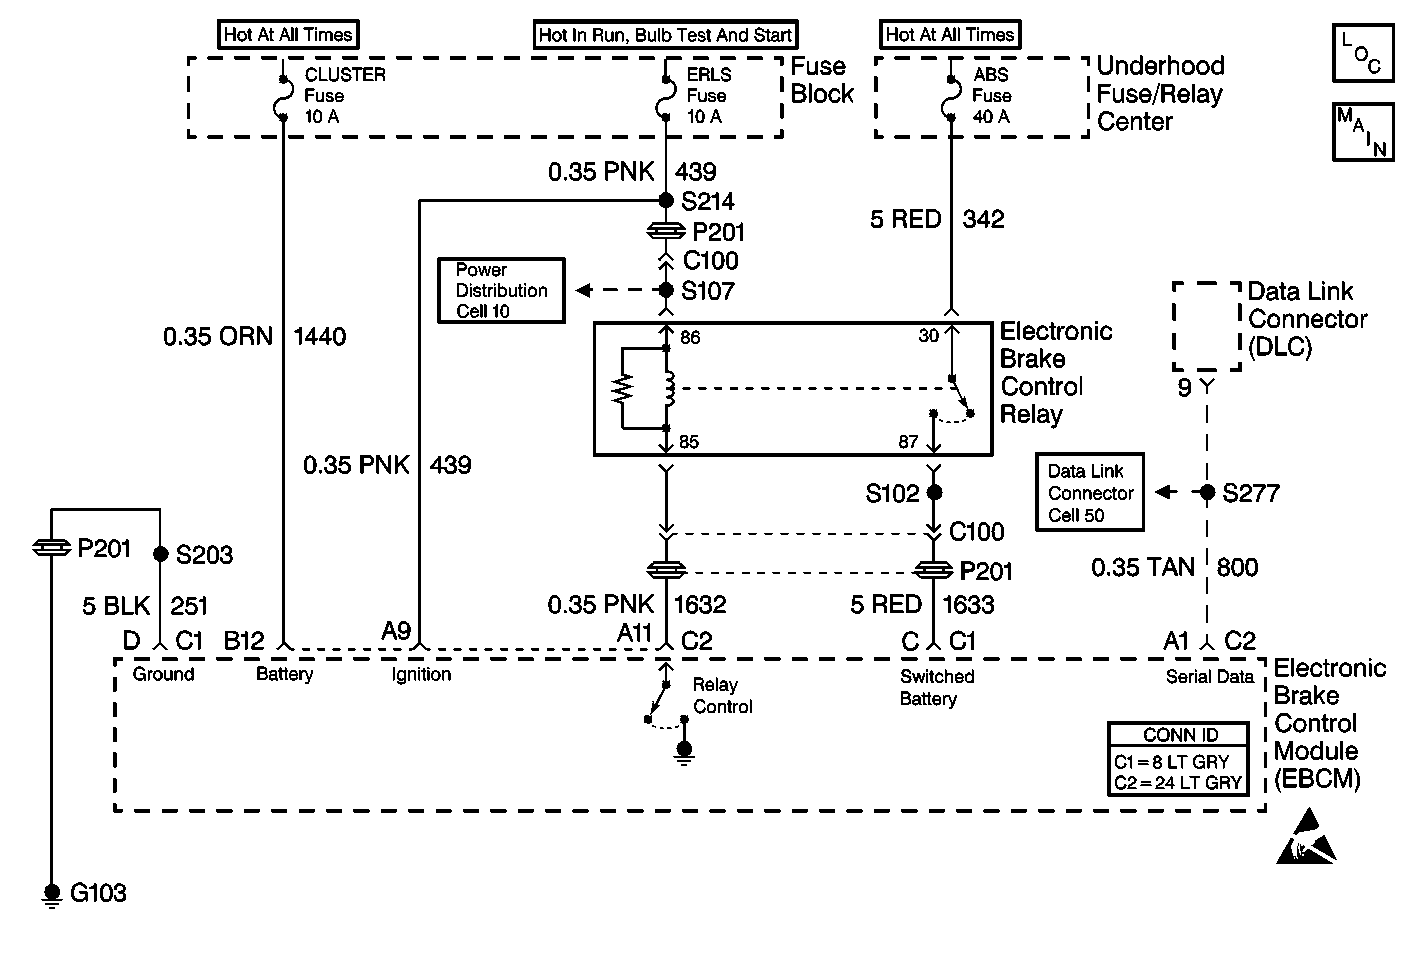
Circuit Description
The EBCM exchanges serial data through the connector C2 terminal A1.
Connector C2 terminal A9 supplies the switched ignition voltage to the EBCM.
Connector C2 terminal B12 supplies the battery voltage to the EBCM.
Connector C1 terminal C supplies the switched battery voltage to the EBCM.
Connector C1 Terminal D provides the ground for the EBCM.
Diagnostic Aids
Communication with the EBCM is not possible when excessive resistance exists in the following components:
| • | The ground |
| • | The power supply circuits |
If communication with the EBCM is not possible, perform the following actions:
| • | Verify that the EBCM ground connection is good. |
| • | Verify that no excessive resistance exists in any of the power supply circuits. |
Test Description
-
This test checks for high resistance in the EBCM ground circuit.
-
This test checks for an open in the EBCM battery feed circuit.
-
This test checks for an open or high resistance in the EBCM switched ignition circuit.
-
This test checks for an open or high resistance in the EBCM serial data circuit.
-
This test checks for a short to ground in the EBCM serial data circuit.
-
This test checks for a short to ground in the EBCM battery feed circuit.
-
This test checks for a short to ground in the EBCM switched ignition circuit.
Step | Action | Value(s) | Yes | No | ||||||
|---|---|---|---|---|---|---|---|---|---|---|
|
Important: Zero the J 39200 test leads before making any resistance measurements. Refer to the J 39200 user's manual. | ||||||||||
1 | Was the Diagnostic System Check performed? | -- | Go to Step 2 | Go to Diagnostic System Check | ||||||
2 | Verify the correct connection of the Scan Tool to the DLC. Is connection of the Scan Tool to the DLC correct? | -- | Go to Step 3 | Go to Step 13 | ||||||
3 |
Is the fuse open? | -- | Go to Step 11 | Go to Step 4 | ||||||
4 |
Is the fuse open? | -- | Go to Step 12 | Go to Step 5 | ||||||
Is the resistance within the specified range? | 0-2 ohms | Go to Step 6 | Go to Step 18 | |||||||
Is the voltage equal to or greater than the specified voltage? | 10 V | Go to Step 7 | Go to Step 19 | |||||||
Do not start the engine. Is the voltage equal to or greater than the specified voltage? | 10 V | Go to Step 8 | Go to Step 20 | |||||||
Is the resistance within the specified range? | 0-2 ohms | Go to Step 9 | Go to Step 21 | |||||||
Use the J 39200 in order to measure the resistance between the EBCM connector terminal A1 and ground. Is the resistance within the specified range? | OL (Infinite) | Go to Step 10 | Go to Step 22 | |||||||
10 | Inspect the EBCM connector for the following conditions:
Are there signs of poor terminal contact, terminal corrosion, or damaged terminals? | -- | Go to Step 23 | Go to Step 24 | ||||||
Is the resistance within the specified range? | OL (Infinite) | Go to Step 14 | Go to Step 15 | |||||||
Is the resistance within the specified range? | OL (Infinite) | Go to Step 16 | Go to Step 17 | |||||||
13 | Disconnect and reconnect the Scan Tool in order to ensure a good connection. Is the Scan Tool correctly connected? | -- | Go to Diagnostic System Check | -- | ||||||
14 | Replace the ABS Fuse. Is the repair complete? | -- | Go to Diagnostic System Check | -- | ||||||
15 | Repair the short to ground in CKT 1633 and replace the ABS Fuse. Refer to Wiring Repairs in Wiring Systems. Is the repair complete? | -- | Go to Diagnostic System Check | -- | ||||||
16 | Replace the ERLS Fuse. Is the repair complete? | -- | Go to Diagnostic System Check | -- | ||||||
17 | Repair the short to ground in CKT 439 and replace the ERLS Fuse. Refer to Wiring Repairs in Wiring Systems. Is the repair complete? | -- | Go to Diagnostic System Check | -- | ||||||
18 | Repair the open or high resistance in CKT 251. Refer to Wiring Repairs in Wiring Systems. Is the repair complete? | -- | Go to Diagnostic System Check | -- | ||||||
19 | Repair the open or high resistance in CKT 1633. Refer to Wiring Repairs in Wiring Systems. Is the repair complete? | -- | Go to Diagnostic System Check | -- | ||||||
20 | Repair the open or high resistance in CKT 439. Refer to Wiring Repairs in Wiring Systems. Is the repair complete? | -- | Go to Diagnostic System Check | -- | ||||||
21 | Repair the open or high resistance in CKT 800. Refer to Wiring Repairs in Wiring Systems. Is the repair complete? | -- | Go to Diagnostic System Check | -- | ||||||
22 | Repair the short to ground in CKT 800. Refer to Wiring Repairs in Wiring Systems. Is the repair complete? | -- | Go to Diagnostic System Check | -- | ||||||
23 | Replace the terminals or the connectors that exhibit the following conditions:
Is the repair complete? | -- | Go to Diagnostic System Check | -- | ||||||
24 | Replace the EBCM. Refer to Electronic Brake Control Module Replacement . Is the repair complete? | -- | Go to Diagnostic System Check | -- | ||||||
