Transmission Replacement With Z0K
Removal Procedure
- Remove the control lever knob and boot assembly. Refer to Control Lever and/or Boot Replacement.
- Remove the catalytic converter. Refer to Catalytic Converter Replacement.
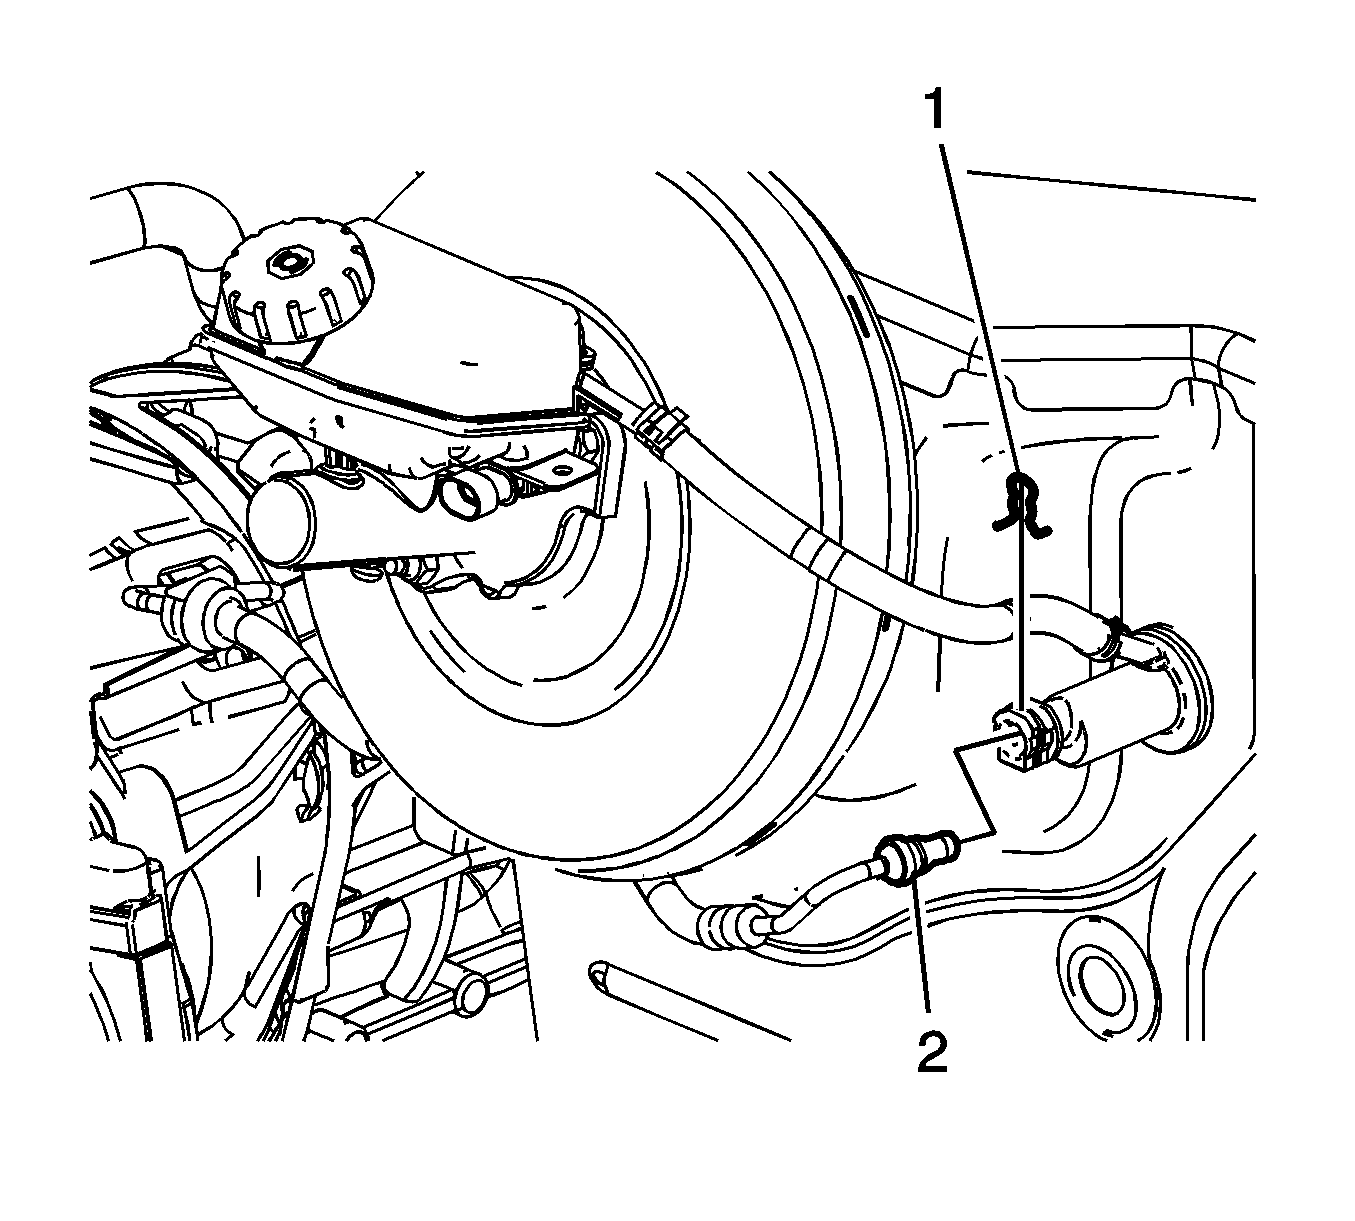
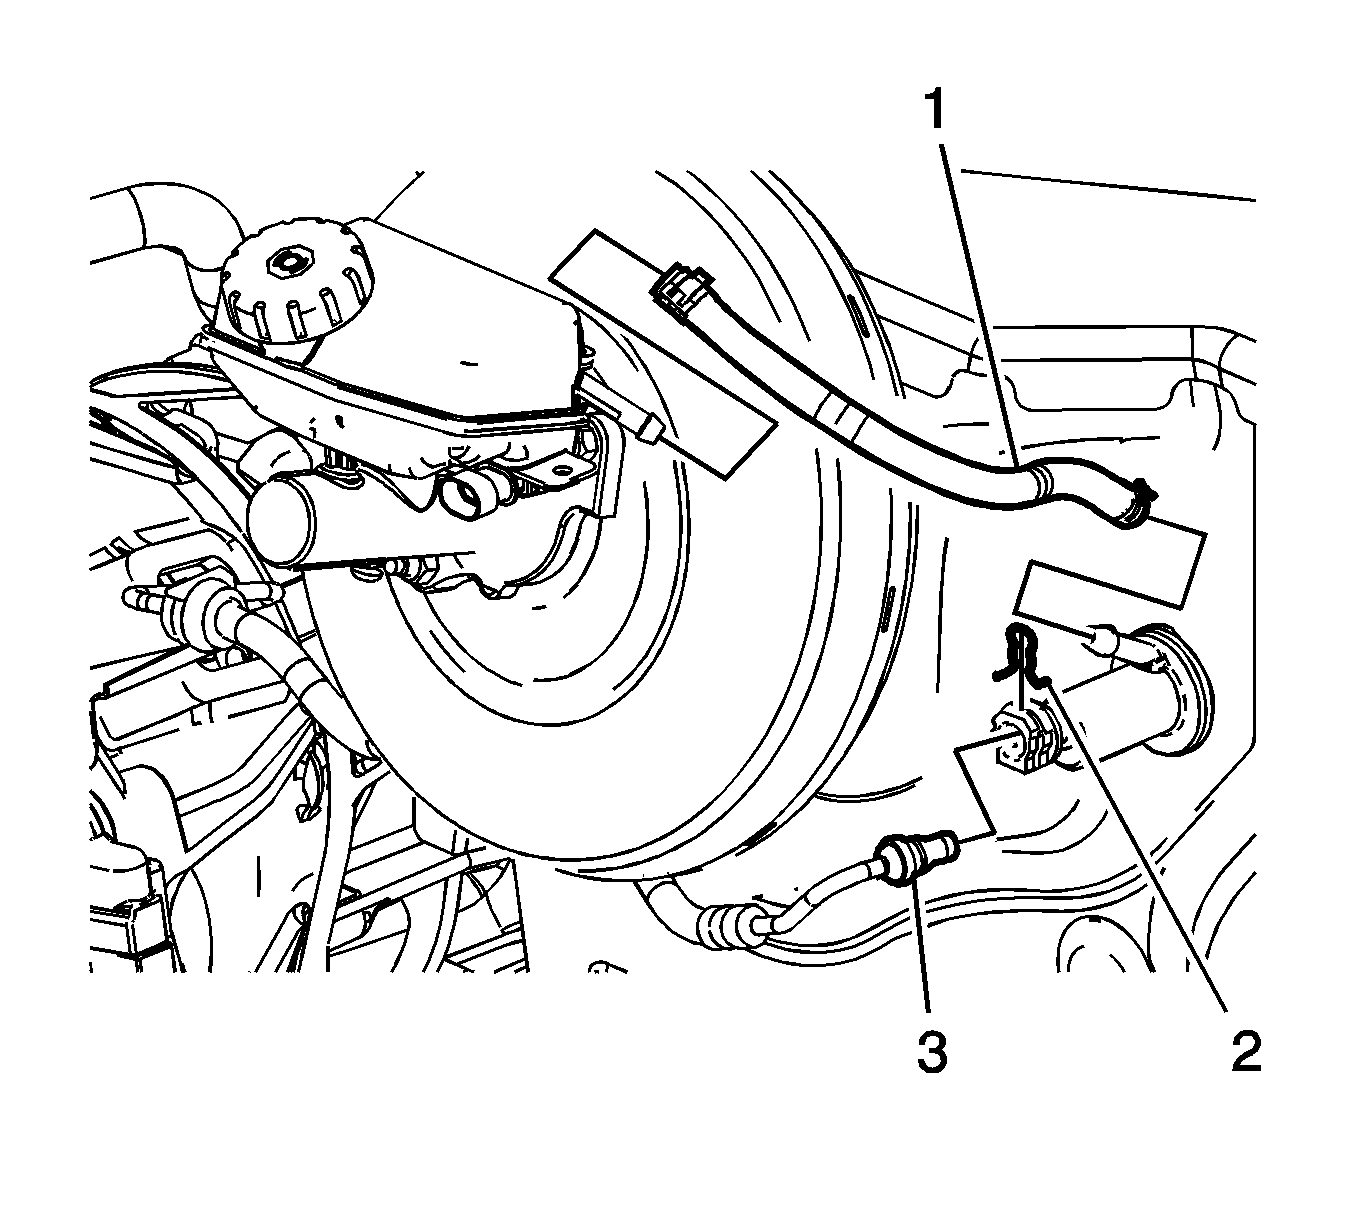
- Remove the clutch hose/pipe assembly retainer clip (1) from the clutch master cylinder.
- Disconnect the clutch hose/pipe assembly (2) from the clutch master cylinder.
- Cap the clutch hose/pipe assembly (2) in order to prevent fluid loss and contamination.
- Remove the starter. Refer to Starter Replacement.
- Drain the transmission fluid if necessary. Refer to Transmission Fluid Replacement.
- Remove the rear propeller shaft. Refer to Propeller Shaft Replacement.
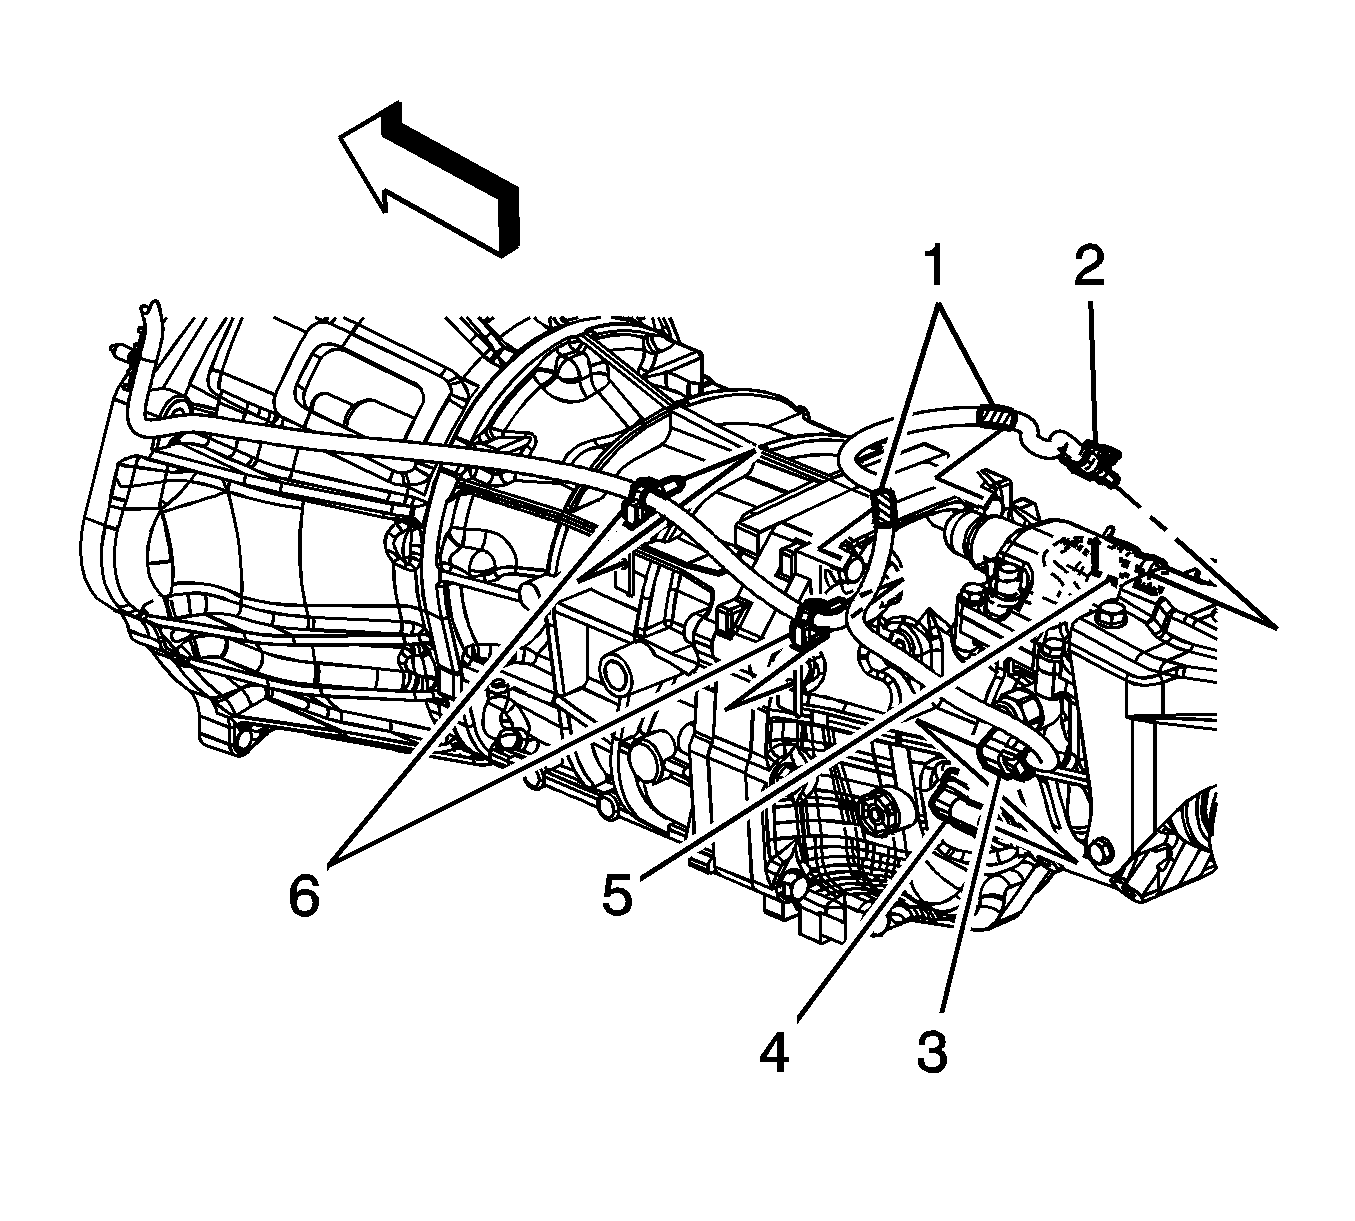
- Disconnect the electrical connector (2) from the backup lamp switch (5).
- Disconnect the electrical connector (3) from the vehicle speed sensor (VSS) (4)
- Disconnect the wiring harness (1) from the clip bracket.
- Disconnect the wiring harness clips (6) from the clip brackets, and position the harness aside.
- Support the transmission using a transmission jack.
- Remove the transmission support. Refer to Transmission Support Replacement.
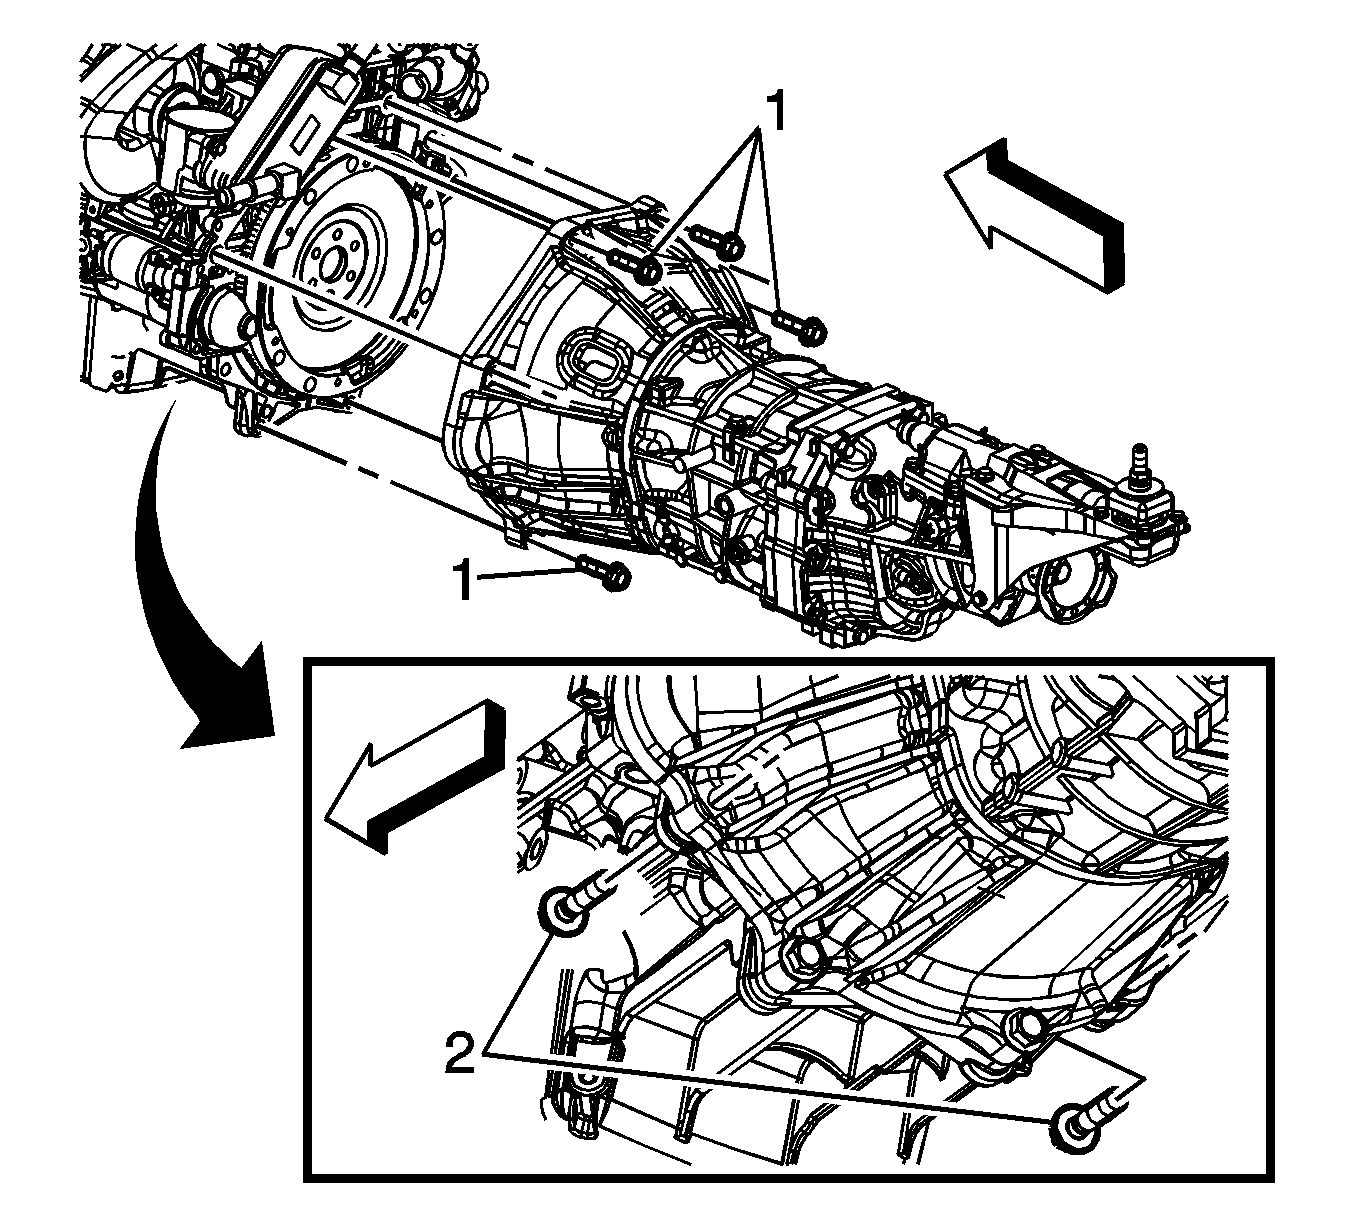
- Remove the 5 transmission to engine mounting bolts (1).
- Remove the 2 engine to transmission mounting bolts (2).
- Remove the 2 remaining transmission mounting bolts (2).
- Pull the transmission straight back off the clutch hub splines.
- Using the transmission jack, carefully lower the transmission from the vehicle.
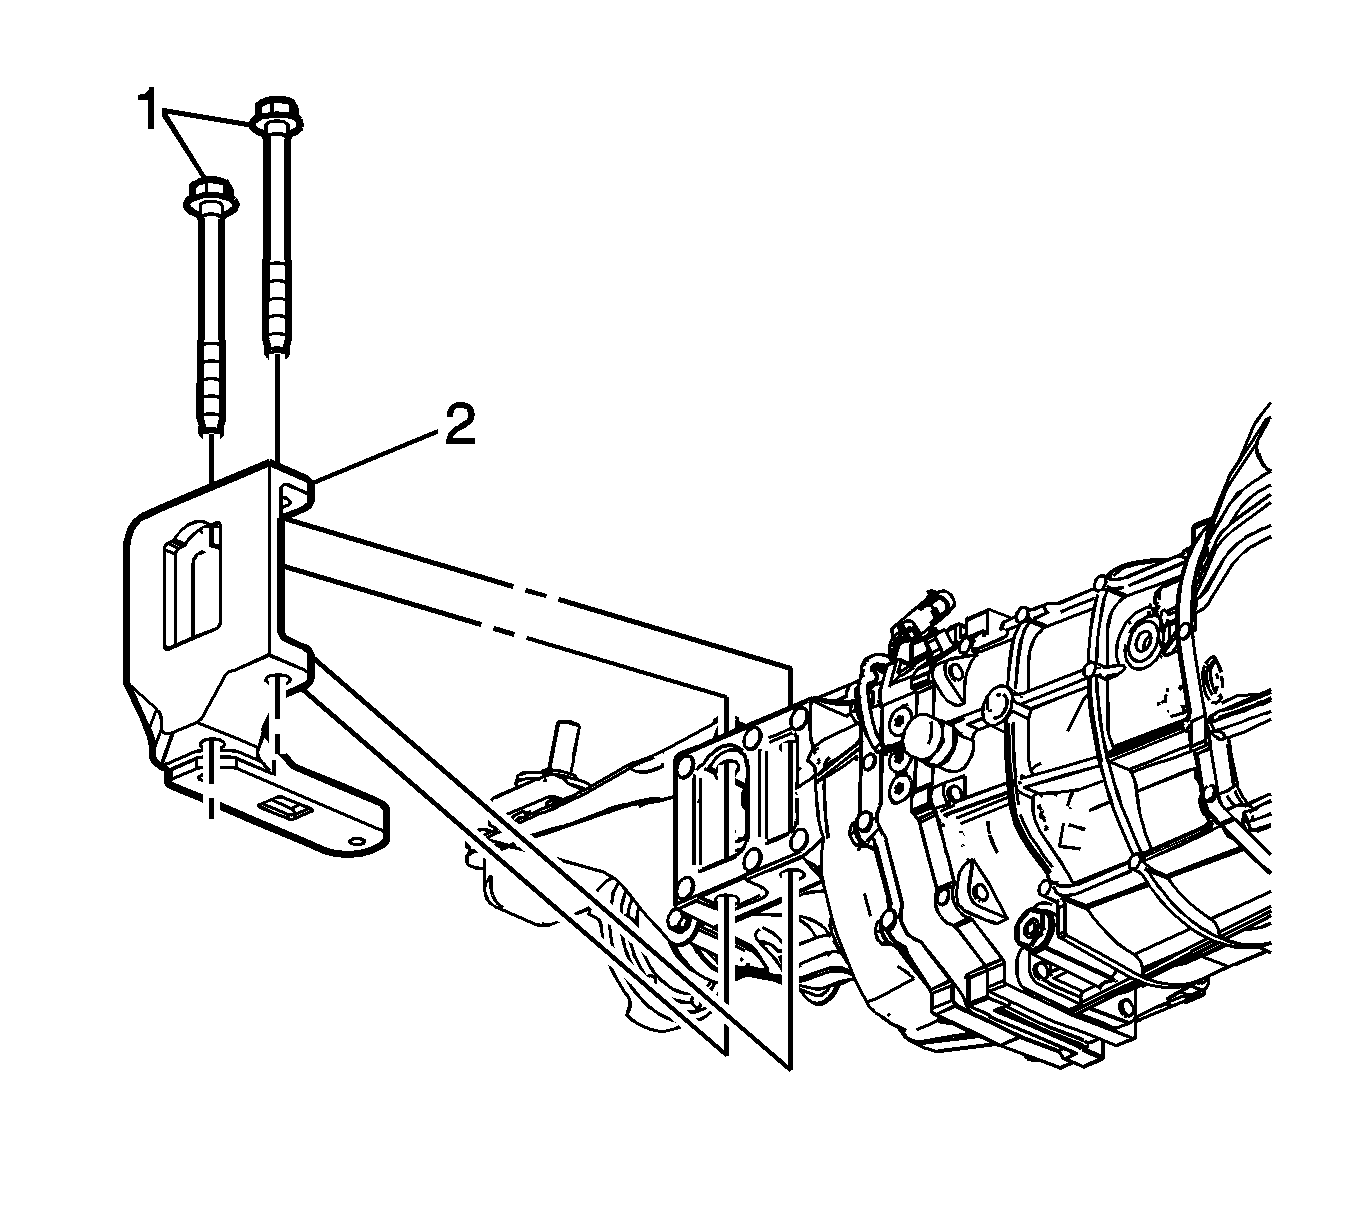
- Remove the transmission mount bracket bolts (1).
- Remove the transmission mount bracket (2).
It is not necessary to plug the lower hose end or slave cylinder fitting as they are equipped with check valves, only minimal fluid loss may be experienced.
Important: Do not allow the transmission to hang from the clutch assembly.
Important: Ensure clearance is maintained between the transmission and the following:
• The catalytic converter • The clutch assembly • The engine wiring harness • The clutch actuator pipe and hose
Installation Procedure
- Install the transmission mount bracket (2).
- Install the transmission mount bracket bolts (1).
- Using the transmission jack, carefully raise the transmission to the engine.
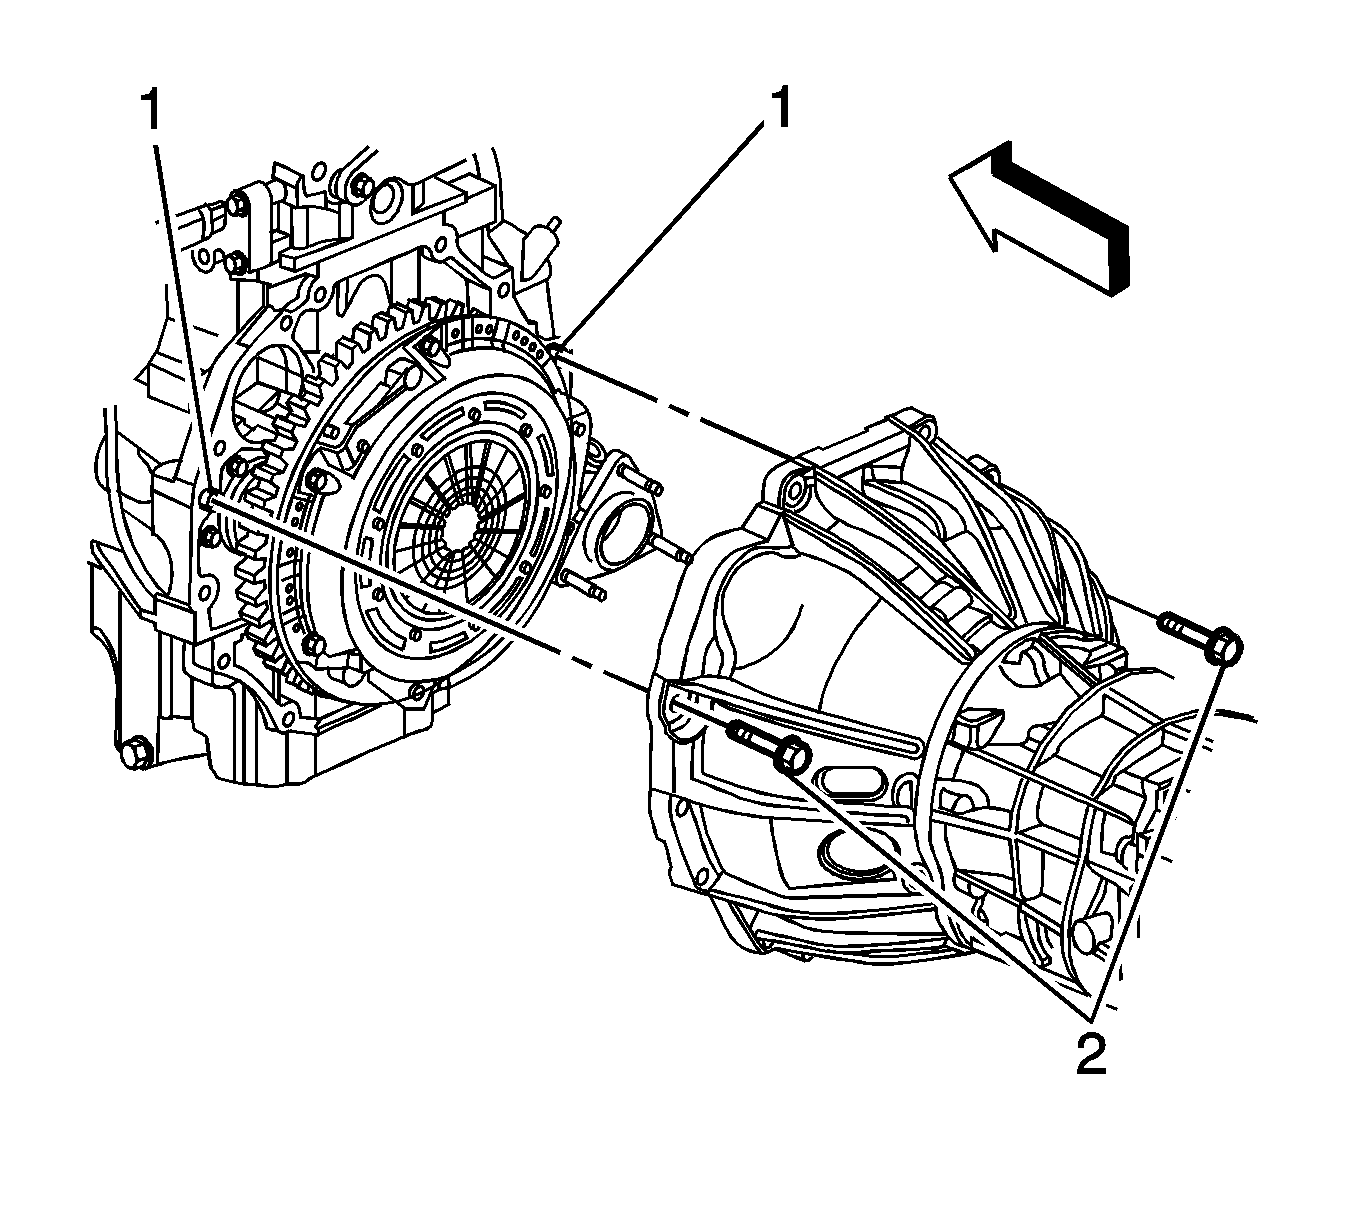
- Align the transmission with the engine dowels (1).
- Install the 2 transmission mounting bolts (2).
- Install the 2 engine to transmission mounting bolts (2).
- Install the 5 transmission to engine mounting bolts (1).
- Install the transmission support. Refer to Transmission Support Replacement.
- Remove the transmission jack from under the vehicle.
- Install the starter. Refer to Starter Replacement.
- Lay the engine wiring harness over the transmission.
- Connect the wiring harness clips (6) to the clip brackets.
- Connect the wiring harness (1) to the clip bracket.
- Connect the electrical connector (3) to the VSS (4)
- Connect the electrical connector (2) to the backup lamp switch (5).
- Install the rear propeller shaft. Refer to Propeller Shaft Replacement.
- Fill the transmission fluid if removed. Refer to Transmission Fluid Replacement.
- Install the clutch hose/pipe assembly retainer clip (2) to the clutch master cylinder.
- Connect the clutch hose/pipe assembly (3) to the clutch master cylinder.
- Tug gently on the clutch hose/pipe assembly (3) to ensure proper retention into the clutch master cylinder.
- Install the catalytic converter. Refer to Catalytic Converter Replacement.
- Install the control lever knob and boot assembly. Refer to Control Lever and/or Boot Replacement.
Notice: Refer to Fastener Notice in the Preface section.
Tighten
Tighten the bolts to 240 N·m (177 lb ft).
Important: Ensure clearance is maintained between the transmission and the following:
• The catalytic converter • The clutch assembly • The engine wiring harness
Important: Do not allow the transmission to hang from the clutch assembly.
Tighten
Tighten the bolts to 50 N·m (37 lb ft).
Tighten
Tighten the bolts to 50 N·m (37 lb ft).
Tighten
Tighten the bolts to 50 N·m (37 lb ft).
Important: Ensure the clutch hydraulic hose does not come in contact with any sharp or potentially hot surfaces.
Transmission Final Test and Inspection
Complete the following procedure after the transmission is installed in the vehicle:
- With the ignition OFF or disconnected and clutch pedal depressed, crank the engine several times. Listen for any unusual noises or evidence that any parts are binding.
- Place the transmission in neutral, start the engine and listen for any unusual noises or evidence that any parts are binding.
- Turn OFF the ignition.
- Perform a final inspection for the proper fluid level. Refer to Transmission Fluid Replacement.
- Road test the vehicle.
Transmission Replacement Without Z0K
Removal Procedure
- Remove the control lever knob and boot assembly. Refer to Control Lever and/or Boot Replacement.
- Remove the catalytic converter. Refer to Catalytic Converter Replacement.
- Remove the clutch hose/pipe assembly retainer clip (1) from the clutch master cylinder.
- Disconnect the clutch hose/pipe assembly (2) from the clutch master cylinder.
- Cap the clutch hose/pipe assembly (2) in order to prevent fluid loss and contamination.
- Remove the starter. Refer to Starter Replacement.
- Remove the transmission support. Refer to Transmission Support Replacement.
- Drain the transmission fluid if necessary. Refer to Transmission Fluid Replacement.
- Disconnect the electrical connector (2) from the backup lamp switch (5).
- Disconnect the electrical connector (3) from the vehicle speed sensor (VSS) (4)
- Disconnect the wiring harness (1) from the clip bracket.
- Disconnect the wiring harness clips (6) from the clip brackets, and position the harness aside.
- Support the transmission using a transmission jack.
- Remove the propeller shaft and driveline support. Refer to Propeller Shaft, Differential, and Driveline Support Replacement.
- Remove the 5 transmission to engine mounting bolts (1).
- Remove the 2 engine to transmission mounting bolts (2).
- Remove the 2 remaining transmission mounting bolts (2).
- Pull the transmission straight back off the clutch hub splines.
- Using the transmission jack, carefully lower the transmission from the vehicle.
It is not necessary to plug the lower hose end or slave cylinder fitting as they are equipped with check valves, only minimal fluid loss may be experienced.
Important: Do not allow the transmission to hang from the clutch assembly.
Important: Ensure clearance is maintained between the transmission and the following:
• The catalytic converter • The clutch assembly • The engine wiring harness • The clutch actuator pipe and hose
Installation Procedure
- Using the transmission jack, carefully raise the transmission to the engine.
- Align the transmission with the engine dowels (1).
- Install the 2 transmission mounting bolts (2).
- Install the 2 engine to transmission mounting bolts (2).
- Install the 5 transmission to engine mounting bolts (1).
- Install the driveline support and propeller shaft. Refer to Propeller Shaft, Differential, and Driveline Support Replacement.
- Remove the transmission jack.
- Lay the engine wiring harness over the transmission.
- Connect the wiring harness clips (6) to the clip brackets.
- Connect the wiring harness (1) to the clip bracket.
- Connect the electrical connector (3) to the VSS (4)
- Connect the electrical connector (2) to the backup lamp switch (5).
- Fill the transmission fluid if removed. Refer to Transmission Fluid Replacement.
- Install the transmission support and closeout panels. Refer to Transmission Support Replacement.
- Install the starter. Refer to Starter Replacement.
- Install the clutch hose/pipe assembly retainer clip (2) to the clutch master cylinder.
- Connect the clutch hose/pipe assembly (3) to the clutch master cylinder.
- Tug gently on the clutch hose/pipe assembly (3) to ensure proper retention into the clutch master cylinder.
- Install the catalytic converter. Refer to Catalytic Converter Replacement.
- Install the control lever knob and boot assembly. Refer to Control Lever and/or Boot Replacement.
Important: Ensure clearance is maintained between the transmission and the following:
• The catalytic converter • The clutch assembly • The engine wiring harness
Important: Do not allow the transmission to hang from the clutch assembly.
Notice: Refer to Fastener Notice in the Preface section.
Tighten
Tighten the bolts to 50 N·m (37 lb ft).
Tighten
Tighten the bolts to 50 N·m (37 lb ft).
Tighten
Tighten the bolts to 50 N·m (37 lb ft).
Important: Ensure the clutch hydraulic hose does not come in contact with any sharp or potentially hot surfaces.
Transmission Final Test and Inspection
Complete the following procedure after the transmission is installed in the vehicle:
- With the ignition OFF or disconnected and clutch pedal depressed, crank the engine several times. Listen for any unusual noises or evidence that any parts are binding.
- Place the transmission in neutral, start the engine and listen for any unusual noises or evidence that any parts are binding.
- Turn OFF the ignition.
- Perform a final inspection for the proper fluid level. Refer to Transmission Fluid Replacement.
- Road test the vehicle.
