INSTALLATION GUIDELINES FOR AFTERMARKET ACCESSORIES

Models Affected: 1982-91 ALL MODELS
The popularity and variety of electronic aftermarket auto accessories is rapidly growing. Many of these devices require permanent connections to the electrical system of the vehicle. These installations are usually performed by the dealership, a specialty shop, or the customer.
Today's automotive electrical systems are very sophisticated. Improperly installed electrical accessories can interfere with the vehicles operation, performance, and in some circumstances cause damage to the vehicle which would not be covered under the General Motors New Vehicle Warranty. Possible problems to the vehicle are, but are not limited to: stalling, surging, poor performance, detonation, blown fuses, damaged wiring, cluster lighting changes, battery drains, alarm system failures, premature relay failures, poor radio reception, and radio speaker noises.
Many customers who encounter aftermarket accessory related problems may in error fault the original manufacturer of the vehicle as the cause of the problem. Therefore, in the interest of customer satisfaction, technicians should check for add-on (non OEM) electrical equipment as the first step in diagnosing electrical problems. If the vehicle is so equipped, disconnect the system to verify that these add-on "accessories" are not the cause of the resulting noise interference.
Installation guidelines are listed below. These guidelines are intended to supplement, but not to be used in place of, the instructions supplied by the manufacturer. Instructions for add-on installations are the sole responsibility of the manufacturer of the radio telephone, land mobile radio, or other accessory.
NOTE: Due to the variety of the aftermarket accessories, consult the manufacturer for additional details specific to their product.
In general, there are three classes of aftermarket equipment.
1. Devices that only require power and ground connections.
Avoid tying directly into the vehicle's wiring system.
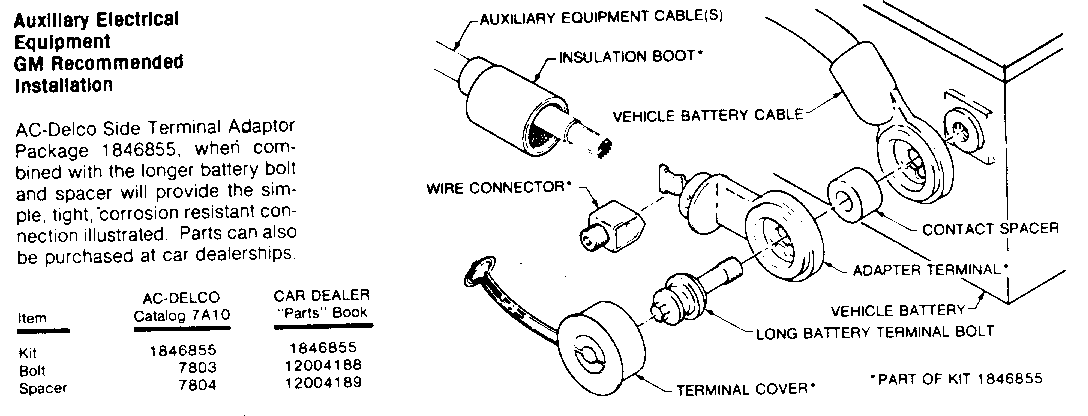
Whenever possible use direct power and ground feeds from the battery or the accessory block stud on vehicles so equipped.
To eliminate voltage spikes, do not tie into existing ground connections. Accessories that use low current can be grounded at the left door hinge pillar. Drill a 5.3mm hole and use a 10mm head screw p/n 11502704 with star washer p/n 11503663.
Parts are currently available from GMSPO.
Install an in-line fuse holder on the power wire as close to the battery as possible. Only use fuses of the correct amperage as specified by the manufacturer of the add-on device.
Twist the lengths of the power and ground wires together, as much as possible to reduce magnetic interference.
Route wires away from all existing harnesses. Pay particular attention to all ECM, ignition, and radio wiring.
If the device must be ignition operated, use the auxiliary ignition jack in the fuse-box and install an in-line fuse. In some cases you may have to add a suppression filter (see Delco Service Managers - Sound Guide).
2. Devices that require connections to vehicle systems or components.
Follow the above procedures for the power and ground connections.
When the manufacturer's directions require the device be tapped into vehicle systems, such as speed sensor, door lock wiring, courtesy light circuits, etc., it is important to verify that the addition does affect the intended function of the circuit or its related components. I.E. reduce signal strength, create a current draw through switches relays and connectors exceeding their ratings, or generates electromagnetic interference.
If a device is powered by tapping into an existing circuit, the power feed to the device must be of equal or numerically higher gauge size than the source circuit. This will help insure adequate failure mode protection.
Splices, taps, and other wiring alterations should be soldered and insulated, preferably with heat shrink tubing to prevent corrosion and resistance buildup. Avoid the use of quick-lock type splices.
3. Devices that transmit a radio signal or magnetic waves.
These include mobile telephones, 2-way business radios, C.B. radios, and Ham radios. The following information has been developed and released pre- viously by Delco Electronics and is included in the service edition of the Delco Sound Service: for man hours and technicians Pub-629. We are reprinting this information for your convenience.
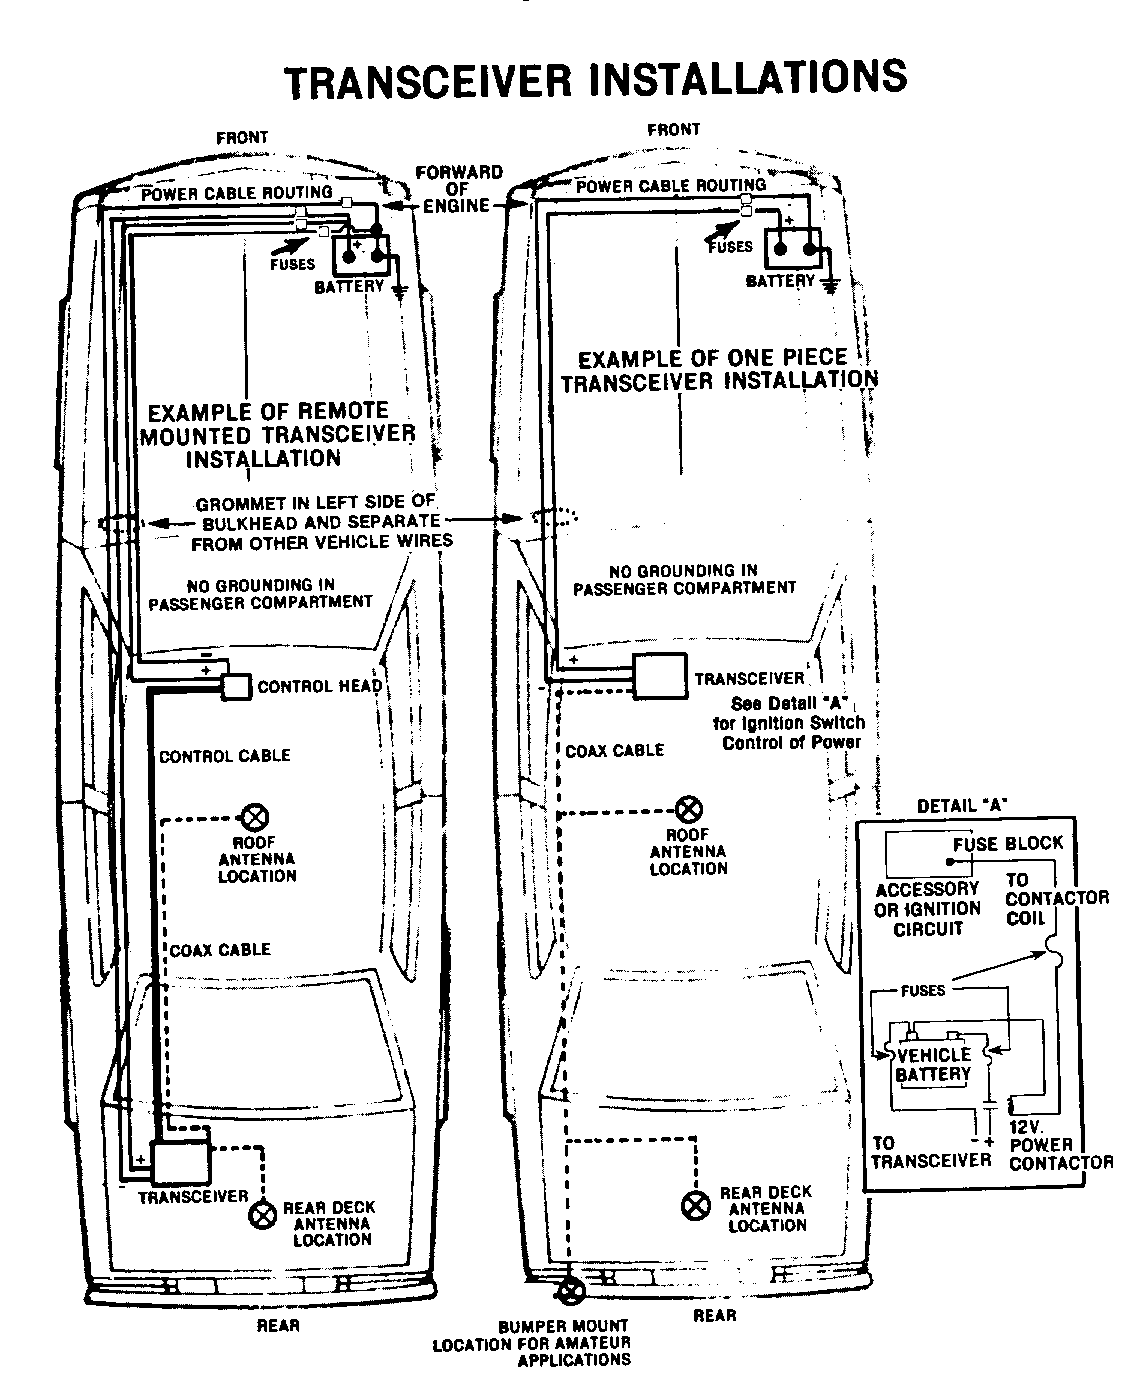
INSTALLATION GUIDELINE (refer to the enclosed figures during installation)
1. Transmitter Location
A. Locate transceiver for remote radios on driver's side of trunk as near to the vehicle body side as possible
B. One piece transceivers should be mounted under dash or on transmission hump where they will not interfere with vehicle controls or passenger movement.
2. Antenna Installation
A. The antenna should be a permanent-mount type located in the center of the roof or center of the rear deck lid. Glass mounted antennas should be kept as high as possible in the center of the rear window or windshield If a magnetic-mount antenna must be used, care should be taken to mount the antenna in the same location as a permanent mount type. If a disguise-mount antenna is used, great care should be taken to shield the tuning network from vehicle electronics and wiring, or to mount the tuning network in an area completely clear of vehicle electronics and wiring
B. Each vehicle model and body style reacts to radio frequency energy differently. When dealing with an unfamiliar vehicle, it is suggested that a magnetic-mount antenna be used to check the proposed antenna location for unwanted effects on the vehicle. Antenna location is a major factor in these effects.
3. Antenna Cable Routing
A. Always use a high quality coax (at least 95% shield coverage) routed away from the Engine Control Module (ECM) and other electronics modules.
B. Care should be taken to avoid routing feedline with any vehicle wiring.
4. Antenna Tuning
A. It is important that the antenna be tuned properly and reflected power be kept to a minimum. (VSWR( 2:1)
5. Radio Wiring and Connection Locations
A. Transceiver Power Leads:
These connections should be made directly to the battery itself, in- cluding the ground, or to the jump start block on vehicles so equipped. The transceiver power feeds should be #10 AWG wire or larger, twisted if possible. The ground wire should not be attached to the body at any point. Appropriate in-line fuses for both the positive and ground leads should be located as near the battery as possible.
NOTE: It is recommended that a fuse be placed in the transceiver ground lead to prevent possible damage to the transceiver, in the event the battery to engine-block ground is inadvertently disconnected
For ONE-PIECE TRANSCEIVERS where ignition switch control is desired, a 12 v power contactor must be installed in the transceiver positive lead. The contactor should be located at the vehicle battery with the coil of the contactor driven through an appropriate in-line fuse from an available accessory circuit or ignition circuit not powered dur- ing cranking. The coil of the contactor must return to battery negative.
B. Handset or Control Unit Battery and Grounding
Any ground lead from a handset or control unit must return to battery negative. It is preferable that the positive lead for a handset or control unit be connected directly to the battery. It is recommended that the handset or control unit positive and ground leads be appropriately fused separately from the transceiver positive and ground leads. If ignition switch control is desired, the handset or control unit positive lead may be connected through an appropriate in-line fuse to an available accessory circuit or ignition circuit not powered during cranking
C. Connections for Multiple Transceivers and Receivers:
If multiple transceivers or receivers are to be installed in the vehicle, power leads to the trunk or under dash should be terminated in covered insulated buss bars. All transceivers or receivers may then have their power leads connected to the buss bars, This makes a neater installation and reduces the number of wires running to vehicle underhood.
6. Wire Routing
A. The power leads should be brought through a grommet on the driver's side firewall For trunk-mounted transceivers, the cables should con- tinue on along the driver's side door sills, under the rear seat, and into the trunk through the rear bulkhead. If the battery is located on the passenger side, battery leads should cross the vehicle in front of the engine. All attempts should be made to maintain as much distance as possible between radio power leads and vehicle electronic modules and wiring.
B. For police vehicles, radio power leads should be routed in the conduit provided with the option package
7. Troubleshooting
A. Should vehicle problems develop following installation, the source of the problem should be determined prior to further operation of the vehicle.
B. Possible causes of vehicle problems include
1. Power feeds connected to points other than the battery
2. Antenna location.
3. Transceiver wiring located too close to vehicle electronic modules or wiring.
4. Poor shielding or poor connectors on antenna feedline.
8. Contact and Feedback
A. GM vehicles have been designed and extensively tested for immunity to known sources of RF energy. However, it is impossible to test for every combination of RF sources and installations. If a persistent condition is encountered,
WRITE TO:
EMC DEPT. - MR BLDG 40 GENERAL MOTORS PROVING GROUND MILFORD, MICHIGAN 48042-2001
General Motors bulletins are intended for use by professional technicians, not a "do-it-yourselfer". They are written to inform those technicians of conditions that may occur on some vehicles, or to provide information that could assist in the proper service of a vehicle. Properly trained technicians have the equipment, tools, safety instructions and know-how to do a job properly and safely. If a condition is described, do not assume that the bulletin applies to your vehicle, or that your vehicle will have that condition. See a General Motors dealer servicing your brand of General Motors vehicle for information on whether your vehicle may benefit from the information.
