Removal Procedure
- Remove the throttle body air inlet duct. Refer to Air Cleaner Element Replacement in Engine Controls - 3.4L.
- Remove the engine mount struts. Refer to Engine Mount Strut Replacement - Left Side and Engine Mount Strut Replacement - Right Side in Engine Mechanical - 3.4L.
- Remove the wiper module cover. Refer to Wiper Module Cover Replacement in Wipers/Washers Systems.
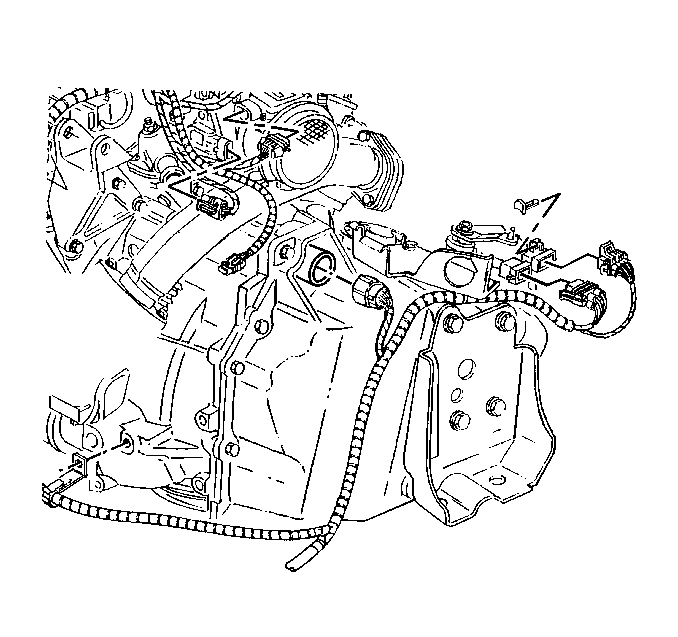
- Disconnect the 20-way electrical connector at the transaxle.
- Remove the shift cable bracket from the transaxle. Refer to Range Selector Lever Cable Bracket Replacement .
- Install the engine support fixture and support the engine/transaxle assembly. Refer to Engine Support Fixture in Engine Mechanical - 3.4L.
- Raise and support the vehicle. Refer to Lifting and Jacking the Vehicle in General Information.
- Remove the left front tire and wheel. Refer to Tire and Wheel Removal and Installation in Tires and Wheels.
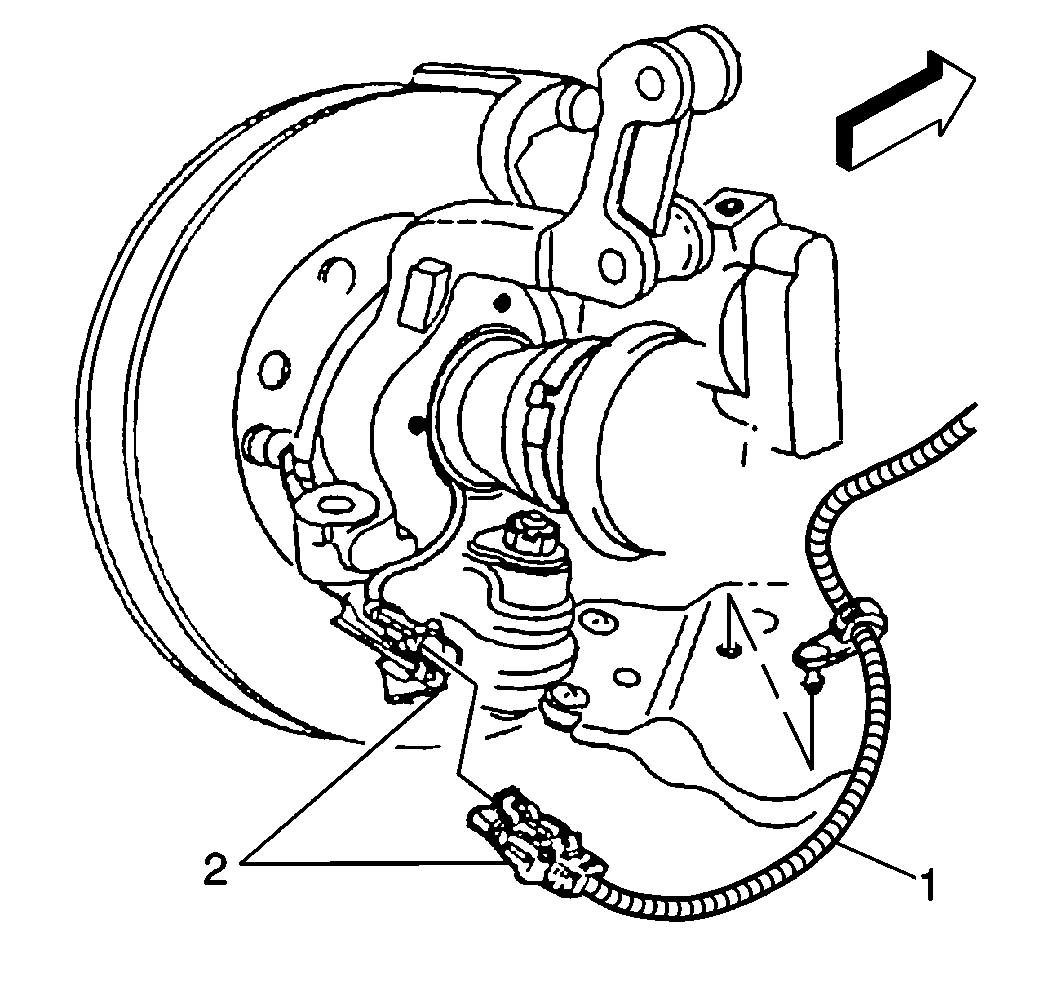
- Disconnect the left wheel speed sensor harness connector (1).
- Remove the left engine splash shield. Refer to Engine Splash Shield Replacement in Body Front End.
- Remove both stabilizer shaft links from the lower control arms. Refer to Stabilizer Shaft Link Replacement in Front Suspension.
- Remove the wheel speed sensor harness (1) from the control arm.
- Remove the left lower ball joint from the left steering knuckle. Refer to Steering Knuckle Replacement in Front Suspension.
- Remove the left drive axle from the transaxle. Refer to Front Wheel Drive Shaft Replacement in Wheel Drive Shafts.
- Reposition and secure the drive axle.
- Remove the heat shield bolts from the frame. Refer to Steering Gear Heat Shield Replacement in Power Steering Systems.
- Remove the steering gear-to-frame bolts (2), and secure the steering gear.
- Support the left side of the frame with a utility stand.
- Remove the transaxle mount lower nuts only. Refer to Transmission Mount Replacement .
- Loosen the engine mount lower nuts. Refer to Engine Mount Replacement in Engine Mechanical - 3.4 L.
- Remove the air deflector. Refer to Radiator Air Baffle Assemblies and Deflectors in Engine Cooling.
- Remove only the left side frame bolts. DO NOT LOOSEN the right side frame-to-body bolts. Refer to Front Frame Replacement in Frame and Underbody.
- Use the utility stand in order to lower left side of the frame.
- Position a drain pan under the transaxle.
- Remove the utility stand and lower the vehicle.
- Loosen the right engine support bolts. Refer to Engine Mount Replacement in Engine Mechanical - 3.4L.
- Raise the vehicle.
- Remove the transmission mount bracket. Refer to Transmission Mount Bracket Replacement .
- Remove the transaxle wiring harness connectors.
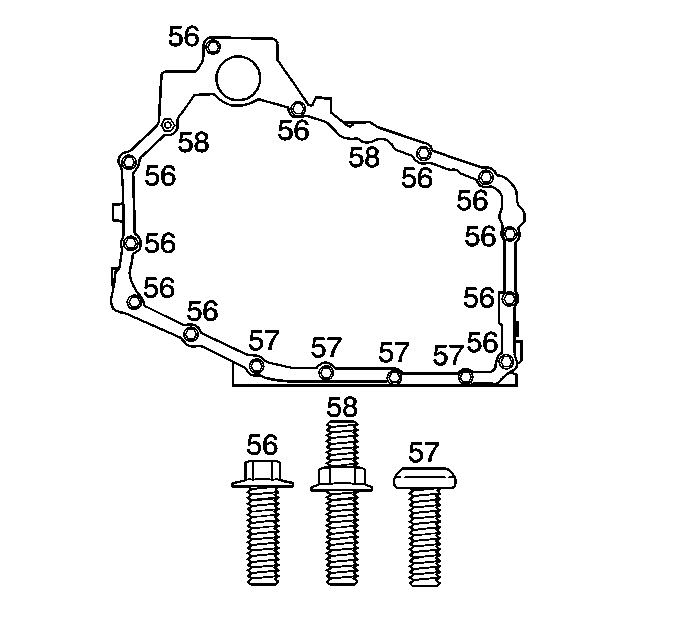
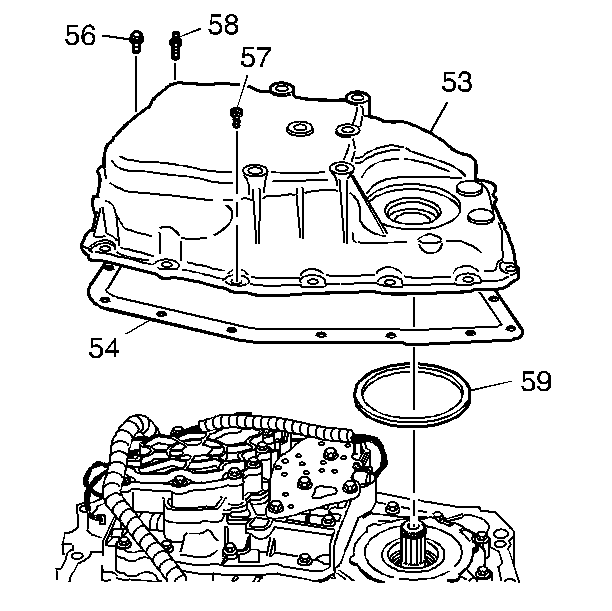
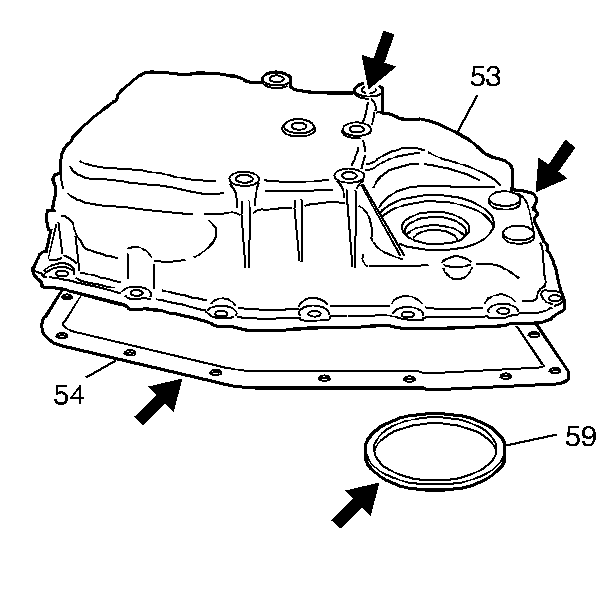
- Remove the case side cover bolts (56-58).
- Remove the case side cover pan (53).
- Remove the case side cover gasket (54).
- Remove the case side cover inner gasket (59).
- Inspect the case side cover (53) for the following conditions:
- Inspect the case side cover gasket (54) and case side cover inner gasket (59) for damage. The gaskets are reusable if they are NOT damaged.
- Clean the case side cover.
- Clean the case side cover gasket surfaces.
| • | Damaged or porous gasket sealing surfaces |
| • | Damaged or porous casting surfaces |
| • | Damaged or stripped bolt holes |
Installation Procedure
- Install the case side cover inner gasket (59).
- Install the case side cover gasket (54).
- Install the case side cover pan (53).
- Install the case side cover bolts (56-58).
- Install the transaxle mount bracket.
- Remove the drain pan from under the transaxle.
- Install the wiring harness connectors.
- Use the utility stand in order to raise the left side of the frame.
- Install the left side frame bolts. Refer to Front Frame Replacement in Frame and Underbody.
- Install the transaxle mount. Refer to Transmission Mount Replacement .
- Remove the utility stand support from the left side of the frame.
- Install the air deflector. Refer to Radiator Air Baffle Assemblies and Deflectors in Engine Cooling.
- Install the left drive axle to the transaxle. Refer to Front Wheel Drive Shaft Replacement in Wheel Drive Shafts.
- Install the left lower ball joint to the left steering knuckle. Refer to Steering Knuckle Replacement in Front Suspension.
- Install two steering gear bolts.
- Install the heat shield. Refer to Steering Gear Heat Shield Replacement in Power Steering System.
- Install the lower ball joint nut and tighten.
- Install and connect the wheel speed sensor harness connector (1).
- Tighten the engine mount lower nuts. Refer to Engine Mount Replacement in Engine Mechanical - 3.4L.
- Install the stabilizer shaft links to the lower control arms. Refer to Stabilizer Shaft Link Replacement in Front Suspension.
- Install the left engine splash shield. Refer to Engine Splash Shield Replacement in Body Front End.
- Install the left front tire and wheel. Refer to Tire and Wheel Removal and Installation in Tires and Wheels.
- Lower the vehicle.
- Install the shift cable bracket. Refer to Range Selector Lever Cable Bracket Replacement .
- Connect the 20-way transmission electrical connector.
- Install the engine mount struts. Refer to Engine Mount Strut Replacement - Left Side and Engine Mount Strut Replacement - Right Side in Engine Mechanical - 3.4L.
- Install the throttle body air inlet duct. Refer to Air Cleaner Element Replacement in Engine Controls - 3.4L.
- Install the wiper module cover. Refer to Wiper Module Cover Replacement in Wipers/Washers Systems.
- Adjust the fluid level. Refer to the following information.
- Inspect for proper completion of the repairs.
- Inspect for fluid leaks.

Notice: Refer to Fastener Notice in the Preface section.

Tighten
Tighten the bolts (56-58) to 25 N·m (18 lb ft).
Torque
Torque to 95 N·m (70 lb ft).

Tighten
Tighten the bolts to 165 N·m (122 lb ft).
Important: This is a prevailing torque type fastener. This fastener may be reused ONLY if:
• The fastener and its counterpart are clean and free from rust. • The fastener develops 2 N·m (18 lb in) of torque/drag against its counterpart prior to the fastener seating. If the fastener does not meet these criteria, REPLACE the fastener.
Tighten
Tighten the bolts to 80 N·m (59 lb ft).

Tighten
Tighten to 23 N·m (17 lb ft).
Notice: Do NOT overfill the transaxle. The overfilling of the transaxle causes foaming, loss of fluid, shift complaints, and possible damage to the transaxle.
| • | Fluid and Lubricant Recommendations in Maintenance and Lubrication |
| • | Approximate Fluid Capacities in Maintenance and Lubrication |
