Circuit Description
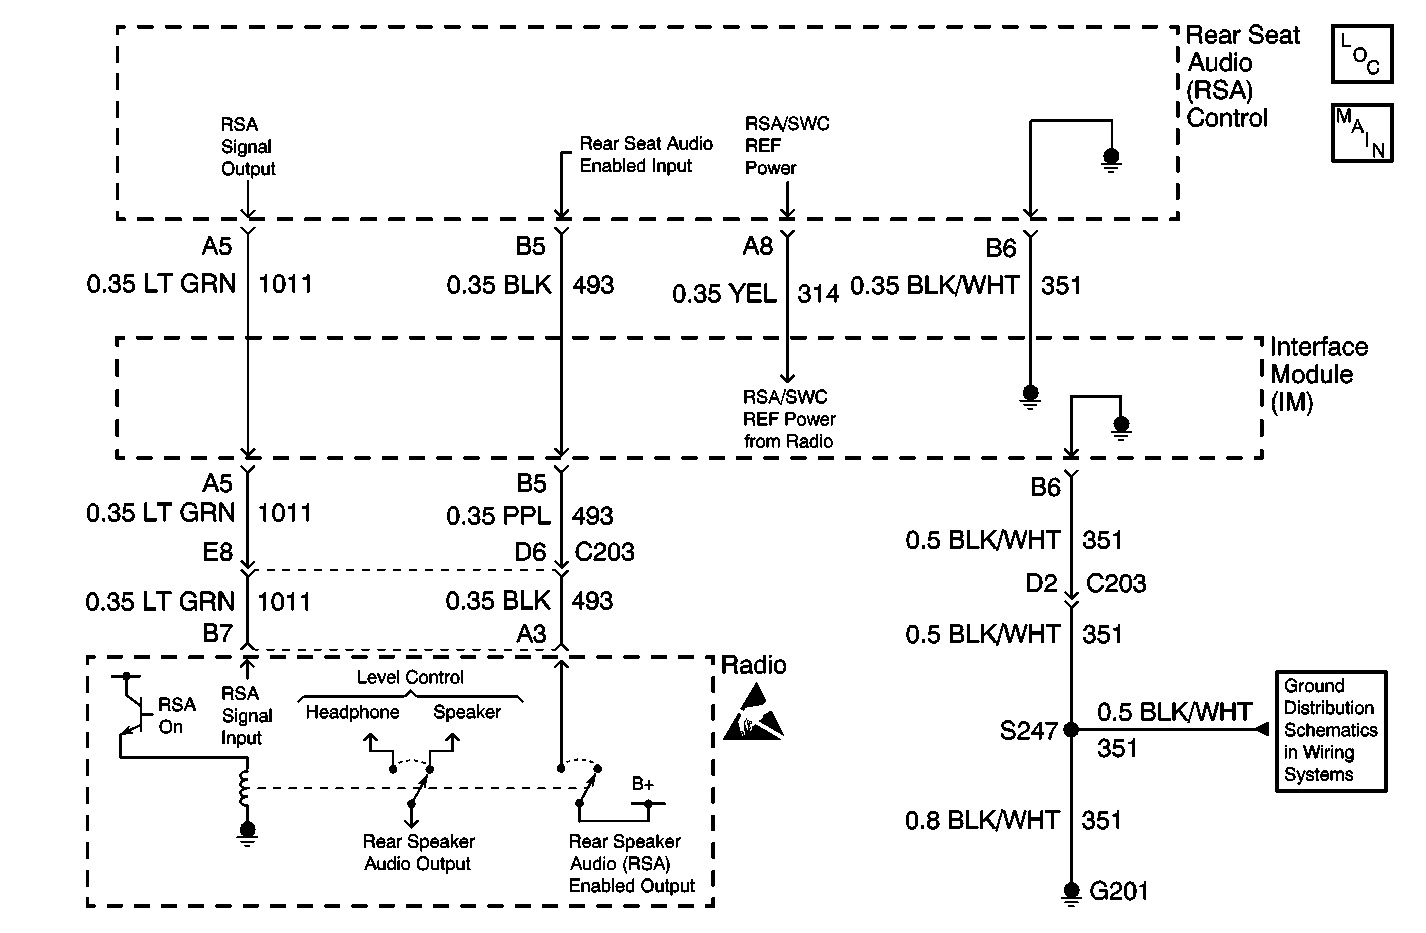
Rear Seat Audio (RSA) control provides second row passengers access to the radio audio system. The RSA, when turned on, allows the user to listen to the radio, audio cassette, or compact disc (if equipped) through headphones. When the RSA is turned on, the RSA automatically mutes the rear speakers. The controls for the radio allow the driver and front passenger to adjust radio audio coming through the front speakers. At the same time, the second (and third row) passengers can listen to the audio cassette or CD while the front passengers are listening to the radio, and vice versa. The RSA provides volume controls, mode selection (radio/tape/cd), seek, among other features. The audio selected at the RSA controls is also routed to the second and third seat audio controls. The RSA headphone jacks do not provide access to the video audio channel; it is only available at the second and third seat audio controls.
The RSA control receives RSA/SWC Reference Power voltage through circuit 314 from the radio through the Interface Module (IM). When the RSA is turned on, the RSA sends a B+ voltage signal to the radio through circuit 1011. This signal enables the radio to perform RSA functions. The radio then sends a B+ signal through circuit 493 back to the RSA, the second and third seat audio controls, enabling them to provide radio audio through their headphone jacks. At the same time, the radio internally changes the loudness output of the rear speakers to a much lower output suitable for headphone use. When the RSA receives the enabling signal from the radio, the RSA mutes the rear speakers.
Diagnostic Aids
| • | Check for the following conditions: |
| - | An open in circuit 314 between the IM and the RSA. |
| - | An open in circuit 351 between the IM and the RSA. |
| - | An open in circuit 351 between the IM and ground. |
| - | An open in circuit 1011 (RSA on signal) |
| - | An open or short to ground in circuit 493 (RSA enabled signal). |
| - | A faulty RSA. |
| - | A faulty radio. |
| • | An intermittent failure may be very difficult to detect and to diagnose accurately. Faulty electrical connections or wiring causes most intermittent problems. When an intermittent condition is suspected, check the suspected circuits for the following conditions: |
| - | Poor mating of connector halves or backed out terminals. |
| - | Improperly formed or damaged terminals. |
| - | Wire chafing. |
| - | Poor wire to terminal connections. |
| - | Dirty or corroded terminals. |
| - | Damage to connector bodies. |
| - | Wire broken inside the insulation. |
Test Description
The number(s) below refer to the step number(s) on the diagnostic table.
-
Determines whether the RSA is enabled (indicating that the RSA and CKT 1011 are OK) or disabled (power/ground fault at RSA or open in CKT 1011).
-
Determines whether CKT 1011 is open or the radio is faulty.
-
Determines whether the RSA is faulty or CKTs 314 and/or 351 are open.
-
Tests for an open in CKT 314.
-
Determines whether power/ground circuits to the IM are open or the IM is faulty.
-
Determines whether CKT 314 or 351 is open.
-
Verifies repairs made to the VES.
Step | Action | Value(s) | Yes | No | ||||||||||||
|---|---|---|---|---|---|---|---|---|---|---|---|---|---|---|---|---|
DEFINITION: The Rear Seat Audio (RSA), when turned on, does not provide radio audio through the headphones at the RSA, second and third seat audio controls. However, the second and third seat audio controls have video audio. | ||||||||||||||||
Does the voltage measure in the specified range? | B+ (10-14 V) | Go to Step 4 | Go to Step 2 | |||||||||||||
Does the voltage measure approximately with the values listed above? | -- | Go to Step 3 | Go to Step 4 | |||||||||||||
3 |
Is the repair complete? | B+ (10-14 V) | Go to Step 13 | -- | ||||||||||||
Does the voltage measure in the specified range? | B+ (10-14 V) | Go to Step 5 | Go to Step 6 | |||||||||||||
5 |
Is the repair complete? | -- | Go to Step 13 | -- | ||||||||||||
Using a DMM, measure the voltage by backprobing the RSA harness connector A8 and ground (ensure that the radio is on). Does the voltage measure in the specified range? | B+ (10-14 V) | Go to Step 7 | Go to Step 8 | |||||||||||||
7 | Repair the poor connection or the open in CKT 351. Is the repair complete? | -- | Go to Step 13 | -- | ||||||||||||
Using a DMM, measure the voltage by backprobing the Interface Module (IM) harness connector terminals A8 and B6. Does the voltage measure in the specified range? | B+ (10-14 V) | Go to Step 9 | Go to Step 10 | |||||||||||||
9 |
Is the repair complete? | -- | Go to Step 13 | -- | ||||||||||||
Using a DMM, measure the voltage by backprobing the Interface Module (IM) harness connector terminals A8 and ground. Does the voltage measure in the specified range? | B+ (10-14 V) | Go to Step 11 | Go to Step 12 | |||||||||||||
11 | Repair a poor connection or an open in CKT 351 (power feed to the IM). Is the repair complete? | -- | Go to Step 13 | -- | ||||||||||||
12 | Repair a poor connection or an open in CKT 314 (ground feed to the IM). Is the repair complete? | -- | Go to Step 13 | -- | ||||||||||||
Doe the VES operate normally? | -- | System OK | ||||||||||||||
