Battery Positive Cable Replacement LS4
Removal Procedure
Important: When replacing battery cables be sure to use replacement cables that are the same type, gauge and length.
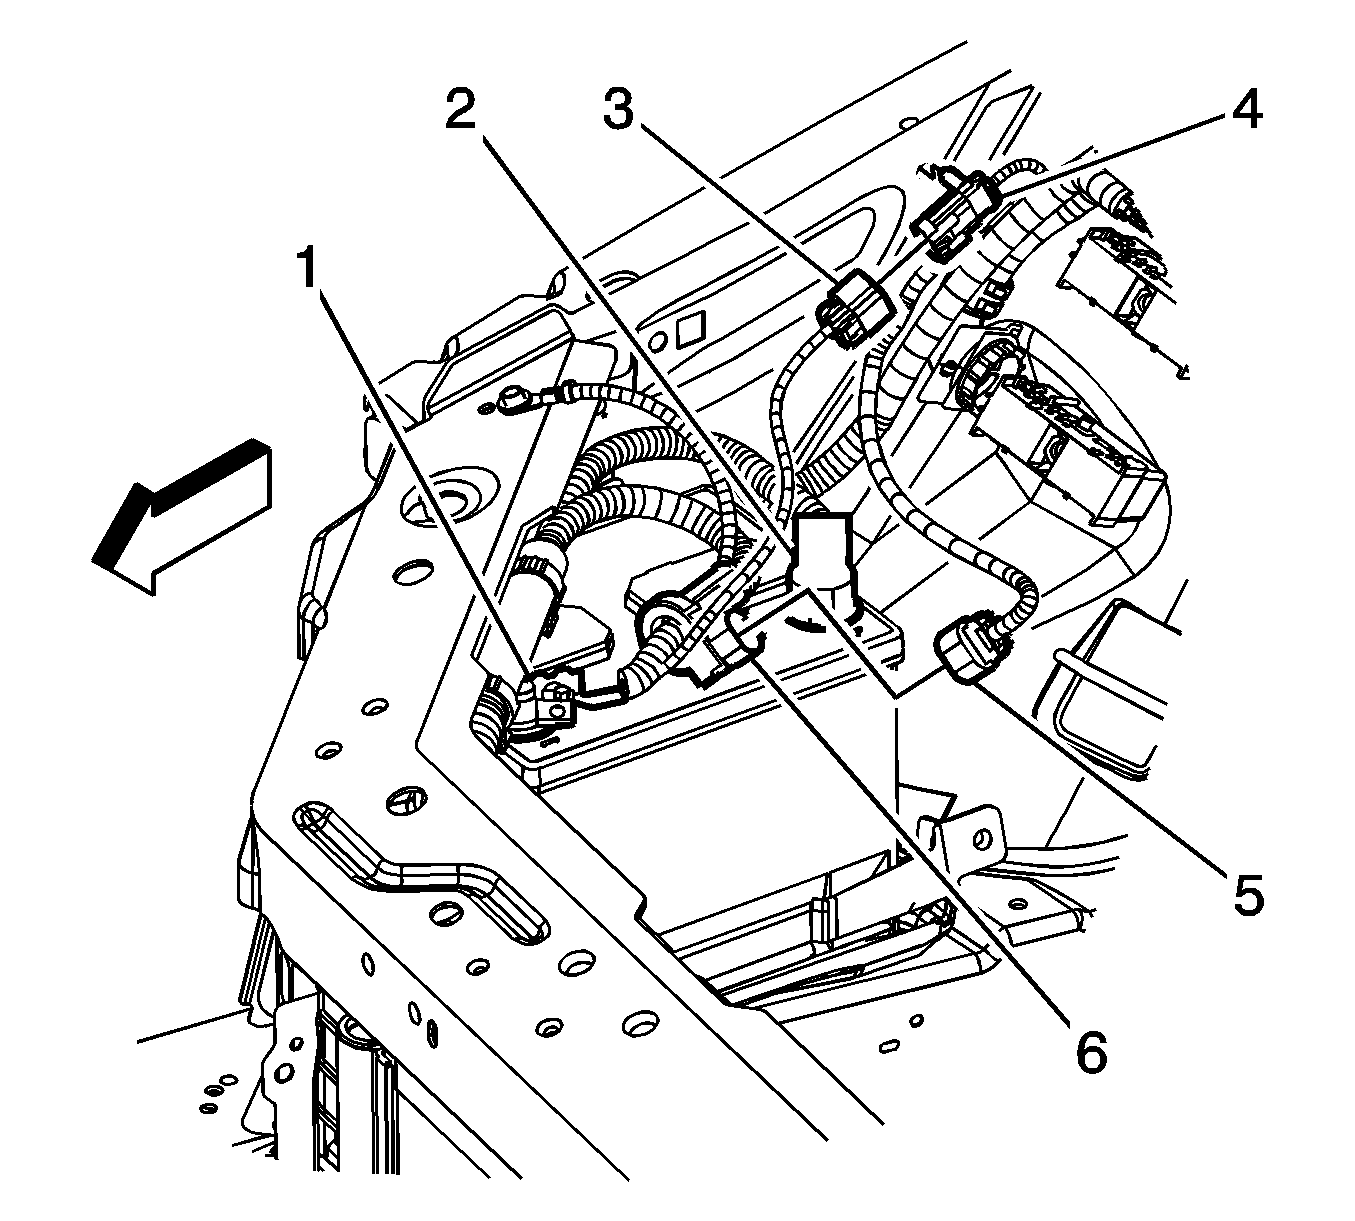
- Disconnect the negative battery cable (1). Refer to Battery Negative Cable Disconnection and Connection .
- Reposition the cover (2) and loosen the positive battery terminal nut.
- Remove the positive battery terminal from the battery.
- Disconnect the battery cable connector (3) from the inline instrument panel (I/P) harness electrical connector (4).
- Disconnect the I/P harness electrical connector (5) from the battery current sensor (6).
- Remove the positive battery cable junction block cover.
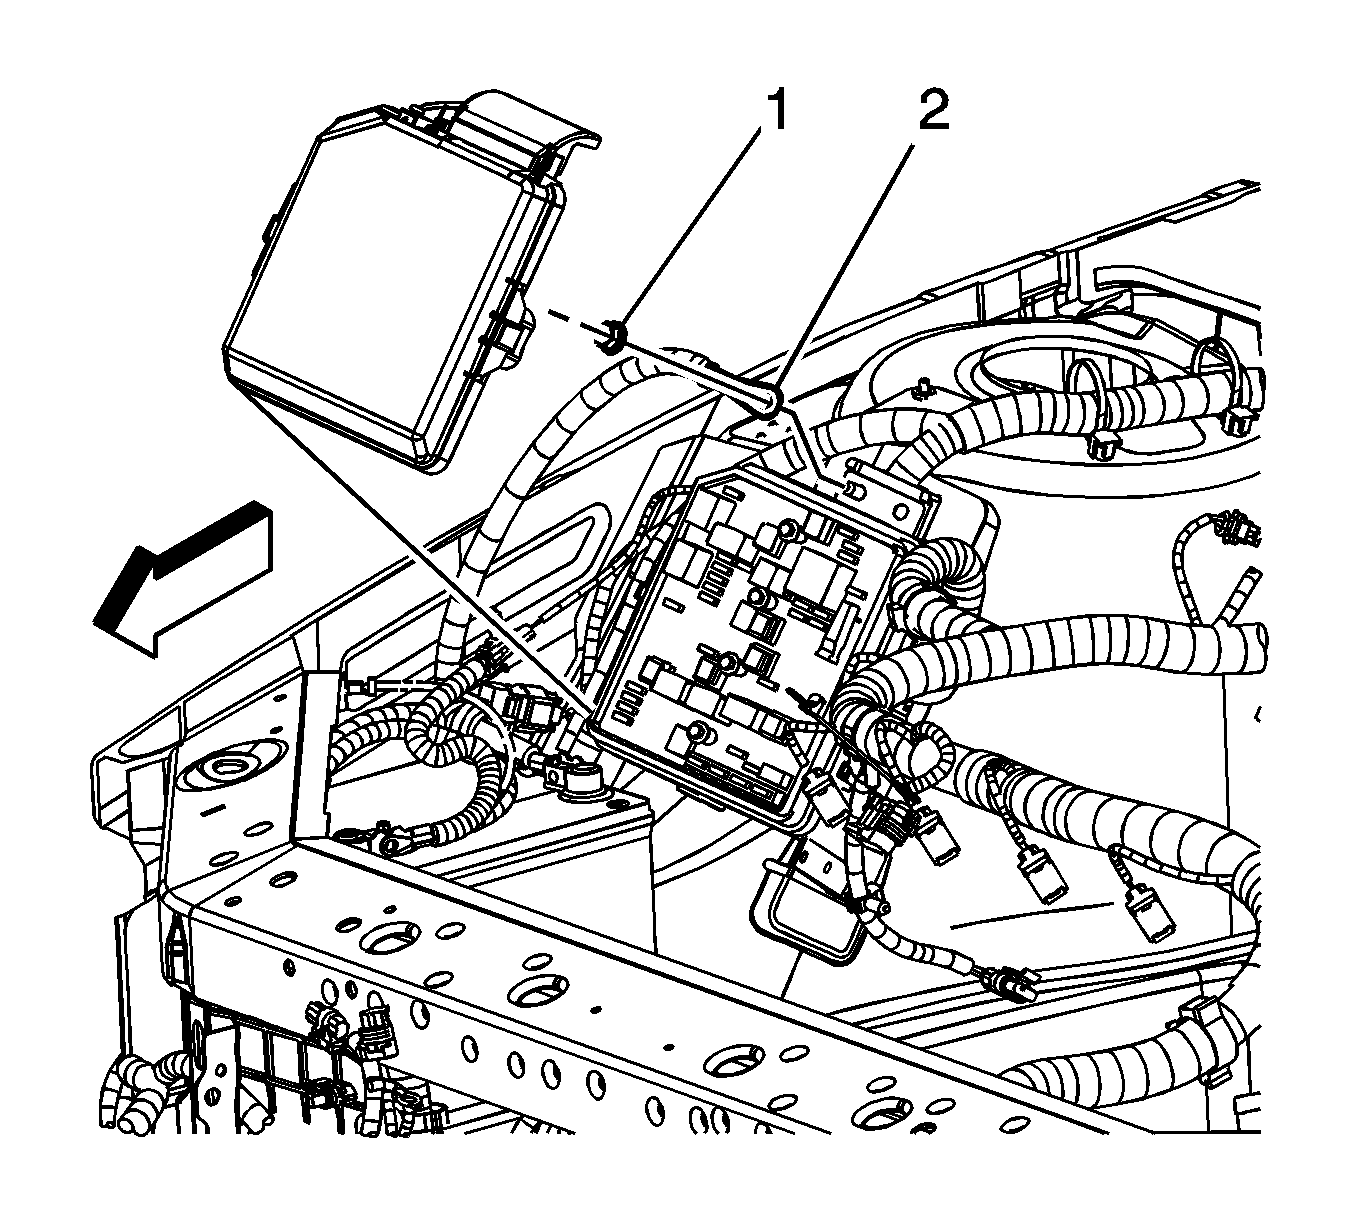
- Remove the positive battery cable junction block lead nut (1).
- Remove the positive battery lead terminal (2) from the bussed electrical center (BEC).
- Un-clip and remove the BEC from the strut tower.
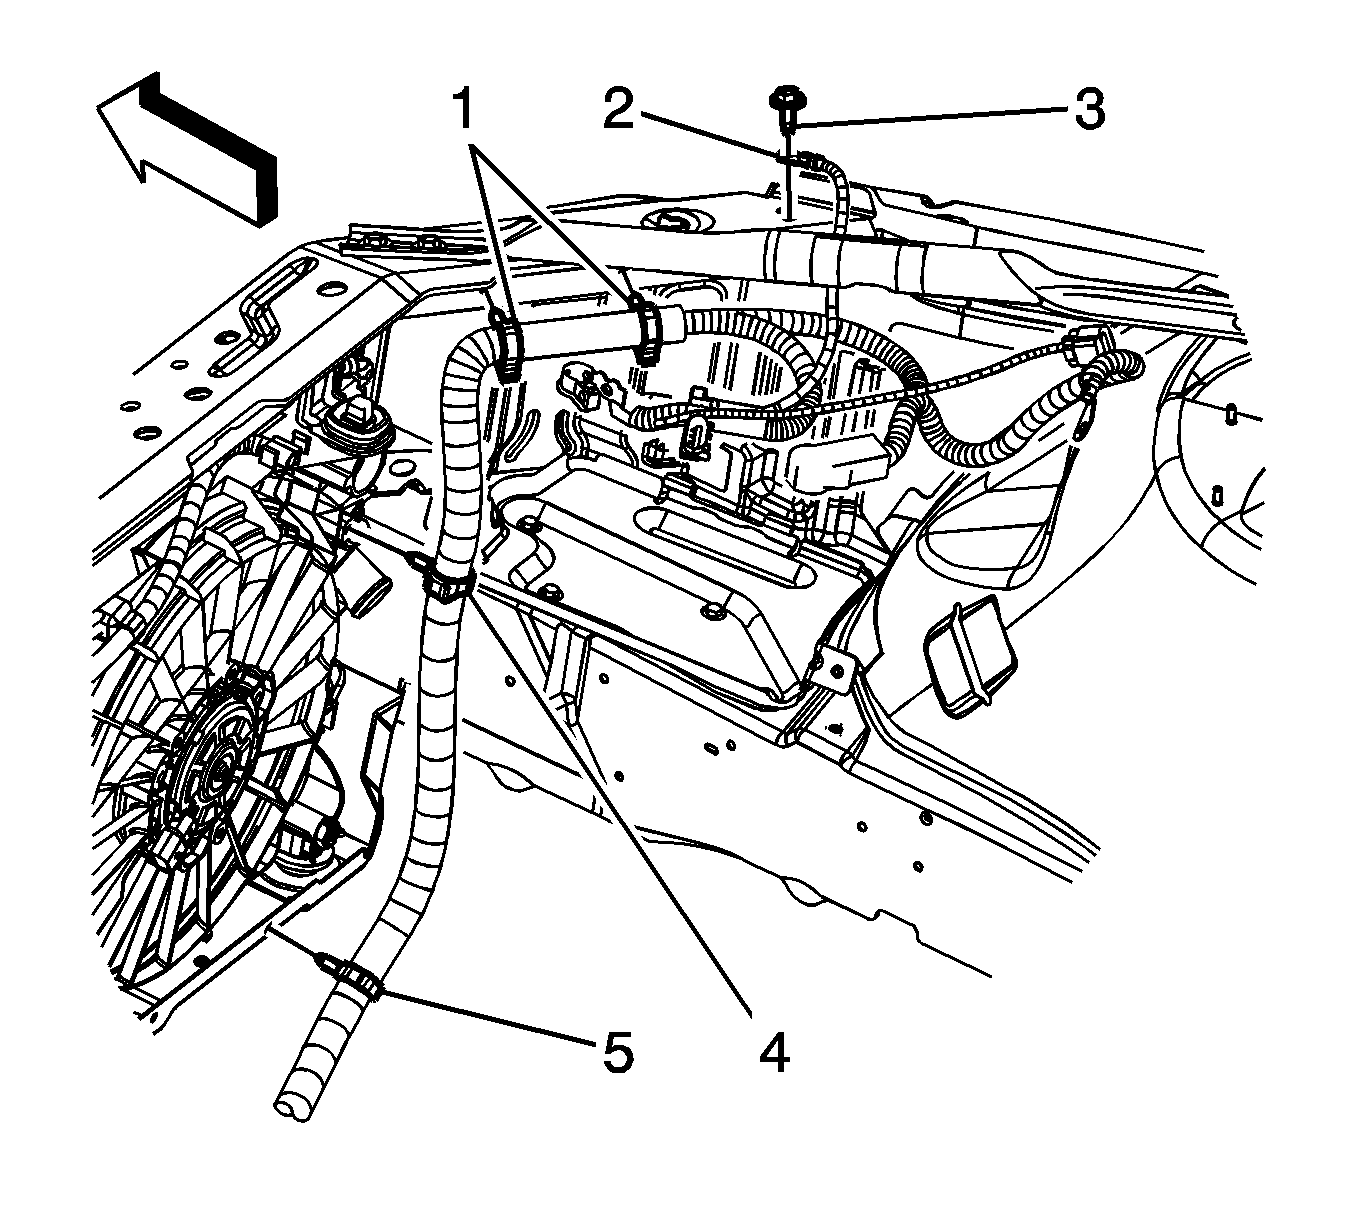
- Remove the ground wire bolt (3) and reposition the wire (2) from the top rail.
- Remove the battery cable harness retaining clips (1, 4, and 5) from the front rail and fan shroud.
- Remove the battery cable harness retainers from the engine cradle.
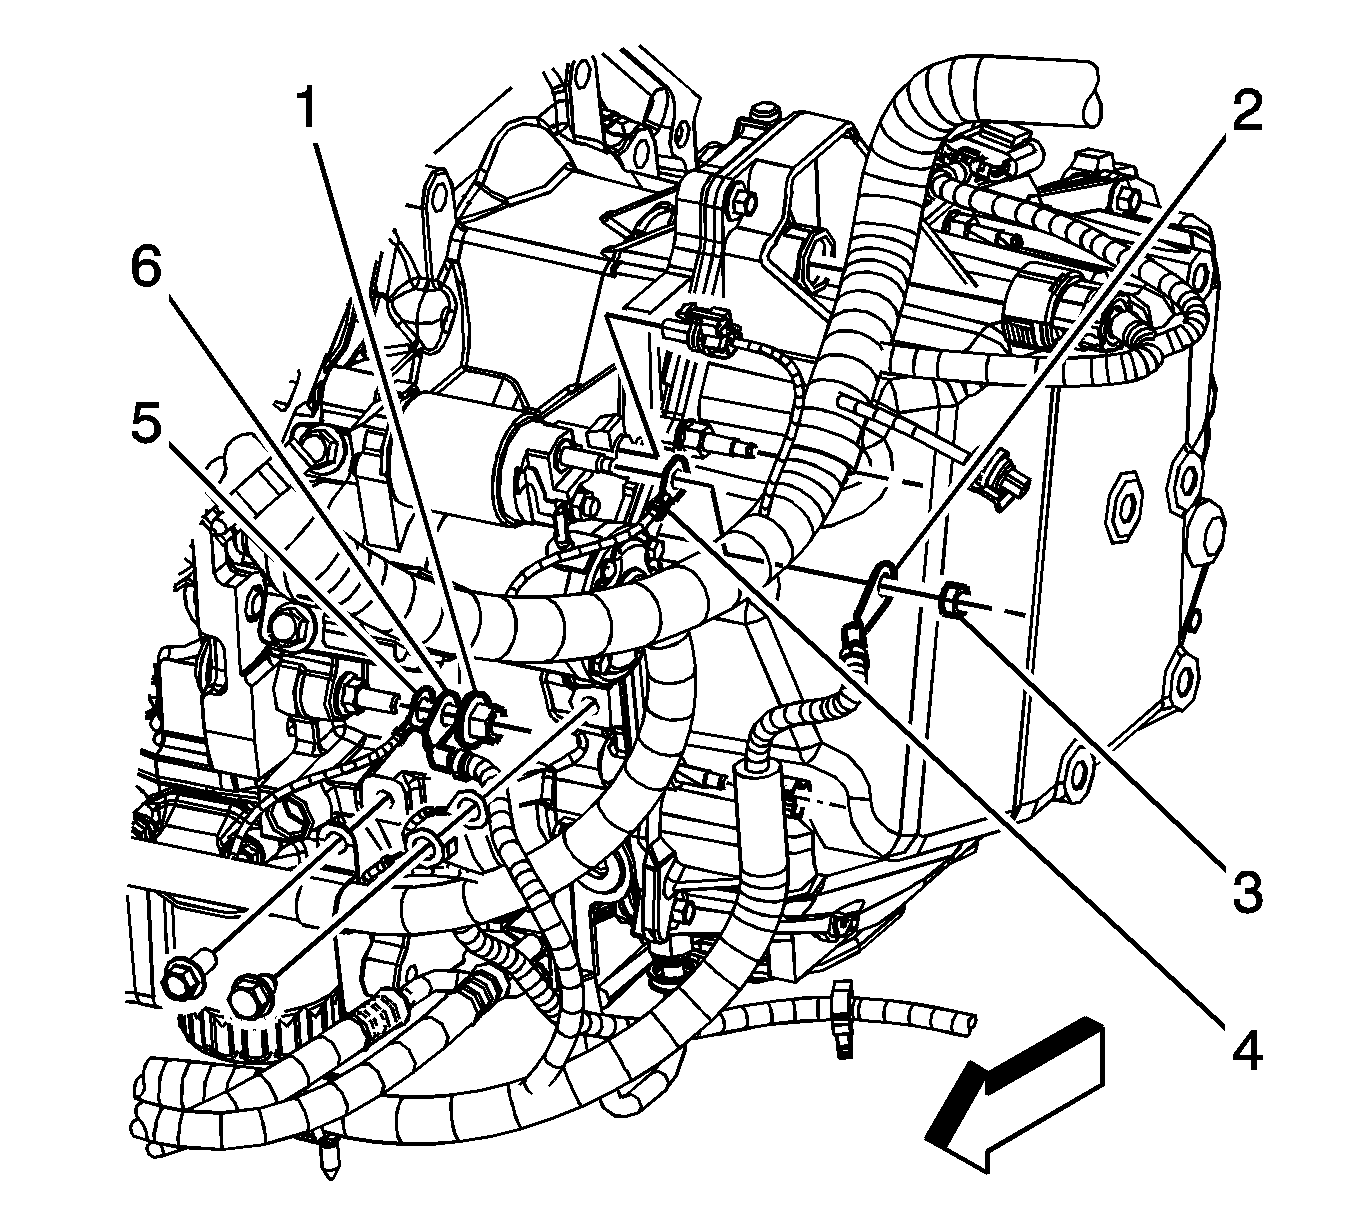
- Remove the transaxle stud nut (1).
- Remove the engine ground cable (6) from the transaxle stud.
- Remove the positive battery cable nut (3) from the starter.
- Remove the positive battery cable (2) from the starter motor BAT terminal.
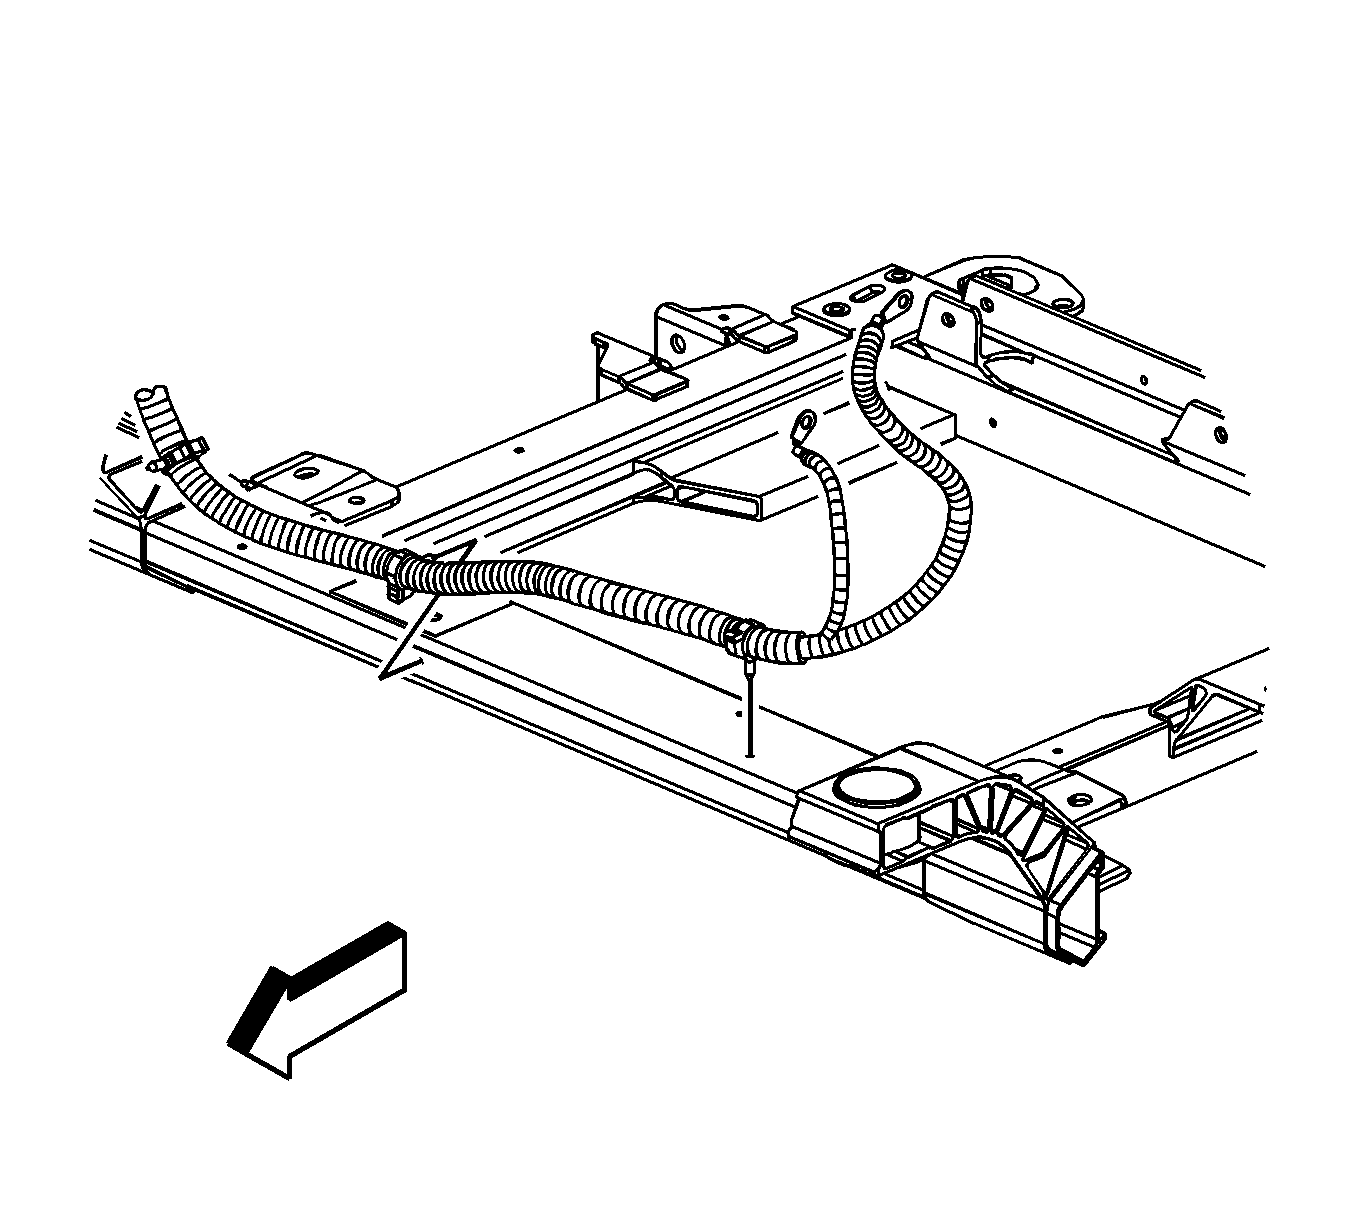
- Remove the battery cable harness from the retainer.
- Remove the battery cable harness from the vehicle.
- Carefully cut the tape on the wiring harness conduit.
- Remove the positive battery cable from the wiring harness conduit.
Installation Procedure
- Install the positive battery cable to the wiring harness conduit.
- Re-tape the wiring harness conduit.
- Install the battery cable harness to the vehicle.
- Install the battery cable harness to the retainer.
- Install the positive battery cable (2) to the starter motor BAT terminal.
- Install the positive battery cable nut (3) to the starter.
- Ensure that the engine harness ground terminal (5) is installed on the transaxle stud prior to installing the engine ground cable.
- Install the engine ground cable (6) to the transaxle stud.
- Install the transaxle stud nut (1).
- Install the battery cable harness retainers to the engine cradle.
- Install the battery cable harness retaining clips (1, 4, and 5) to the front rail and fan shroud.
- Position the wire (2) to the top rail, and install the ground wire bolt (3).
- Install the BEC to the strut tower.
- Install the positive battery lead terminal (2) to the BEC.
- Install the positive battery cable junction block lead nut (1).
- Install the positive battery cable junction block cover.
- Connect the I/P harness electrical connector (5) to the battery current sensor (6).
- Connect the battery cable connector (3) to the inline I/P harness electrical connector (4).
- Install the positive battery terminal from the battery.
- Tighten the positive battery terminal nut and position the cover (2)
- Connect the negative battery cable. Refer to Battery Negative Cable Disconnection and Connection .

Notice: Refer to Fastener Notice in the Preface section.
Tighten
Tighten the nut to 10 N·m (89 lb in).
Tighten
Tighten the nut to 30 N·m (22 lb ft).


Tighten
Tighten the bolt to 10 N·m (89 lb in).

Tighten
Tighten the nut to 10 N·m (89 lb in).

Tighten
Tighten the nut to 15 N·m (11 lb ft).
Battery Positive Cable Replacement L26
Removal Procedure
Important: When replacing battery cables be sure to use replacement cables that are the same type, gauge and length.
- Disconnect the negative battery cable. Refer to Battery Negative Cable Disconnection and Connection .
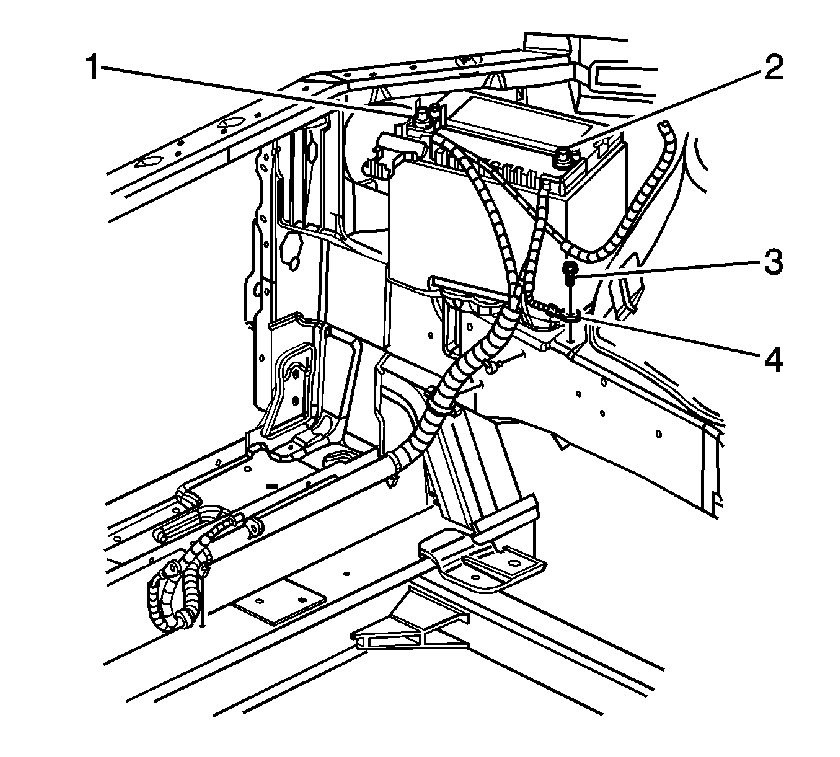
- Loosen the positive battery terminal nut.
- Remove the positive battery terminal (1) from the battery.
- Remove the ground wire bolt (3) and the wire (4) from the frame.
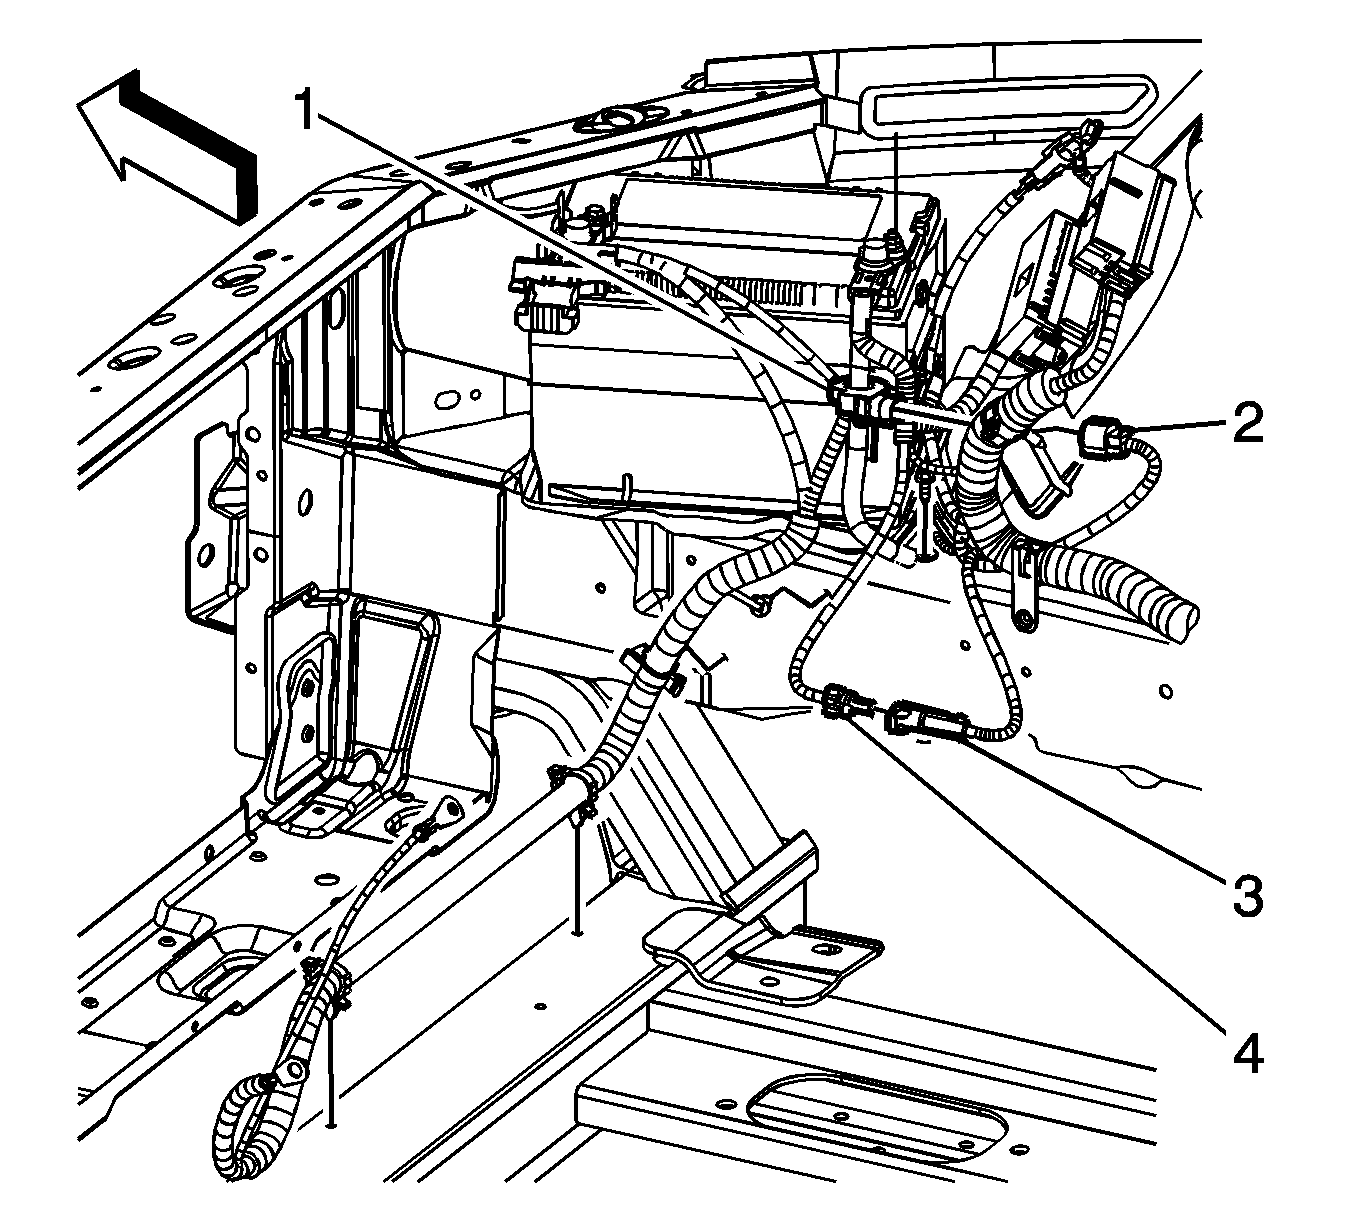
- Disconnect the instrument panel (I/P) harness electrical connector (2) from the battery current sensor (1).
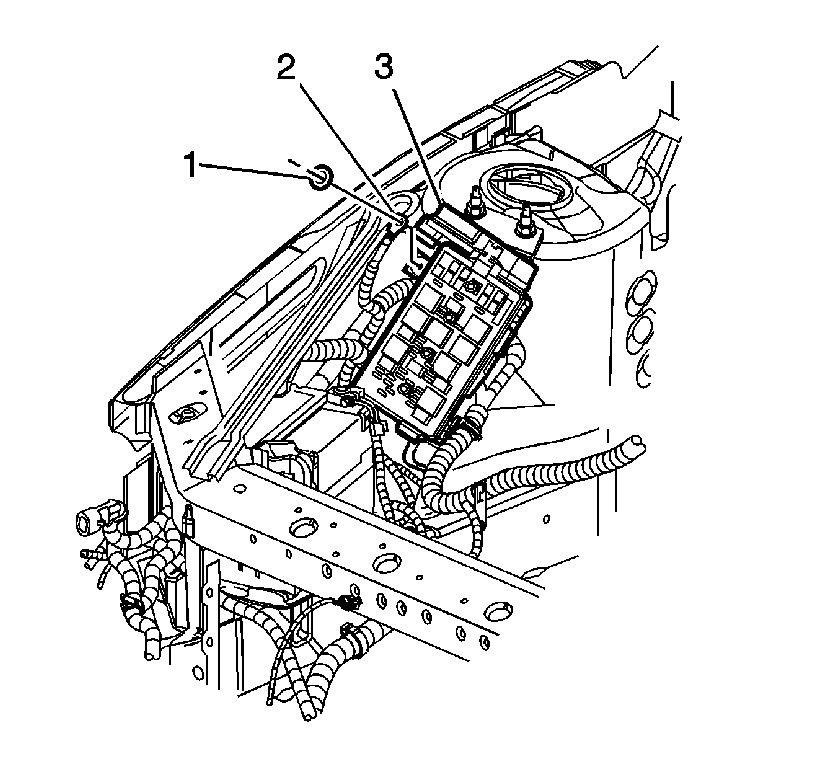
- Remove the positive battery cable junction block lead nut (1).
- Remove the positive battery cable (2) from the bussed electrical center (BEC).
- Remove the BEC (3) from the strut tower.
- Un-clip and remove the positive battery cable harness from the BEC.
- Raise and support the vehicle. Refer to Lifting and Jacking the Vehicle .
- Remove the front lower air deflector. Refer to Radiator Air Lower Baffle and Deflector Replacement .
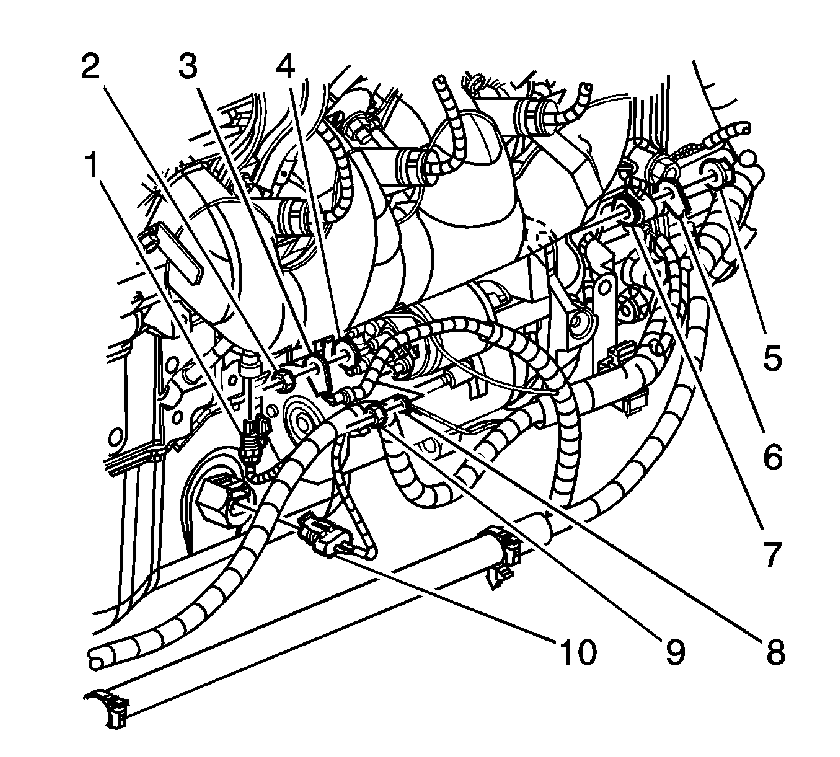
- Remove the positive battery cable nut (2) from the starter.
- Remove the positive battery cable (3) from the starter motor BAT terminal.
- Remove the transaxle stud nut (5).
- Remove the engine ground cable (6) from the transaxle stud.
- Un-clip and remove the battery cable harness from the retainers.
- Remove the battery cable harness from the vehicle.
- Carefully cut the tape on the wiring harness conduit.
- Remove the positive battery cable from the wiring harness conduit.
Installation Procedure
- Install the positive battery cable into the wiring harness conduit.
- Re-tape the wiring harness conduit.
- Install the battery cable harness to the vehicle.
- Install the battery cable harness to the retainers.
- Install the engine ground cable (6) to the transaxle stud.
- Install the transaxle stud nut (5).
- Install the positive battery cable to the starter motor BAT terminal.
- Install the starter solenoid BAT terminal nut.
- Install the front lower air deflector. Refer to Radiator Air Lower Baffle and Deflector Replacement .
- Lower the vehicle.
- Install the positive battery cable harness to the BEC.
- Install the BEC to the strut tower.
- Install the positive battery cable (2) to the BEC (3).
- Install the positive battery cable junction block lead nut (1).
- Connect the I/P harness electrical connector (2) to the battery current sensor (1).
- Install the ground wire (4) and the bolt (3) to the frame.
- Install the positive battery terminal (1) to the battery.
- Connect the negative battery cable. Refer to Battery Negative Cable Disconnection and Connection .

Notice: Refer to Fastener Notice in the Preface section.
Tighten
Tighten the nut to 30 N·m (22 lb ft).
Tighten
Tighten the nut to 10 N·m (89 lb in).

Tighten
Tighten the nut to 10 N·m (89 lb in).


Tighten
Tighten the bolt to 10 N·m (89 lb in).
Tighten
Tighten the nut to 15 N·m (11 lb ft).
