Removal Procedure
- Disable the SIR system. Refer to SIR Disabling and Enabling or to SIR Disabling and Enabling .
- For pretensioner handling and scrapping refer to Pretensioner Handling and Scrapping .
- Remove the seat bolts. Refer to Front Seat Replacement - Bucket .
- Tip the seat forward, remove the position assurance pin (2), and disconnect the pretensioner electric connector (1) from the body harness.
- Note how the pretensioner wire is secured and disconnect the seat harness connector from the body harness.
- Disconnect the pretensioner electrical connector from the seat electrical harness.
- If equipped, disconnect the seat belt reminder cable.
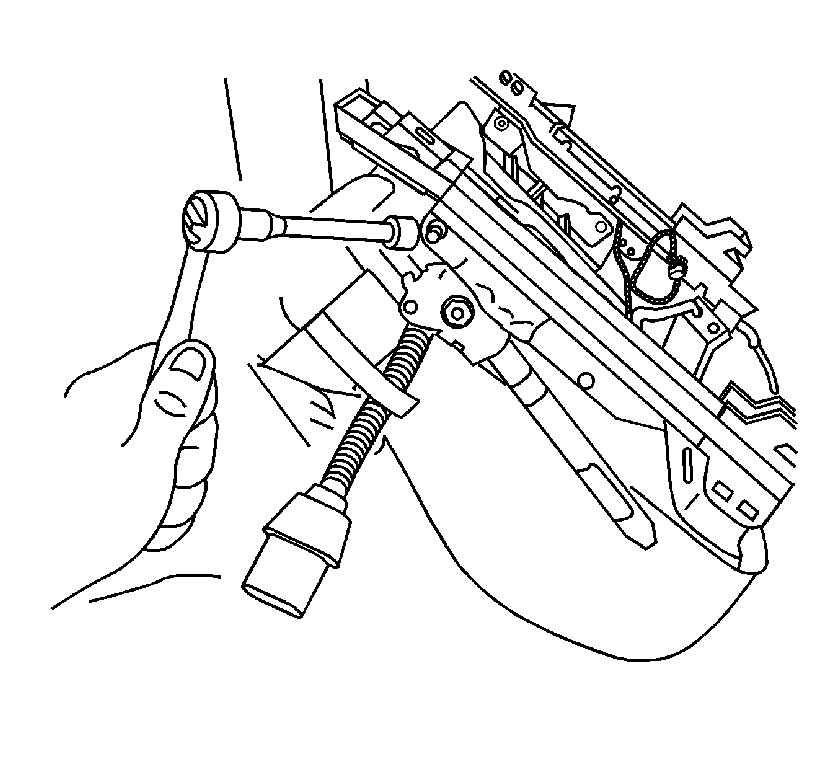
- Remove the nut from the seat belt pretensioner bracket.
- Remove the wiring harness from the seat belt pretensioner through the seat bottom frame.
- Remove the pretensioner and bracket, from the seat .
Caution: Refer to SIR Caution in the Preface section.
Caution: When carrying an undeployed inflatable restraint seat belt pretensioner:
• Do not carry the seat belt pretensioner by the wires or connector. • Carry the seat belt pretensioner by the piston tube, keeping hands and
fingers away from the cable. • Make sure the open end of the seat belt pretensioner piston tube points
away from you and other people. • Do not cover the seat belt pretensioner piston tube opening with your
hand.

Installation Procedure
- Position the pretensioner to the seat bottom frame.
- Position the wiring harness to the seat belt pretensioner through the seat bottom frame and secure using the same method as noted during disassembly.
- Connect the pretensioner electrical connector to the seat electrical harness.
- If equipped, connect the seat belt reminder cable.
- Install the nut to the seat belt pretensioner bracket.
- Install the pretensioner electric connector (1) and position assurance pin (2) to the body harness.
- Connect the seat harness connector to the body harness.
- Install the driver seat bolts. Refer to Front Seat Replacement - Bucket .
- Enable the SIR system. Refer to SIR Disabling and Enabling or to SIR Disabling and Enabling .
- If the pretensioner is to be scrapped, deploy the pretensioner. Refer to Pretensioner Handling and Scrapping .
- If the pretensioner is to be returned undeployed to the manufacturer for warranty, refer to Pretensioner Handling and Scrapping .
Important: If pretensioner wire is not secured properly, warning light may go off as wires are strained under load. Failure to secure wire may result in failure, service light and unnecessary pretensioner replacement.
Notice: Refer to Fastener Notice in the Preface section.
Important: If the pretensioner to bracket nut was removed it requires the same torque as the bracket to seat adjuster nut.
Tighten
Tighten the nut to 40 N·m (30 lb ft).
