Removal Procedure
Important: Clean the fuel and evaporative emission (EVAP) connections and surrounding areas prior to disconnecting the lines in order the avoid possible system contamination.
- Relieve the fuel system pressure. Refer to
Fuel Pressure Relief
.
- Remove the air cleaner outlet duct. Refer to
Air Cleaner Resonator Outlet Duct Replacement
.
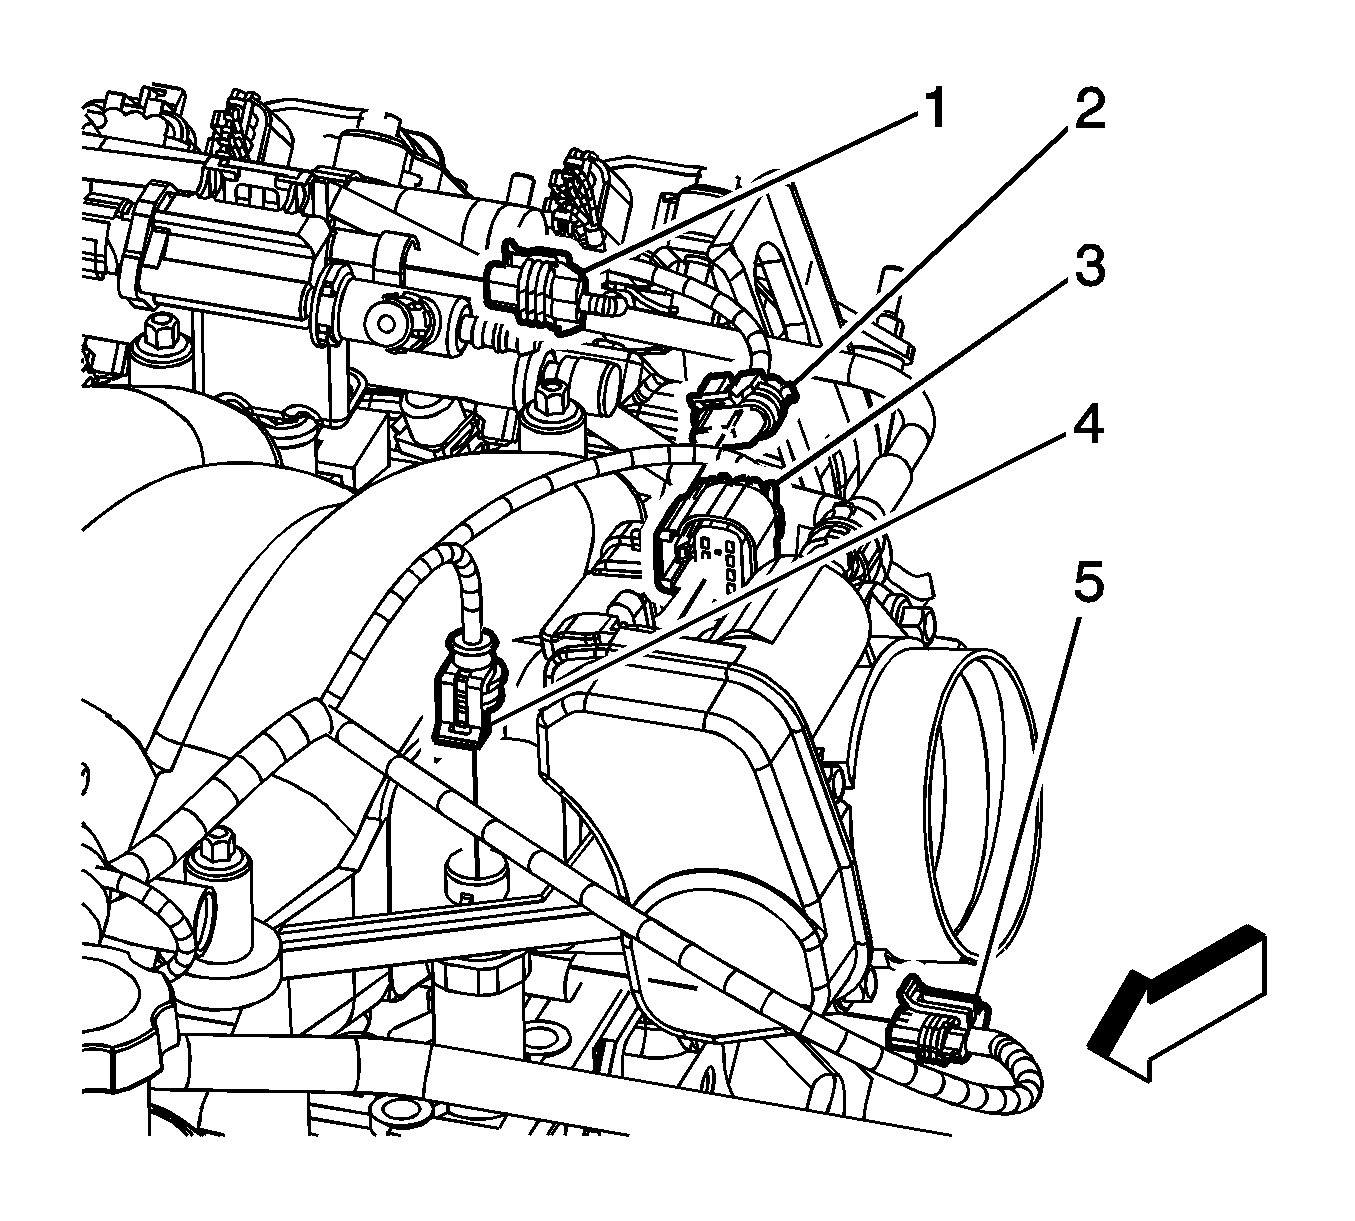
- Disconnect the following electrical connectors:
| • | EVAP purge solenoid (1) |
| • | Manifold absolute pressure (MAP) sensor (2) |
| • | Electronic throttle control (ETC) (3) |
| • | Oil pressure sensor (4) |
| • | Valve lifter oil manifold (5) |
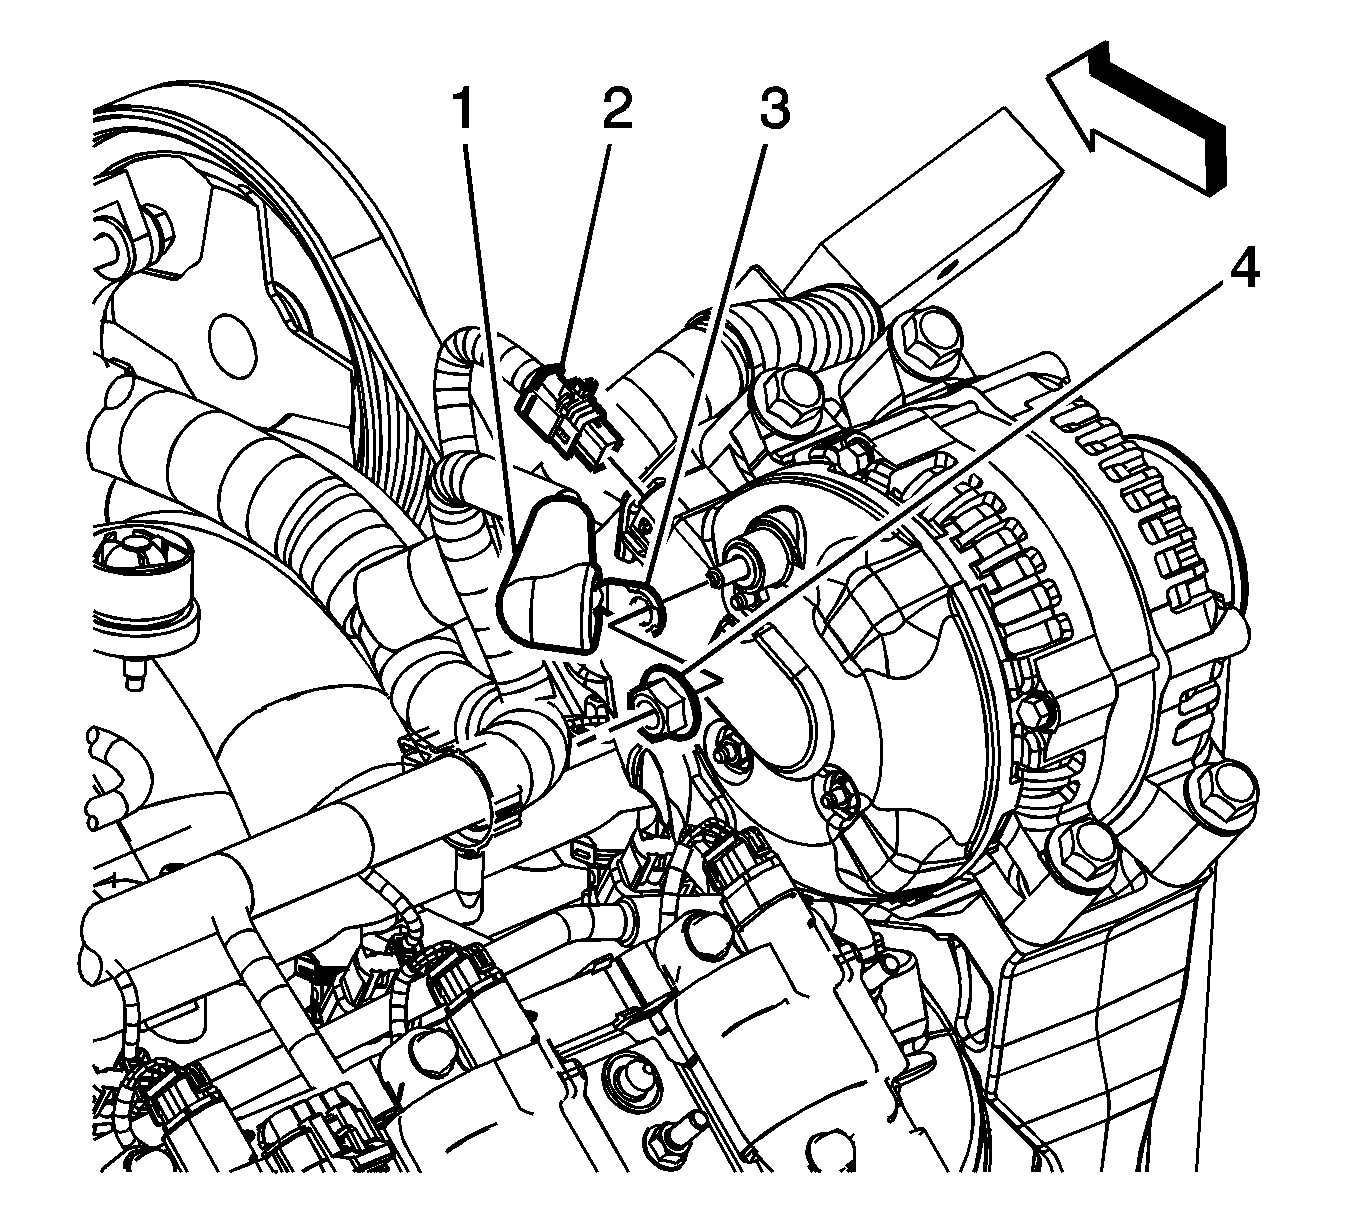
- Disconnect the generator electrical connector (2).
- Remove the connector position assurance (CPA) retainer (3).
- Disconnect the main ignition coil harness electrical connector (4).
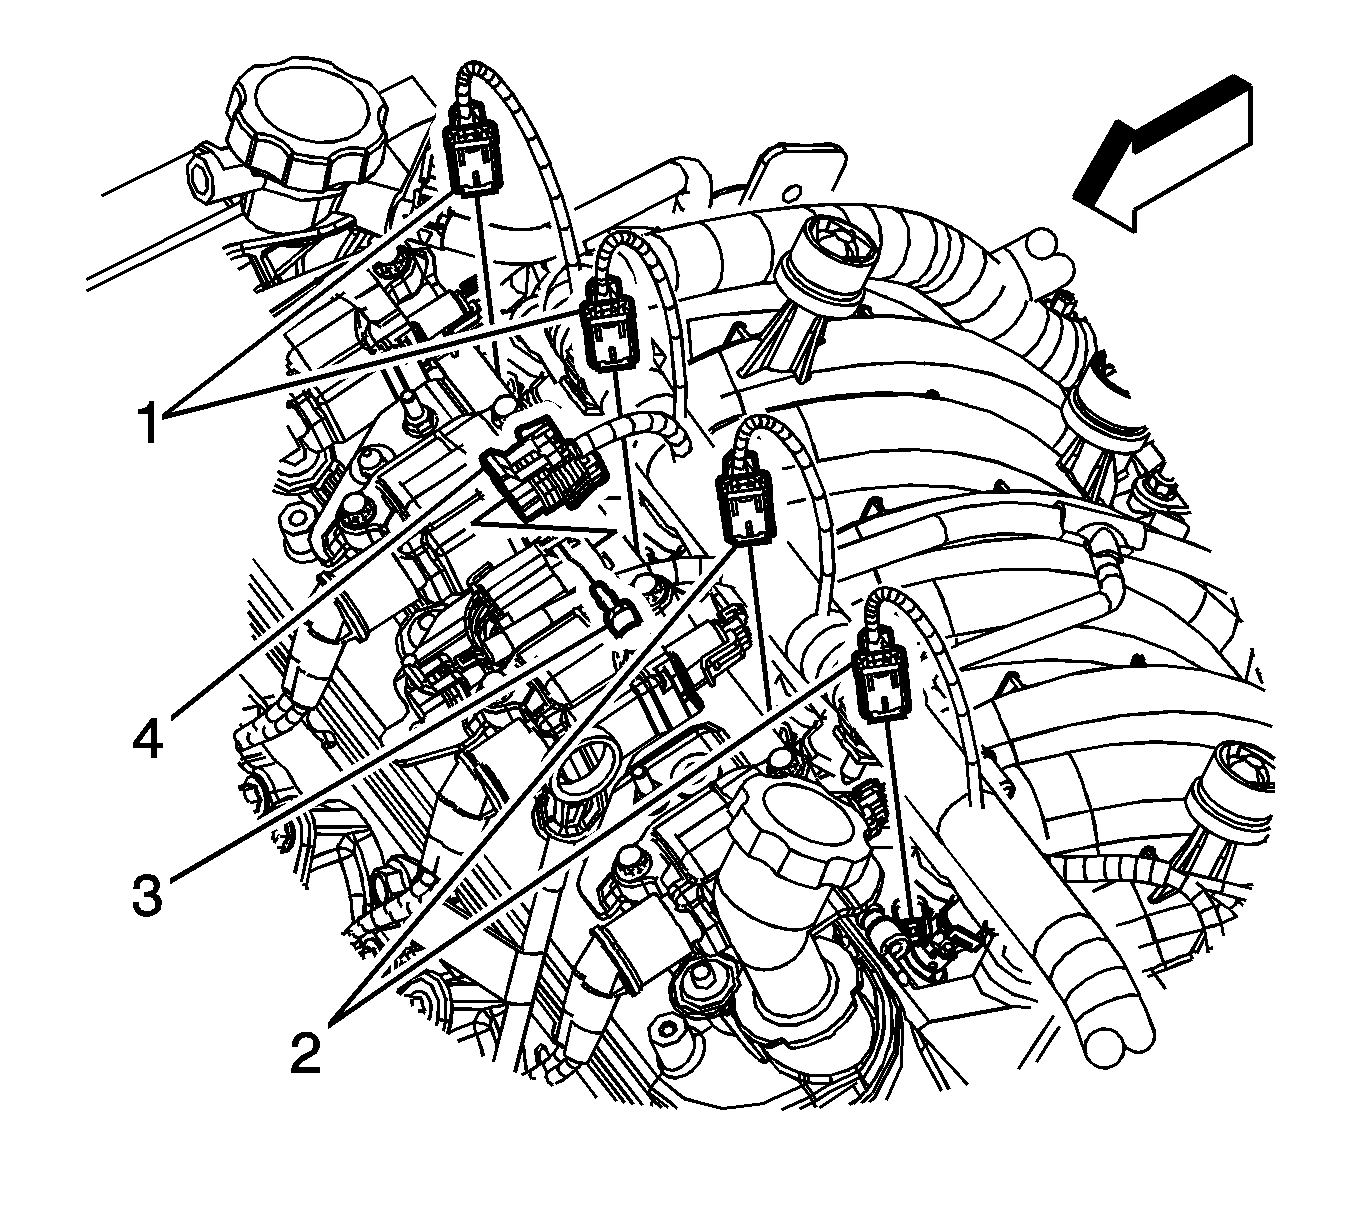
Important: Mark the injector connectors to their corresponding injectors to ensure correct reassembly.
- Disconnect the fuel injector electrical connectors (1, 2).
- Remove the CPA retainer (3).
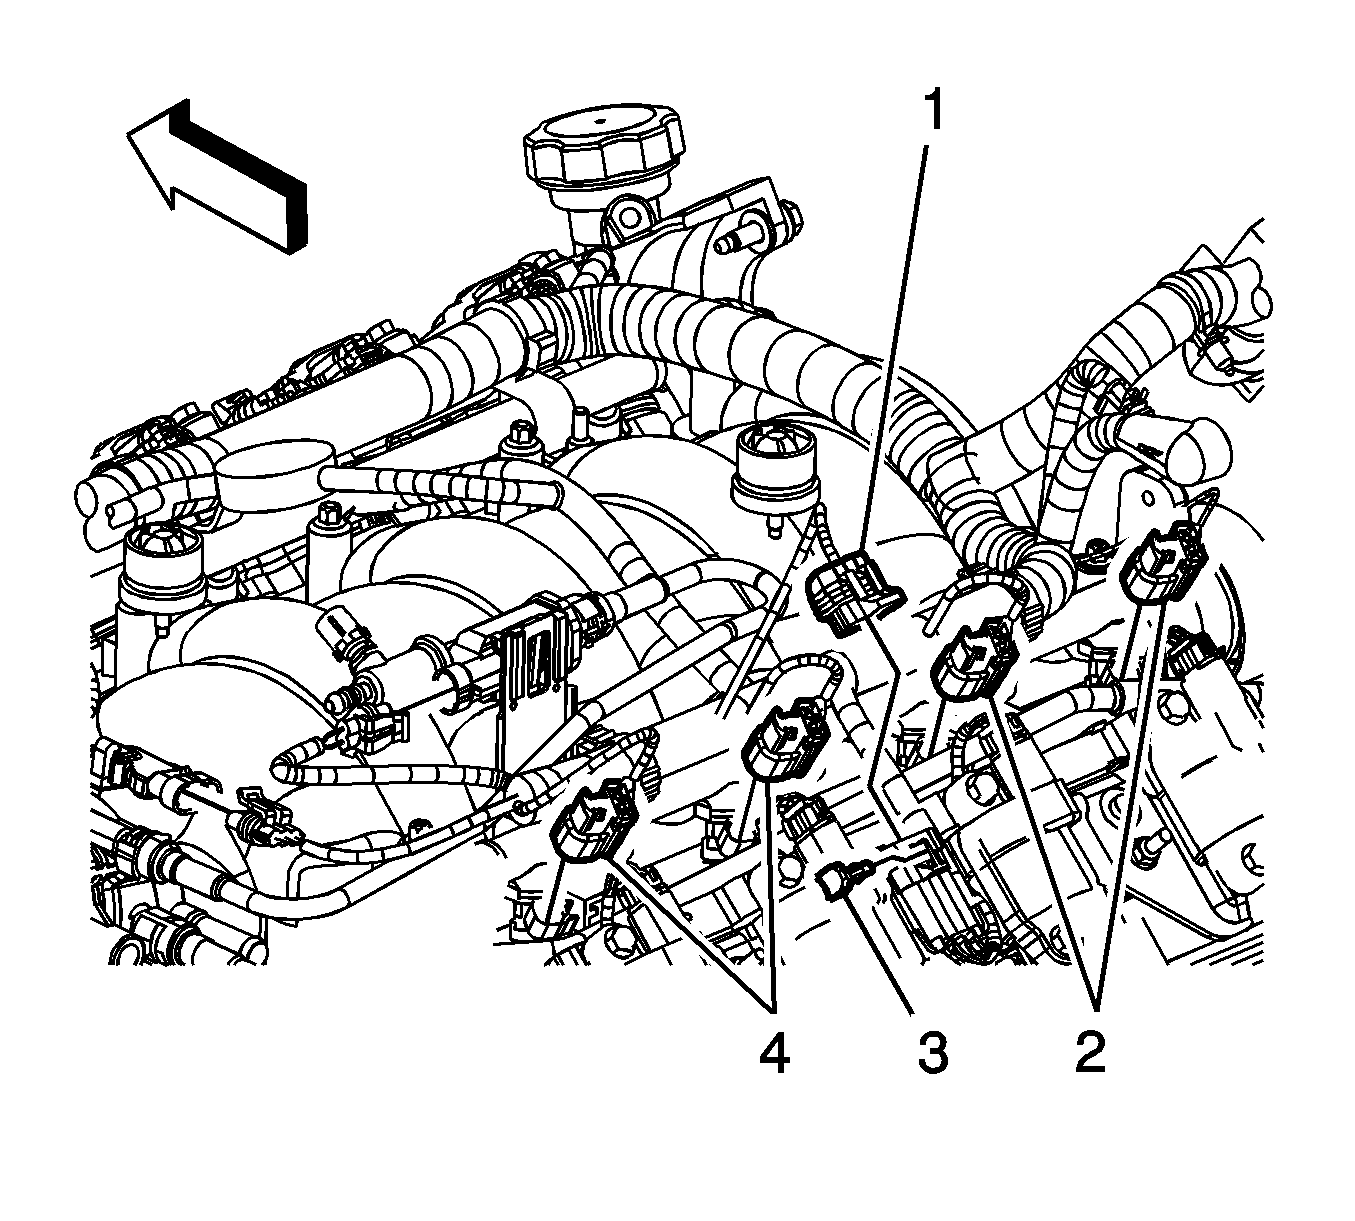
- Disconnect the main ignition coil harness electrical connector (1).
Important: Mark the injector connectors to their corresponding injectors to ensure correct reassembly.
- Disconnect the fuel injector electrical connectors (2, 4).

- Remove the engine wiring harness retainers from the tabs on the fuel rail. Reposition the harness out of the
way.
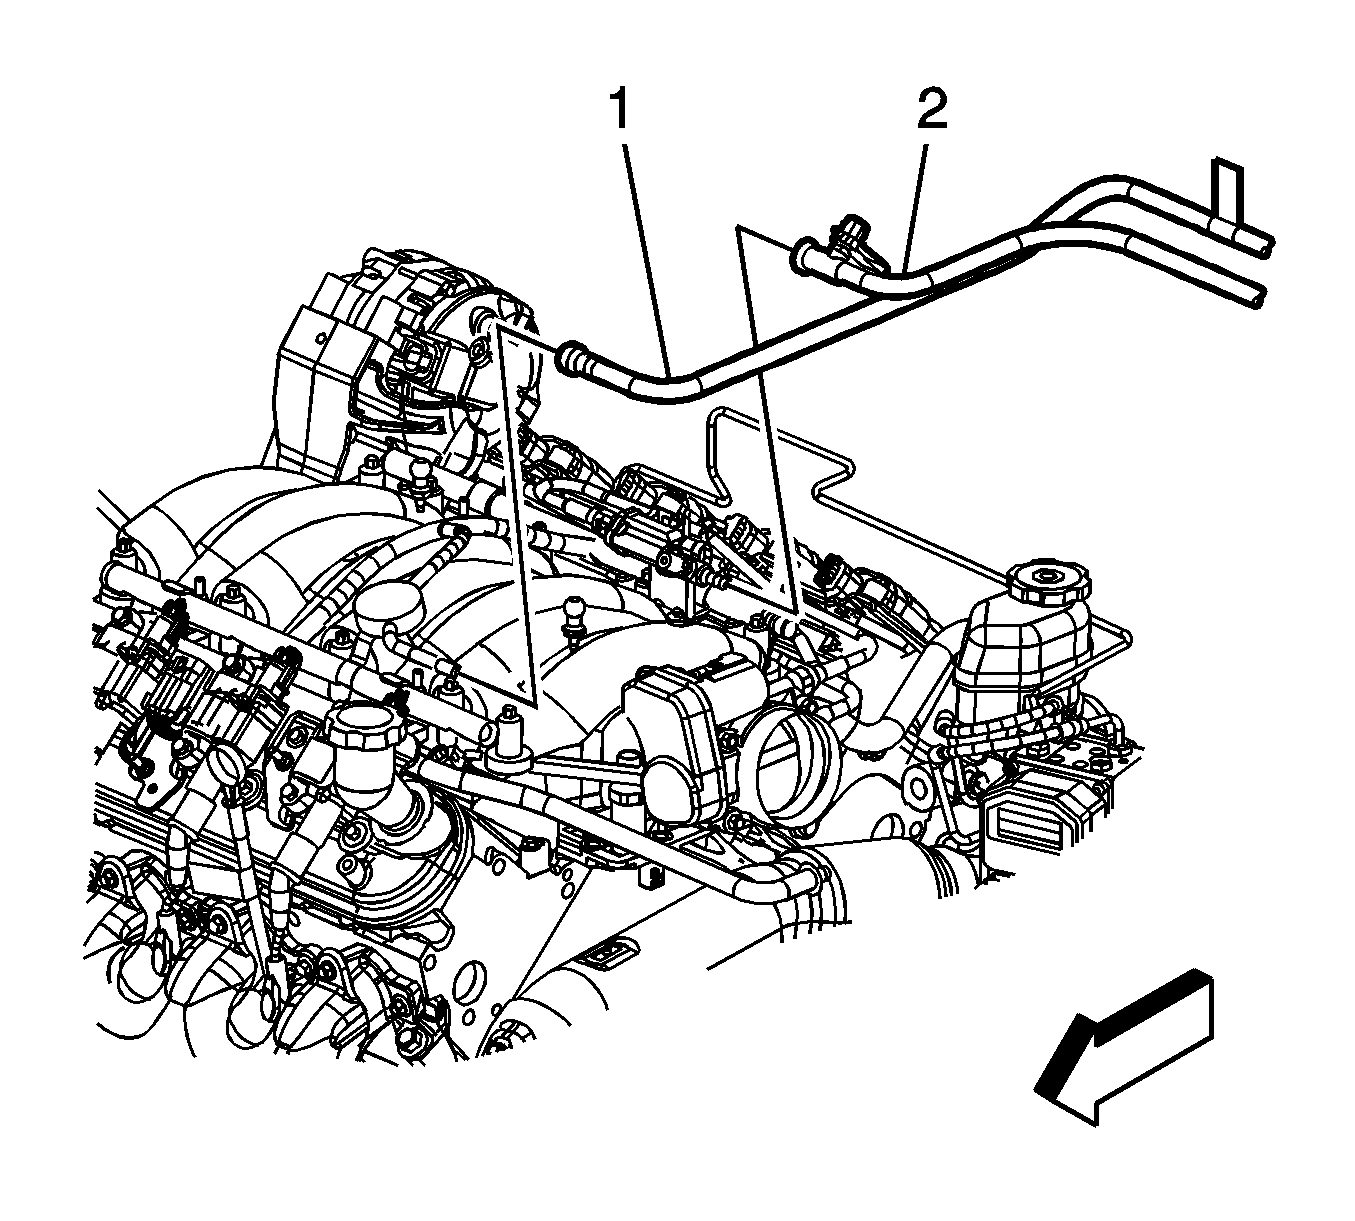
- Disconnect the fuel feed (1) and EVAP (2) lines. Refer to
Metal Collar Quick Connect Fitting Service
and
Plastic Collar Quick Connect Fitting Service
.
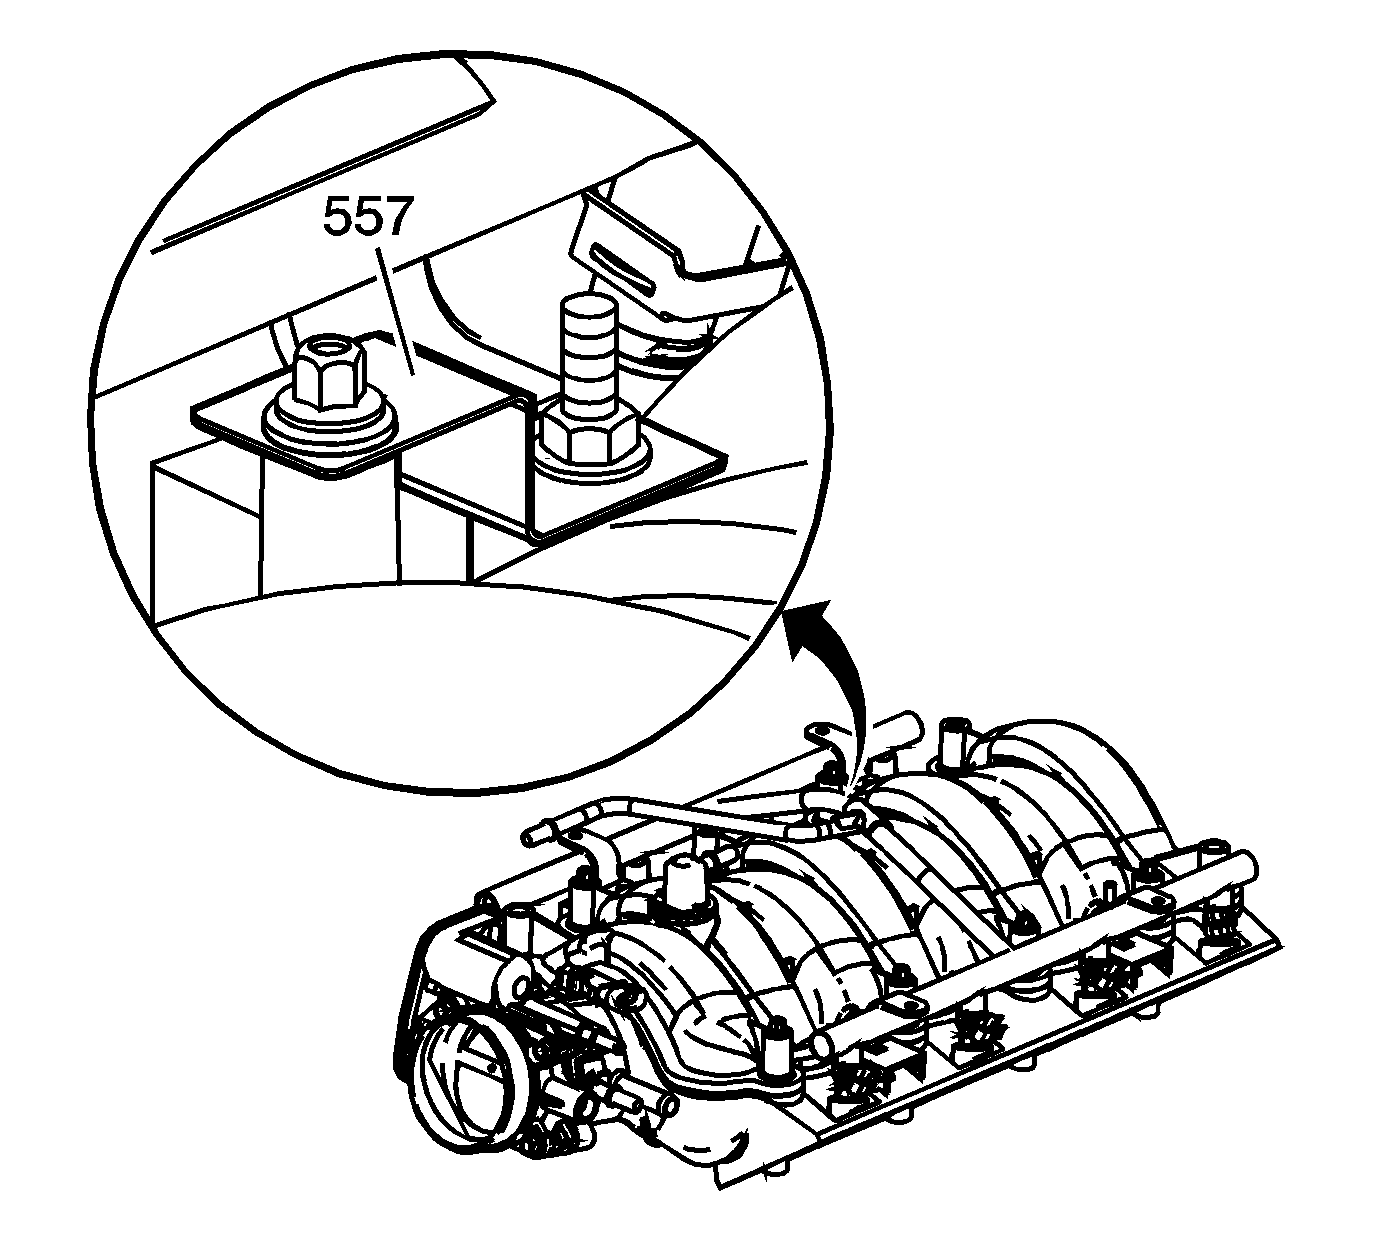
- Note the location of the fuel rail ground strap (557).
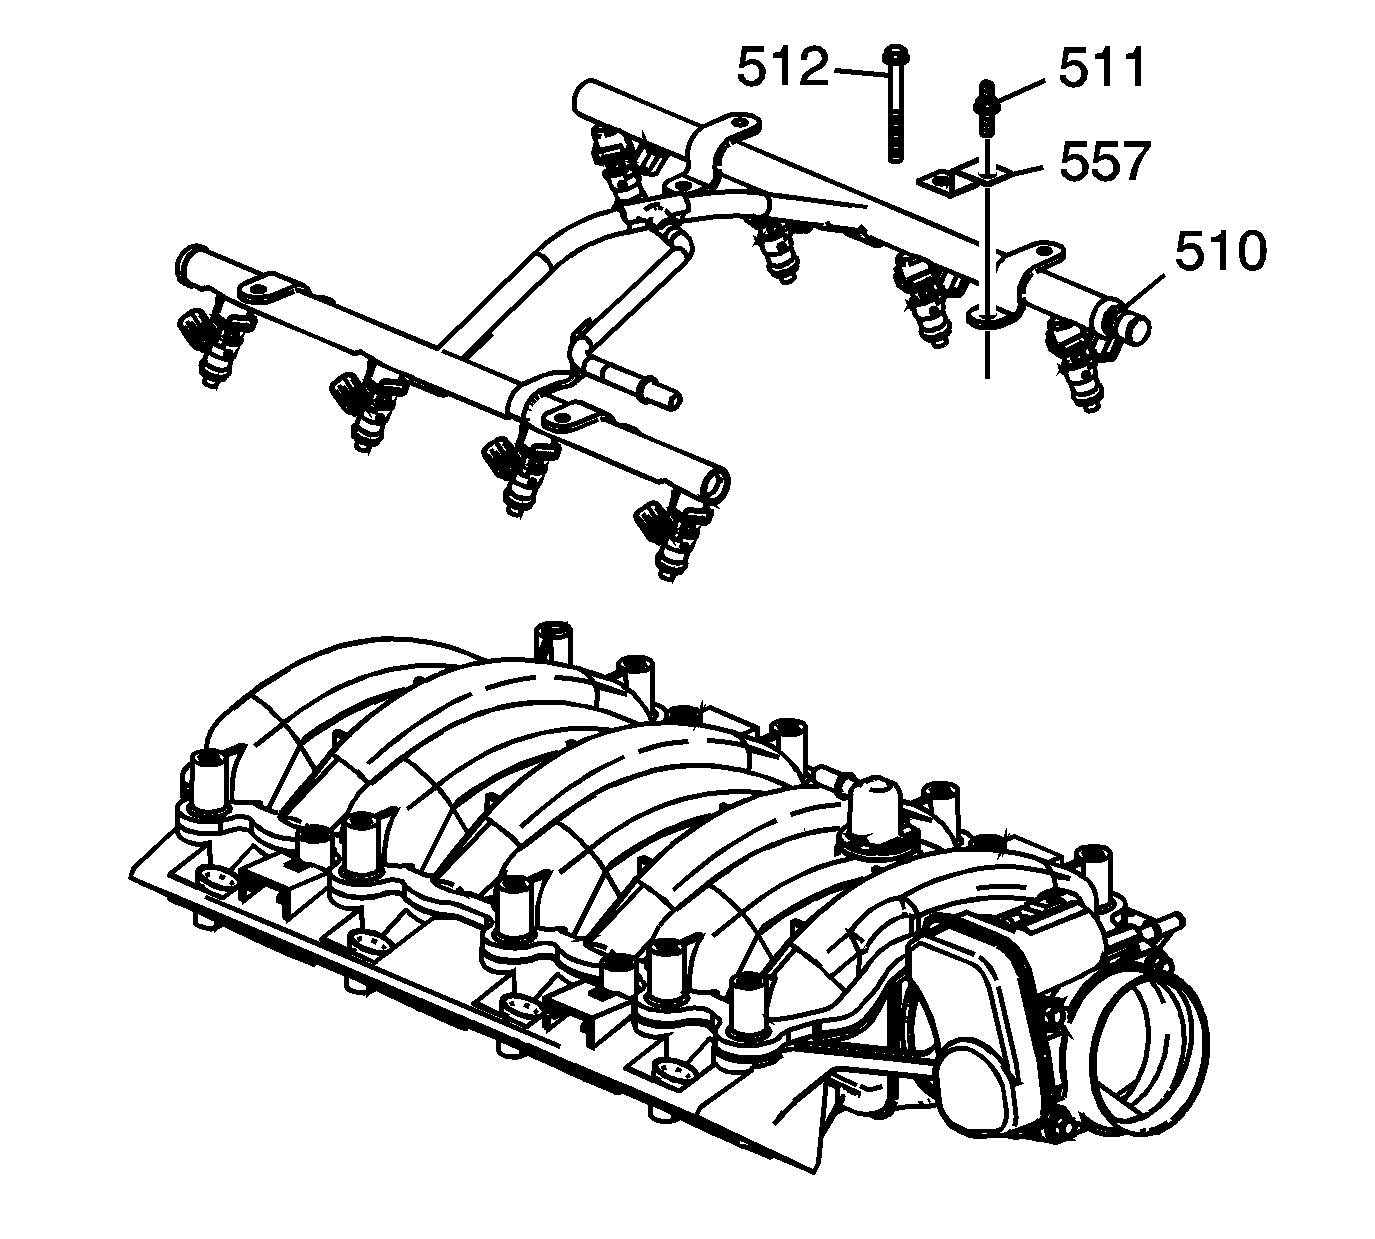
- Remove the intake manifold bolt (512) and ground strap (557).
- Remove the fuel rail bolts (511).
- Remove the fuel rail (510) with injectors. Lift evenly on both sides of the fuel rail until all injectors have been removed from their bores.
Important: Do not separate the fuel injectors from the fuel rail unless component service is required.
- If replacing the fuel rail, remove the fuel injectors. Refer to
Fuel Injector Replacement
.
Installation Procedure
Important: Do not reuse the fuel injector O-ring seals. Install NEW O-ring seals during assembly.
- Note the installed location of the fuel rail ground strap (557).
- If replacing the fuel rail, install the fuel injectors. Refer to
Fuel Injector Replacement
.
- If necessary, Lubricate the NEW O-ring seals with clean engine oil.
- If necessary, install NEW O-ring seals to the fuel injectors.
- Install the fuel rail (510) with injectors. Push firmly on both sides of the rail until all the injectors have been seated into their bores.
- Apply a 5 mm (0.2 in) band of threadlock GM P/N 12345382 (Canadian P/N 10953489) or equivalent to the threads of the fuel rail bolts.
Notice: Refer to Fastener Notice in the Preface section.
- Install the fuel rail bolts (511).
Tighten
Tighten the bolts to 10 N·m (89 lb in).
- Install the ground strap (557) and intake manifold bolt (512).
Tighten
Tighten the bolt to 10 N·m (89 lb in).
- Connect the fuel feed (1) and EVAP (2) lines. Refer to
Metal Collar Quick Connect Fitting Service
and
Plastic Collar Quick Connect Fitting Service
.
- Position the harness to the engine. Install the engine wiring harness retainers to the tabs on the fuel rail.
Important: Install the marked injector connectors to their corresponding injectors.
- Connect the fuel injector electrical connectors (2, 4).
- Connect the main ignition coil harness electrical connector (1).
- Install the CPA retainer (3).
Important: Install the marked injector connectors to their corresponding injectors.
- Connect the fuel injector electrical connectors (1, 2).
- Connect the main ignition coil harness electrical connector (4).
- Install the CPA retainer (3).
- Connect the generator electrical connector (2).
- Connect the following electrical connectors:
| • | EVAP purge solenoid (1) |
| • | Oil pressure sensor (4) |
| • | Valve lifter oil manifold (5) |
- Install the air cleaner outlet duct. Refer to
Air Cleaner Resonator Outlet Duct Replacement
.
- Connect the negative battery cable. Refer to
Battery Negative Cable Disconnection and Connection
.
- Use the following steps to inspect for leaks:
| 21.1. | Turn the ignition ON, with the engine OFF, for 2 seconds. |
| 21.2. | Turn the ignition OFF for 10 seconds. |
| 21.3. | Turn the ignition ON with the engine OFF. |
- Install the engine sight shield. Refer to
Upper Intake Manifold Sight Shield Replacement
.
