Disassembly Procedure
Caution: Do not disturb or remove the screw which retains the primary spring
to the secondary piston. This screw has been set to a predetermined height,
and the performance of the master cylinder will be adversely affected if this
setting is changed. An improperly adjusted screw may result in
poor brake performance and possible personal injury.
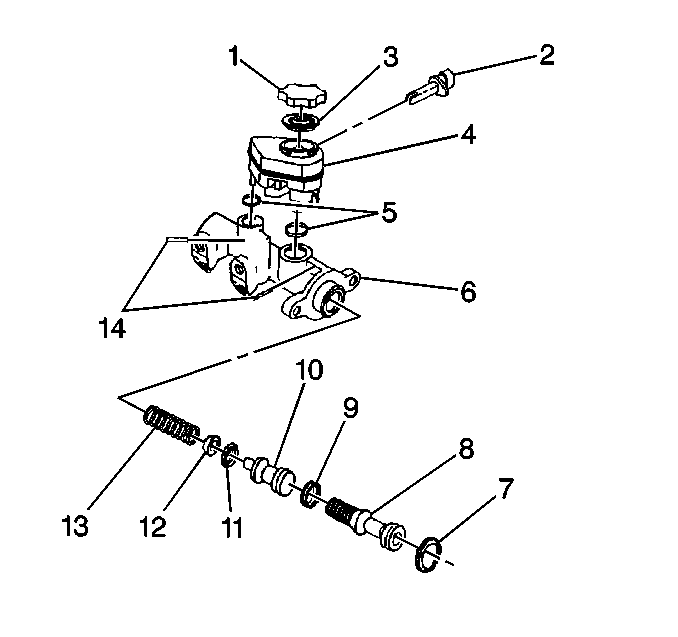
- Remove the master cylinder.
Refer to
Master Cylinder Replacement
.
Notice: Do not overtighten vise, or damage to the master cylinder
will result.
- Install master cylinder properly into a vice.
- Wipe the reservoir cap clean.
- Remove the reservoir cap and the diaphragm.
- Replace the reservoir cap (1) and the diaphragm (3)
if the following damage is evident:
- Remove the fluid level sensor. Refer to
Brake Fluid Level Indicator Switch Replacement
.
- Remove the retainer (7) while depressing the primary piston (8).
Use care so that you do not damage the piston, the bore or the retainer
groove.
- Apply low pressure, non-lubricated, compressed air into the upper
outlet port at the blind end of the bore while the other outlet ports are
plugged. Remove the following parts:
| | Caution: Do not disturb or remove the screw which retains the primary spring
to the secondary piston. This screw has been set to a predetermined height,
and the performance of the master cylinder will be adversely affected if this
setting is changed. An improperly adjusted screw may result in
poor brake performance and possible personal injury.
|
| 8.2. | Secondary piston (10) |
| 8.4. | Spring retainer (12) |
- Remove the seals (9) and the spring retainer (12)
from the secondary piston (10).
- Inspect the master cylinder for scoring or corrosion. Replace
the master cylinder if damage exists.
Do not use abrasives in the bore.
- Clean all of the parts in clean, denatured alcohol.
- Dry the parts with non-lubricated, compressed air.
Assembly Procedure
Important: Lubricate the parts with clean brake fluid in order to ease assembly.
- Install the lubricated seals (9) and the spring retainer (12)
onto the secondary piston (10).
- Install the spring (13) and the secondary piston (10)
into the cylinder bore.
- Install the lubricated primary piston (8) into the cylinder
bore.
- While depressing the primary piston (8) install the retainer (7).
- Install the fluid level sensor. Refer to
Brake Fluid Level Indicator Switch Replacement
.
- Insert the diaphragm into the reservoir cap.
Install the cap on the reservoir.
- Install the master cylinder. Refer to
Master Cylinder Replacement
.
