Fuel Pump Resistor (Customer Satisfaction Campaign)

| Subject: | 01033 -- Fuel Pump Resistor |
| Models: | 1997-1998 Buick Regal GS & Pontiac Grand Prix GTP with L67 3.8L V6 Engine (Located in the High Corrosion Provinces of Newfoundland, Nova Scotia, Prince Edward Island, New Brunswick, Quebec and Ontario) |
THIS CAMPAIGN IS IN EFFECT THROUGH JULY 31, 2002.
Condition
General Motors has decided that all 1997-1998 Buick Regal GS and Pontiac Grand Prix GTP model vehicles equipped with L67 3.8L V6 engines, located in the high corrosion provinces of Newfoundland, Nova Scotia, Prince Edward Island, New Brunswick, Quebec and Ontario, may develop an electrical open in the fuel pump resistor. This condition prevents operation of the fuel pump and the engine will not run.
Correction
Dealers are to install a new resistor on the plenum with an aesthetic cover.
Vehicles Involved
Involved are all 1997-1998 Buick Regal GS and Pontiac Grand Prix GTP model vehicles equipped with L67 3.8L V6 engines and built within these VIN breakpoints:
Year | Division | Model | Plant | From | Through |
|---|---|---|---|---|---|
1997 | Buick | W | Oshawa 2 | V1400025 | V1482781 |
1998 | Buick | W | Oshawa 2 | W1400008 | W1614345 |
1997 | Pontiac | W | Fairfax | VF200090 | VF359094 |
1998 | Pontiac | W | Fairfax | WF200104 | WF342330 |
Important: Dealers should confirm vehicle eligibility through GM Access Screen prior to beginning campaign repairs. [Not all vehicles within the above breakpoints may be involved.]
Involved vehicles have been identified by Vehicle Identification Number. Computer listings containing the complete Vehicle Identification Number, customer name and address data have been prepared, and are being furnished to involved dealers with the campaign bulletin. The customer name and address data furnished will enable dealers to follow up with customers involved in this campaign. Any dealer not receiving a computer listing with the campaign bulletin has no involved vehicles currently assigned.
These dealer listings may contain customer names and addresses obtained from Motor Vehicle Registration Records. The use of such motor vehicle registration data for any other purpose is a violation of law in several states/provinces/countries. Accordingly, you are urged to limit the use of this listing to the follow-up necessary to complete this campaign.
Parts Information
Parts required to complete this campaign are to be obtained from General Motors Service Parts Operations (GMSPO). Please refer to your "involved vehicles listing" before ordering requirements. Normal orders should be placed on a DRO = Daily Replenishment Order. In an emergency situation, parts should be ordered on a CSO = Customer Special Order.
Part Number | Description | Qty/ Vehicle |
|---|---|---|
88951182 | RESISTOR KIT, F/PMP | 1 |
Service Procedure
Important: Please note that there are two different service procedures. The first procedure is for 1997 models with the windshield washer reservoir located on top of the battery and the second procedure is for 1998 models with the washer reservoir located down in the front fender.
Service Procedure for 1997 Pontiac Grand Prix GTP and Buick Regal GS with L67 Engine
Figure 1
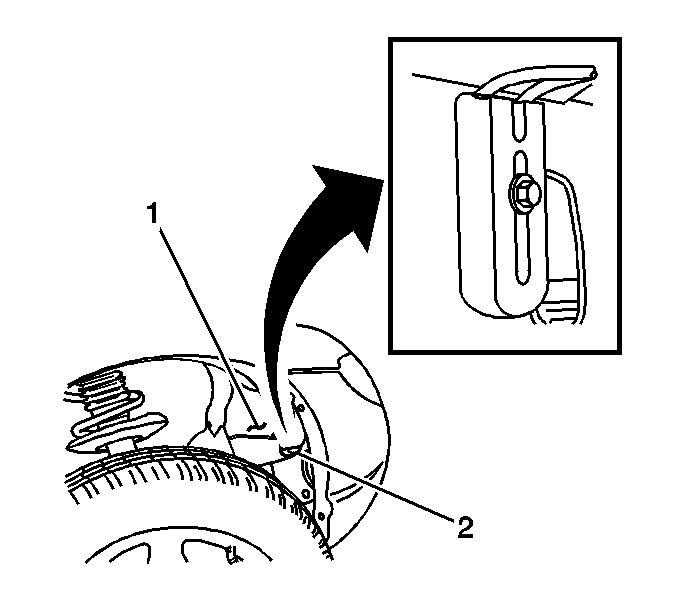
Figure 2
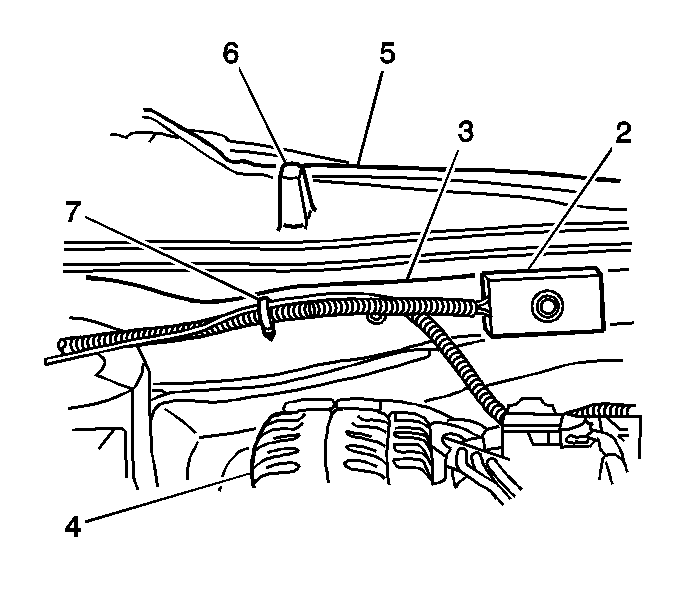
The following are instructions for removing the fuel pump resistor from its original mounting location on the lower right front body rail as shown in Figure 1, and replacing it with a new fuel pump resistor and cover in new location shown in Figure 2. The new location is on the front of dash sheet metal (3) at the rear of the engine compartment, inboard or to the left of the alternator (4). The passenger or right side windshield wiper arm (5) and stop (6) are called out for reference purposed only.
- Turn the steering wheel to the full right position.
- Open the hood and disconnect the negative battery cable.
- Remove the diagonal brace (1) from over the windshield washer solvent reservoir by removing the two bolts (2) that attach it to the radiator support and the one bolt (3) that attaches it to the strut tower. Refer to Figure 3.
- Remove the two plastic push-in retainers (1) that attach the windshield washer solvent reservoir (2) to the radiator support (3) and the one nut (4) that attaches it to the strut tower (5). Refer to Figure 4.
- Reposition the reservoir for access to the area rearward of the battery.
- Raise the vehicle on a hoist.
- At the right front wheel opening, remove the three screws that attach the inner fender splash shield to the front fascia at the wheel opening and the two screws that attach it to the bottom of the fascia. Refer to Figure 5.
- Reposition the inner fender splash shield (1) to access the fuel pump resistor (2). Refer to Figure 1 at the beginning of this procedure.
- Unclip the fuel pump resistor electrical connector from the body and disconnect the connector.
- Remove the 10mm hex head bolt attaching the fuel pump resistor to the body and discard both the bolt and the resistor.
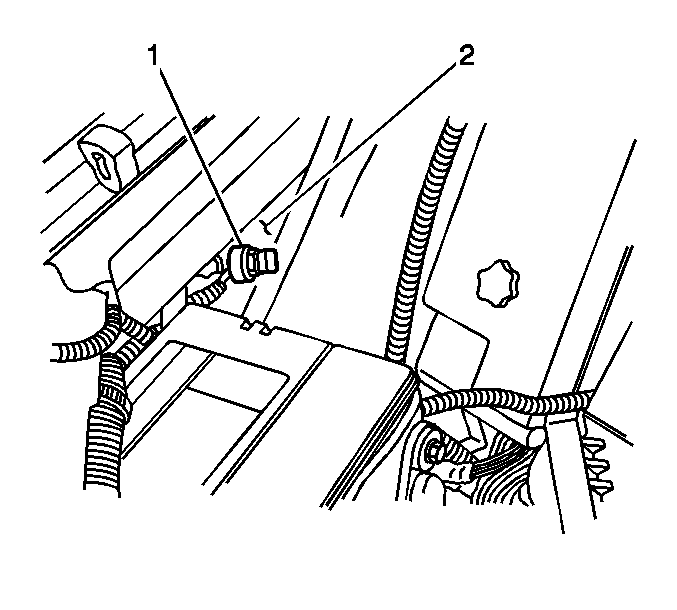
- Route the body side connector (1) that was connected to the resistor through the opening in the sheet metal (2) and into the engine compartment. When properly routed, the connector should be entering the engine compartment just rearward of the battery. Refer to Figure 6.
- Verify that the black conduit on the wiring harness is protecting the wiring from any sharp edges in the sheet metal opening. Reposition the conduit and harness if necessary.
- Reposition and align the inner fender splash shield to the front fascia and install the five screws.
- Lower the hoist.
- If equipped, remove the nuts attaching the cross vehicle brace/bar to the left and right strut towers and remove the brace.
- Position the new fuel pump resistor on the front of the dash sheet metal at its NEW mounting location as shown at the beginning of this procedure.
- Mark the location for the hole (1) to be drilled in the front of the dash sheet metal (2). Refer to Figures 2 and 7.
- Using a 3.5mm (9/64 in) diameter drill bit, drill a hole at the location marked in Step 17. Refer to Figure 7.
- Position the fuel pump resistor cover on the resistor and position the assembly on the front of the dash sheet metal with the hole in the sheet metal in alignment with the hole in the resistor and cover.
- Install the bolt supplied with the kit through the cover and resistor and into the hole in the front of the dash.
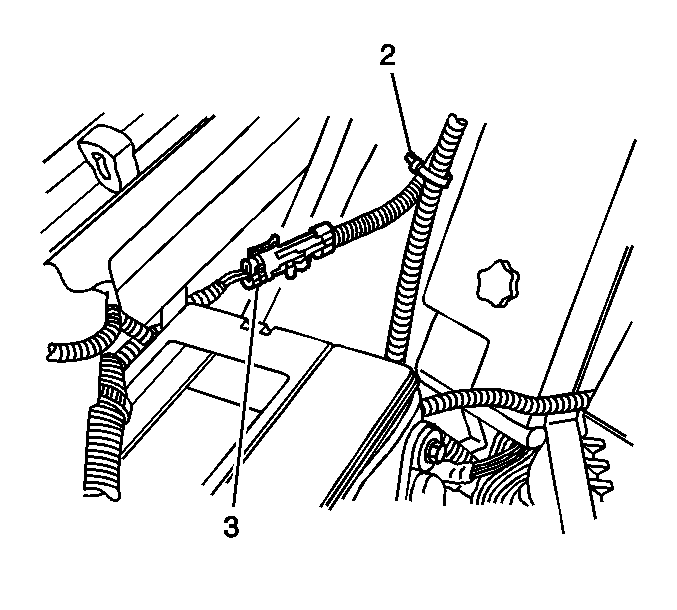
- Route the new fuel pump resistor wiring harness along the front of the dash and secure it to the vacuum harness conduit at the location shown (7) using a plastic tie included with the kit. Refer to Figure 2 at the beginning of this procedure.
- Continue routing the wiring harness along the top of the right front strut tower (1). Secure it to the existing conduit at the location shown (2) using a plastic tie. Refer to Figure 8.
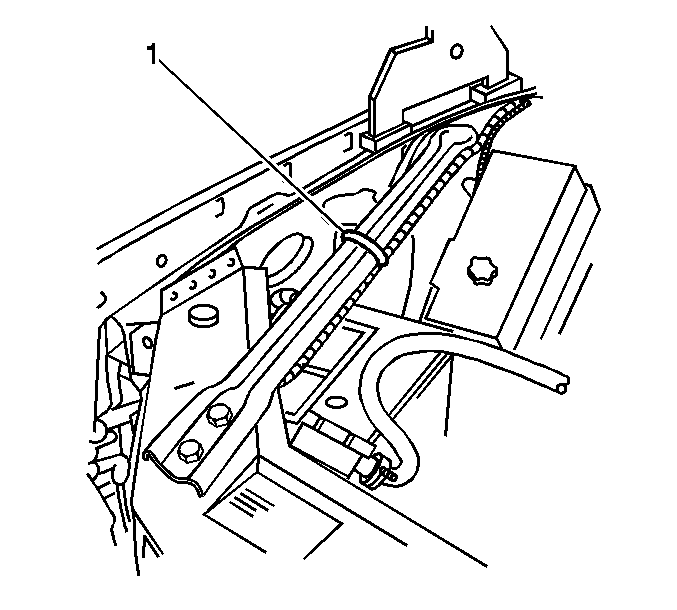
- Continue routing the wiring harness down the front of the strut tower and secure it to the existing conduit with a plastic tie (2). Refer to Figure 9.
- Connect the new fuel pump resistor connector (3) to the wiring harness connector.
- If equipped, install the cross vehicle brace and nuts.
- Reinstall the windshield washer solvent reservoir and install the two push-in fasteners and nut.
- Reinstall the diagonal brace over the reservoir and install the two bolts that attach it to the radiator support and the one bolt that attaches it to the strut tower.
- Reconnect the negative battery cable.
- Start the engine to verify proper fuel pump resistor operation.
- Install the GM Campaign Identification Label and close the hood.
Figure 3
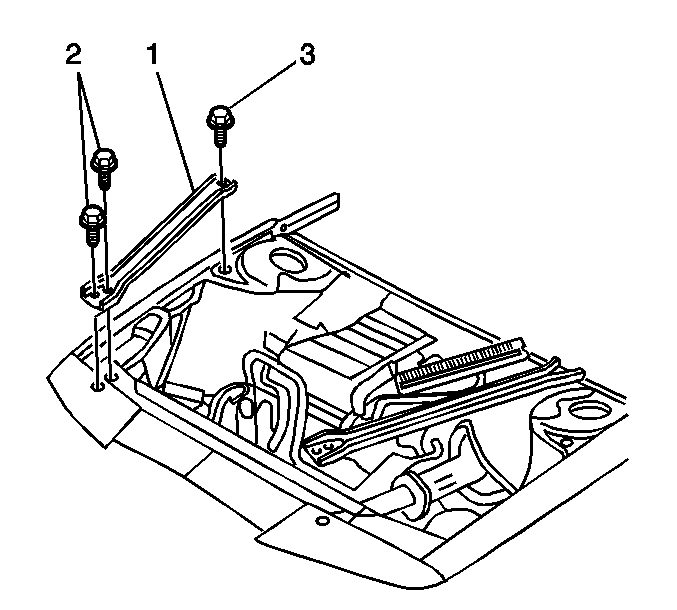
Figure 4
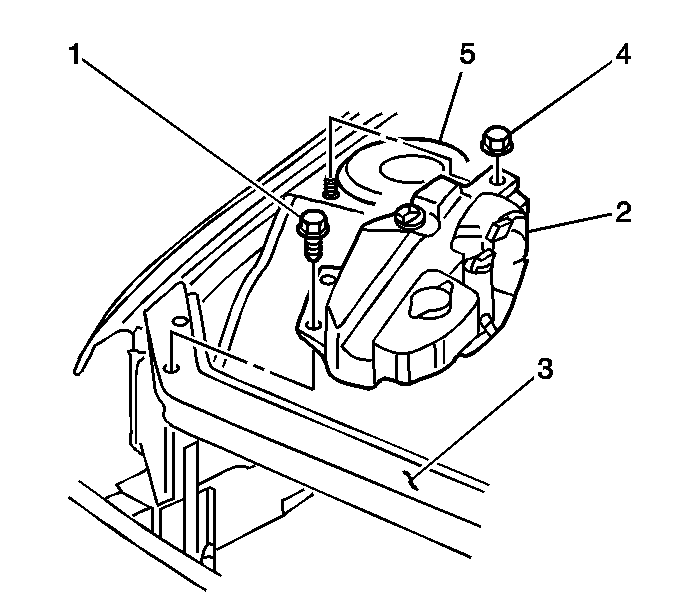
Figure 5
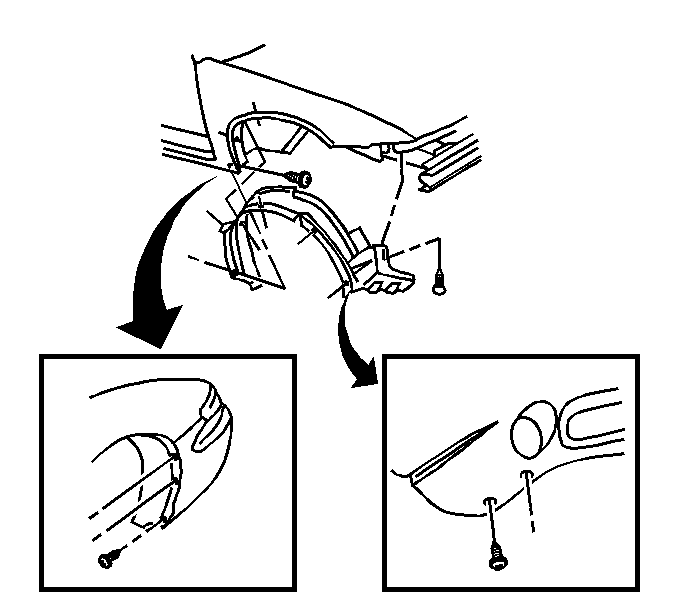
Figure 6
Tighten
Tighten the screws to 2 N·m (18 lb in).
Important: Some owners may have had a cross vehicle brace or upper tie bar that attaches to the left and right strut towers added to their vehicle as an accessory. To access the front of the dash sheet metal, it is necessary to remove this brace in the next step. Because this brace is a customer installed accessory, the labour times listed at the end of this campaign do NOT include its removal and installation. If the vehicle you are performing this campaign on has this customer installed brace and additional time is required to remove and install it, contact your District Service Manager for approval.
Figure 7
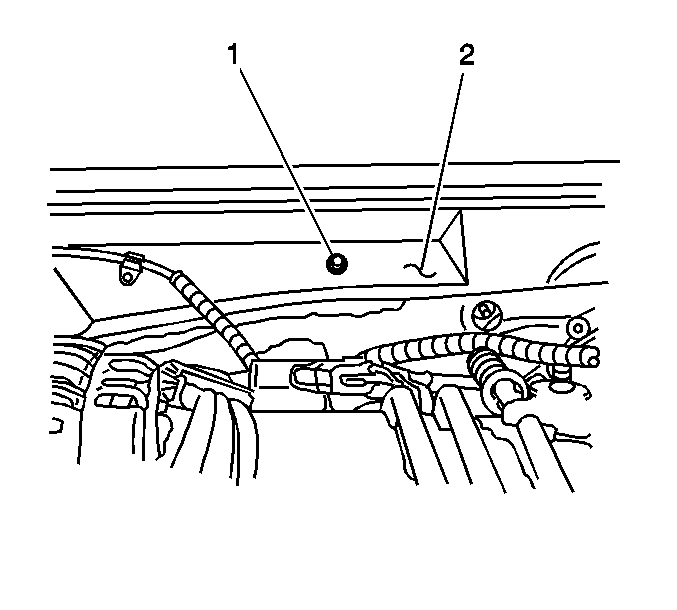
Important: The exact location of the hole to be drilled in the next step is not critical to the operation of the resistor. Refer to Figures 2 and 7 when determining hole location.
Tighten
Tighten the bolt to 1.5 N·m (13 lb in).
Figure 8
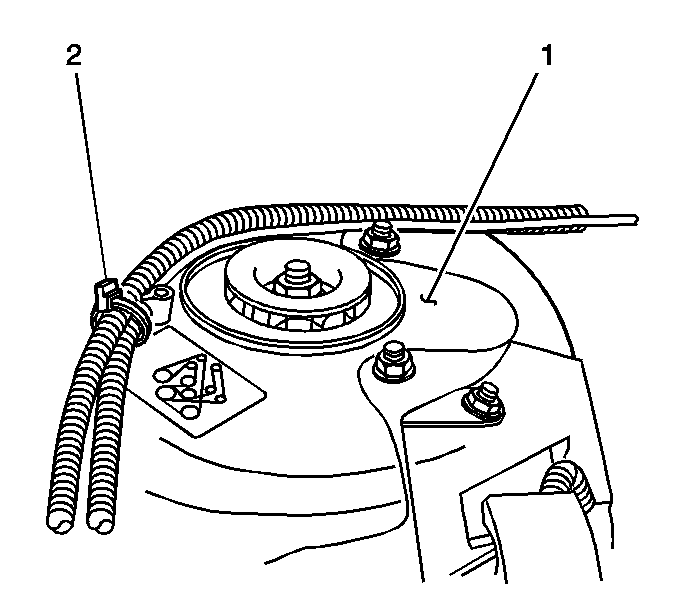
Important: The routing of the existing conduit on the top of the right front strut tower in the next step may vary slightly from model to model.
Figure 9
Tighten
Tighten the nuts to 18 N·m (13 lb ft).
Tighten
Tighten the nut to 6 N·m (53 lb in).
Tighten
Tighten the bolts to 47 N·m (35 lb ft).
Service Procedure for 1998 Pontiac Grand Prix GTP and Buick Regal GS with L67 Engine
Figure 1
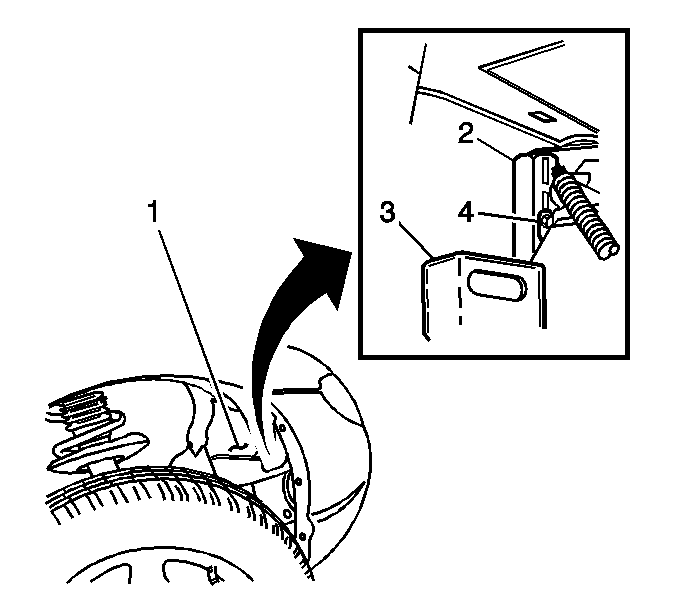
Figure 2
The following are instructions for removing the fuel pump resistor from its original mounting location on the lower right front body rail as shown in Figure 1, and replacing it with a new fuel pump resistor and cover in new location shown in Figure 2. The new location is on the front of dash sheet metal (3) at the rear of the engine compartment, inboard or to the left of the alternator (4). The passenger or right side windshield wiper arm (5) and stop (6) are called out for reference purposed only.
- Turn the steering wheel to the full right position.
- Open the hood and disconnect the negative battery cable.
- Raise the vehicle on a hoist.
- At the right front wheel opening, remove the three screws that attach the inner fender splash shield to the front fascia at the wheel opening and the two screws that attach it to the bottom of the fascia. It is not necessary to remove the other inner fender splash shield screws. Refer to Figure 3.
- Reposition the inner fender splash shield (1) to access the fuel pump resistor (2). Refer to Figure 1 at the beginning of this procedure.
- Remove the two bolts attaching the windshield washer reservoir to the rear mounting bracket (3) and remove the one bolt attaching the bracket to the body. Refer to Figure 1.
- From underneath the vehicle, using a 10mm box or open end wrench, remove the bolt (4) that attaches the fuel pump resistor to the body. Refer to Figure 1.
- Unclip the fuel pump resistor pigtail electrical (2-wire) connector (1) from the sheet metal next to the battery and disconnect the connector.
- Pull the resistor wiring and connector down and out from under the vehicle. Discard the fuel pump resistor and mounting bolt.
- Reinstall the windshield washer reservoir rear mounting bracket to the body and install the bolt.
- Install the two bolts that attach the windshield washer reservoir to the rear mounting bracket.
- Reposition and align the inner fender splash shield to the front fascia and install the five screws.
- Lower the hoist.
- Route the body side wiring connector that was connected to the resistor so that it runs along the bottom side of the diagonal brace over the battery as shown. Using a plastic tie strap from the kit, secure the resistor harness to the diagonal brace (1). Refer to Figure 4.
- Verify that the black conduit on the wiring harness is protecting the wiring from any sharp edges. Reposition the conduit and harness if necessary.
- If equipped, remove the nuts attaching the cross vehicle brace/bar to the left and right strut towers and remove the brace.
- Position the new fuel pump resistor on the front of the dash sheet metal at its NEW mounting location as shown in Figure 2 at the beginning of this procedure.
- Mark the location for the hole (1) to be drilled in the front of the dash sheet metal (2). Refer to Figure 2 and 5.
- Using a 3.5mm (9/64 in) diameter drill bit, drill a hole at the location marked in Step 18. Refer to Figure 5.
- Position the fuel pump resistor cover on the resistor and position the assembly on the front of the dash sheet metal with the hole in the sheet metal in alignment with the hole in the resistor cover. Refer to Figure 2.
- Install the bolt supplied with the kit through the cover and the resistor and into the hole in the front of the dash.
- Route the new fuel pump resistor wiring harness along the front of the dash and secure it to the vacuum harness conduit at the location shown (7) using a plastic tie included with the kit. Refer to Figure 2.
- Continue routing the resistor wiring harness following the existing conduit on the top of the right front strut tower (1). Secure it to the existing conduit at the location shown (2) using a plastic tie. Refer to Figure 6.
- Continue routing the resistor wiring harness down to the diagonal brace and connect it to the wiring harness attached earlier. Refer to Figure 4.
- If equipped, install the cross vehicle brace and nuts.
- Reconnect the negative battery cable.
- Start the engine to verify proper fuel pump resistor operation.
- Install the GM Campaign Identification Label and close the hood.
Figure 3
Important: Removal of the windshield washer reservoir rear mounting bracket in the next step will improve tool clearance when removing the fuel pump resistor mounting bolt in Step 7.
Tighten
Tighten the bolt to 7 N·m (62 lb ft).
Tighten
Tighten the bolts to 5 N·m (44 lb in).
Tighten
Tighten the screws to 2 N·m (18 lb in).
Figure 4
Important: Some owners may have had a cross vehicle brace or upper tie bar that attaches to the left and right strut towers added to their vehicle as an accessory. To access the front of the dash sheet metal, it is necessary to remove this brace in the next step. Because this brace is a customer installed accessory, the labour times listed at the end of this campaign do NOT include its removal and installation. If the vehicle you are performing this campaign on has this customer installed brace and additional time is required to remove and install it, contact your District Service Manager for approval.
Figure 5
Important: The exact location of the hole to be drilled in the next step is not critical to the operation of the resistor. Refer to Figure 2 and 5 when determining hole location.
Tighten
Tighten the bolt to 1.5 N·m (13 lb in).
Figure 6
Important: The routing of the existing conduit on the top of the right front strut tower in the next step may vary slightly from model to model.
Tighten
Tighten the nuts to 18 N·m (13 lb ft).
Campaign Identification Label
For Canada
Place a Campaign Identification Label on each vehicle corrected in accordance with the instructions outlined in this Product Campaign Bulletin. Each label provides a space to include the campaign number and the five (5) digit dealer code of the dealer performing the campaign service. This information may be inserted with a typewriter or a ball point pen.
Put the Campaign Identification Label on a clean and dry surface of the radiator core support in an area that will be visible to people servicing the vehicle. Additional Campaign Identification Labels for Canadian dealers can be obtained from DGN by calling 1-800-668-5539 (Monday-Friday, 8:00 am to 5:00 pm EST). Ask for Item Number GMP91 when ordering.
Claim Information
Submit a Product Campaign Claim with the information indicated below.
Repair Performed | Part Count | Part No. | Parts Allow | CC-FC | Labor Op* | Labor Hours | Net Item |
|---|---|---|---|---|---|---|---|
Replace Fuel Pump Resistor '97 & '98 | 1 | 88951182 | *** | MA-96 | V0752 | 0.5** |
|
Customer Reimbursement | N/A | N/A | N/A | MA-96 | V0753 | 0.2 Administrative Labour Hours | **** |
* -- Labour operation valid for Repair Orders dated prior to August 01, 2002. ** -- For Campaign Administrative Allowance, add 0.1 hours to the "Labour Hours". *** -- The "Parts Allowance" should be the sum total of the current GMSPO Dealer Net price plus applicable Mark-Up for parts needed to complete the repair. **** -- The amount identified in the "Net Item" column should represent the dollar amount reimbursed to the customer. | |||||||
Refer to the General Motors WINS Claim Processing Manual for details on Product Campaign Claim Submission.
Customer Reimbursement
Customer requests for reimbursement of previously paid repairs to correct Fuel Pump Resistor failure are to be submitted by August 01, 2002 (this time limit may be longer depending upon the law in your state/province/country).
Consideration for reimbursement will be allowed only if genuine General Motors parts were used. The amount to be reimbursed will be limited to the amount the repair would have cost if completed by an authorized General Motors dealer.
When a customer requests reimbursement, they must provide the following:
| • | Proof of ownership at the time of repair. |
| • | Original paid receipt confirming the amount of unreimbursed repair expense(s), a description of the repair, and the person or entity performing the repair. |
Claims for customer reimbursement on previously paid repairs are to be submitted as required by WINS.
Important: Refer to the GM service policies and procedures manual, section 1.6.2, for specific procedures regarding customer reimbursement verification.
Customer Notification
For Canada
Customers will be notified of this campaign on their vehicles by General Motors (see copy of customer letter included with this bulletin).
Dealer Campaign Responsibility
All unsold new vehicles in dealers' possession and subject to this campaign MUST be held and inspected/repaired per the service procedure of this campaign bulletin BEFORE customers take possession of these vehicles.
Dealers are to service all vehicles subject to this campaign at no charge to customers, regardless of mileage, age of vehicle, or ownership, through July 31, 2002.
Customers who have recently purchased vehicles sold from your vehicle inventory, and for which there is no customer information indicated on the dealer listing, are to be contacted by the dealer. Arrangements are to be made to make the required correction according to the instructions contained in this bulletin. This could be done by mailing to such customers a copy of the customer letter accompanying this bulletin. Campaign follow-up cards should not be used for this purpose, since the customer may not as yet have received the notification letter.
In summary, whenever a vehicle subject to this campaign enters your vehicle inventory, or is in your dealership for service prior to August 01, 2002, you must take the steps necessary to be sure the campaign correction has been made before selling or releasing the vehicle.
July 2001Dear General Motors Customer:
We want your experience owning your 1997-1998 Buick Regal GS/Pontiac Grand Prix GTP to be better than any other you've had, which is why we're writing.
We have learned that your vehicle may develop an electrical open circuit in the fuel pump resistor. This condition prevent operation of the fuel pump and the engine will not run.
We've sent the parts to your dealer so that if your vehicle was built with the fuel pump resistor involved, it can be serviced as quickly as possible. This service will be performed for you at no charge through July 31, 2002.
You may be contacted by a dealer other than the dealer who sold or is currently servicing your vehicle. Please be advised that you may take your vehicle to the General Motors dealership of your choice to have the recall service work completed. Please contact your dealer as soon as possible to arrange a service date.
If parts are required, ask your dealer for details regarding their availability. If parts are not in stock, they can be ordered before scheduling your service date.
This letter identified your vehicle. Presentation of this letter to your dealer will assist their Service personnel in completing the necessary correction to your vehicle in the shortest possible time.
We sincerely regret any inconvenience this causes you; however, we have taken this action in the interest of your continued satisfaction with our products.
Customer Support Department
General Motors of Canada Limited
