Rattle/Creak/Popping Type Noise from Front of Vehicle When Turning (Replace Both Front Stabilizer Shaft Insulator Brackets)

| Subject: | Rattle/Creak/Popping Type Noise from Front of Vehicle When Turning (Replace Both Front Stabilizer Shaft Insulator Brackets) |
| Models: | 2002-2005 Chevrolet Cavalier |
| 2002-2004 Oldsmobile Alero |
| 2002-2005 Pontiac Grand Am, Sunfire |
| with FE1, FE2 or FE3 Suspension |
This bulletin is being revised to include FE3 suspension. Please discard Corporate Bulletin Number 02-03-08-008A (Section 03 - Suspension).
Condition
Some customers may comment on a rattle/creak/popping type noise coming from the front of the vehicle when turning the steering wheel. This noise can typically be duplicated with a short drive on uneven road surfaces, then turning the vehicle left or right into a 90 degree turn.
Cause
This condition may be caused by the front stabilizer shaft insulator to front suspension crossmember brackets being out of specification. Using the J 39570 Chassis Ear hooked up to each bracket may assist in determining if they are the source of the noise.
Correction
Replace both the front stabilizer shaft insulator brackets using the procedure listed below.
- Raise and suitably support the vehicle.
- Remove the front tire and wheel assemblies.
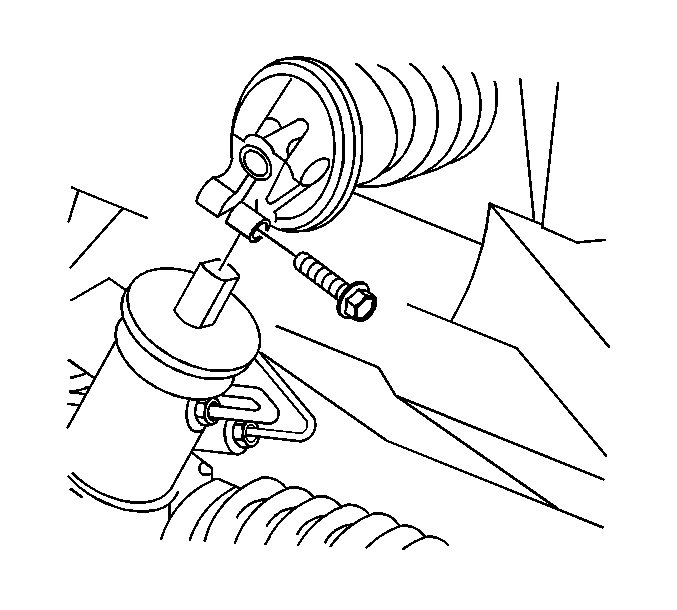
- Reposition the intermediate steering shaft seal in order to gain access to the lower pinch bolt.
- Remove the lower pinch bolt from the steering gear.
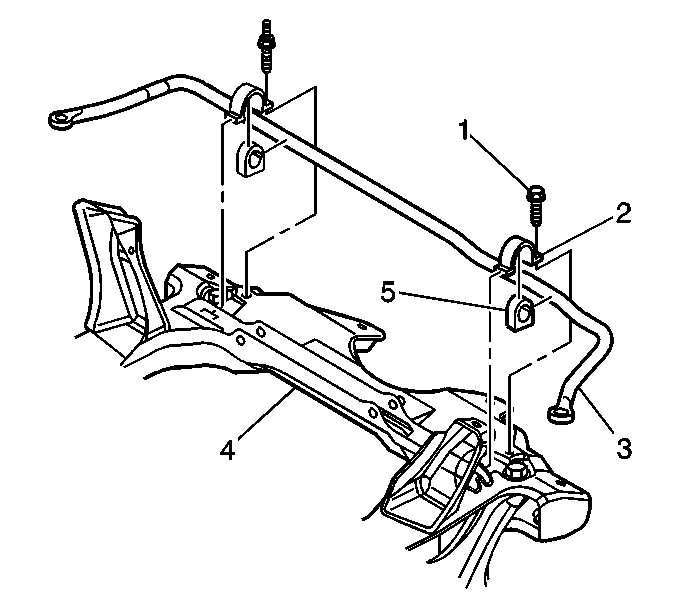
- Support the front suspension crossmember with a suitable jackstand.
- Remove the rear mounting bolts from the front suspension crossmember.
- Remove the center mounting bolts from the front suspension crossmember.
- Remove the front mounting bolts from the front suspension crossmember.
- Lower the front suspension crossmember approximately 15 cm (6 in) by adjusting the jackstand down.
- Remove the retaining bolts and stabilizer shaft insulator brackets.
- Install the new stabilizer shaft insulator brackets and retaining bolts.
- Install the front mounting bolts to the front suspension crossmember. Hand tighten the bolts.
- Install the center mounting bolts to the front suspension crossmember. Hand tighten the bolts.
- Install the rear mounting bolts to the front suspension crossmember. Hand tighten the bolts.
- Tighten the left rear bolt to 110 N·m(71 lb ft).
- Tighten the right rear bolt to 110 N·m(71 lb ft).
- Tighten the left front bolt to 110 N·m(71 lb ft).
- Tighten the right front bolt to 110 N·m(71 lb ft).
- Tighten the center bolts to 110 N·m(71 lb ft).
- Tighten the stabilizer shaft insulator brackets bolts to 66 N·m(49 lb ft).
- Install the lower pinch bolt from the steering gear.
- Install the front tire and wheel assemblies.
- Lower the vehicle.
Tighten
Tighten the stabilizer shaft insulator bracket bolts to 66 N·m (49 lb ft).
Tighten
Tighten
Tighten the bolt to 40 N·m(30 lb ft).
Tighten
Tighten the nuts in a criss-cross pattern 140 N·m (100 lb ft).
Parts Information
Part Number | Description | Qty |
|---|---|---|
22660396 | Clamp (Bracket), Front Stabilizer Shaft | 2 |
Warranty Information
For vehicles repaired under warranty, use:
Labor Operation | Description | Labor Time |
|---|---|---|
E2180 | Insulator and/or Bracket Front Stabilizer Shaft at Frame -- Replace | Use Published Labor Operation Time |
