Clunk, Rattle Noise from Front of Vehicle (Replace Brake Pedal Assembly)

| Subject: | Clunk, Rattle Noise from Front of Vehicle (Replace Brake Pedal Assembly) |
| Models: | 1997-2001 Chevrolet Malibu |
| 1997-1999 Oldsmobile Cutlass |
| 1999-2001 Oldsmobile Alero |
| 1999-2001 Pontiac Grand Am |
| with Automatic Transmission |
Built Prior to the following VIN Breakpoints:
Model | VIN Breakpoint | Plant |
|---|---|---|
Chevrolet Malibu | 1M554918 | Lansing |
16180968 | Oklahoma | |
Oldsmobile Alero/Pontiac Grand Am | 1C158122 | Lansing (C) |
1M555395 | Lansing (M) |
Condition
Some customers may comment on a rattle or clunk type noise coming from the underbody or front suspension.
Cause
The brake pedal pivot pin bushing may cause this condition.
Correction
Diagnose condition prior to replacing the brake pedal assembly by putting light side pressure on the brake pedal with your foot and applying the brakes. If the noise is no longer present, replace the existing brake pedal assembly with a new assembly, P/N 22672398. If the noise is still present, re-evaluate the condition using diagnostic information in the appropriate Service Manual. Follow the service procedure listed below to replace the brake pedal assembly.
- Remove left sound insulator panel.
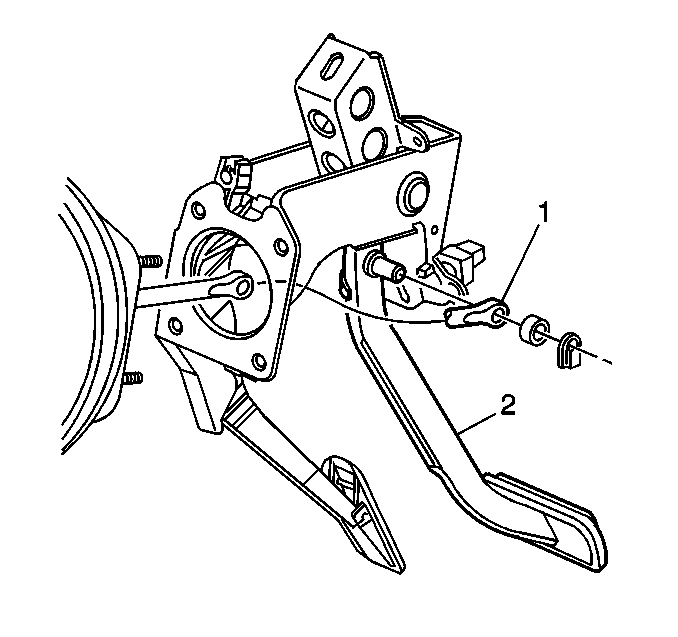
- Depress the accelerator control cable (1) tangs from the pedal lever assembly.
- Remove the accelerator control cable from the pedal lever assembly.
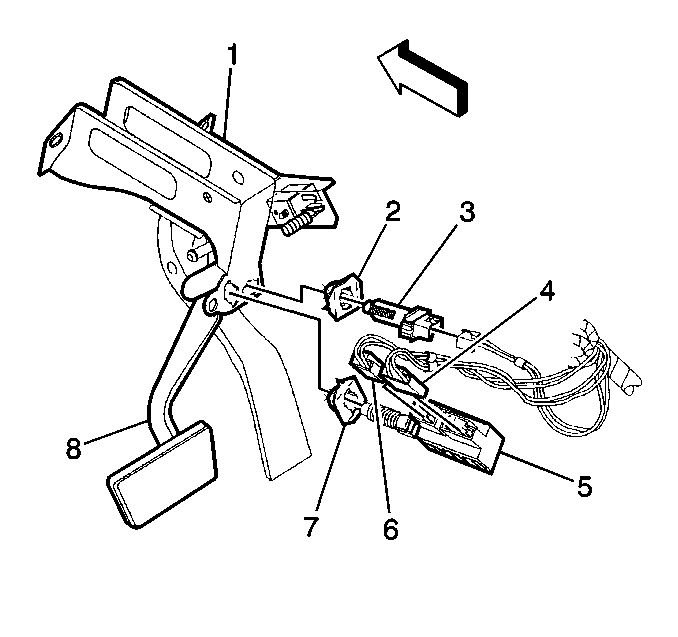
- Disconnect the brake pedal pushrod (1) from the brake pedal (2).
- Disconnect the electrical connector from the stop lamp switch.
- Remove the stop lamp switch (5) from the brake pedal bracket by grasping the switch and turning it 90 degrees counter clockwise while pulling toward the rear of the vehicle.
- Disconnect the electrical connector from the cruise release switch.
- Remove the cruise release switch (3) from the brake pedal bracket by grasping the switch and turning it 90 degrees counter clockwise while pulling toward the rear of the vehicle.
- Disconnect the electrical harness from the brake pedal bracket.
- Remove the upper (1) and the lower (2) mounting nuts from the brake pedal assembly.
- Remove the brake pedal assembly.
- Install the brake pedal assembly into position.
- Install the upper and the lower mounting nuts to the brake pedal assembly.
- Connect the brake pedal pushrod to the brake pedal.
- Connect the electrical harness to the brake pedal bracket.
- Insert the stop lamp switch and cruise release switch into their containers until the switch body is seated on the retainer.
- Connect the electrical connectors to the stop lamp switch and cruise release switch.
- Adjust the stop lamp switch and cruise release switch.
- Install the accelerator control cable to the pedal lever assembly. Ensure the tangs are fully expanded and seated.
- Slip the accelerator control cable through the slot in the rod of the accelerator pedal and install the retainer in the rod. Ensure the retainer is seated.
- Check for proper operation of stop lamps and cruise control.
- Install the left sound insulator panel.

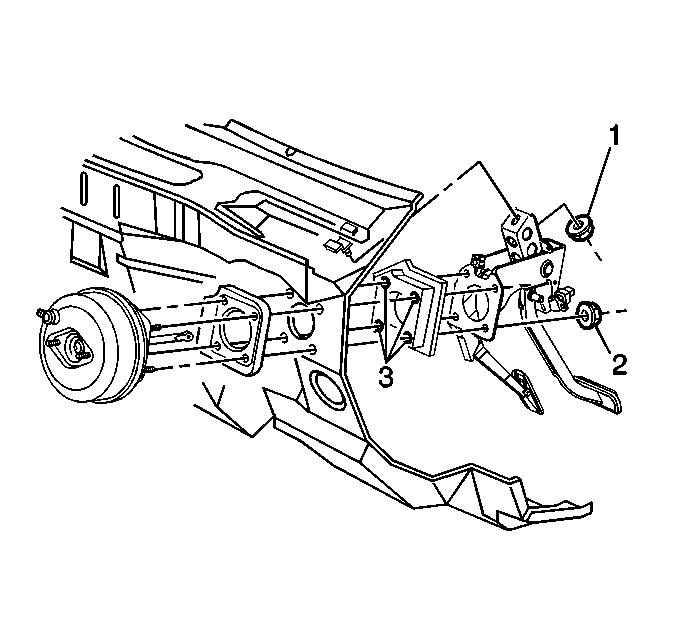
Tighten
Tighten the mounting nuts to 27 N·m (20 lb ft).
Important: Adjust the stop lamp switch and cruise release switch at the same time. The adjustment procedures for the switches are identical.
| • | Pull the brake pedal (4) upward against the internal pedal stop. |
| • | Turn the switch 90 degrees clockwise in order to lock the switch into position. |
Parts Information
Part Number | Description | Qty |
|---|---|---|
22672398 (Automatic Transmission) | Pedal Assembly - Brake | 1 |
Parts are currently available from GMSPO.
Warranty Information
For vehicles repaired under warranty, use:
Labor Operation | Description | Labor Time |
|---|---|---|
H2640 | Pedal and/or Bushing, Brake - Replace | Use publishedlabor operation time |
