
| Subject: | Revised Steering Wheel Position Sensor or Steering Shaft Lower
Bearing Replacement Procedure and Steering Wheel Position Sensor Centering Procedure |
| Models: | 1998-2003 Buick LeSabre, Park Avenue |
| 1998-2003 Cadillac
DeVille, Seville |
| 1998-2003 Chevrolet Corvette |
| 1998-2002 Oldsmobile Intrigue |
| 1998-2003 Oldsmobile Aurora |
| 1999-2003 Oldsmobile Alero |
| 1998-2003 Pontiac Bonneville, Grand Am |
| 1998-2000 Chevrolet C/K Pickup Models |
| 1998-2003 Chevrolet Suburban, Tahoe |
| 1999-2003 Chevrolet Silverado |
| 2002-2003 Chevrolet Avalanche |
| 1998-2000 GMC C/K Pickup Models |
| 2000-2003 GMC Yukon Denali, Yukon XL |
This bulletin is being issued to revise the Steering Wheel Position Sensor or
Steering Shaft Lower Bearing Replacement procedure in the Variable Effort Steering
(1998-2001 model years) or Steering Wheel and Column (2002-2003 model years) and add
the Steering Wheel Position Sensor Centering procedure in the Steering Wheel and Column
sub-sections of the Service Manual. Please replace the current information in the
Service Manual with the following information.
The following information has been updated within SI. If you are using a paper
version of this Service Manual, please make a reference to this bulletin on the affected
page.
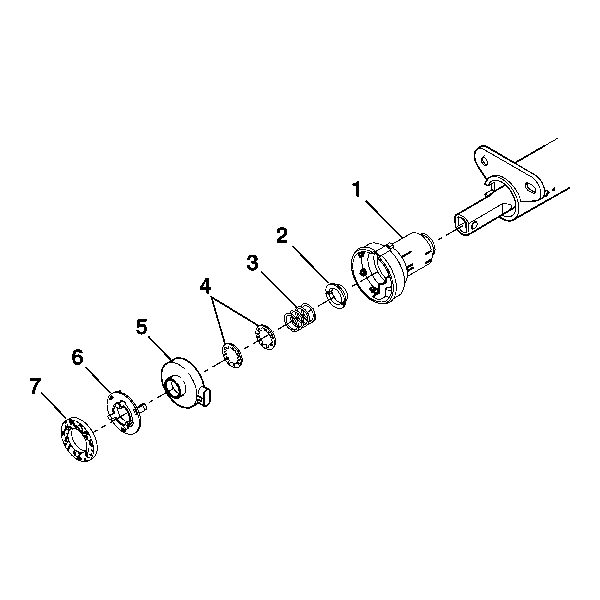
Steering Wheel Position Sensor or Steering Shaft Lower Bearing Replacement
Removal Procedure
Caution: Refer to SIR Caution
in Cautions and Notices.
- Disable the SIR system. Refer to SIR
Disabling and Enabling Zone 3 in SIR.
- Remove the steering column from the vehicle. Refer to Steering Column
Replacement.
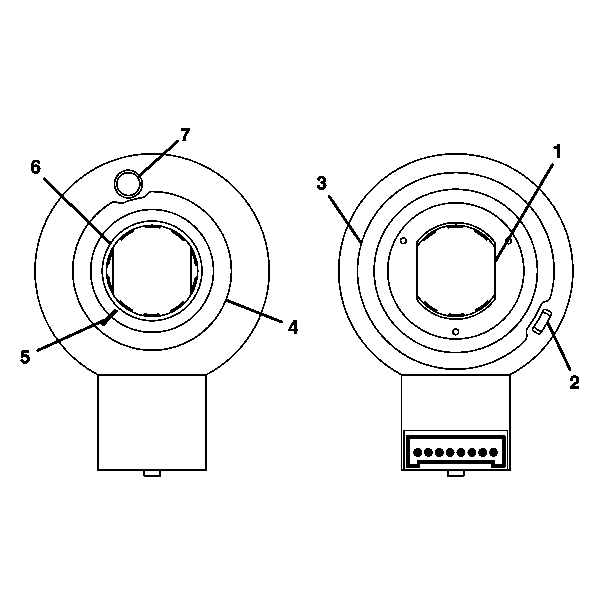
- Remove the following from the steering shaft:
| 3.1. | steering shaft seal (7) |
| 3.3. | steering wheel position sensor (5), refer to Steering Wheel Position
Sensor Centering. |
| 3.4. | 2 lower spring retainers (4) |
| 3.5. | lower bearing spring (3) |
| 3.6. | lower bearing seat (2) |
| 3.7. | adapter and bearing assembly (1) |
Installation Procedure
- Install the following onto the steering shaft:
| 1.1. | adapter and bearing assembly (1) |
| 1.2. | lower bearing seat (2) |
| 1.3. | lower bearing spring (3) |
| 1.4. | 2 lower spring retainers (4) |
| 1.5. | steering wheel position sensor (5) refer to Steering Wheel Position
Sensor Centering. |
| 1.7. | steering shaft seal (7) |
| 1.8. | Enable the SIR system. Refer to in SIR. |
- Install the steering column to the vehicle. Refer to Steering Column
Replacement.
- Enable the SIR system. Refer to SIR Disabling and Enabling Zone 3 in
SIR.
Steering Wheel Position Sensor Centering
Removal Procedure
Important: Identify the type of steering wheel position
sensor from the illustrations below BEFORE removing the sensor from the steering column.
Once you have identified the steering wheel position sensor, follow the instructions
listed in the removal procedure.
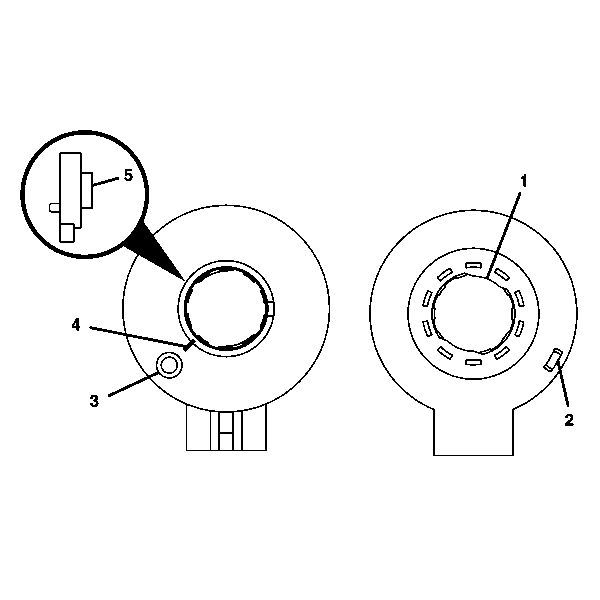
- Verify the type of steering wheel position sensor.
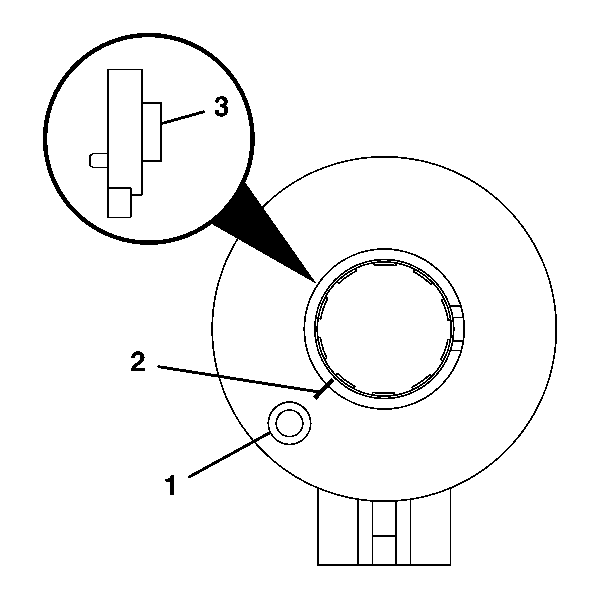
- From the technicians point of view, the FRONT of the
sensor (1) connector will be on the right.
Important: If reusing the existing sensor, you do not
have to align the sensor before removal. Centering is not required when it is time
to reinstall.
- Remove the connector from the sensor.
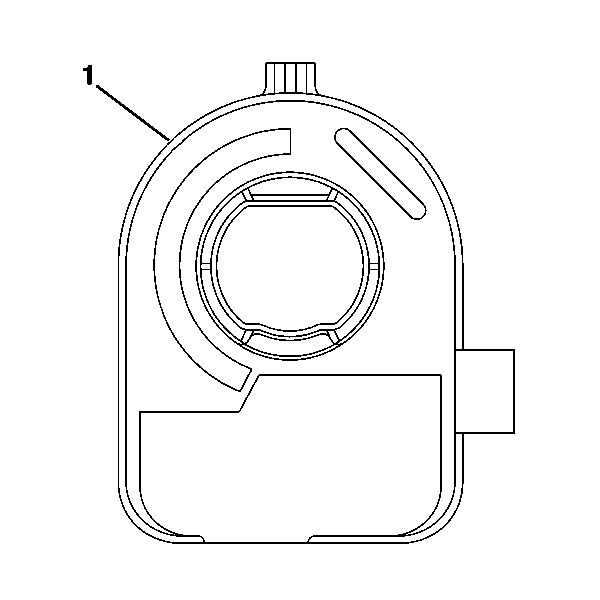
- Remove the sensor (1) from the adapter and bearing assembly.
- To install the sensor, proceed to step 1 in the installation section.
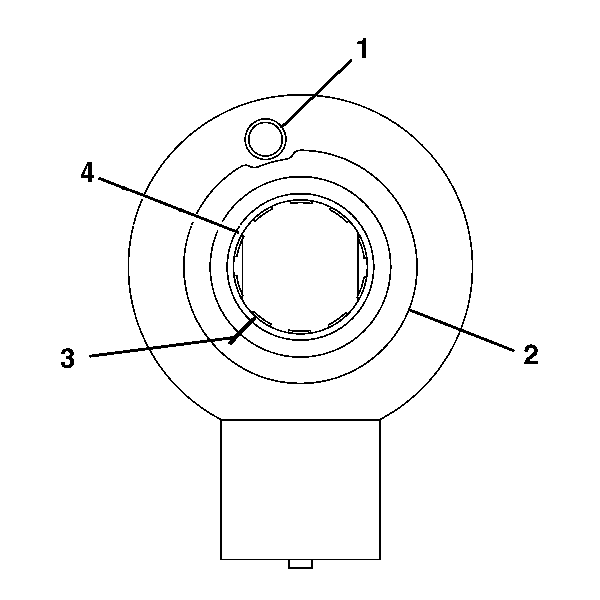
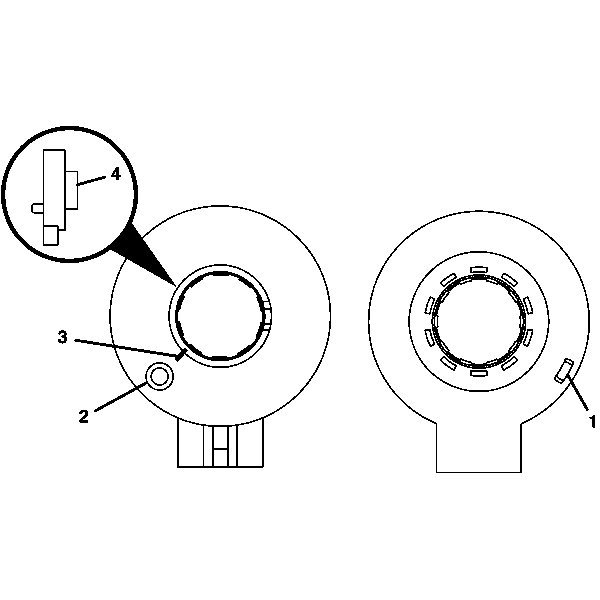
- From the technicians point of view, the FRONT of the
sensor will have:
| • | A pin hole (1) for centering the pin (note location of the pin
hole) |
| • | A flush rotor flange cuff (4) |
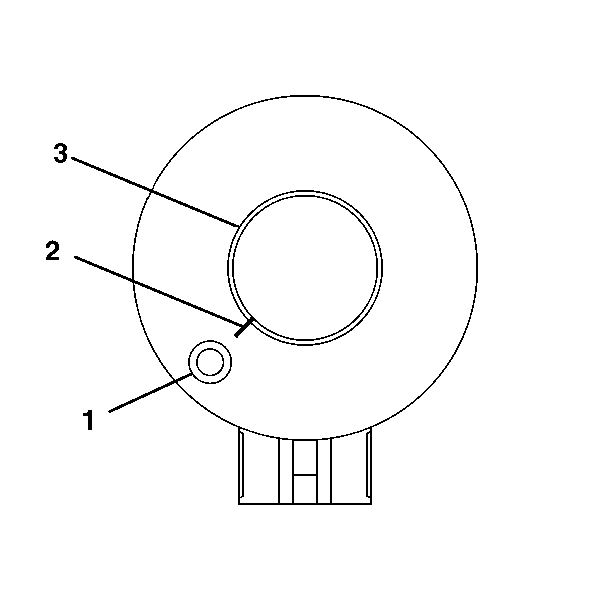
Important: If reusing the existing sensor, you must
make an alignment mark on the rotor flange cuff (3) before removing the sensor.
Failure to do so will cause misalignment when installing the sensor. A new sensor
will be required if misaligned.
- Make an alignment mark on the flush rotor flange cuff (3).
- Remove the connector from the sensor.
- Remove the sensor from the adapter and bearing assembly.
- To install the sensor, proceed to step 5 in the installation section.
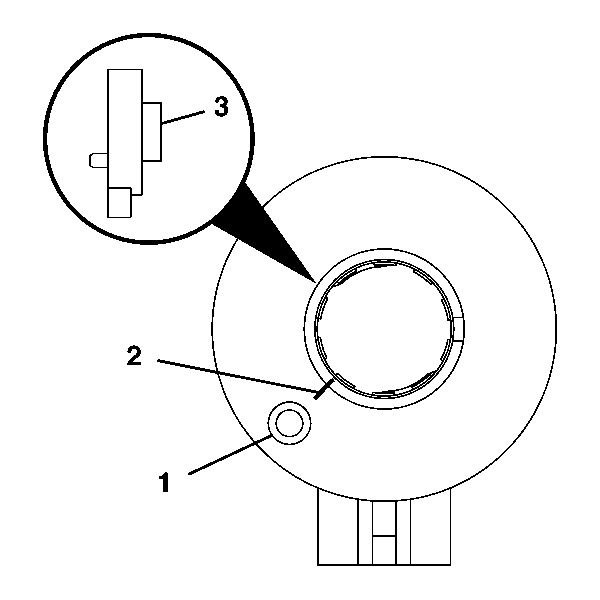
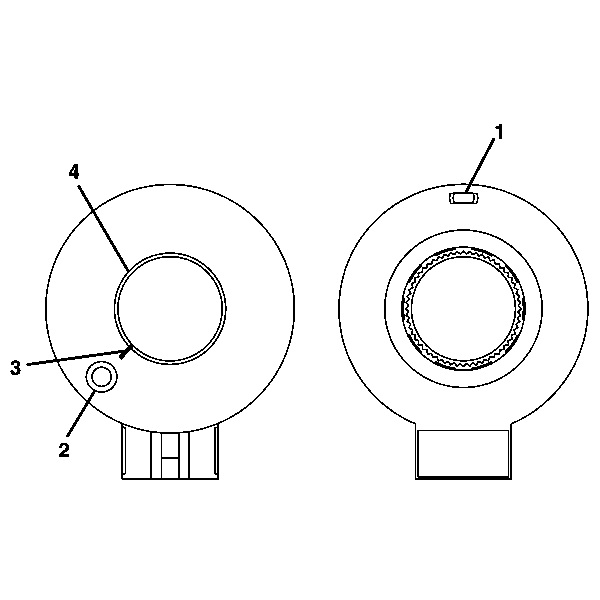
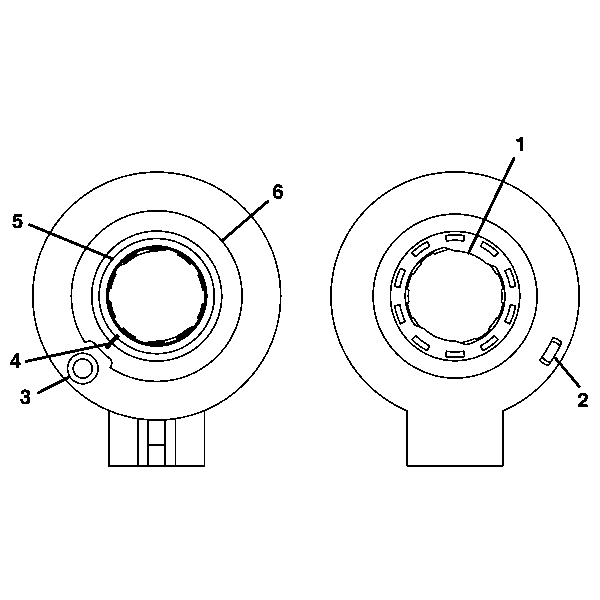
- From the technicians point of view, the FRONT of the
sensor will have:
| • | A raised rotor flange cuff (3) |
| • | An alignment mark (2) on the rotor flange cuff (3) for installation |
| • | A pin hole (1) for the centering pin (note location of the pin
hole) |
- Remove the connector from the sensor.
- Remove the sensor from the adapter and bearing assembly.
- To install the sensor, proceed to step 9 in the installation section.
- From the technicians point of view, the FRONT of the
sensor will have:
| • | A raised rotor flange cuff (3) |
| • | An alignment mark (2) on the rotor flange cuff (3) for installation |
| • | A pin hole (1) for the centering pin (note location of the pin
hole) |
| • | A sensor clip in FRONT of the sensor |
- Remove the connector from the sensor.
- Remove the sensor clip from the sensor.
- Remove the sensor from the adapter and bearing assembly.
- To install the sensor, proceed to step 13 in the installation section.
- From the technicians point of view, the FRONT of the
sensor will have:
| • | A flush rotor flange cuff (3) |
| • | A pin hole (1) for the centering pin (note location of the pin
hole) |
| • | An alignment mark (2) on the flush rotor flange cuff (3)
for installation |
- Remove the connector from the sensor.
- Remove the sensor from the adapter and bearing assembly.
- To install the sensor, proceed to step 17 in the installation section.
- From the technicians point of view, the FRONT of the
sensor will have:
| • | A flush rotor flange cuff (4) |
| • | A pin hole (2) for the centering pin (note location of the pin
hole) |
| • | An alignment mark (3) on the flush rotor flange cuff (4)
for installation |
- Remove the connector from the sensor.
- Remove the sensor from the adapter and bearing assembly.
- To install the sensor, proceed to step 21 in the installation section.
Installation Procedure
Important: If reusing the existing sensor, no centering
of the sensor is required.
- If installing a new sensor, it will come with a pin installed in the sensor.
Do not remove the pin until the sensor is seated.
- From the technicians point of view, the FRONT of the sensor (1)
connector will be on your right.
From the technicians point of view, the
BACK of the sensor (2) connector will be on your left.
- Looking at the FRONT of the sensor, align the sensor with the steering
shaft and install into the adapter and bearing assembly.
- Install the connector to the sensor.
- From the technicians point of view, the FRONT of the
sensor will have:
| • | A pin hole (7) for the centering pin (note location of the pin
hole) |
| • | A flushed rotor flange cuff (6) |
| • | An alignment mark (5) for installation |
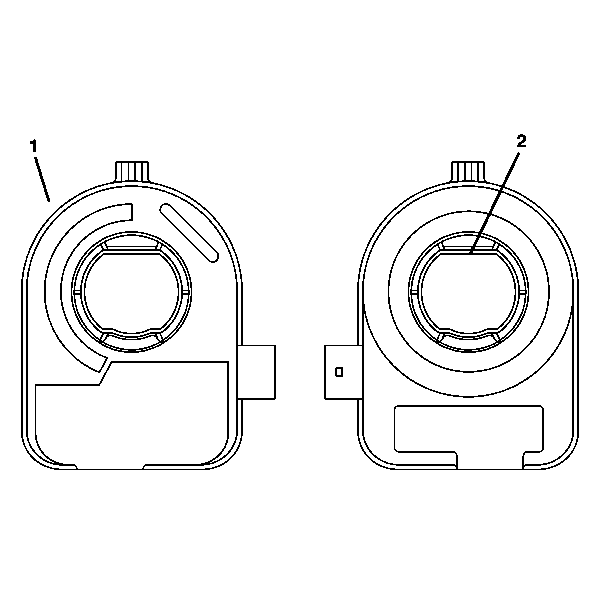
- From the technicians point of view, the BACK of the sensor will have:
| • | An alignment tab (2) for installing into the adapter and bearing
assembly. |
| • | A view of the inside of the connector |
Important: If reusing the existing sensor, you must
align the marks on the flush rotor flange cuff before installation. The alignment
mark must stay aligned until the sensor is seated into the adapter and bearing assembly.
If installing a new sensor, it will come with a pin installed in the
sensor. Do not remove the pin until the sensor is seated. If the new sensor did not
come with a pin installed, you must reorder a new sensor.
- Looking at the FRONT of the sensor, align the sensor with the steering shaft
and install into the adapter and bearing assembly.
- Install the connector to the sensor.
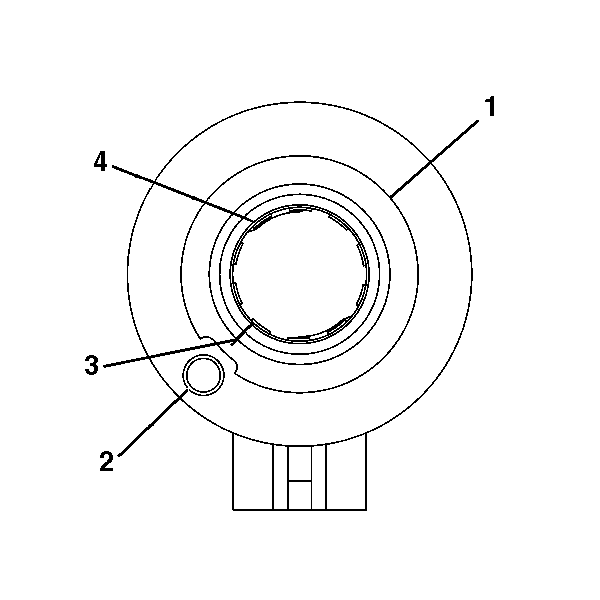
- From the technicians point of view, the FRONT of the
sensor will have:
| • | A pin hole (3) for the centering pin (note location of the pin
hole) |
| • | A raised rotor flange cuff (5) |
| • | An alignment mark (4) for installation |
- From the technicians point of view, the BACK of the sensor will have:
| • | An alignment tab (2) for installing into the adapter and bearing
assembly. |
Important: If reusing the existing sensor, you must
align the marks on the raised rotor flange cuff before installation. The alignment
mark must stay aligned until the sensor is seated into the adapter and bearing assembly.
If installing a new sensor, it will come with a pin installed in the
sensor. Do not remove the pin until the sensor is seated. If the new sensor did not
come with a pin installed, you must reorder a new sensor.
- Looking at the FRONT of the sensor, align the sensor with the steering shaft
and install into the adapter and bearing assembly.
- Install the connector to the sensor.
- From the technicians point of view, the FRONT of the
sensor will have:
| • | A pin hole (2) for the centering pin (note location of the pin
hole) |
| • | A raised rotor flange cuff (4) |
| • | An alignment mark (3) for installation |
- From the technicians point of view, the BACK of the sensor will have an
alignment tab (1) for installation. This sensor does not have double D flats.
Important: If reusing the existing sensor, you must
align the marks on the raised rotor flange cuff before installation. The alignment
mark must stay aligned until the sensor is seated into the adapter and bearing assembly.
If installing a new sensor, it will come with a pin installed in the
sensor. Do not remove the pin until the sensor is seated. If the new sensor did not
come with a pin installed, you must reorder a new sensor.
- Looking at the FRONT of the sensor, align the sensor with the steering shaft
and install into the adapter and bearing assembly.
- Install the connector to the sensor.
- From the technicians point of view, the FRONT of the
sensor will have:
| • | A pin hole (2) for the centering pin (note location of the pin
hole) |
| • | A flush rotor flange cuff (4) |
| • | An alignment mark (3) for installation |
- From the technicians point of view, the BACK of the sensor will have an
alignment tab (1) for installation. This sensor does not have double D flats.
Important: If reusing the existing sensor, you must
align the marks on the flush rotor flange cuff before installation. The alignment
mark must stay aligned until the sensor is seated into the adapter and bearing assembly.
If installing a new sensor, it will come with a pin installed in the
sensor. Do not remove the pin until the sensor is seated. If the new sensor did not
come with a pin installed, you must reorder a new sensor.
- Looking at the FRONT of the sensor, align the sensor with the steering shaft
and install into the adapter and bearing assembly.
- Install the connector to the sensor.
- From the technicians point of view, the FRONT of the
sensor will have:
| • | A pin hole (3) for the centering pin (note location of the pin
hole) |
| • | A flush rotor flange cuff (5) |
| • | An alignment mark (4) for installation |
- From the technicians point of view, the BACK of the sensor will have:
| • | An alignment tab (2) for installing into the adapter and bearing
assembly. |
Important: If reusing the existing sensor, you must
align the marks on the flush rotor flange cuff before installation. The alignment
mark must stay aligned until the sensor is seated into the adapter and bearing assembly.
If installing a new sensor, it will come with a pin installed in the
sensor. Do not remove the pin until the sensor is seated. If the new sensor did not
come with a pin installed, you must reorder a new sensor.
- Looking at the FRONT of the sensor, align the sensor with the steering shaft
and install into the adapter and bearing assembly.
- Install the connector to the sensor.
