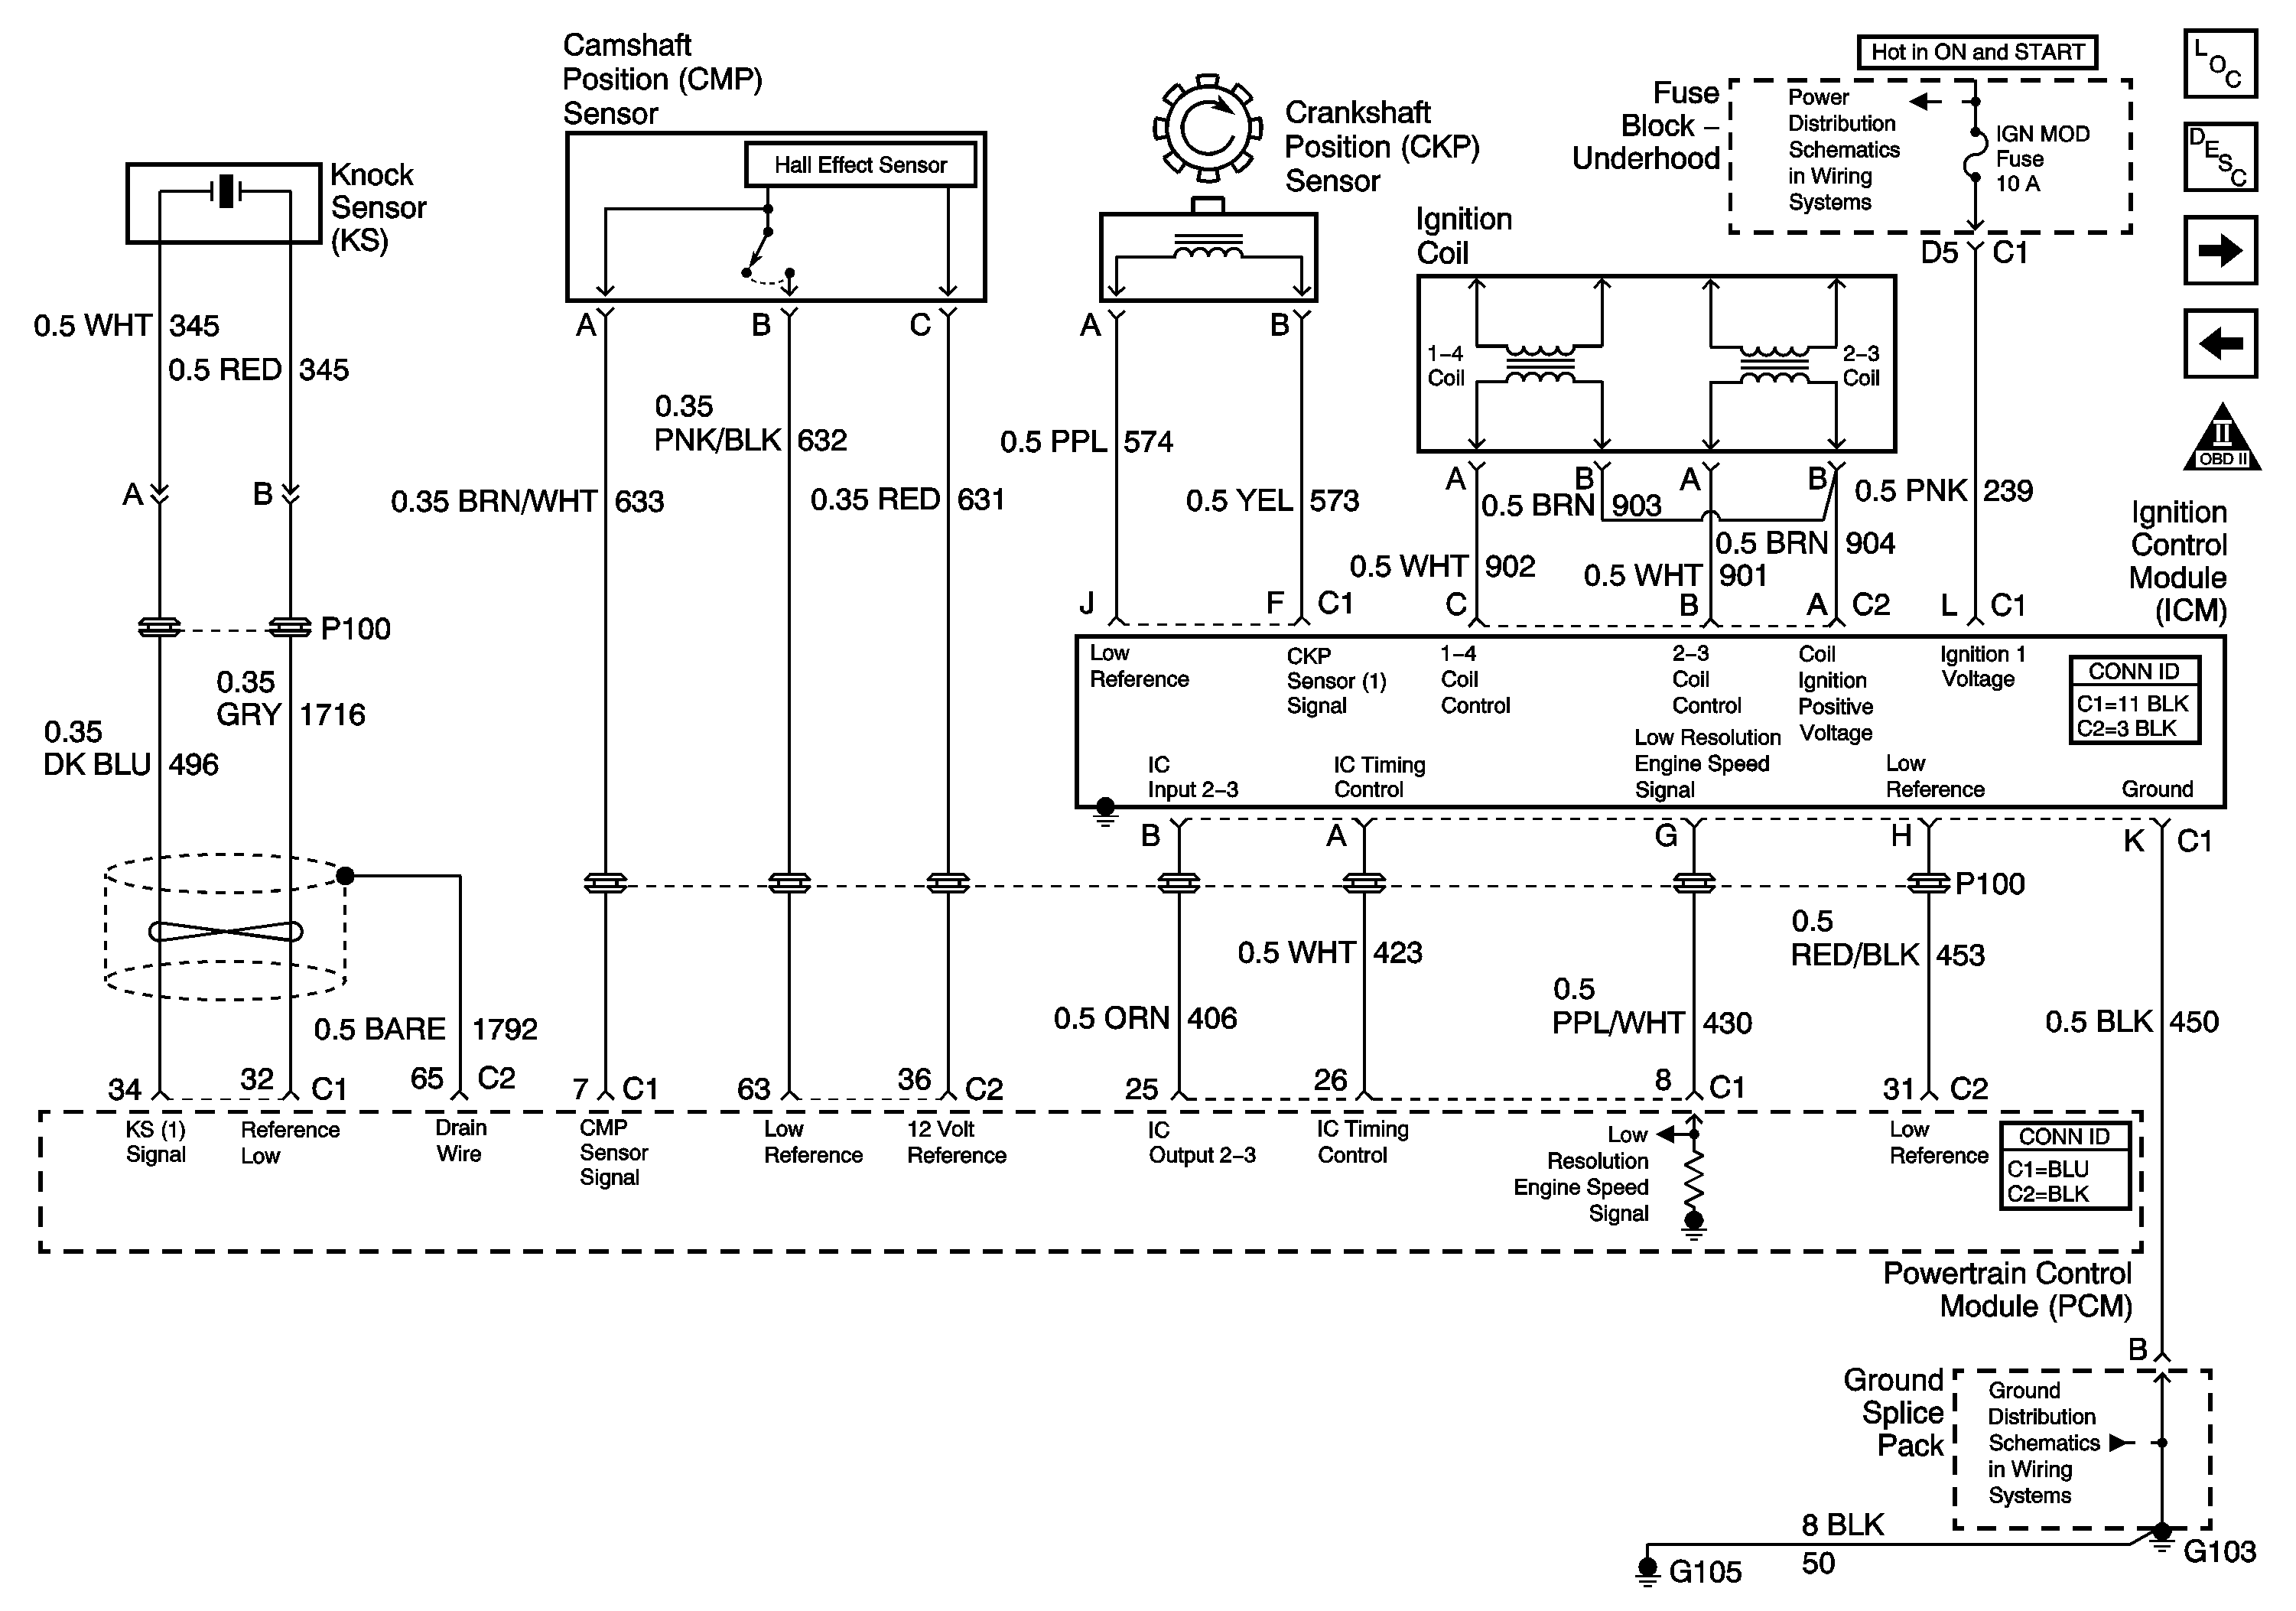
Circuit Description
The ignition control (IC) module has independent power and ground circuits. The circuits between the IC module and the powertrain control module (PCM) consist of the following:
| • | The low reference circuit |
| • | The low resolution engine speed signal |
| • | The two IC timing control signals |
| - | For cylinders 1 and 4 |
| - | For cylinders 2 and 3 |
The IC module and PCM use the low resolution engine speed signal to control ignition operation. The low resolution engine speed signal is derived from the crankshaft position (CKP) sensor, which is connected directly to the IC module.
Diagnostic Aids
| • | A small amount of resistance in the battery positive voltage circuit to the PCM may cause a no start. Test the battery positive voltage circuit for excessive resistance or corrosion. Refer to Wiring Repairs in Wiring Systems. |
| • | The PCM grounds will cause a NO START only if all of them are not making a good connection. Refer to Testing for Intermittent Conditions and Poor Connections in Wiring Systems. |
| • | If the CKP sensor is loose it may cause an intermitted NO START by moving away from the reluctor wheel. Inspect the sensor and matting surface for being clean and tight. |
Step | Action | Value(s) | Yes | No | ||||||||
|---|---|---|---|---|---|---|---|---|---|---|---|---|
Schematic Reference:
| ||||||||||||
1 | Did you perform the Diagnostic System Check-Engine Controls? | -- | Go to Step 2 | |||||||||
2 |
Does the CKP Active Counter increment? | -- | Go to Step 3 | Go to Step 6 | ||||||||
3 |
Important:: Not grounding the ICM Assembly may cause erratic spark. Does the spark tester spark on all cylinders? | -- | Go to Step 4 | Go to Step 12 | ||||||||
4 |
Did you find and correct the condition? | -- | Go to Step 30 | Go to Step 5 | ||||||||
5 | Inspect for basic engine problems. Refer to Symptoms - Engine Mechanical in Engine Mechanical. Did you find and correct any conditions? | -- | Go to Step 30 | Go to Step 25 | ||||||||
6 |
Does the voltage measure near the specified value? | Battery Voltage | Go to Step 7 | Go to Step 20 | ||||||||
7 | Connect the DMM between battery ground and the CKP sensor low reference circuit at the connector. Does the DMM read voltage? | -- | Go to Step 23 | Go to Step 8 | ||||||||
8 | Use the DMM in order to measure the resistance between the battery ground and the CKP sensor low reference circuit at the connector. Does the resistance measure infinity? | -- | Go to Step 9 | Go to Step 24 | ||||||||
9 | Measure the resistance between the CKP sensor low reference circuit and the CKP sensor 1 signal circuit at the connector. Does the resistance measure within the specified value? | 500-900 ohms | Go to Step 10 | Go to Step 15 | ||||||||
10 |
Does the voltage measure greater then the specified value? | 1-1.3 Volts | Go to Step 11 | Go to Step 26 | ||||||||
11 |
Does the CKP Active Counter increment? | -- | Go to Step 16 | Go to Step 19 | ||||||||
12 |
Does the voltage measure near the specified value? | Battery Voltage | Go to Step 13 | Go to Step 16 | ||||||||
13 |
Does the test lamp blink? | -- | Go to Step 22 | Go to Step 14 | ||||||||
14 |
Important:: DO NOT use a test lamp in the next test. Does the voltage measure near the specified value? | Battery Voltage | Go to Step 18 | Go to Step 17 | ||||||||
15 |
Did you find and correct the condition? | -- | Go to Step 30 | Go to Step 26 | ||||||||
16 |
Did you find and correct the condition? | -- | Go to Step 30 | Go to Step 27 | ||||||||
17 |
Did you find and correct the condition? | -- | Go to Step 30 | Go to Step 29 | ||||||||
18 |
Did you find and correct the condition? | -- | Go to Step 30 | Go to Step 27 | ||||||||
19 |
Did you find and correct the condition? | -- | Go to Step 30 | Go to Step 29 | ||||||||
20 | Repair open in the ICM ground circuit and/or ignition voltage 1 circuit. Refer to Wiring Repairs in Wiring Systems. Did you complete the repair? | -- | Go to Step 30 | Go to Step 21 | ||||||||
21 | Repair short to ground in the coil control circuits. Did you complete the repair? | -- | Go to Step 30 | -- | ||||||||
22 | Repair open or short to ground in the Jumper Harness between the ICM and the Coils. Refer to Wiring Repairs in Wiring Systems. Did you complete the repair? | -- | Go to Step 30 | Go to Step 28 | ||||||||
23 | Repair the short to voltage in the CKP sensor 1 signal circuit. Refer to Wiring Repairs in Wiring Systems. Did you complete the repair? | -- | Go to Step 30 | -- | ||||||||
24 | Repair the short to ground in the CKP sensor 1 signal circuit. Refer to Wiring Repairs in Wiring Systems. Did you complete the repair? | -- | Go to Step 30 | -- | ||||||||
25 |
Did you find and correct the condition? | -- | Go to Step 30 | -- | ||||||||
26 |
Important:: The Crankshaft Position Variation procedure must be performed. Refer to Crankshaft Position System Variation Learn . Replace the CKP sensor. Refer to Crankshaft Position Sensor Replacement . Did you complete the replacement? | -- | Go to Step 30 | -- | ||||||||
27 | Replace the ICM. Refer to Ignition Control Module Replacement . Did you complete the replacement? | -- | Go to Step 30 | -- | ||||||||
28 | Replace both Ignition Coils. Refer to Ignition Coil Replacement . Did you complete the replacement? | -- | Go to Step 30 | -- | ||||||||
29 | Replace the PCM. Refer to Powertrain Control Module Replacement . Did you complete the replacement? | -- | Go to Step 30 | -- | ||||||||
30 | Attempt to start the engine. Does the engine start and continue to run? | -- | Go to Step 31 | Go to Step 2 | ||||||||
31 |
Does the vehicle operate normally, with no MIL illumination and no stored DTCs? | -- | System OK | |||||||||
