System Description
The Powertrain Control Module (PCM) monitors both the crankshaft and the camshaft position in order to detect an engine misfire. A rapid decrease in the crankshaft speed indicates misfire. The PCM may require that several consecutive misfire conditions are detected before storing this DTC and before illuminating the MIL. Under light misfire conditions, the PCM may require more than one trip to set this DTC. Under a severe misfire, the PCM flashes the MIL. A flashing MIL indicates that there is a misfire that is capable of damaging the catalytic converter. The torque converter clutch (TCC) disables momentarily in order to determine if the misfire was due to a rough road condition, automatic transmission only.
Conditions for Setting the DTC
| • | The misfire total is greater than 12 counts. |
| • | The engine speed is between 469 RPM and 6400 RPM |
| • | The battery voltage is between 9 volts and 17 volts. |
| • | The Engine Coolant Temperature (ECT) is between -7°C (20°F) and 123°C (254°F). |
| • | The engine has been running more than 15 seconds. |
| • | The Throttle Position (TP) hasn't changed more than 8% in 1 second. |
| • | DTCs P0106, P0107, P0112, P0113, P0117, P0118, P0121, P0122, P0123, P0125, P0131, P0132, P0133, P0134, P0171, P0172, P0325, P0335, P0341, P0342, P0404, P0405, P0502, P0503, P0506, P0507, P0601, P0740, P0742, P1133, P1404, and P1621 not set. |
Action Taken When the DTC Sets
| • | The malfunction indicator lamp (MIL) illuminates if the fault is active within the same conditions for two out of eighty ignition cycles and a misfire is present. |
| OR |
| The MIL illuminates after two consecutive ignition cycles during in which the diagnostic runs with the fault active |
| OR |
| The MIL illuminates immediately and flashes if a misfire is severe enough to cause any catalyst damage. |
| • | In vehicles with automatic transmission only, the torque converter clutch (TCC) is disablesd when a misfire is present. |
| • | The PCM records the operating conditions at the time that the diagnostic fails. This information will store in the Freeze Frame and Failure Records buffers. |
| • | A history DTC is stored. |
| • | The coolant fan turns ON. |
Conditions for Clearing the MIL/DTC
| • | The MIL turns OFF after three consecutive ignition cycles during which the diagnostic runs without a fault present under the Freeze Frame conditions that existed when the DTC failed. |
| • | A history DTC clears after 40 consecutive warm up cycles without a fault. |
| • | Clear the MIL/DTCs with a scan tool. |
Diagnostic Aids
An intermittent can also be the result of a defective reluctor wheel. Remove crankshaft sensor and inspect reluctor wheel through sensor mount hole. Check for porosity and condition of wheel.
Verify the electronic Ignition Control Module (ICM) 11 pin harness connector terminal K, ground circuit should have less than 0.5 ohms of resistance.
If DTC is intermittent, refer to Symptoms .
When checking the electrical terminal connections with a test light or DMM, a malfunctioning electrical terminal connection maybe cleaned and not detected as a problem. You may also clean a corroded or dirty electrical terminal connection when disconnecting and reconnecting any electrical connector.
Test Description
The numbers below refer to the step numbers on the Diagnostic Table.
-
The Powertrain OBD System Check prompts the technician to complete some of the basic checks and to store the freeze frame and failure records data on the scan tool if applicable. This creates an electronic copy of the data captured when the malfunction occurred. The scan tool stores this data for later reference.
-
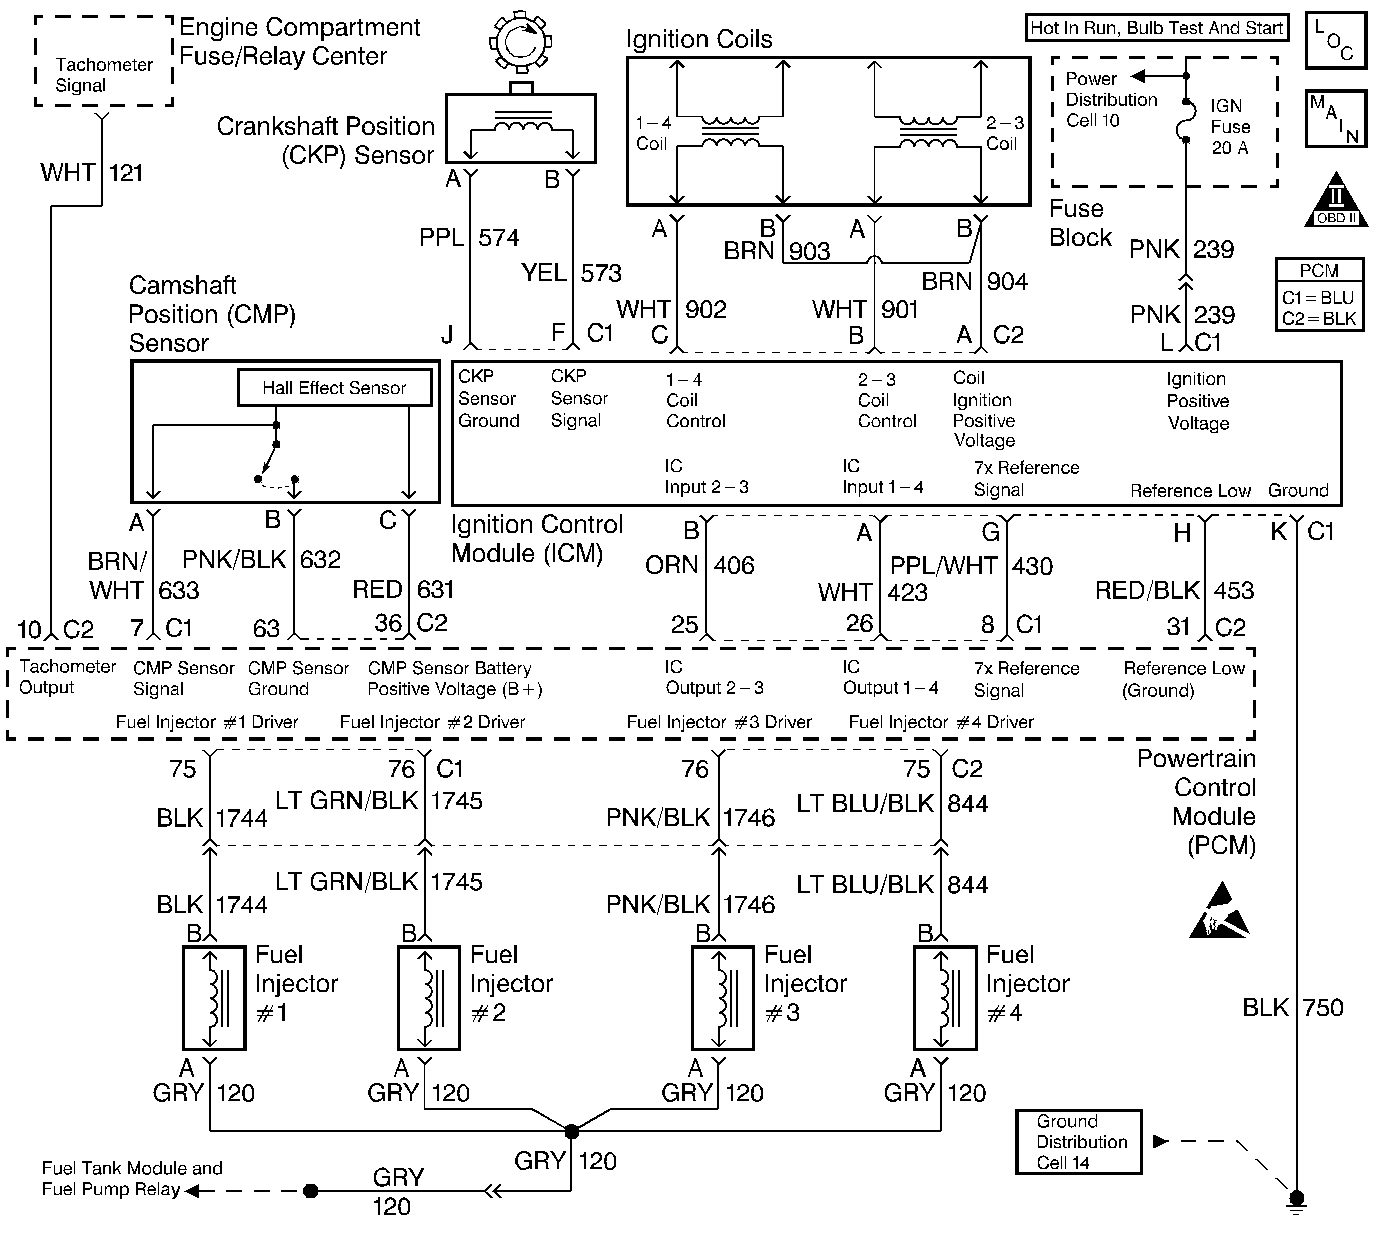
If a DTC P0200 is present, the condition causing the misfire is in the fuel injector circuitry. The DTC P0200 table will diagnose the fuel injectors and the fuel injectors circuitry.
-
A visual/physical inspection should include checking the following components:
-
This step determines if the DTC P0300 is the result of a hard malfunction or an intermittent condition.
-
If the misfire is not present, it may be necessary to duplicate the conditions in the freeze frame data in order to detect the misfire. Depending on the engine load, the conditions may have to be maintained for up to 20 seconds. If the misfire accumulators start to increment, then this indicates that the misfire is present. A sudden change in the throttle, a rough road, or other crankshaft rotation disturbances may cause the counter to increment a few counts and then stop. This can be considered normal and should not be diagnosed as a misfire. The history counter begins counting after the DTC is set and will indicate only true misfires. A history misfire counter will store the number of misfires that have occurred until the DTC is cleared.
-
If all of the accumulators indicate misfire, then the misfire is being caused by something that affects the entire engine.
-
A basic engine problem or a fuel injector problem that affects all of the cylinders is possible at this point (e.g. the valve train, the compression, etc.). Refer to Base Engine Misfire Diagnosis in Engine Mechanical for the diagnosis. Also refer to DTC P0200 Injector Control Circuit .
-
After repairs, verify a no misfire by duplicating the conditions within Freeze Frame Data while watching the misfire counters.
-
Important: If the fused jumper wire is not used to ground the ICM assembly, the system may spark erratically.
If a spark plug boot is burned, the other spark plug on that ignition coil may still fire at idle. This step tests the systems ability to produce at least 25,000 volts at each spark plug.
-
Refer to Spark Plug Replacement in Engine Electrical.
Replace any spark plugs that are in the following condition:
-
No spark on one coil may be caused by an open secondary circuit. Therefore, the coils secondary resistance should be checked. If the resistance readings are above 20,000 ohms, but not infinite, this will probably not cause a no start but may cause an engine miss under certain conditions.
-
The test light will blink if the no spark condition is caused by the following items:
-
Thoroughly check any suspected circuitry for the following conditions:
-
Program the replacement PCM and perform the crankshaft position system variation learn procedure. Refer to the latest Techline procedure for PCM reprogramming and to Crankshaft Position System Variation Learn .
-
Conditions for setting the DTC P0420 need to be performed in order to determine that the catalyst has been damaged from the misfire.
| • | The ignition systems electrical wiring for the following condition(s): |
| - | Proper electrical terminal connections |
| - | Pinches in the wires |
| - | Cuts in the wires |
| • | The PCM grounds for being clean and tight |
| • | The vacuum hoses for proper connections as shown on the Vehicle Emission Information label |
| • | Check the Intake manifold sealing surfaces for air leaks |
| • | Check the EGR valve for the following conditions: |
| - | Air leaks in the EGR tubes |
| - | Stuck open |
| - | Loose bolts at mounting plate |
| - | Poor mounting gasket |
| • | Worn |
| • | Cracked |
| • | Fouled |
| • | Ignition coil electrical connections |
| • | Ignition coil |
| • | Secondary boot assembly |
| • | Backed out terminals |
| • | Improper mating |
| • | Broken locks |
| • | Improperly formed or damaged terminals |
| • | Poor terminal to wiring connections |
| • | Physical damage to the wiring harness |
Step | Action | Value(s) | Yes | No | ||||||||
|---|---|---|---|---|---|---|---|---|---|---|---|---|
Did you perform the Powertrain On-Board Diagnostic (OBD) System Check? | -- | |||||||||||
Was a DTC P0200 set? | -- | |||||||||||
Were any repairs necessary? | -- | |||||||||||
Are there any Misfire Current counters incrementing? | -- | |||||||||||
Are there any Misfire Current counters incrementing? | -- | |||||||||||
Was misfire present in all cylinders? | -- | |||||||||||
7 |
Is the fuel pressure within the specified range? | 290-379kPa (42-55psi) | Go to Fuel System Diagnosis | |||||||||
8 |
Is the fuel OK (uncontaminated)? | -- | ||||||||||
Is the action complete? | -- | -- | ||||||||||
Replace the contaminated fuel. Refer to the Fuel System Cleaning . Is the action complete? | -- | -- | ||||||||||
Important: If the fused jumper wire is not used to ground the ICM assembly, the system may spark erratically. Does the spark tester spark on all of the cylinders? | -- | |||||||||||
Were any spark plugs malfunctioning? | -- | |||||||||||
13 |
Notice: Do not leave the test lamp connected to the PCM IC circuit connector for longer than 5 seconds at a time. Failure to do so may damage the ignition coil and/or the Ignition Control Module. Is there a spark present when you remove the test light from the IC circuit? | -- | ||||||||||
Is the resistance between the specified values? | 4-8Kohms | |||||||||||
Notice: Do not leave the test lamp connected to the PCM IC circuit connector for longer than 5 seconds at a time. Failure to do so may damage the ignition coil and/or the Ignition Control Module. Does the other test light blink? | -- | |||||||||||
16 |
Is the resistance between the specified values? | 4-8Kohms | ||||||||||
17 |
Was a repair necessary? | -- | ||||||||||
18 |
Was a repair necessary? | -- | ||||||||||
19 |
Important: Carefully handle the ignition coils electrical connectors to avoid spark arching from the electrical terminals and causing the IGN fuse to open which would lead to misdiagnosis. Does the test light illuminate for both circuits? | -- | ||||||||||
20 |
Was a repair necessary? | -- | ||||||||||
21 |
Was a repair or replacement necessary? | -- | ||||||||||
22 |
Is the action complete? | -- | -- | |||||||||
23 |
Is the action complete? | -- | -- | |||||||||
24 | Replace the ICM. Refer to Ignition Control Module Replacement . Is the action complete? | -- | -- | |||||||||
25 |
Are the connections OK? | -- | ||||||||||
Repair the electrical connector or connections terminals. Refer to Wiring Repairs in Wiring Systems. Is the action complete? | -- | -- | ||||||||||
Replace the PCM. Refer to the Powertrain Control Module Replacement/Programming . Is the action complete? | -- | -- | ||||||||||
Does the scan tool indicate that these diagnostics have ran and passed? | -- | |||||||||||
29 | Check if any additional DTCs are set. Does the scan tool display any DTCs that you have not diagnosed? | -- | Go to the applicable DTC table | System OK |
