REVISED C31 IGNITION SYSTEM CHECK DIAGNOSTIC PROCEDURES

VEHICLES AFFECTED: 1986 'N' AND 'H' MODELS EQUIPPED WITH 3.0L V-6 ENGINES
The 'Type I' C3I ignition system check diagnostic procedures been revised for 1986 'N' AND 'H' models equipped with a 3.0L V-6 engine. In addition, 'Type II' diagnostic procedures have been included for your information.
Please update the applicable pages in Section 6E3-C4B of your 1986 New Product Service Information Manual - All Series Except 'E'.
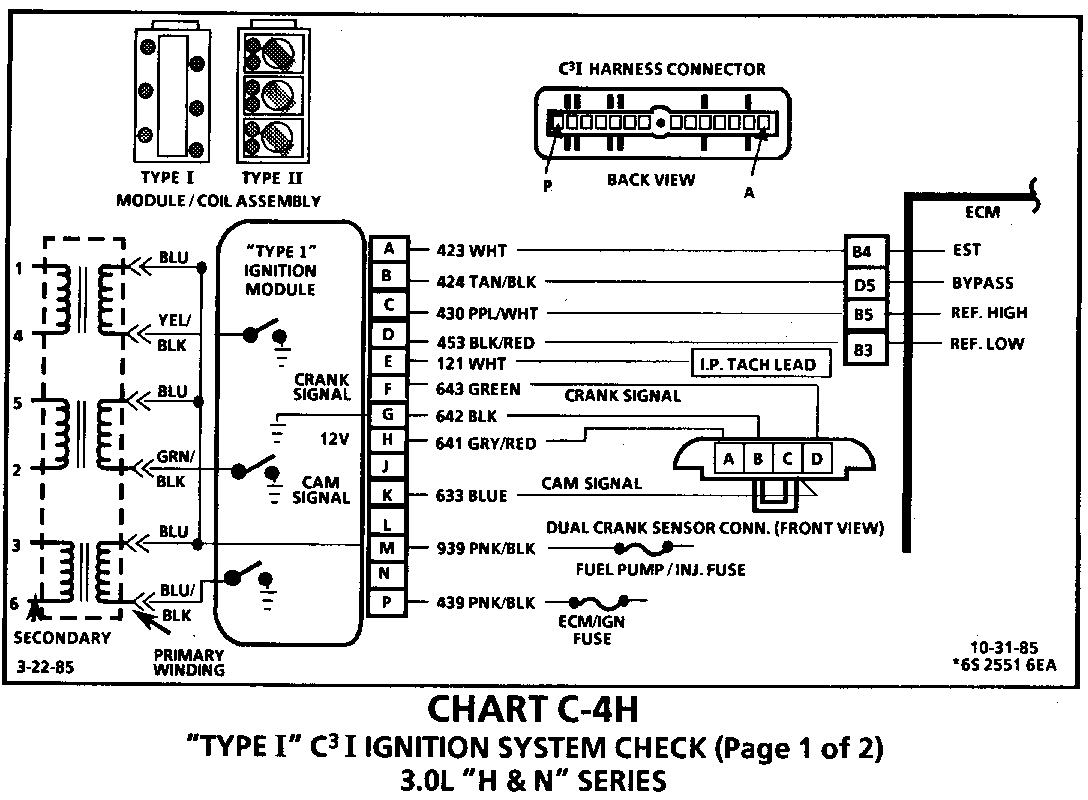
CHART C-4H "TYPE I" C3I IGNITION SYSTEM CHECK (Page 1 of 2) 3.0L "H & N" SERIES
The C31 uses a waste spark method of distribution. In this type of system the ignition module triggers the #1/4 coil pair resulting in both #1 and #4 spark plugs firing at the same time. #1 cylinder is on the compression stroke at the same time #4 is on the exhaust stroke, resulting in a lower energy requirement to fire #4 spark plug. This leaves the remainder of the high voltage to be used to fire #1 spark plug.
1. Verification of "TYPE I" or "TYPE II" is very important, because "TYPE I" diagnostics chart will not work on a "TYPE II" system, or visa versa. If a plug wire is open, the other plug on that coil may still fire at idle. This tests the ability of the system to produce at least 25,000 volts.
2. No spark on one cylinder may be caused by an open plug wire or secondary winding. Therefore, both wires related to a coil and the secondary winding resistance should be checked. Resistance readings over the upper limit, but not infinite, will probably not cause a no start but may cause an engine miss under certain conditions.
3. This tests the triggering circuit in the ignition module. A blinking light indicates the module is triggering. The diagram above shows the control wire color for each coil. For example, if testing, why # 1 Plug did not fire, connect the test light between the blue feed wire and the yel/blk control wire. Before checking the primary winding, check and note the resistance of the ohmmeter leads by touching them together.
4. This test determines whether the ECM is seeing cam and crank sensor signals. If the test light blinks, the ECM is receiving good cam and crank signals, so the problem is a faulty module connection or module.
5. This test provides the ECM with a substitute Cam and Crank signals. The ECM must see a cam signal first, before it will recognize the crank signal. Therefore, momentarily jumpering the cam signal first, is very important in making an accurate test at this point
6. Tests to determine whether problem is in sensor, Ignition Module, or power circuits.
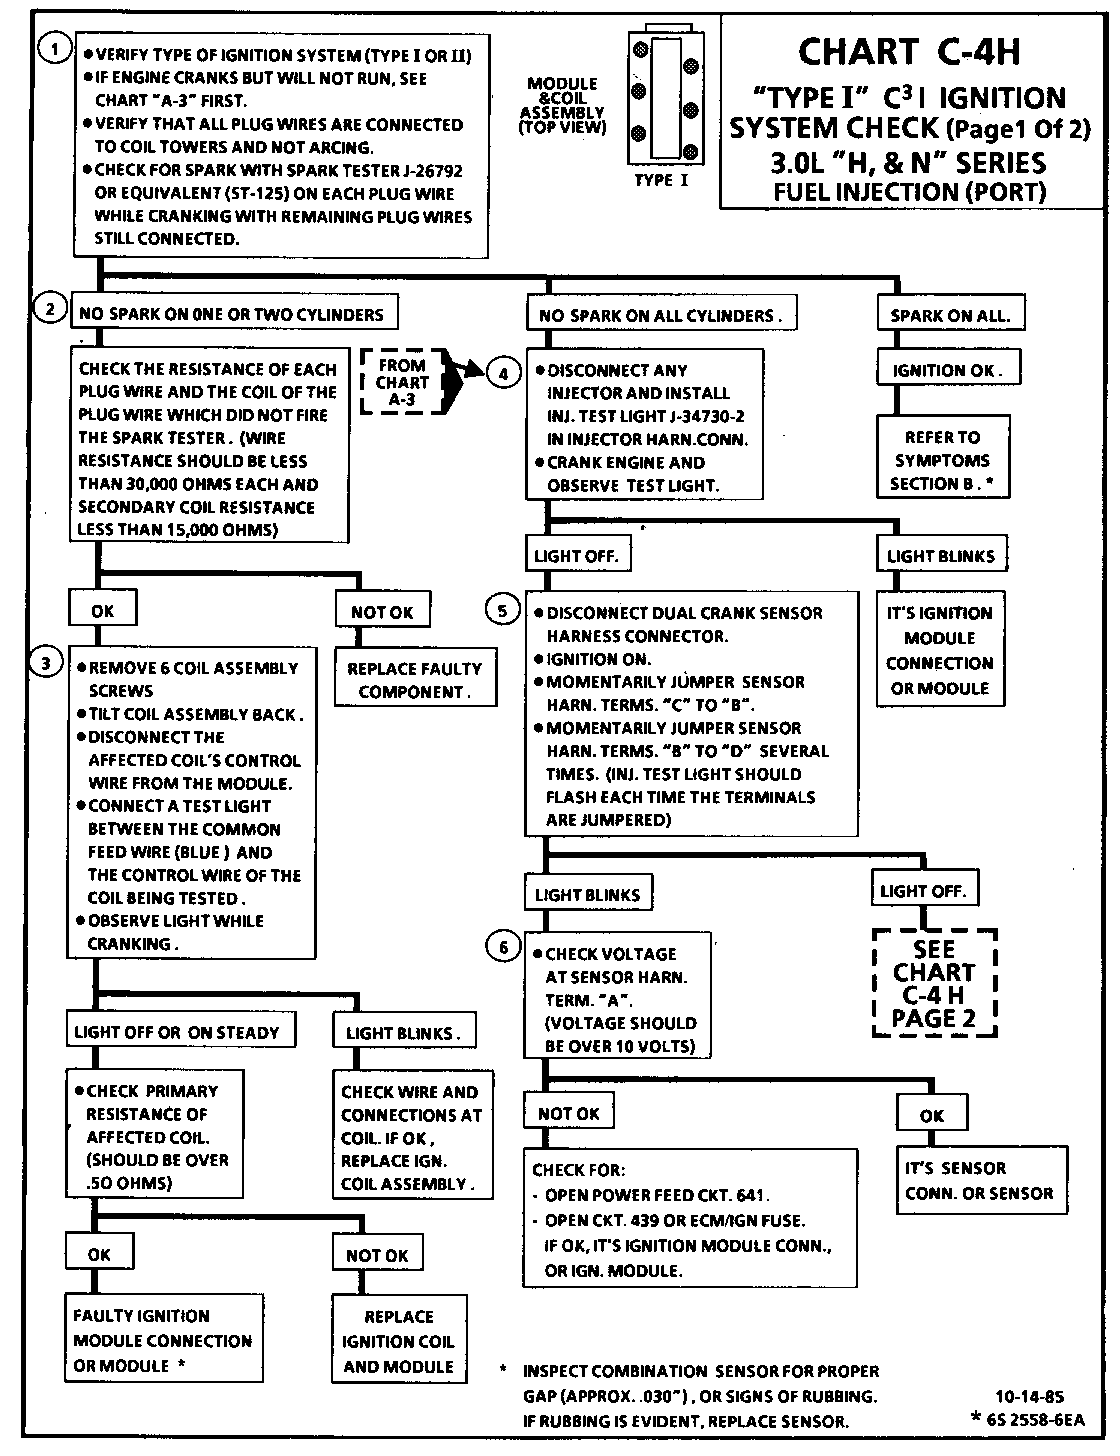
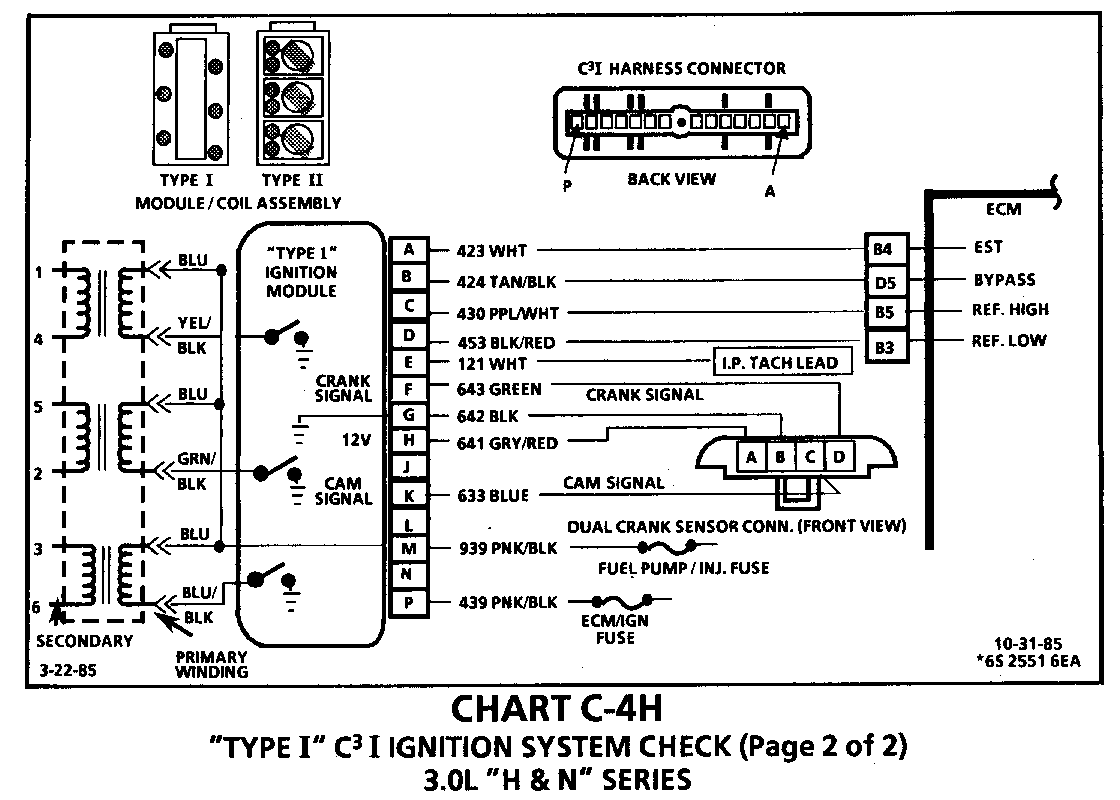
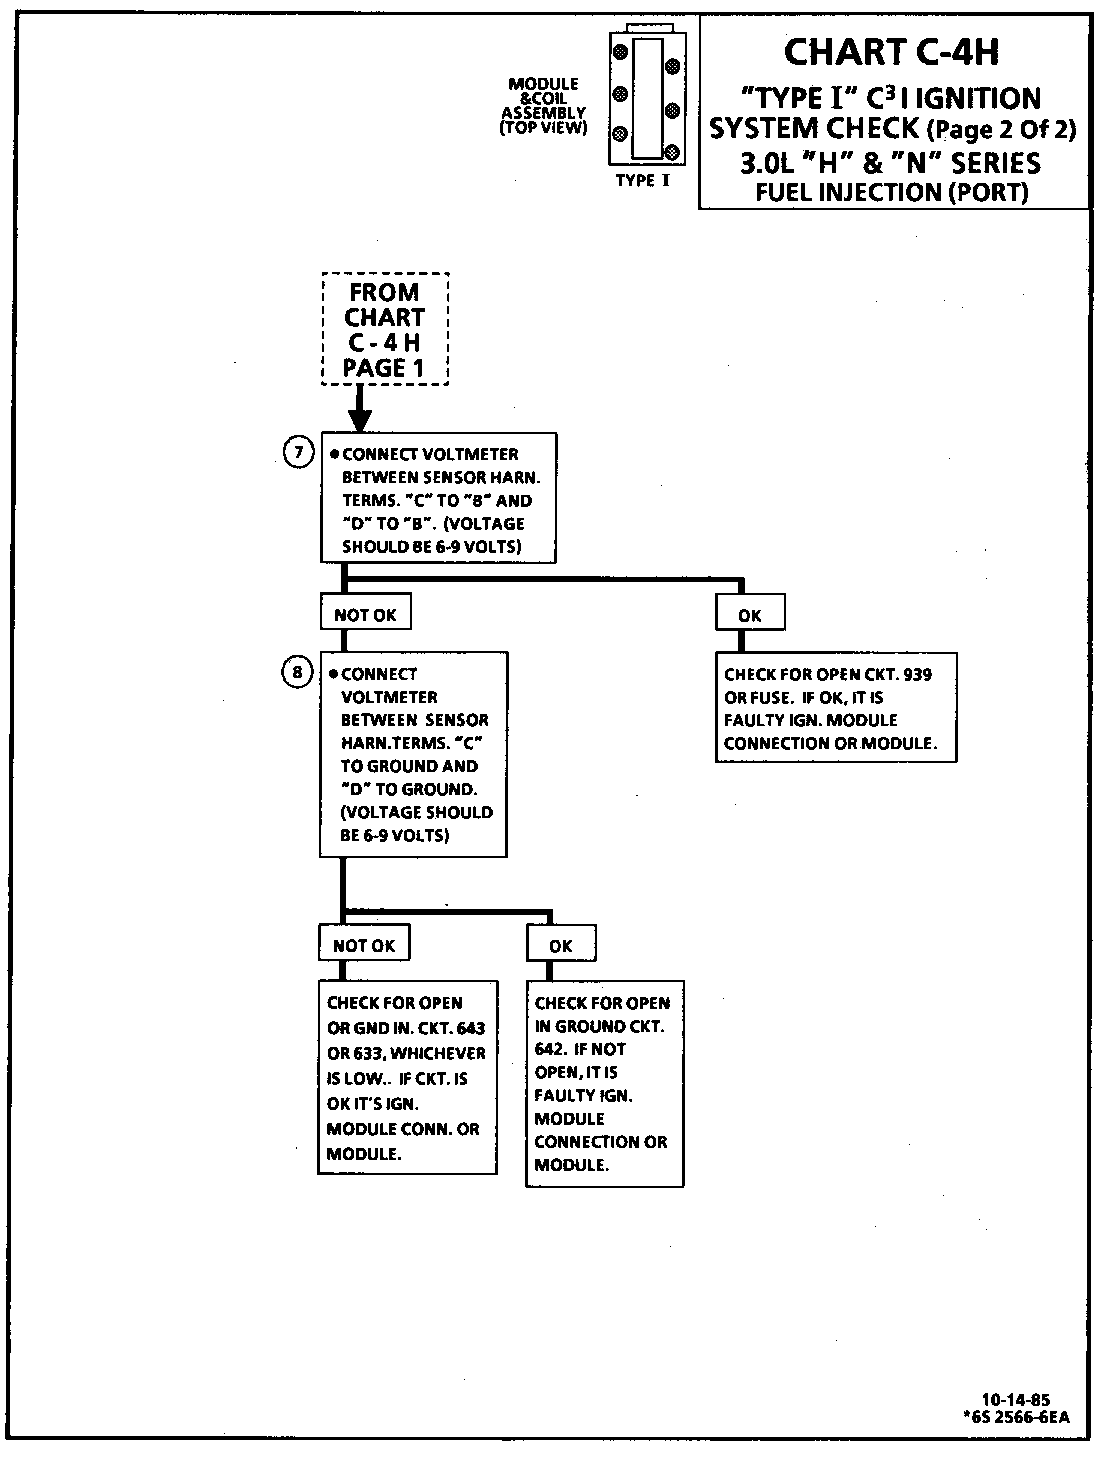
CHART C-4H "TYPE I" C3I IGNITION SYSTEM CHECK (Page 2 of 2) 3.0L "H & N" SERIES
For timing of spark plug firing, a dual crankshaft sensor "hall effect" switch is used. The cam signal part of this switch sends a signal to the ignition module, when cylinders #1 & #4 are 25 DEG after top dead center. This signal is used to begin the correct sequence of coil firing, which starts with the #3/6 coil. The engine will continue to run, if the cam signal is lost while running, and a Code 41 will be stored. However, it will not restart after shut down. The crank signal portion of the sensor sends a signal to the ignition module, and then to the ECM, for reference RPM and crankshaft position. There are three windows in a disc, which is mounted to the harmonic balancer. These windows pass by the sensor and, as each window passes, the next coil is triggered.
7. This signal is supplied by the module and is pulled low each time the crank signal occurs.
8. Checks to see if problem is in ground circuit 642, crank signal circuit 643, Cam signal circuit 633, or ignition module.
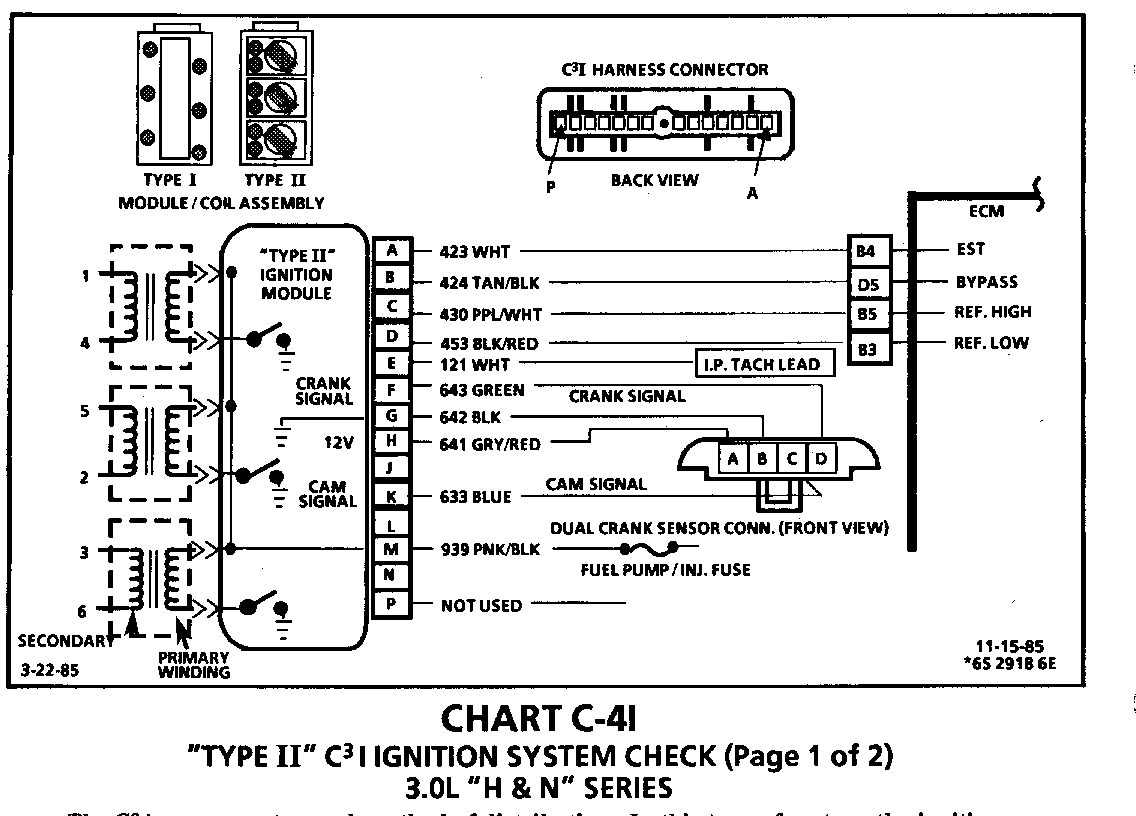
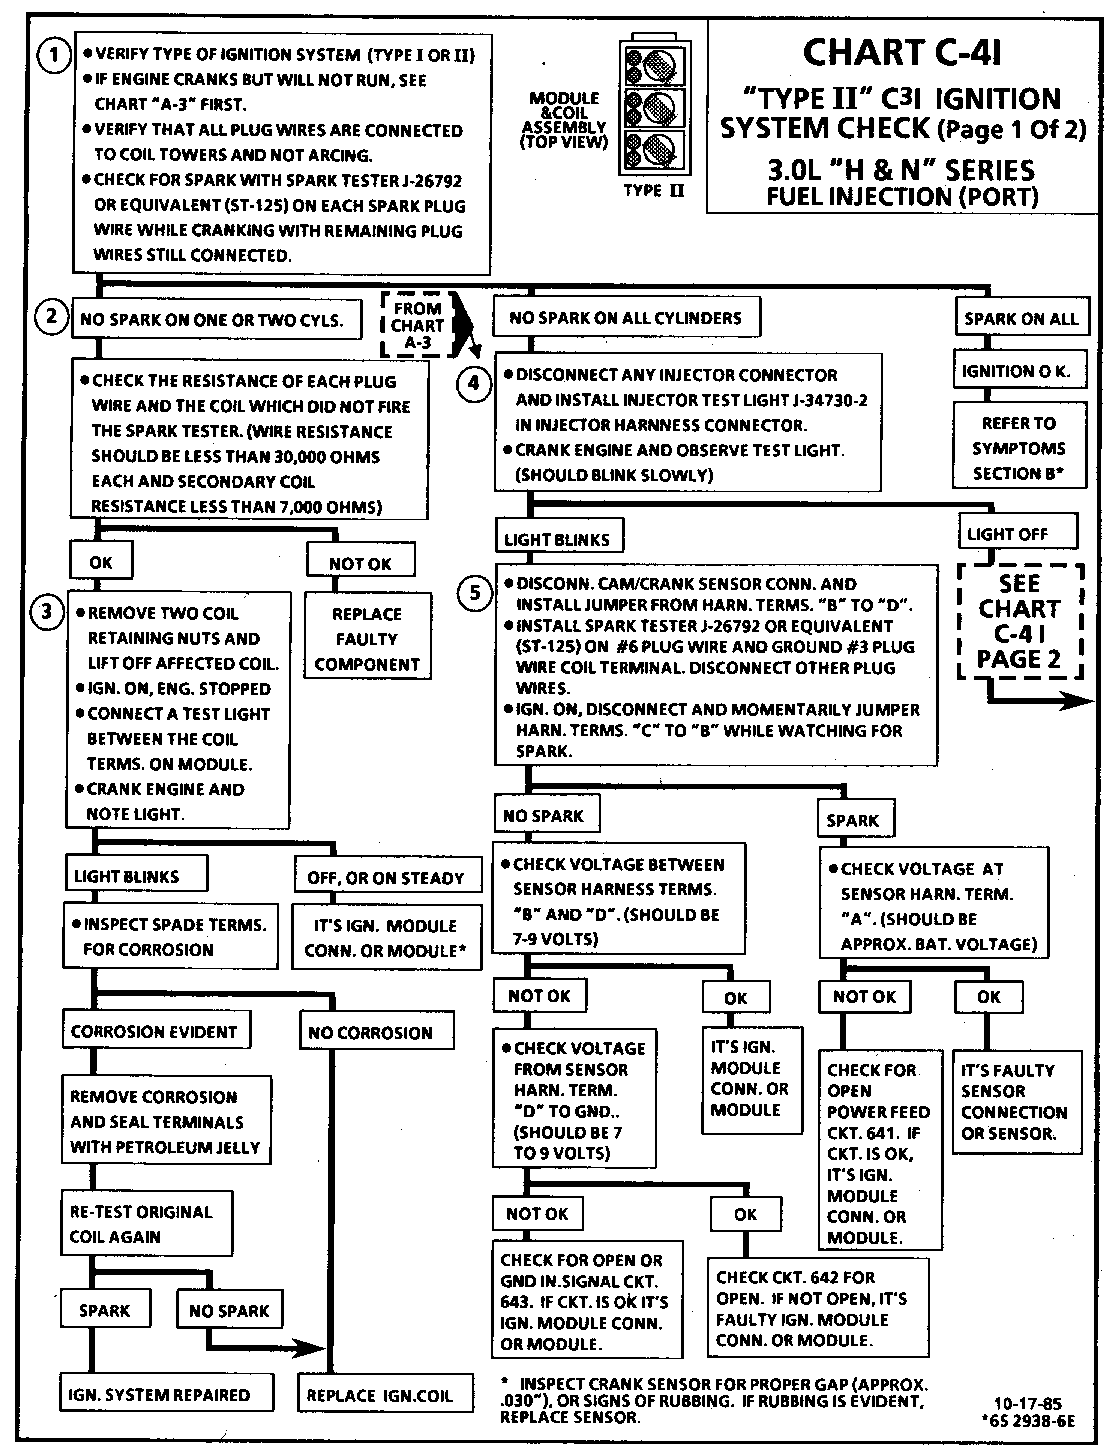
CHART C-41 "TYPE II" C3I IGNITION SYSTEM CHECK (Page 1 of 2) 3.0L "H & N" SERIES
The C3I uses a waste spark method of distribution. In this type of system, the ignition module triggers the #1/4 coil pair, resulting in both #1 and #4 spark plugs firing at the same time. #1 cylinder is on the compression stroke at the same time #4 is on the exhaust stroke, resulting in a lower energy requirement to fire #4 spark plug. This leaves the remainder of the high voltage to be used to fire #1 spark plug.
1. Verification of "TYPE I" or "TYPE II" is very important because "TYPE I" diagnostics chart will not work on a "TYPE II" system, or visa versa. If a plug wire is open, the other plug on that coil may still fire at idle. This tests the ability of the system to produce at least 25,000 volts.
2. No spark on one cylinder may be caused by an open plug wire or secondary winding. Therefore, both wires related to a coil and the secondary winding resistance should be checked. Resistance readings over the upper limit, but not infinite, will probably not cause a no start but may cause an engine miss under certain conditions.
3. This tests the triggering circuit in the ignition module. A blinking light indicates the module is triggering.
4. A slowly blinking light, at this point, indicates the ECM is not seeing a crank sensor signal.
5. At this point, the cam sensor and its control circuits have proved to be good. The problem is in the combination sensor, sensor circuits, or the ignition module.
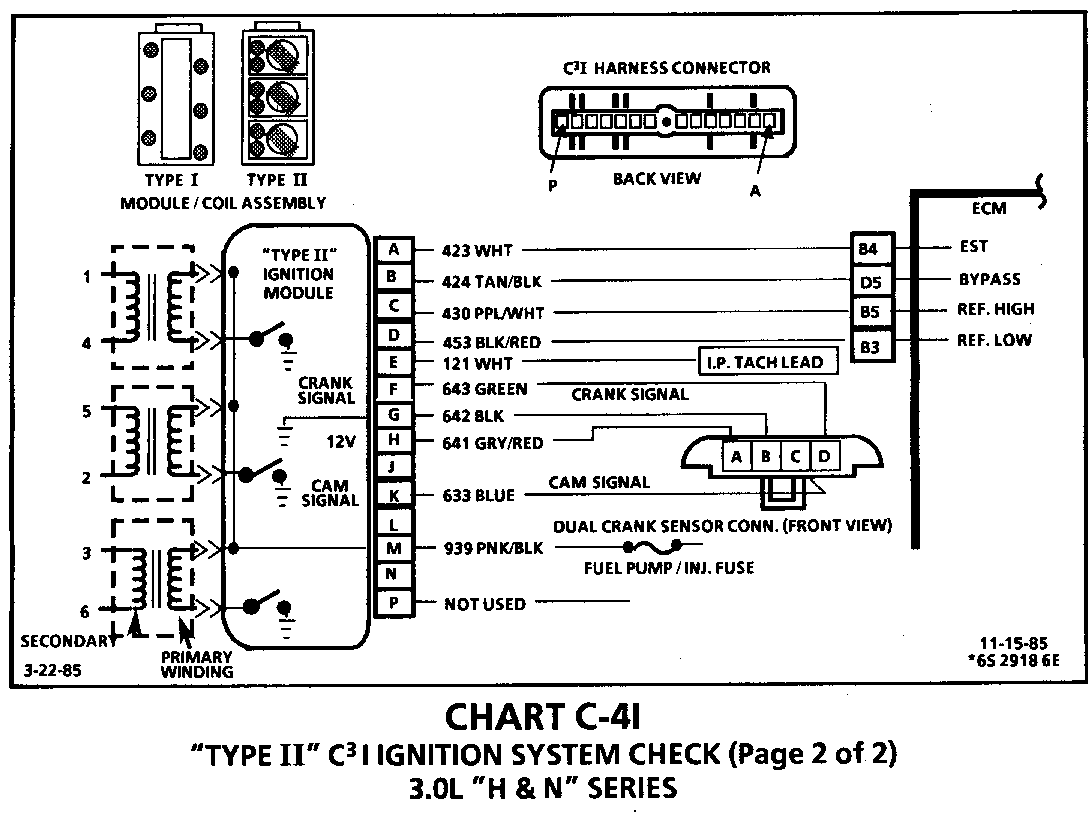
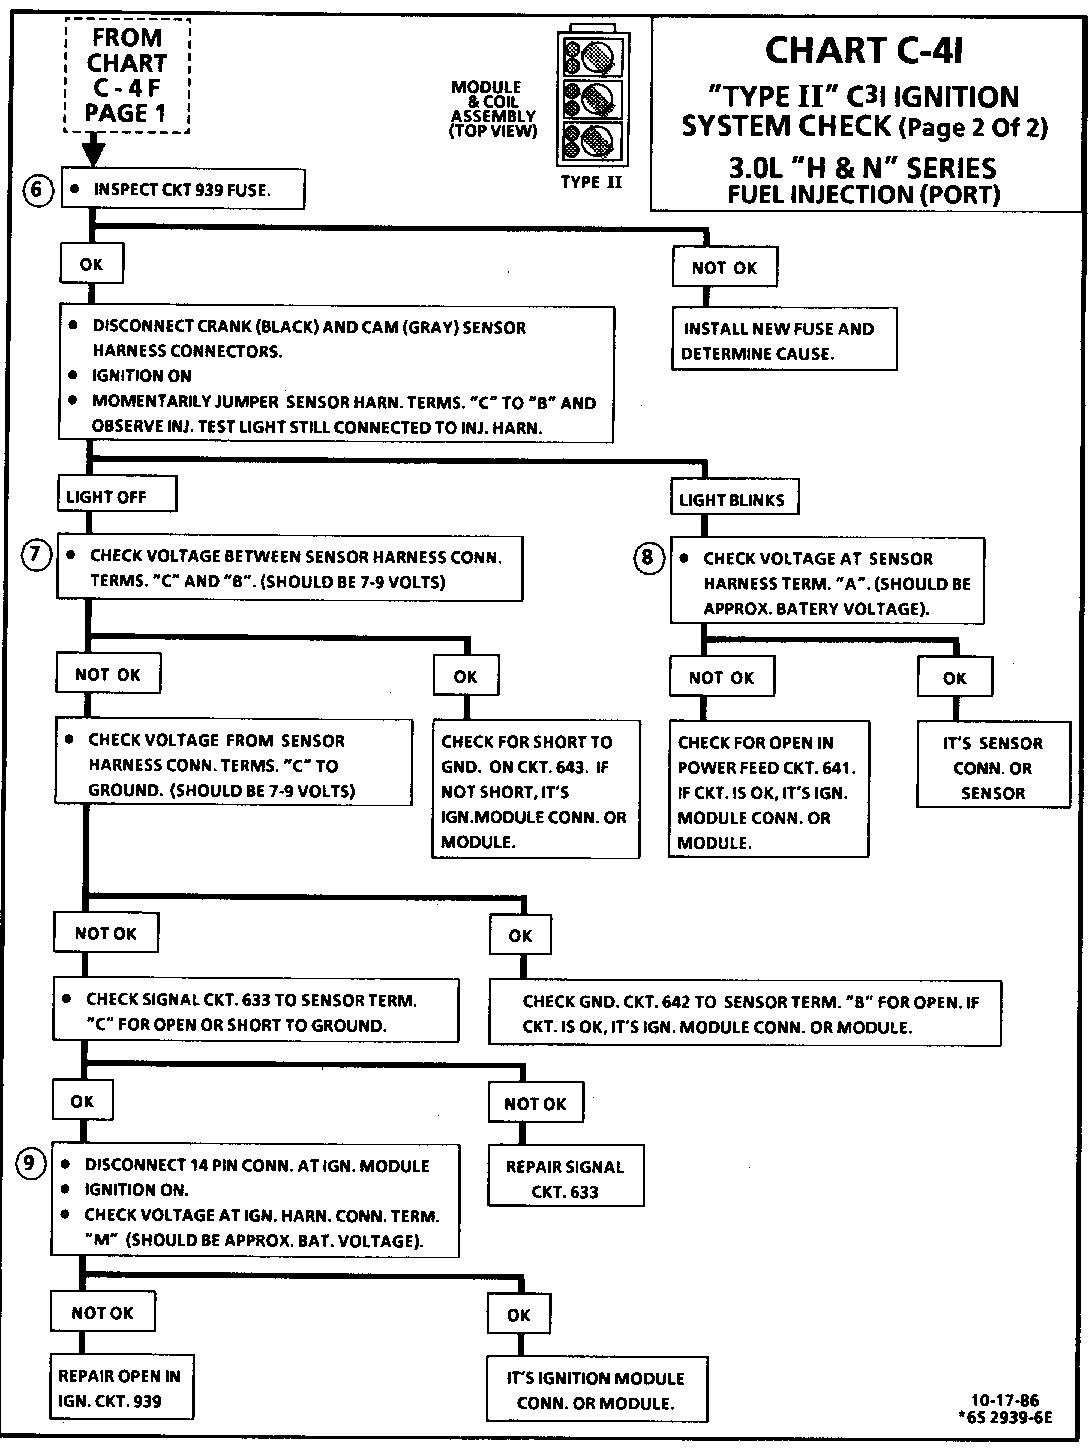
CHART C-41 "TYPE II" C3I IGNITION SYSTEM CHECK (Page 2 of 2) 3.0L "H & N" SERIES
For timing of spark plug firing, a cam sensor "hall effect" switch is used. The cam signal sends a signal to the ignition module when cylinder #1 is on the compression stroke. This signal is used to start the correct sequence of coil firing and to enable sequential fuel injection. The engine will continue to run if the cam signal is lost while running, however, will not restart after shut down and a Code 41 will be stored if the cam signal was lost while running. The crank sensor sends a signal to the ignition module and then to the ECM for reference RPM and crankshaft position. There are three windows in a disc which is mounted to the harmonic balancer. These windows pass by the sensor and as each window passes, the next coil is triggered.
6. Turn ignition on and listen for fuel pump within first 2 seconds. If fuel pump runs, the fuse is ok.
7. Check to see if problem is a grounded crank signal circuit or a cam signal circuit fault
8. The ignition module supplies the power to operate the sensor. This step checks to see if problem is the module or the harness.
9. Step 6 checked the fuse. This step determines if problem is in circuit 939 from the fuse or a faulty ignition module.
General Motors bulletins are intended for use by professional technicians, not a "do-it-yourselfer". They are written to inform those technicians of conditions that may occur on some vehicles, or to provide information that could assist in the proper service of a vehicle. Properly trained technicians have the equipment, tools, safety instructions and know-how to do a job properly and safely. If a condition is described, do not assume that the bulletin applies to your vehicle, or that your vehicle will have that condition. See a General Motors dealer servicing your brand of General Motors vehicle for information on whether your vehicle may benefit from the information.
