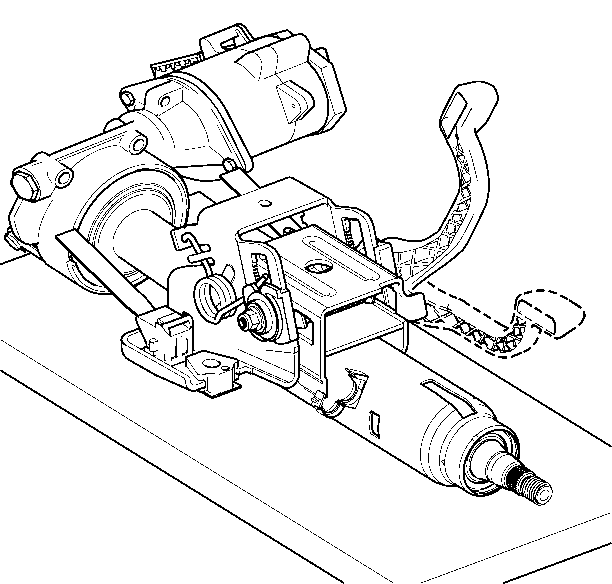
Tilt Lever Replacement Electronic Power Steering
Removal Procedure
- Disable the supplemental inflatable restraint (SIR) system. Refer to SIR Disabling and Enabling .
- Disconnect the negative battery cable. Refer to Battery Negative Cable Disconnection and Connection .
- Remove the knee bolster. Refer to Knee Bolster Replacement .
- Disconnect any electrical connectors as needed.
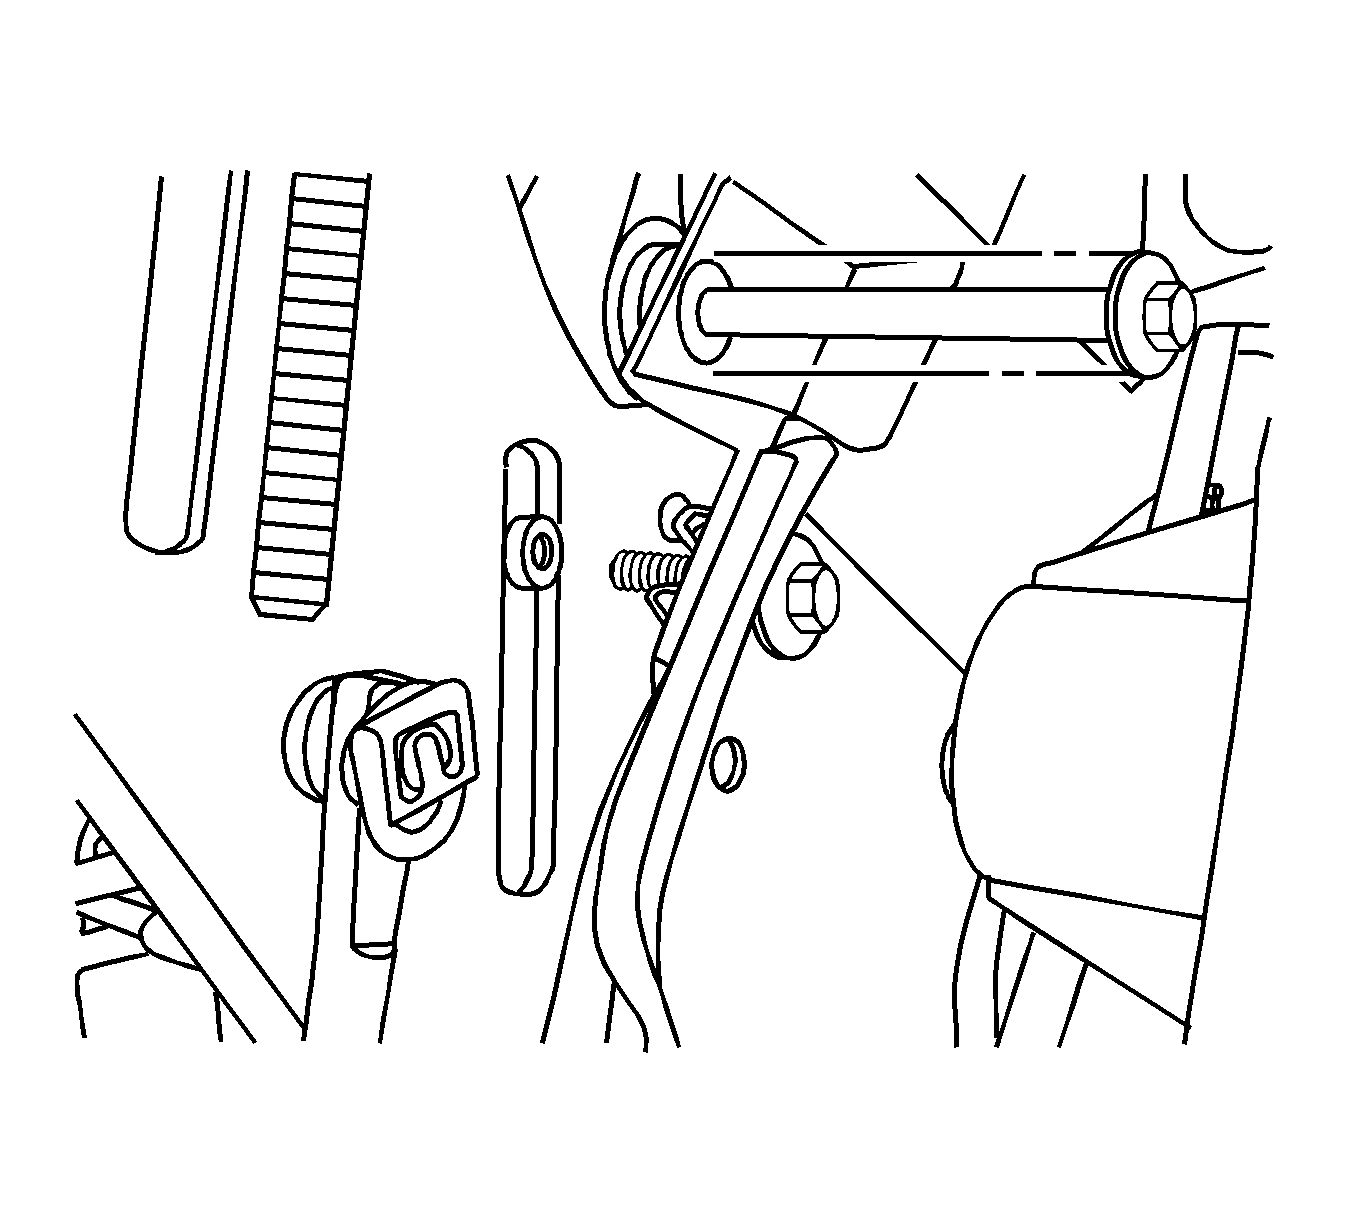
- Loosen the lower steering column bolt.
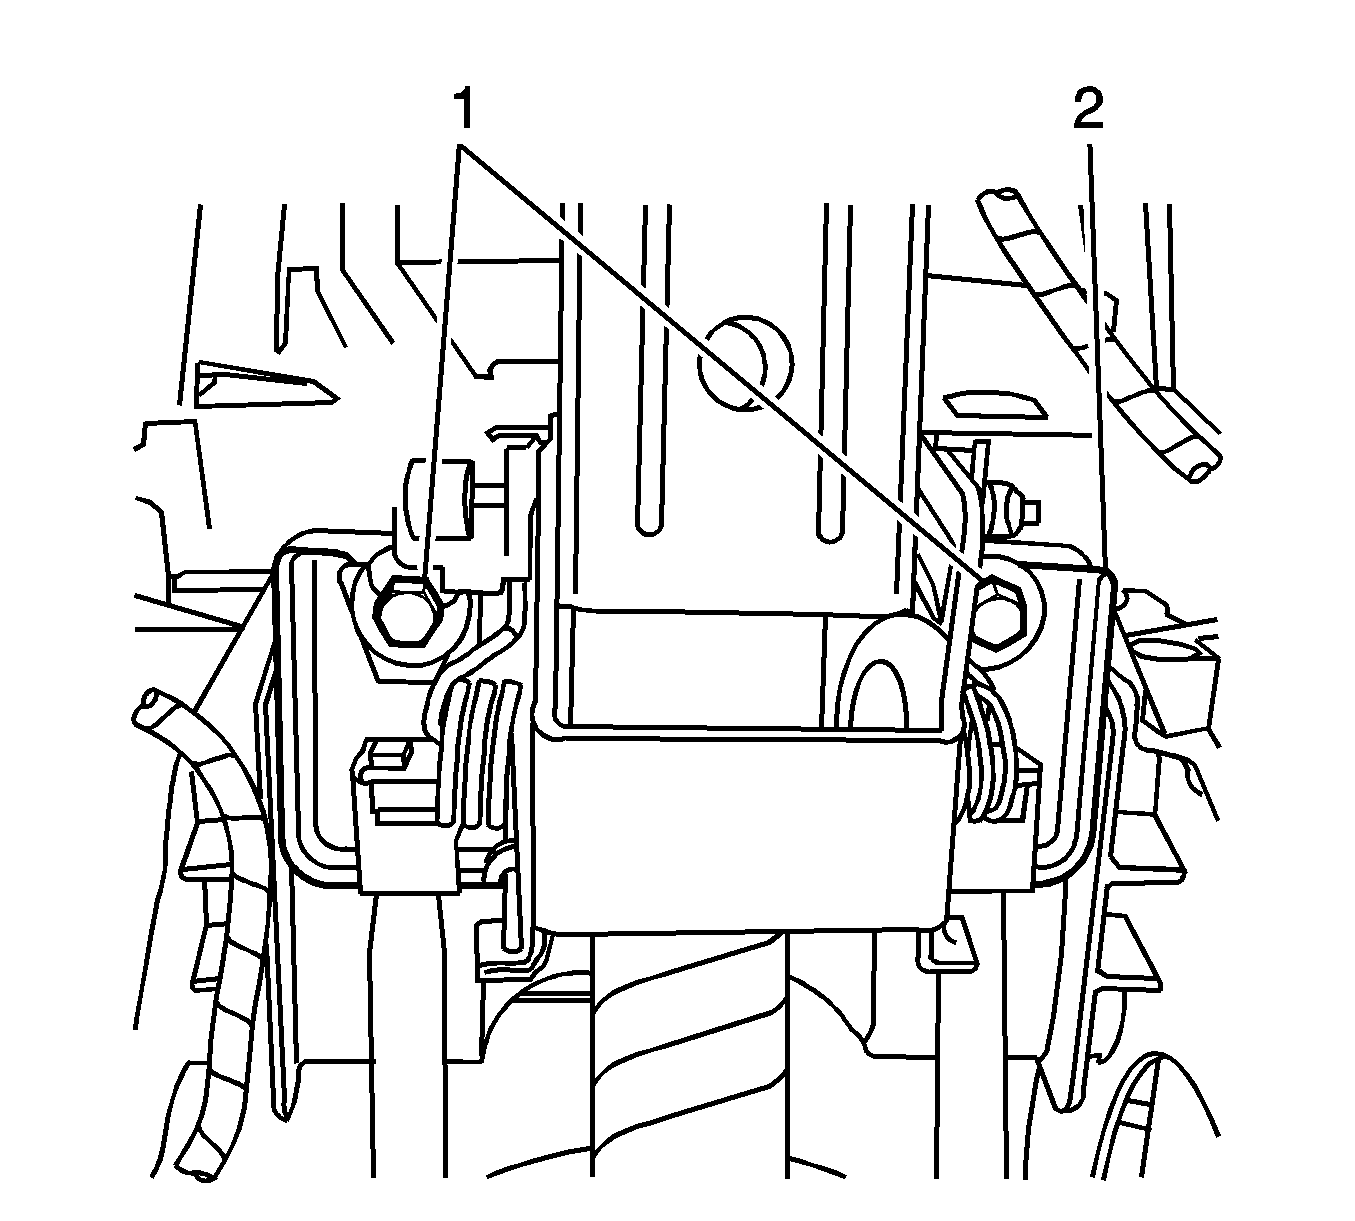
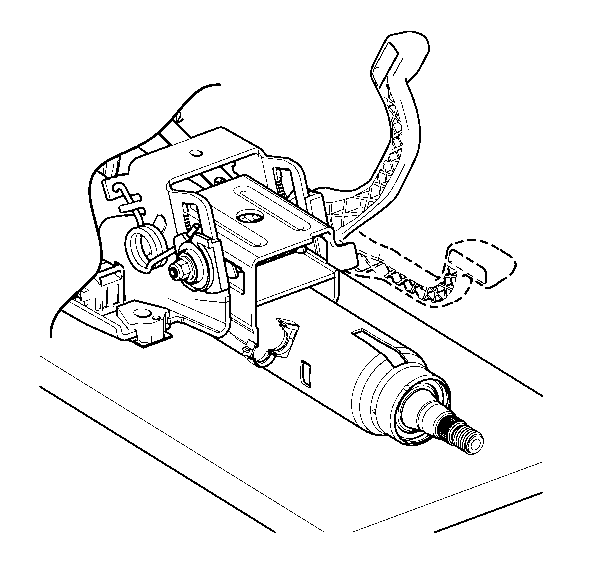
- Remove the upper steering column bolts (1).
- Actuate the tilt lever to full "UNLOCK" position to release the coil spring tension.
- Remove the left hand and right hand coil springs.
- Remove and discard the tilt lever nut.
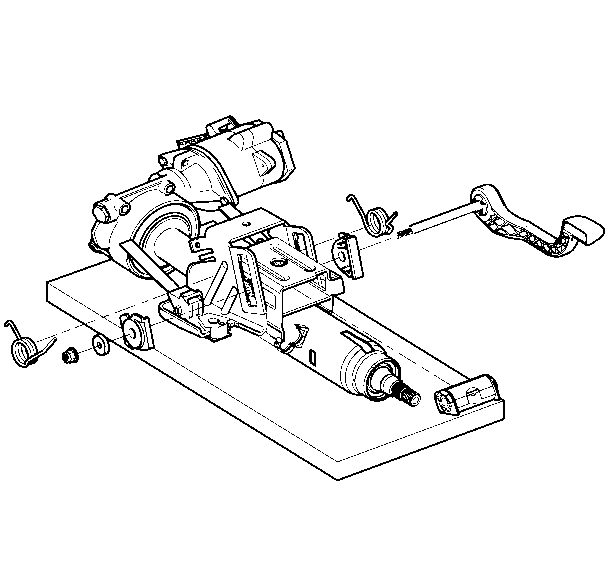
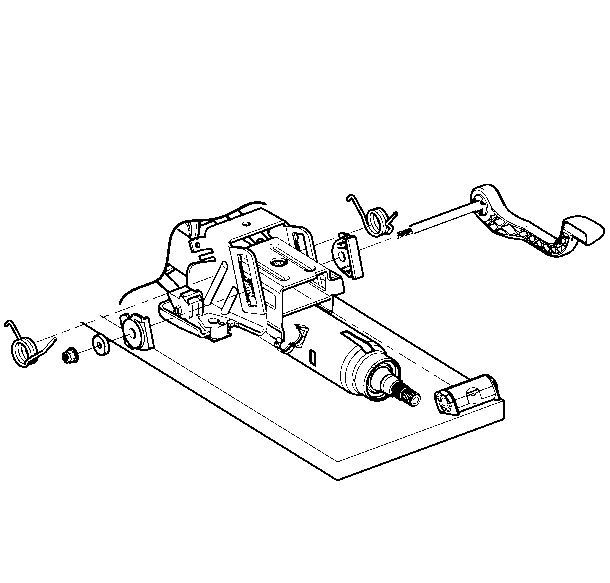
- Remove the tilt lever, thrust washer, bolt retainer, spacer, cam follower and the follower release.
- Leave two tilt teeth and lever detent in assembled position.
Important: DO NOT disconnect the adjustable brake pedal cable.
Notice: Once the steering column is lowered, the column is extremely susceptible to damage. Leaning on or pushing down on the column will result in damage to the intermediate shaft boot seal and could cause the jacket to bend of deform.
If the components are removed, follow the instructions for reassembly.
Installation Procedure
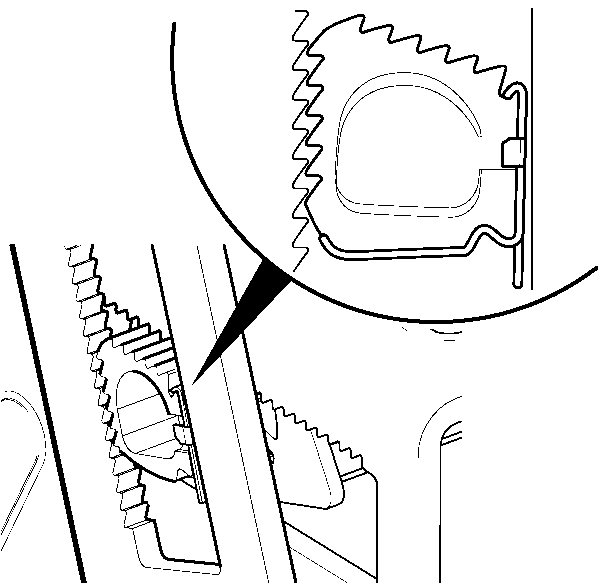
- If the tilt teeth and/or detent lever was removed, carefully reinstall in the correct orientation as shown.
- Align with the tilt teeth and attach to the side of the tilt bracket.
- Subassemble the cam follower to release the follower.
- Assemble the tilt lever through components.
- Attach the thrust washer and preassemble the new torque prevailing nut.
- Hold the tilt lever, with light pressure, against the cam follower.
- Continue to maintain light pressure on the tilt lever and tighten the tilt lever nut.
- Actuate the tilt lever to the OPEN and CLOSED position several times while holding the tilt bracket in the proper alignment.
- Adjust the tilt lever nut torque until the load on the tilt lever handle is approximately 55 N·m (41 lb ft) to fully close the tilt lever.
- Compare with a similar vehicle to confirm proper tilt lever closing force.
- Tighten the steering column bolts in the following sequence:
- Tighten the lower steering column bolt to 27 N·m (20 lb ft).
- Tighten the left side upper steering column bolt to 27 N·m (20 lb ft).
- Tighten the right side upper steering column bolt to 27 N·m (20 lb ft).
- Connect any electrical connectors as needed.
- Install the knee bolster. Refer to Knee Bolster Replacement .
- Connect the negative battery cable. Refer to Battery Negative Cable Disconnection and Connection .
- Enable the SIR system. Refer to SIR Disabling and Enabling .
- Reprogram the steering system. Refer to Control Module References .
Important: You MUST properly install the tilt teeth into the upper steering column bracket to prevent steering column movement in the event of a collision.
| • | Line up the tilt teeth in the proper orientation. |
| • | Compress the tooth spring within compression bracket slot. |
Important: Grease the cam surface with GM P/N 12346293 (Canadian P/N 992723).
Subassemble spacer to bolt retainer.Align with the tilt teeth and attach to the side of the tilt bracket.
Actuate the tilt lever to position against closed stop detent. Lever handle should be approximately parallel with the work surface.
Notice: Refer to Fastener Notice in the Preface section.
Tighten
Tighten the nut to 5.5 N·m (49 lb in).
Caution: In order to ensure the intended function of the steering
column in a vehicle during a crash and in order to avoid personal injury to
the driver, perform the following:
• Tighten the steering column lower fasteners before you tighten
the steering column upper fasteners. Failure to do this can damage the steering
column. • Tighten the steering column fasteners to the specified torque.
Overtightening the upper steering column fasteners could affect the steering
column collapse.
Tighten
Tilt Lever Replacement Hydraulic Power Steering
Removal Procedure
- Disable the supplemental inflatable restraint (SIR) system. Refer to SIR Disabling and Enabling .
- Disconnect the negative battery cable. Refer to Battery Negative Cable Disconnection and Connection .
- Remove the knee bolster. Refer to Knee Bolster Replacement
- Disconnect any electrical connectors as needed.
- Loosen the lower steering column bolt.
- Remove the upper steering column bolts (1).
- Actuate the tilt lever to the full "UNLOCK" position to release the coil spring tension.
- Remove the left hand and right hand coil springs.
- Remove and discard the tilt lever nut.
- Remove the tilt lever, thrust washer, bolt retainer, spacer, cam follower and the follower release.
- Leave the two tilt teeth and lever detent in the assembled position.
Important: DO NOT disconnect the adjustable brake pedal cable.
Notice: Once the steering column is lowered, the column is extremely susceptible to damage. Leaning on or pushing down on the column will result in damage to the intermediate shaft boot seal and could cause the jacket to bend of deform.
If the components are removed, follow the instructions for reassembly.
Installation Procedure
- If the tilt teeth and/or detent lever was removed, carefully reinstall in the correct orientation as shown.
- Align with the tilt teeth and attach to the side of the tilt bracket.
- Subassemble the cam follower to release the follower.
- Assemble the tilt lever through components.
- Attach the thrust washer and preassemble the new torque prevailing nut.
- Hold the tilt lever, with light pressure, against the cam follower. Actuate the lever to position against closed stop detent. Lever handle should be approximately parallel with the work surface.
- Continue to maintain light pressure on the tilt lever and tighten the tilt lever nut.
- Loosely install the upper steering column bolts (1).
- Actuate the tilt lever to OPEN and CLOSED position several times while holding the tilt bracket in the proper alignment.
- Adjust the tilt lever nut torque until the load on the tilt lever handle is approximately 55 N·m (41 lb ft) to fully close the tilt lever.
- Tighten the steering column bolts in the following sequence:
- Tighten the lower steering column bolt to 27 N·m (20 lb ft).
- Tighten the left side upper steering column bolt to 27 N·m (20 lb ft).
- Tighten the right side upper steering column bolt to 27 N·m (20 lb ft).
- Connect any electrical connectors as needed.
- Install the knee bolster. Refer to Knee Bolster Replacement
- Connect the negative battery cable. Refer to Battery Negative Cable Disconnection and Connection .
- Enable the SIR system. Refer to SIR Disabling and Enabling .
- Reprogram the steering system. Refer to Control Module References .
Important: You MUST properly install the tilt teeth into the steering column upper bracket to prevent steering column movement in the event of a collision.
| • | Line up the teeth in the proper orientation. |
| • | Compress the tooth spring within the compression bracket slot. |
Important: Grease the cam surface with GM P/N 12346293 (Canadian P/N 992723).
Subassemble the spacer to bolt retainer.Align with the tilt teeth and attach to the side of the tilt bracket.
Notice: Refer to Fastener Notice in the Preface section.
Tighten
Tighten the nut to 5.5 N·m (49 lb in).
Important: Do not bend the steering column energy absorbing straps located on the upper steering column mounting bracket during installation.
Compare with a similar vehicle to confirm proper tilt lever closing force.
Caution: In order to ensure the intended function of the steering
column in a vehicle during a crash and in order to avoid personal injury to
the driver, perform the following:
• Tighten the steering column lower fasteners before you tighten
the steering column upper fasteners. Failure to do this can damage the steering
column. • Tighten the steering column fasteners to the specified torque.
Overtightening the upper steering column fasteners could affect the steering
column collapse.
Tighten
