For 1990-2009 cars only
Removal Procedure
- Relieve the fuel system pressure. Refer to Fuel Pressure Relief .
- Drain the fuel tank. Refer to Fuel Tank Draining .
- Remove the rear seat cushion from the vehicle.
- Disconnect the fuel pump, fuel level sensor (fuel gauge sending unit), and fuel tank pressure sensor electrical connectors.
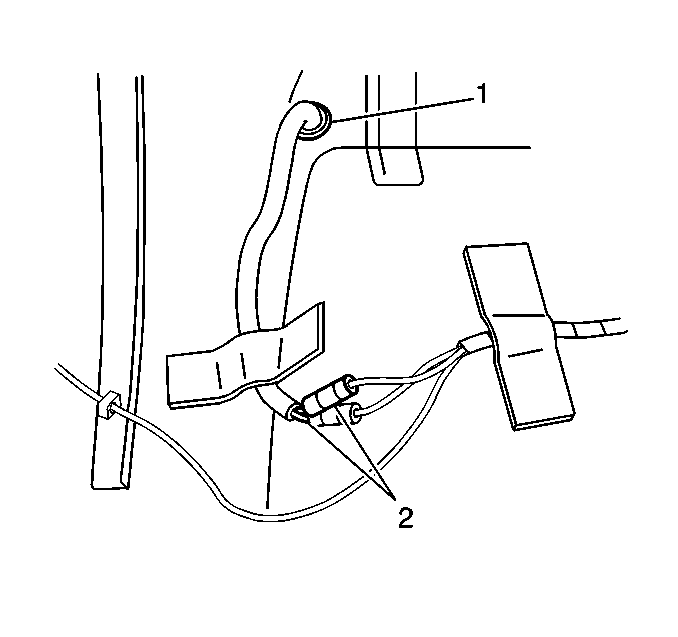
- Push electrical connectors (2) through the grommet (1) in the floor.
- Raise and suitably support the vehicle. Refer to Lifting and Jacking the Vehicle in General Information.
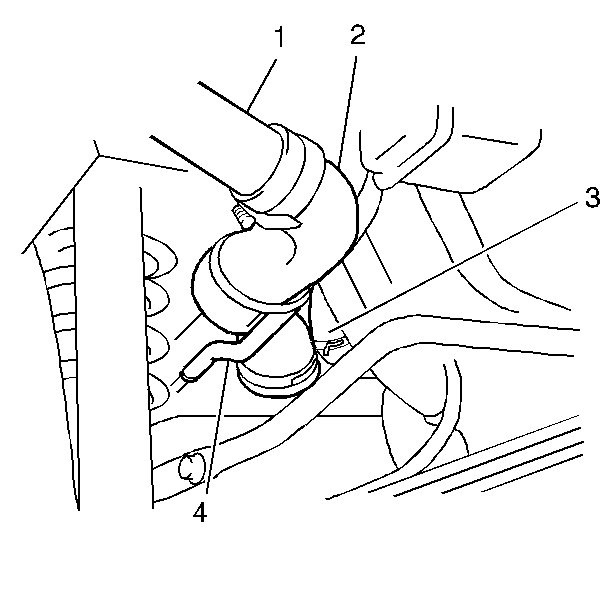
- Remove the one clamp and the fuel filler hose (2) from the fuel filler neck
- Remove the one clamp and the fuel breather hose (3) from the fuel filler neck.
- Remove the one clamp and the fuel feed inlet hose from the fuel filter.
- Remove the one clamp and the fuel return hose from the fuel return pipe.
- Remove the one clamp and the fuel vapor hose from the fuel vapor pipe.
- Remove the four fuel tank mounting bolts and fuel tank from vehicle underbody.
Inspection Procedure
| • | Inspect the fuel pump assembly hose connections for signs of leaks, loose fittings, deterioration or damage. |
| • | Inspect the fuel pump assembly and the fuel level sensor gaskets for signs of leaks. |
| • | Inspect the fuel tank for signs of damage that may cause leaks. |
| • | Clean or replace components/assemblies as required. |
Disassembly Procedure
- Remove the clamp and the fuel feed hose from fuel feed pipe on the fuel tank.
- Remove the clamp and the fuel return hose from fuel return pipe on the fuel tank.
- Remove the clamp and the fuel vapor hose from fuel vapor pipe on the fuel tank.
- Remove the clamp and the fuel filler hose from the fuel tank.
- Remove the clamp and the fuel breather hose from the fuel tank.
- Remove the five screws and the fuel level sensor from the fuel tank.
- Remove the seven screws and the fuel pump assembly including the fuel feed and fuel return pipes from the fuel tank.
- Remove the twelve screws and the fuel cut valves with the fuel vapor separator assembly from the fuel tank.
- Remove the one screw and the fuel return volume assembly from the fuel tank (If equipped with the EVAP Tank Pressure Control Solenoid Vacuum Valve).
Assembly Procedure
- Connect the fuel filler hose to the fuel tank and secure with one clamp.
- Connect the fuel breather hose to the fuel tank and secure with one clamp.
- Install the fuel cut valves with the fuel vapor separator assembly to the fuel tank and secure with twelve screws.
- Install the one screw and the fuel return volume assembly from the fuel tank (If equipped with the EVAP Tank Pressure Control Solenoid Vacuum Valve).
- Install the fuel pump assembly including the fuel feed and the fuel return pipes to the fuel tank and secure with seven screws.
- Install the fuel level sensor to the fuel tank and secure with five screws.
- Connect the fuel vapor hose to the fuel vapor pipe on the fuel tank and secure with one clamp.
- Connect the fuel return hose to the fuel return pipe on the fuel tank and secure with one clamp.
- Connect the fuel feed hose to the fuel feed pipe on the fuel tank and secure with one clamp.
Installation Procedure
- Install the fuel tank to the vehicle underbody and secure with four mounting bolts.
- Connect the fuel vapor hose to the fuel vapor pipe and secure with one clamp.
- Connect the fuel return hose to the fuel return pipe and secure with one clamp.
- Connect the fuel feed inlet hose to the fuel filter and secure with one clamp.
- Connect the fuel breather hose (3) to the fuel filler neck and secure with one clamp.
- Connect the fuel filler hose (2) to the fuel filler neck and secure with one clamp.
- Push the fuel pump and the fuel level sensor electrical connectors (2) up through the grommet (1) in the floor.
- Lower the vehicle.
- Connect the fuel pump and the fuel level sensor electrical connectors.
- Install the rear seat cushion to the vehicle.
- Refill the fuel tank.
- Connect the negative (-) battery cable.
- Turn ON the ignition in order to pressurize the fuel system.
- Turn OFF the ignition.
- Check for any fuel leaks and repair as necessary.
Tighten
Tighten the fuel tank mounting bolts to 25 N·m (18 lb ft).
Tighten
Tighten the negative (-) battery cable-to-negative (-) battery terminal retainer to 5.5 N·m (4 lb ft).
