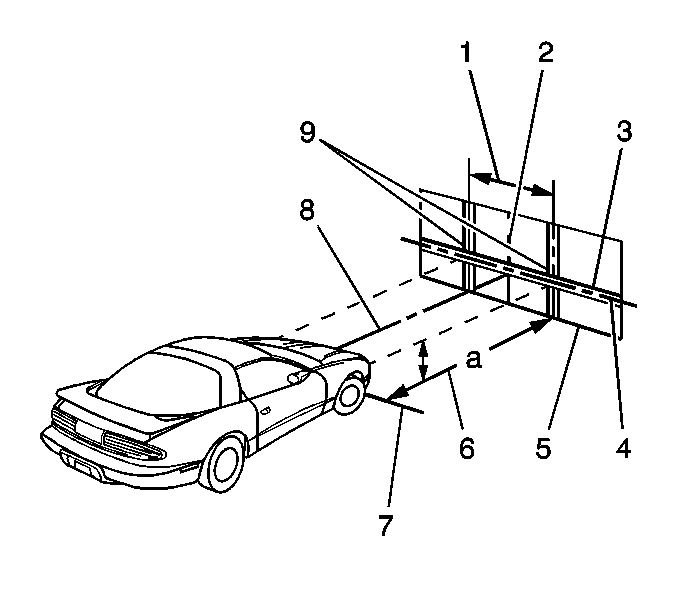
Headlamp Aiming Screen Method
Aiming By Screen Method
| • | To correct the horizontal aim use the adjusting screw located
on the outer side of the headlamps. |
| • | To correct the vertical aim by use the adjusting screw located
in the top center of the headlamps. |
| • | Use a specific aiming area in a darkened location. Ensure that
the aiming area meets the followings: |
| - | The area used must accommodate the vehicle with a space of 7.6 m
(25 ft) left over. |
| - | Measure the additional 7.6 m (25 ft) from the face
of the headlamps to the front of the screen. |
| - | The floor that the vehicle rests on is level with the bottom of
the screen. |
| - | If the floor is not level, then compensate for the unlevel floor. |
| • |
Ensure that the aiming
screen meets the following: |
| - | The screen (2) is 1.5 m (5 ft) high and 3.6 m
(12 ft) wide. |
| - | The surface of the screen (2) is a matte white. |
| - | The screen (2) is well shaded from outside light. |
| - | The screen (2) is correctly adjusted to the floor on which the
vehicle stands. |
| - | The following items are present: |
| • | A vertical center line (2) |
| • | A horizontal center line (4) for the center line of the lamps |
| • | A horizontally adjustable horizontal tape (3) |
| • | 2 laterally adjustable vertical tapes (9) |
| | Important: Adjust the horizontal lines or tape (3) on the screen (2) for each vehicle
that you inspect. Vehicles of the same model and year may have different
standing height for the headlamps.
|
| • | Make provisions for moving the aiming screen in order to align
the aiming screen parallel with the rear axle of the vehicle. |
| - | This will allow for a horizontal line (4) drawn to pass through
the center point between the two headlamp capsules. |
| - | The horizontal line (4) will be drawn perpendicular from the center
line of the screen (2). |
| • | Once you set up the screen (2) in a permanent location, paint
a reference line (7) on the floor. The reference line (7) will identify the
proper location of the headlamps when the headlamps are being aimed. |
| • | If a regular commercial aiming screen is not available, the screen
may consist of the following items: |
| • | A vertical wall that has a clear, uninterrupted area. Ensure that the area is 1.8 m (6 ft) high and 3.6 m
(12 ft) wide
|
| • | Ensure that the area is finished with a washable, nongloss white
paint. |
Vehicle Preparation
Prepare the vehicle for inspecting the headlamp beam aim.
- Perform the following to ensure an accurate headlamp aim.
| 1.1. | Completely assemble all of the components on the vehicle. |
| 1.2. | Ensure that the fuel tank is full. |
| 1.3. | Ensure that the only other load in the vehicle is the driver. |
| 1.4. | Mark the center of the front and rear windows with narrow tape. |
Use these sights to locate the center of the vehicle.
| 1.5. | Do this by moving the vehicle or the screen until the center line
(2) of the screen comes into alignment with the two points. |
| 1.7. | Rock the vehicle sideways in order to stabilize the suspension. |
- Position the vehicle so that the vehicle is square with the aiming
screen.
- Position the headlamps directly over the reference line (7).
- Locate the vertical line (4) on the aiming screen so that the
vertical lines meets the following criteria:
| • | The vertical line is aligned with the center of the rear window. |
| • | The vertical line is over the hood. |
Domestic Low Beam
Check the following for the low beam headlamps.
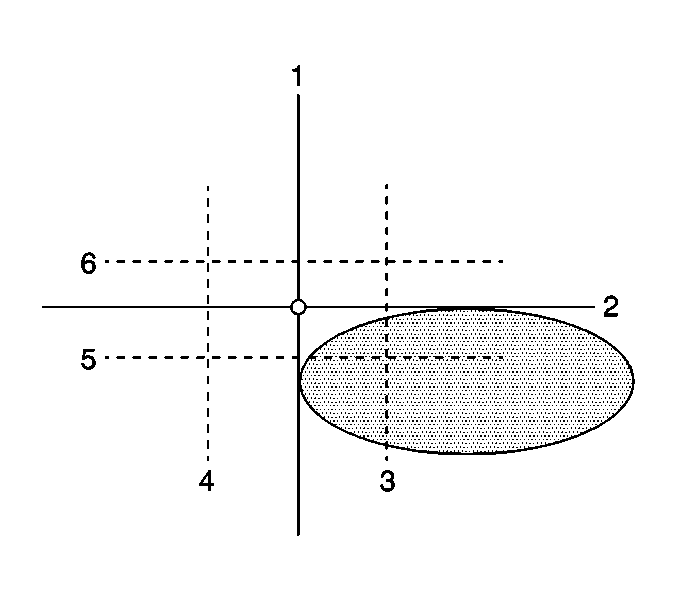
Important: DO NOT cover the headlamp, this may cause excessive heat build up.
- Turn on the low beam headlamps and block the light from projecting onto
the screen from the passenger side headlamp.
- To adjust the headlamp aim perform the following:
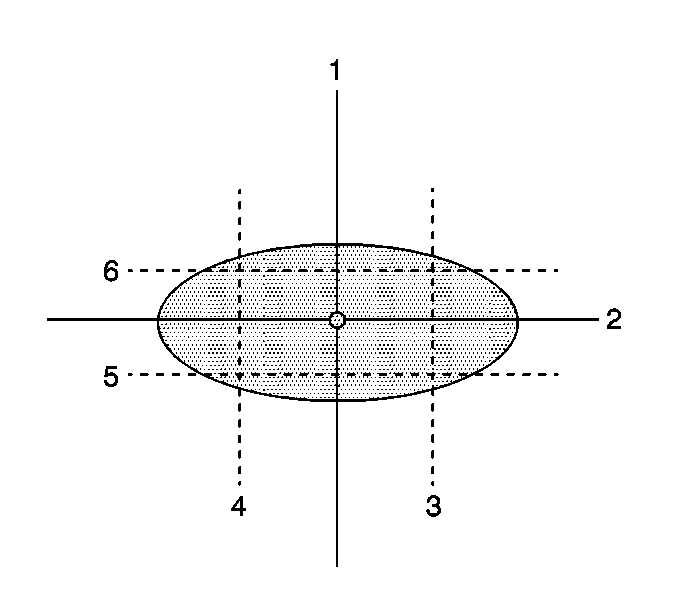
| • | For the horizontal aim the left edge of the high intensity zone
should be on the vertical axis (1), or within +102 mm (+4.0 in)
(3), or (4) -102 mm (-4.0 in) of the vertical
axis (1). |
| • | For the vertical aim the top edge of the high intensity zone should
be on the horizontal axis (2), or within -63.5 mm (-2.5 in)
(5), or +51 mm (+2.0 in) (6) of the horizontal axis (2). |
- If the above specifications are not met adjust the headlamps accordingly.
- Repeat the aiming procedure for the passenger side headlamp while
blocking the light from projecting onto the screen from the driver side headlamp.
European Low Beam (Right Hand Rule of Road) (Export Only)
Check the following for the European low beam headlamps.
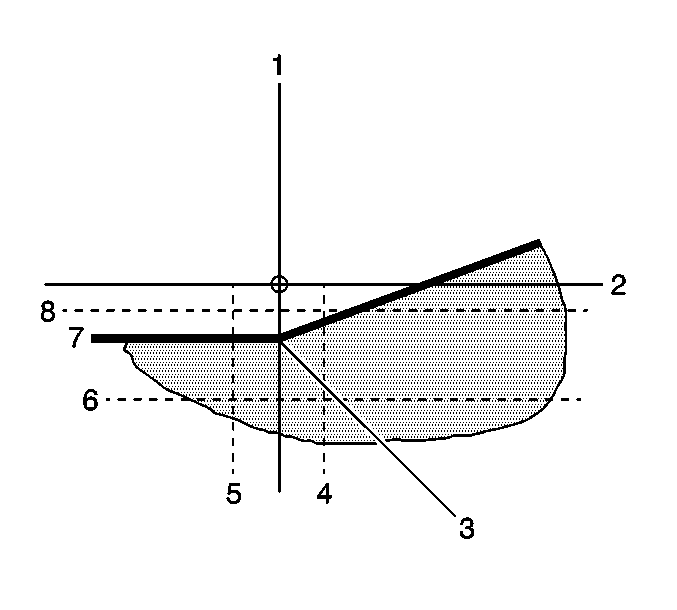
Important: DO NOT cover the headlamp, this may cause excessive heat build up.
- Turn on the low beam headlamps and block the light from projecting onto
the screen from the passenger side headlamp.
- To adjust the headlamp aim perform the following:
| • | For the horizontal aim set the center beam's break point (3) should
be on the vertical axis (1), or within -38.1 mm (-1.5 in)
(5) or 38.1 mm (1.5 in) (4) of the vertical axis (1). |
| • | For the vertical aim set the beam's break point (3) at -92.25 mm
(-3.75 in) (7) below the horizontal axis (2), or within -57.15 mm
(-2.25 in) (8) or -171.45 mm (-6.75 in)
(6) below the horizontal axis (2). |
- If the above specifications are not met adjust the headlamps accordingly.
- Repeat the aiming procedure for the passenger side headlamp while
blocking the light from projecting onto the screen from the driver side headlamp.
United Kingdom (UK) and Japanese Low Beam (Left Hand Rule of Road)
(Export Only)
Check the following for the UK and Japanese low beam headlamps.
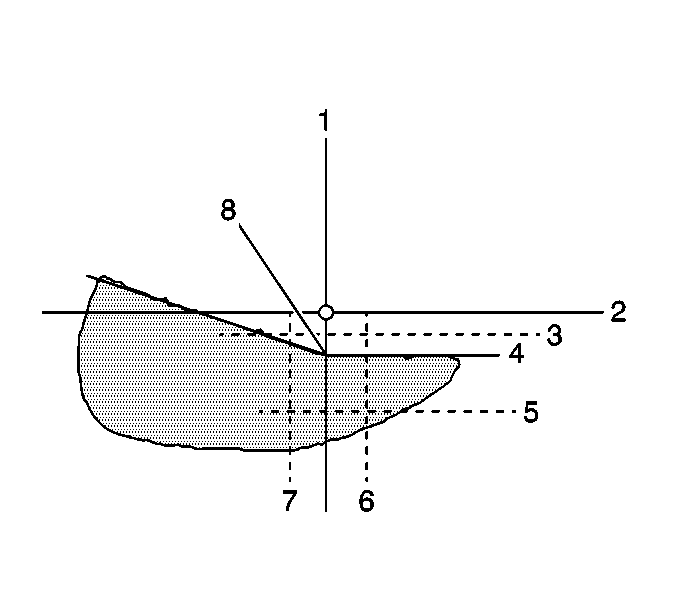
Important: DO NOT cover the headlamp, this may cause excessive heat build up.
- Turn on the low beam headlamps and block the light from projecting onto
the screen from the passenger side headlamp.
- To adjust the headlamp aim perform the following:
| • | For the horizontal aim set the center beam's break point (8) should
be on the vertical axis (1), or within +38.1 mm (+1.5 in) (6)
or -38.1 mm (-1.5 in) (7) of the vertical
axis (1). |
| • | For the vertical aim set the beam's break point (3) at -92.25 mm
(-3.75 in) (4) below the horizontal axis (2), or within -57.15 mm
(-2.25 in) (3) or -171.45 mm (-6.75 in)
(5) below the horizontal axis (2). |
- If the above specifications are not met adjust the headlamps accordingly.
- Repeat the aiming procedure for the passenger side headlamp while
blocking the light from projecting onto the screen from the driver side headlamp.
Domestic and Export High Beam
Check the following specifications for the high beam headlamps.
Important: DO NOT cover the headlamp, this may cause excessive heat build up.
- Turn on the low beam headlamps and block the light from projecting onto
the screen from the passenger side headlamp.
With the headlamps on high beam, observe the center of the high intensity
zone on the screen.
Important: With composite headlamps, Chevrolet, it is not necessary to aim the
high beam lamps, the low beam adjustment will also aim the high beams.
- To adjust the headlamp aim perform the following:
| • | For the horizontal aim set the center beam's high intensity zone
should be on the vertical axis (1), or within +102 mm (+4.0 in)
(3), or (4) -102 mm (-4.0 in) of the vertical
axis (1). |
| • | For the vertical aim the center beam's high intensity zone should
be on the horizontal axis (2), or within -63.5 mm (-2.5 in)
(5), or +51 mm (+2.0 in) (6) of the horizontal axis (2). |
- Repeat the aiming procedure for the passenger side headlamp while
blocking the light from projecting onto the screen from the driver side headlamp.
Headlamp Aiming Alternate Procedure
Tools Required
J 25300-D Headlamp
Aimer - Mechanical, or equivalent
Important: When using headlamp aiming equipment which attaches to the headlamps
with a suction cup type devise, DO NOT leave the headlamps on while the equipment
is attached. On vehicles with plastic headlamps (body styled composite
or sealed beam) having the headlamps illuminated when the equipment is
attached, may cause heat build-up combined with the suction cup may cause
the plastic headlamp lens to become distorted, requiring lamp replacement.
- Prepare the vehicle for checking beam aim as follows:
| • | Place the vehicle on a flat surface. |
| • | Remove large amounts of mud or ice from the underside of the fenders,
if necessary. |
| • | Check whether tires are noticeably deflated and inflate if necessary. |
| • | Ensure there is no load in the vehicle other than the driver. |
| • | Rock the vehicle sideways to stabilize the suspension. |
| • | Clean the headlamp lenses and aiming pads. |
- Refer to the manufacture's instruction for the correct operation
of the headlamp aiming equipment.
