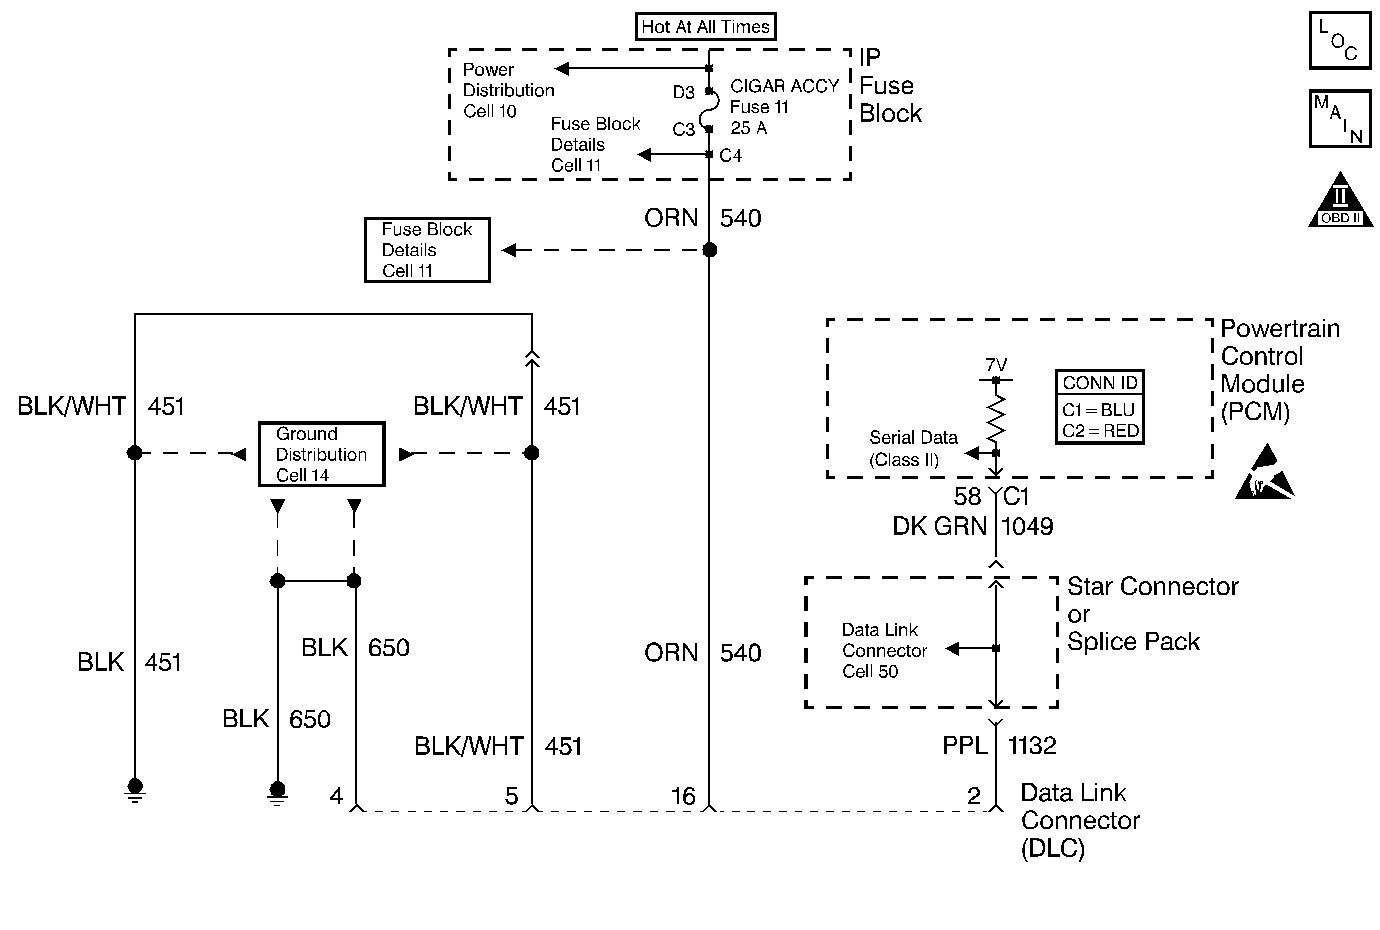
Circuit Description
Use a properly functioning scan tool with the diagnostic tables in this section. DO NOT use the Clear Info function unless instructed by a diagnostic procedure.
Important: This vehicle, equipped with a Powertrain Control Module (PCM), utilizes an Electrically Erasable Programmable Read Only Memory (EEPROM). Program the new PCM when the diagnostics call for replacement of the PCM. Refer to Powertrain Control Module Replacement/Programming .
Diagnostic Aids
| • | The following may cause an intermittent: |
| - | Poor connections; Refer to Intermittents and Poor Connections Diagnosis in Wiring Systems. |
| - | Corrosion |
| - | Mis-routed harness. |
| - | Rubbed through wire insulation. |
| - | Broken wire inside the insulation. |
| • | For an intermittent, refer to Symptoms . |
Test Description
The numbers below refer to the step numbers on the diagnostic table.
-
An engine that just cranks and does not attempt to start indicates that the PCM is not powered-up.
-
A ground must be available at both terminals for the scan tool to function properly.
-
A no start condition occurs when the fuse(s) for the battery or ignition feed circuits is open. The MIL is inoperative when the battery and ignition feed circuit fuses open. Inspect the circuits for being grounded when either of these fuses open.
-
If the test lamp does not illuminate for a circuit, inspect the fuse for being open. If the fuse is open, inspect the circuit for a short to ground.
-
Inspect for an open fuse that supplies the DLC. If the fuse is open, repair the grounded circuit.
Step | Action | Value(s) | Yes | No |
|---|---|---|---|---|
1 | Did you perform the Powertrain On-Board Diagnostic (OBD) System Check? | -- | ||
2 |
Important: This table assumes that the scan tool you are using is functional.
Does the scan tool power-up? | -- | ||
Does the engine start and continue to operate? | -- | |||
4 |
Is the test lamp illuminated? | -- | ||
Probe the DLC terminals 4 and 5 using the test lamp J 35616-200 connected to B+. Is the test lamp illuminate on both the circuits? | -- | |||
6 | Inspect the scan tool connections to the DLC. Also inspect the terminals for proper terminal tension at the DLC. Refer to Intermittents and Poor Connections Diagnosis in Wiring Systems for procedures. Is the action complete? | -- | -- | |
7 | Repair the open ground circuit to the DLC terminals 4 and 5. Refer to Wiring Repairs in Wiring Systems . Is the action complete? | -- | -- | |
Does the test lamp illuminate for each circuit? | -- | |||
9 |
Does the DMM display the specified value (or lower) on each circuit? | 2 ohms | ||
10 |
Did you find and correct the condition? | -- | ||
11 |
Did you find and correct the condition? | -- | ||
12 |
Important: Program the replacement PCM. Refer to Powertrain Control Module Replacement/Programming . Replace the PCM. Is the action complete? | -- | -- | |
Repair the circuit that did not illuminate the test lamp. Refer to Wiring Repairs in Wiring Systems . Is the action complete? | -- | -- | ||
14 | Repair the faulty PCM ground circuit(s). Refer to Wiring Repairs in Wiring Systems . Is the action complete? | -- | -- | |
Repair the faulty B+ supply circuit. Refer to Wiring Repairs in Wiring Systems . Is the action complete? | -- | -- |
