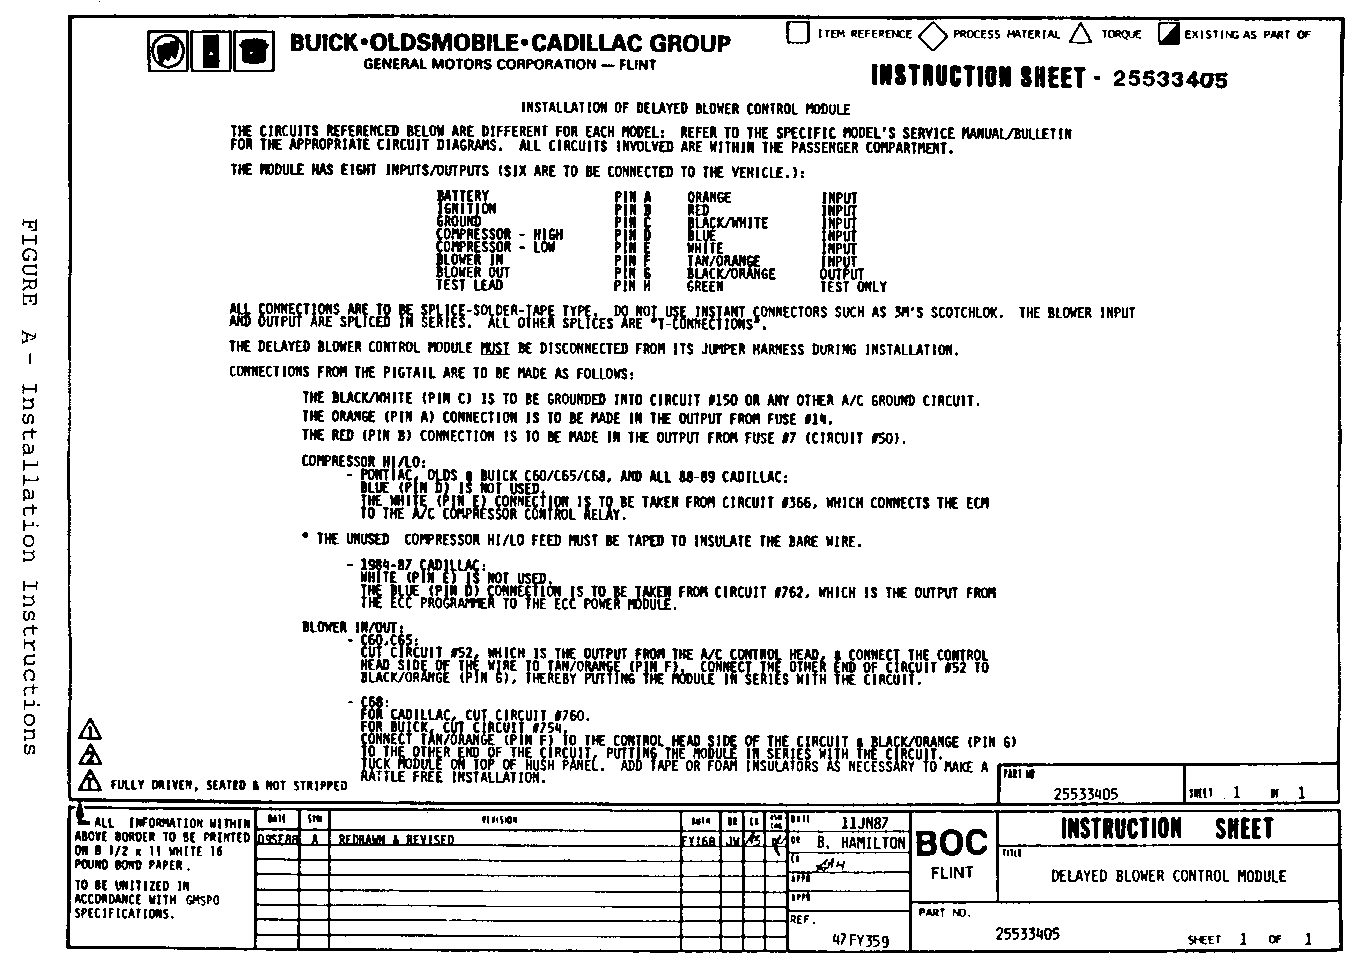
AFTERBLOW MODULE INFORMATION INSTALLATION ON A/C ODOR

Subject: AFTERBLOW MODULE INFORMATION/ INSTALLATION ON A/C ODOR CONDITION
Models Affected: 1985-91 ALL MODELS
This bulletin is intended for information purposes only and addresses A/C odors emitted from the air conditioning system, primarily at start up, in hot humid climate. This odor may be the result of foreign material, or microbial growth, in the heater/evaporator plenum. Past Service Bulletins, (Examples: 89-1-3, 90-1-6, 90-1-16 and 90-1-18) , address specific procedures for resolving this condition, on various carlines. Each of these Bulletins, in part, require the installation of an afterblow module to ward off recurring odors.
This Bulletin has been released for three (3) reasons:
1. It describes the proper function/testing of the module:
2. It covers the general module input/output requirements, necessary for afterblow operation:
3. It summarizes the various A/C afterblow module circuit diagrams which have been previously published in a number of Product Service Bulletins.
AFTERBLOW MODULE OPERATION:
The afterblow module will enable the blower to run at high speed for five (5) minutes. It will do so approximately fifty (50) minutes after the ignition has been turned off, provided the compressor had been engaged for four (4) or more minutes during the most recent ignition cycle. By doing so, the evaporator plenum and core are "Dried Out", reducing the chances of a recurring A/C odor.
AN AFTERBLOW MODULE WILL NOT REMOVE EXISTING A/C ODORS. REFER TO AN APPROPRIATE PRODUCT SERVICE BULLETIN FOR CLEANING/ODOR ELIMINATING PROCEDURES.
AFTERBLOW MODULE INPUT/OUTPUT
Each afterblow module (P/N #25533406) is shipped with an instruction sheet. It contains limited instructions for specific systems as well as a Pin/Wire Color reference chart. The requirements for each pin are as follows:
Pin A - Orange (Input): Connect his wire to a "Hot All" battery feed, such as the cigar lighter
Pin B - Red (Input): Connect this wire to a "Hot Run" ignition feed.
Pin C - Blk/White (Output): Connect this wire to the A/C control assembly ground circuit.
Pin D - Blue (Input) Connect this wire to a compressor control circuit which has positive voltage when A/C is commanded.
Pin E - White (Input): Connect this wire to a compressor control circuit which is grounded when A/C is commanded.
Pin F - Tan/Orange (Input): Identify the circuit which supplies the blower motor with high speed voltage. Cut this wire prior to the blower motor itself, but after all blower motor control devices. Attach Pin F to the out portion of wire leading to the control devices.
Pin G - Blk/Orange (Output): Connect Pin G to the remaining portion of the wire cut above. NOTE: The module is now in service with the Hi Speed blower motor, through Pin F and Pin G.
Pin H - Green (Input): This wire is for test purposes only, and is not to be permanently connected. Refer to "Testing The Module".
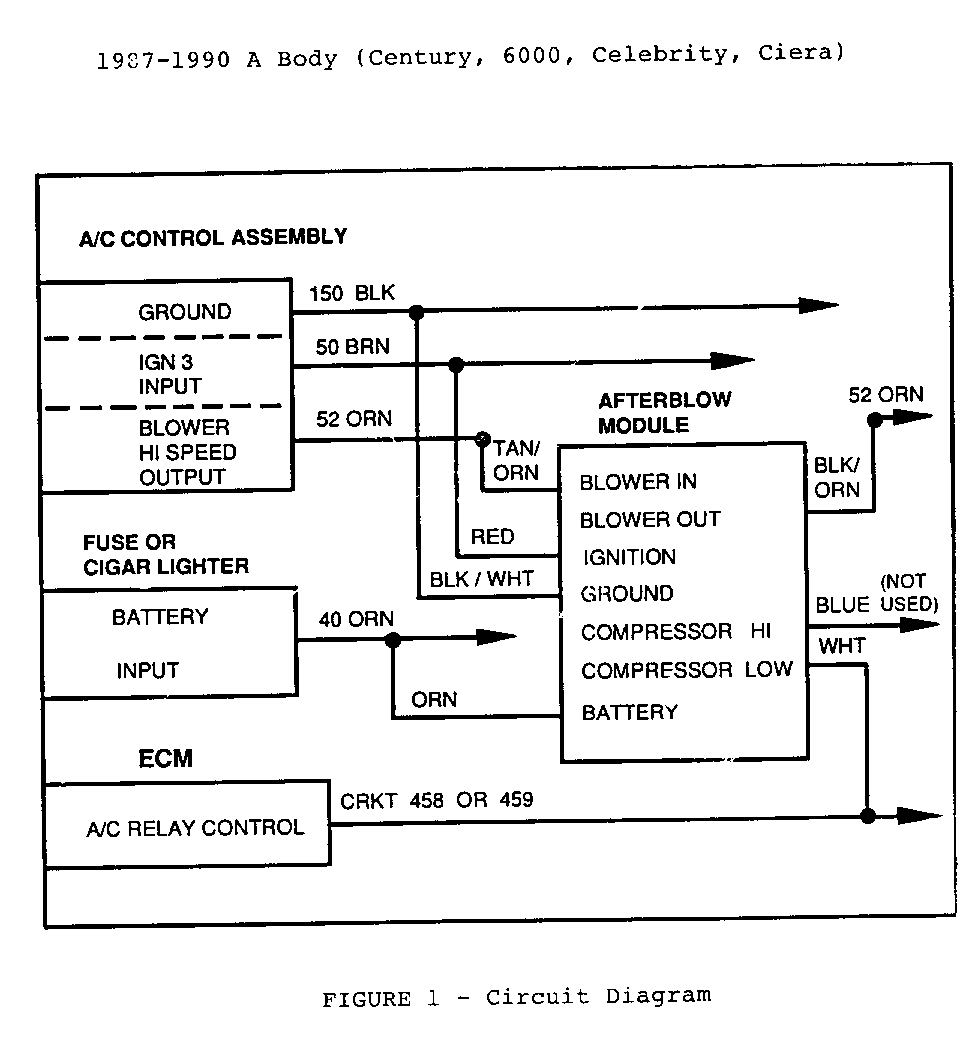
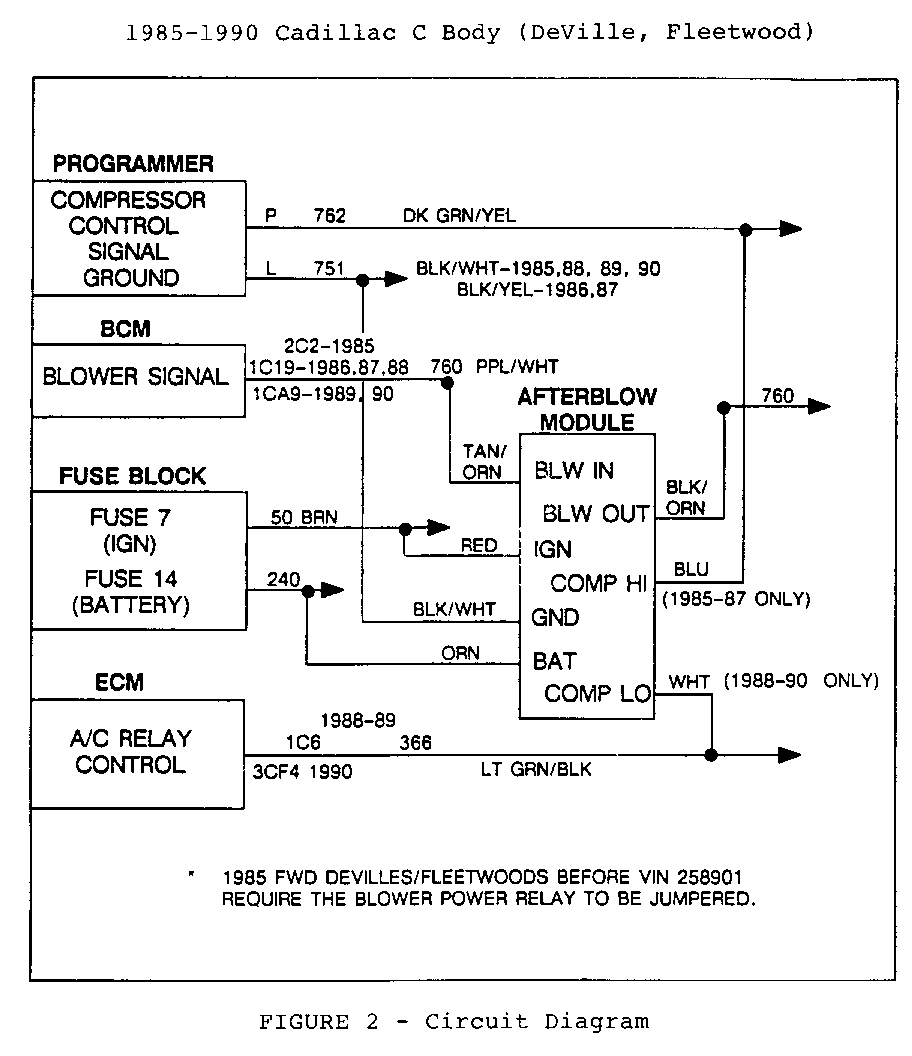
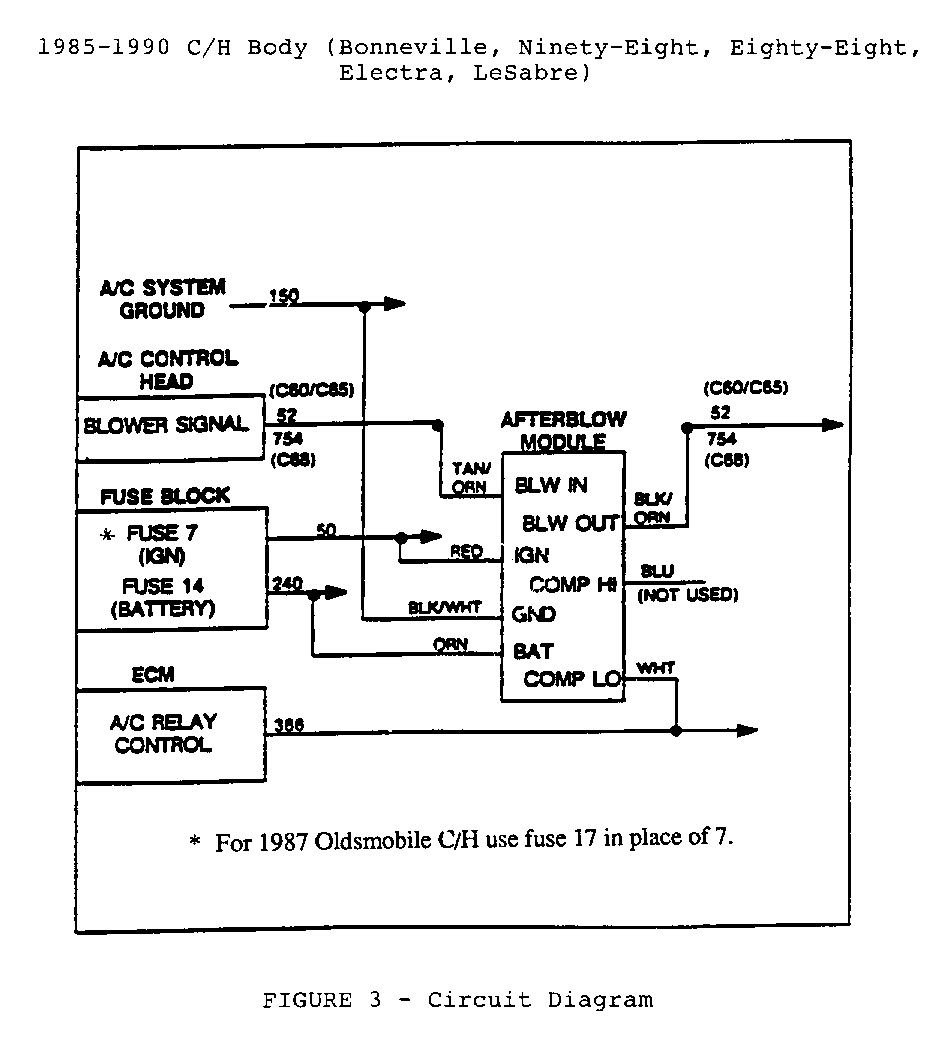
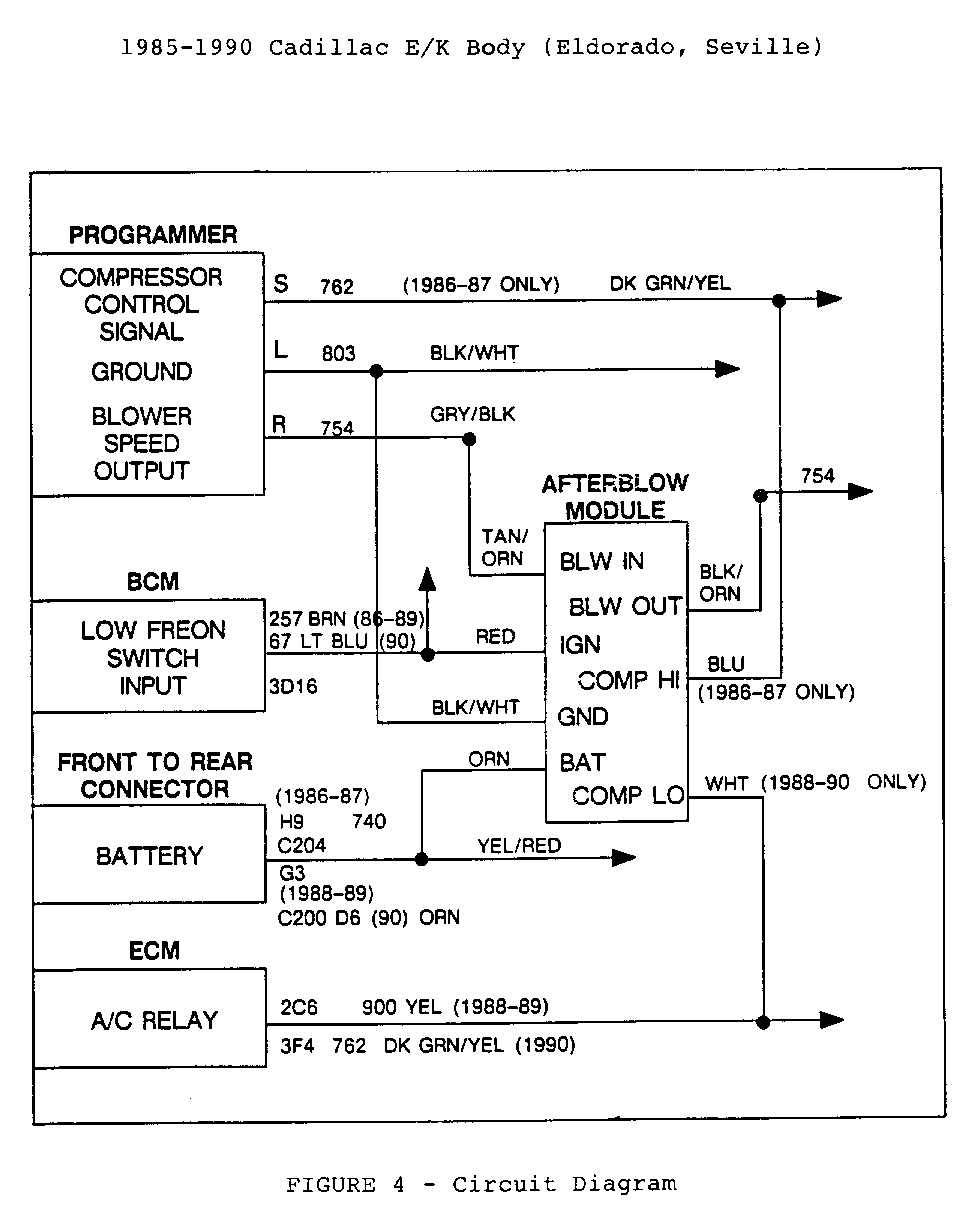
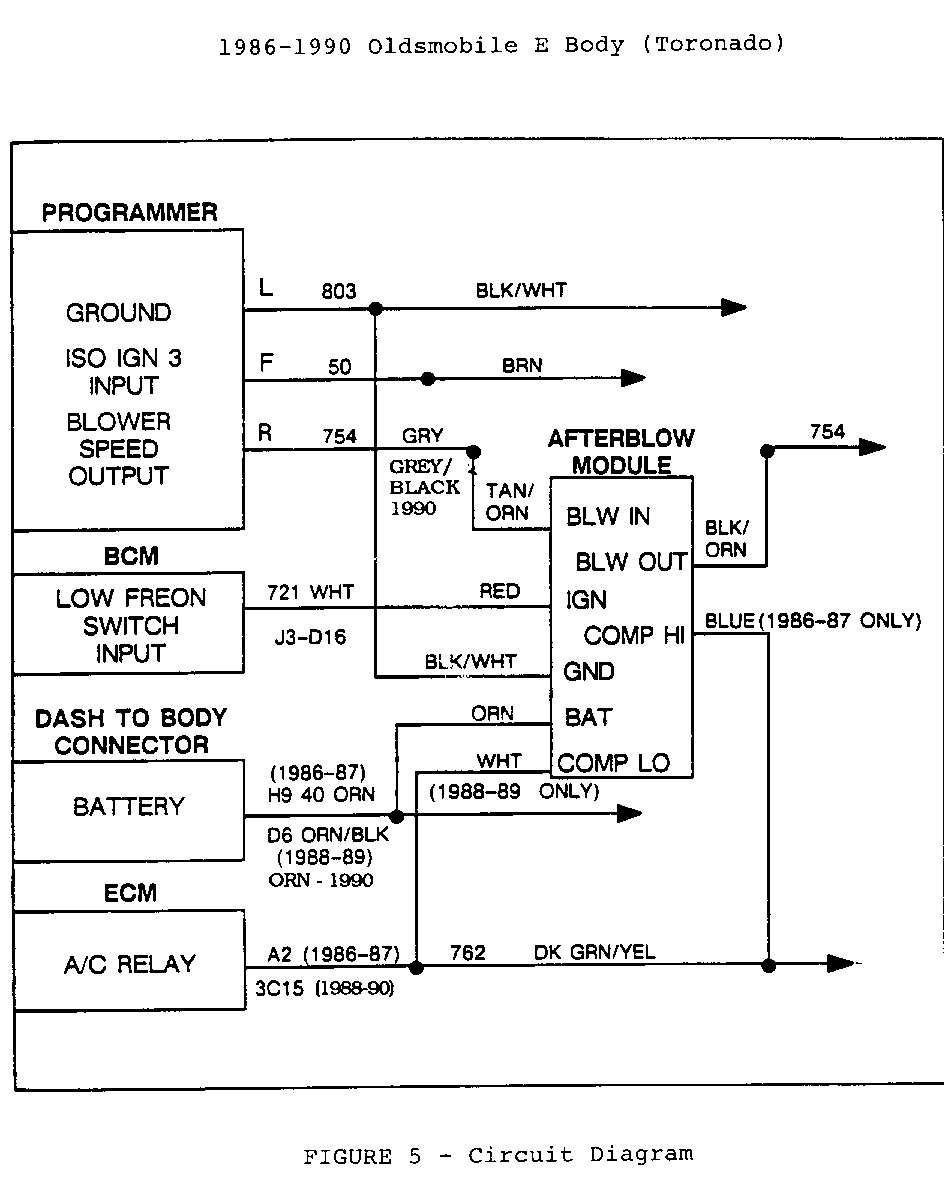
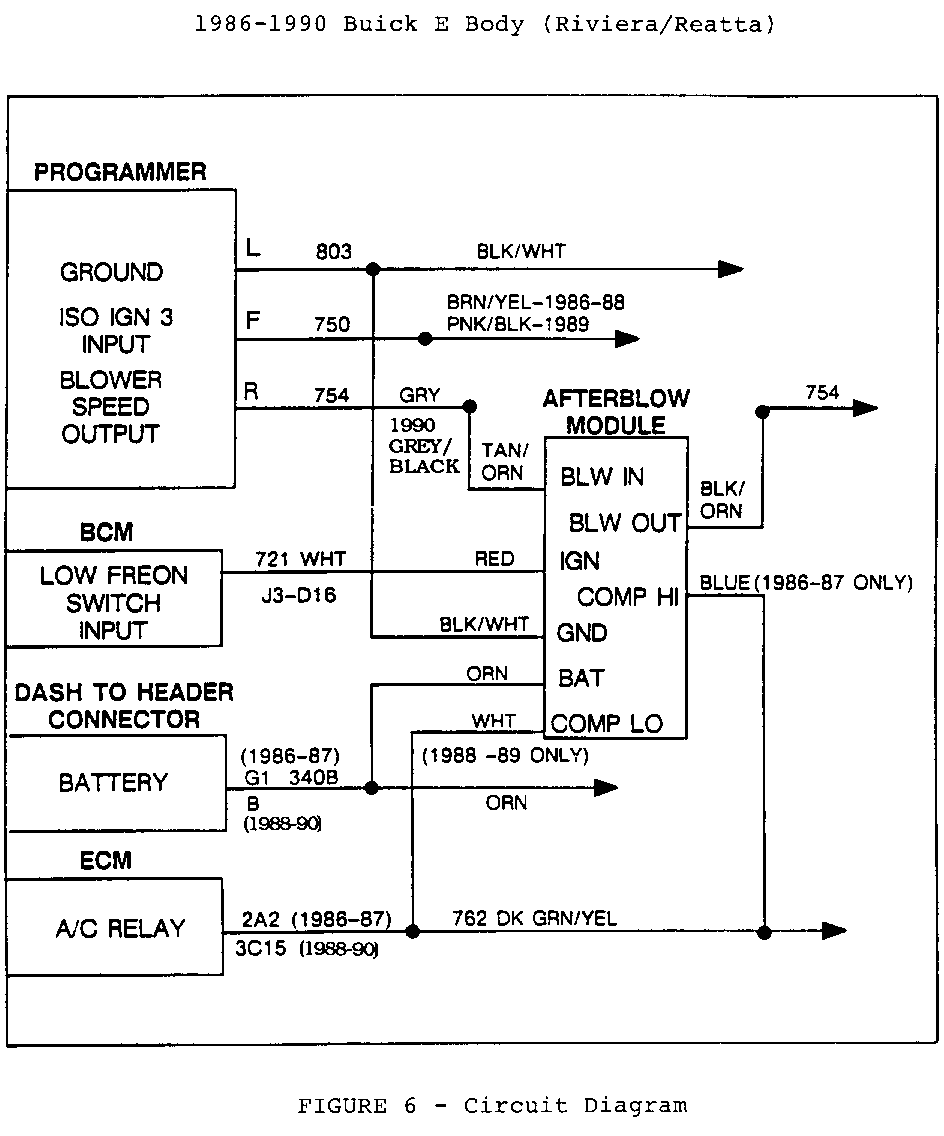
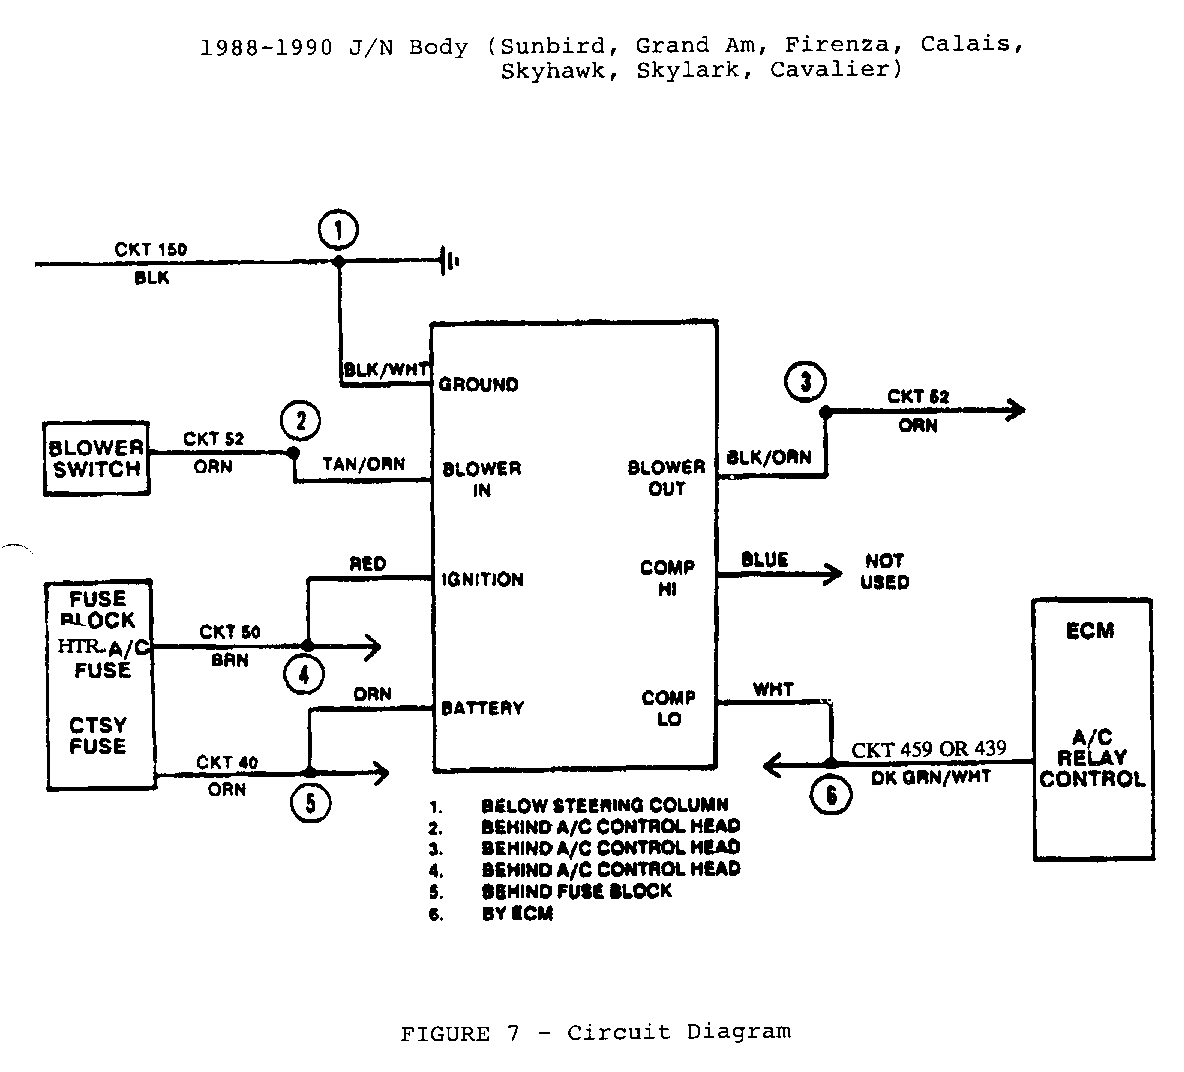
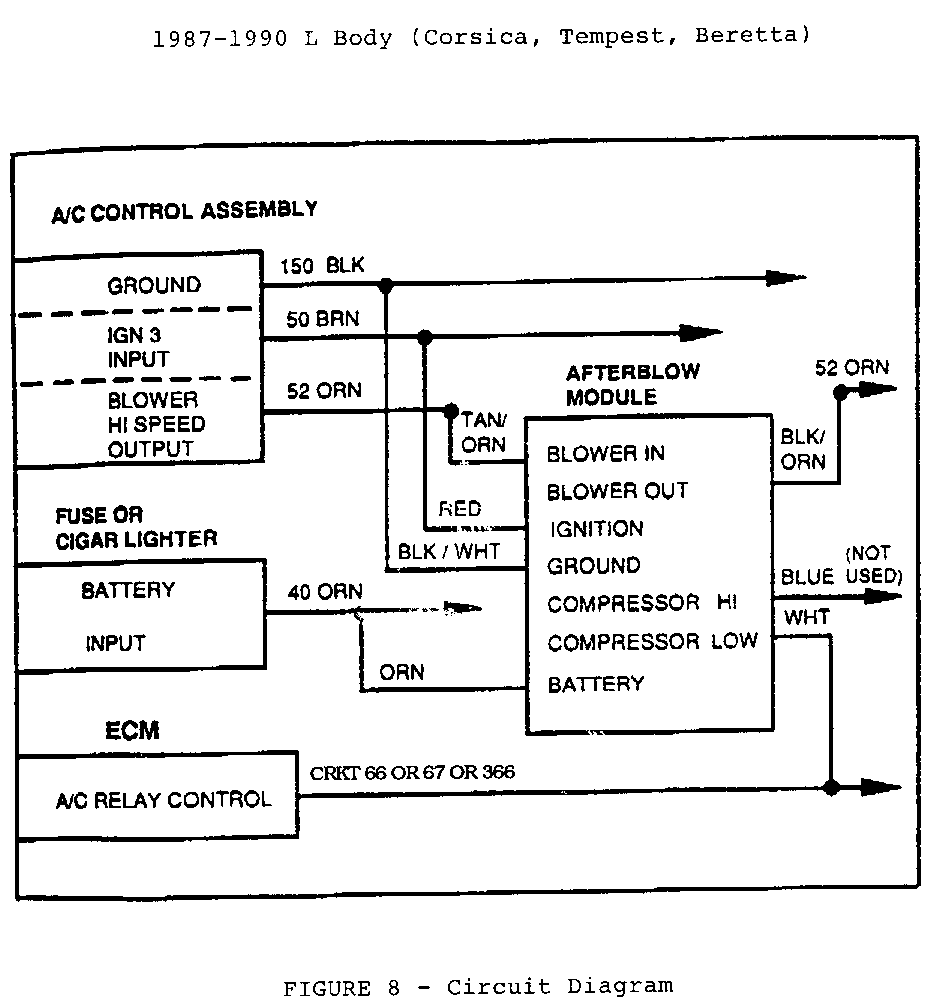
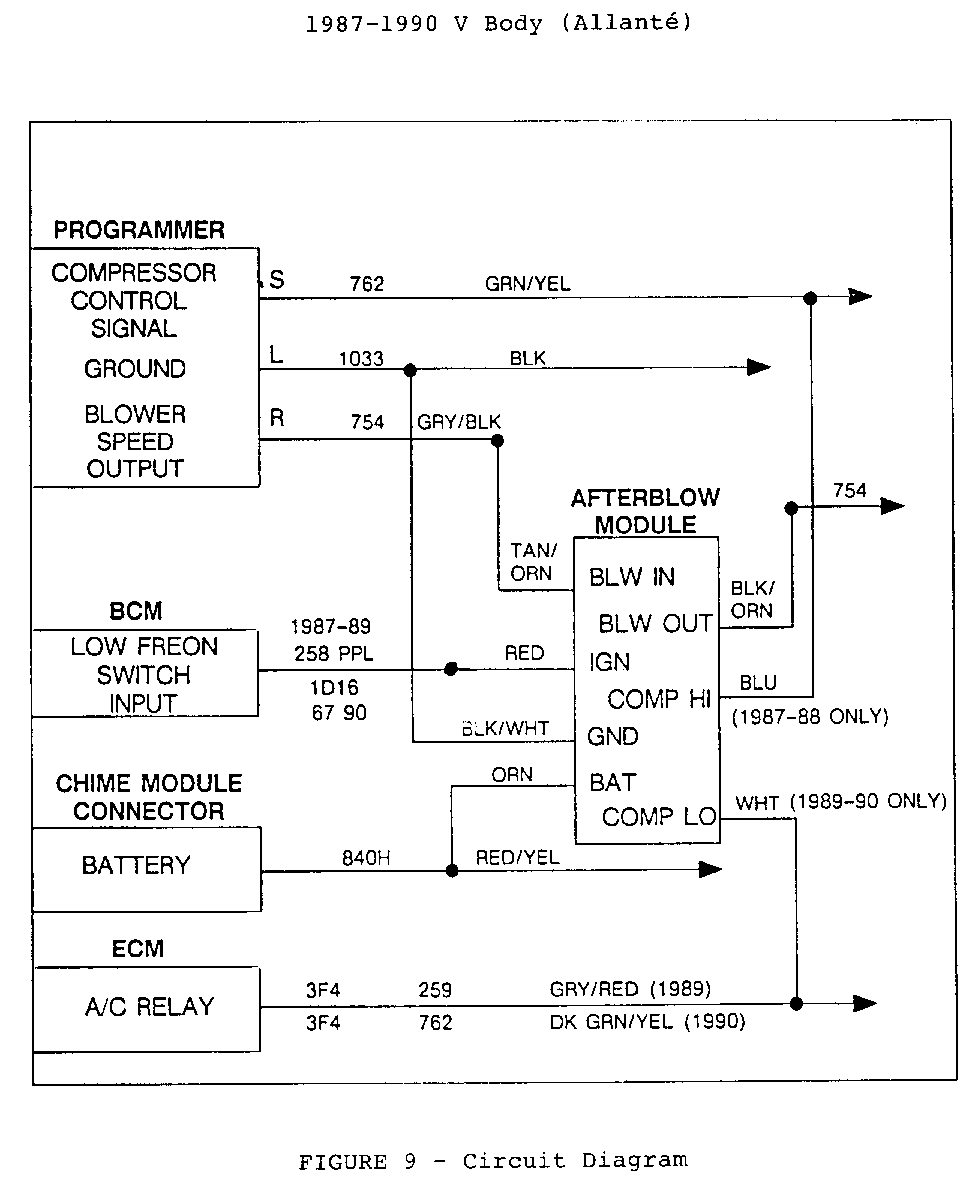
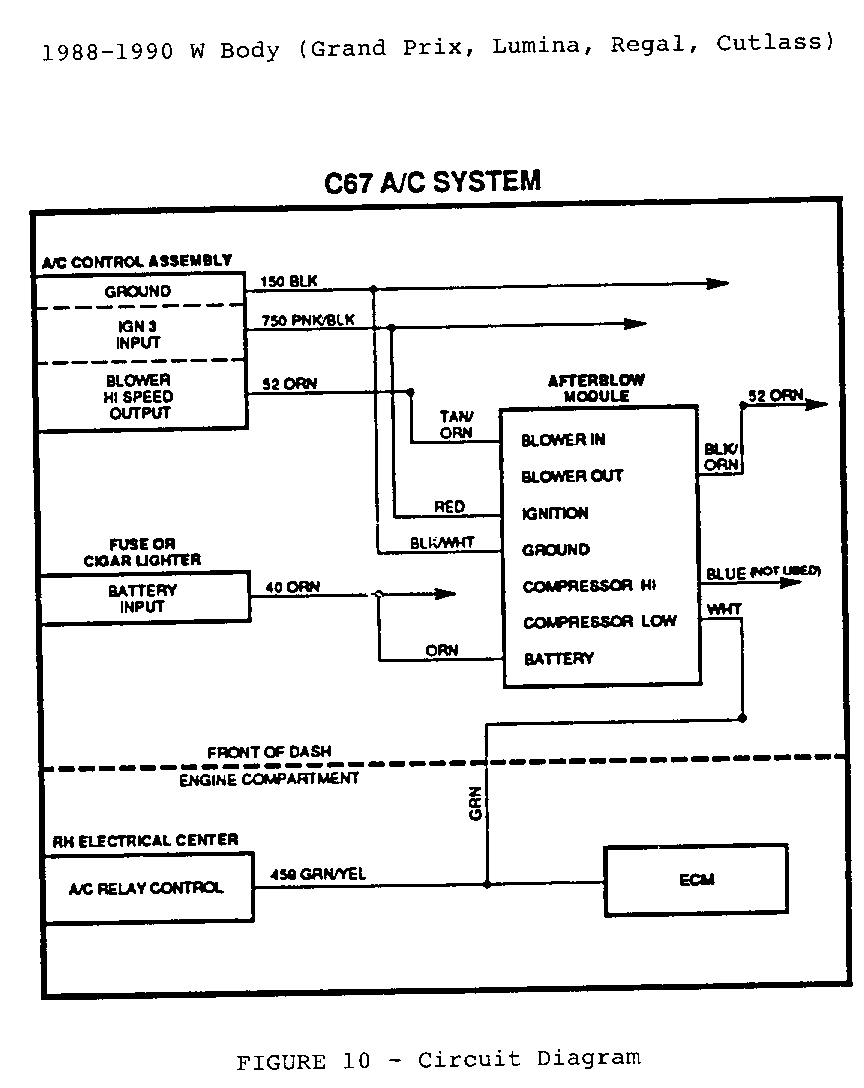
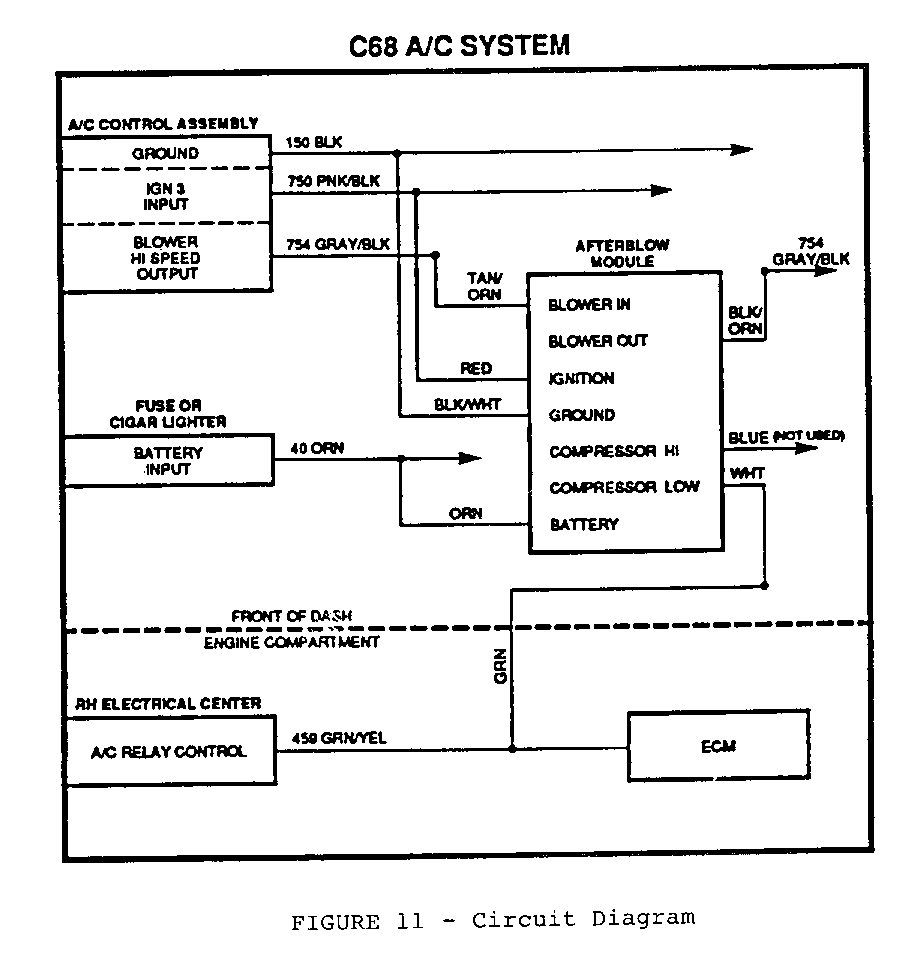
After Module Circuit Diagrams:
The following five (5) figures are current summaries of afterblow module circuit diagrams, for carlines covered by an A/C odor bulletin. They can be used to either wire an affected vehicle, or they can serve as examples for wiring other systems not specifically covered by an A/C odor bulletin.
INSTALLATION PRECAUTIONS:
- Disconnect the negative battery cable before performing any electrical hook-ups.
- All the connections of the afterblow module harness to the vehicle wiring should be performed using the technique described in Section 8A of the Service Manual. Splices/connections 'should be made using splice clips, or solder. Do not use instant connectors such as 3M's "Scothblock" brand,
- All unused module wires must be taped and secured to prevent future electrical problems.
- The afterblow module is not compatible with some non-factory installed theft alarm systems. The module current draw in the key off position could trigger alarms that sense battery voltage changes or current drain.
TESTING THE AFTERBLOW MODULE:
1. Start the engine.
2. Command the A/C system ON and ensure the compressor engages.
3. Apply battery voltage to the green test lead (PIN H) for at least 30 seconds while the compressor is engaged.
4. Turn ignition off.
5. The blower should: come on after approximately 10 seconds; run for 1 second; then shut off.
6. Disconnect the jumper wire.
Warranty Information:
Labor operation: T6235
Labor Time Refer to applicable bulletin.
General Motors bulletins are intended for use by professional technicians, not a "do-it-yourselfer". They are written to inform those technicians of conditions that may occur on some vehicles, or to provide information that could assist in the proper service of a vehicle. Properly trained technicians have the equipment, tools, safety instructions and know-how to do a job properly and safely. If a condition is described, do not assume that the bulletin applies to your vehicle, or that your vehicle will have that condition. See a General Motors dealer servicing your brand of General Motors vehicle for information on whether your vehicle may benefit from the information.
