SERVICE MANUAL UPDATE-SEC. 8A REAR VIEW MIRROR OPT. DD7&DD8

SUBJECT: SECTION 8A AND 10-2 BREAKAWAY REAR VIEW MIRROR REMOVE/INSTALL PROCEDURES
VEHICLES AFFECTED: 1992-93 "C" AND "H" MODELS - 1993 "E", "K" AND "D" MODELS
THIS BULLETIN SUPERSEDES AND REPLACES GM OF CANADA BULLETIN 208120. THIS BULLETIN IS BEING REVISED TO INCLUDE NEW ARTWORK FOR THE BREAKAWAY REARVIEW MIRRORS AND ADD THE 1993 "E,K,D" MODELS
The Remove And Install Procedure for the Clip Mounted Rear View Mirror has been added to supplement the Service and Electrical Systems Manuals with the addition of options DD7 and DD8 (Breakaway Rear View Mirrors).
Please update your respective Service Manual accordingly.
BREAKAWAY REARVIEW MIRRORS
An Electrochromic rearview mirror is standard on both the Deville and Sixty Special. For circuit operation refer to Section 8A. A breakaway feature has been added to this mirror. It is designed to detach at the mirror support in the event of an inflatable restraint deployment. The mirror can be reattached using the procedure below.
ELECTROCHROMIC REARVIEW MIRROR
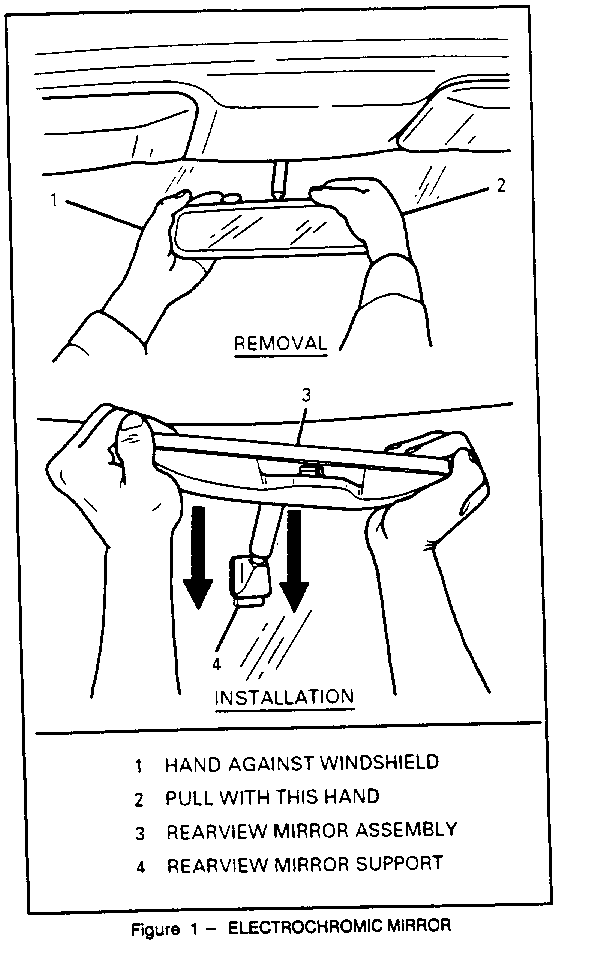
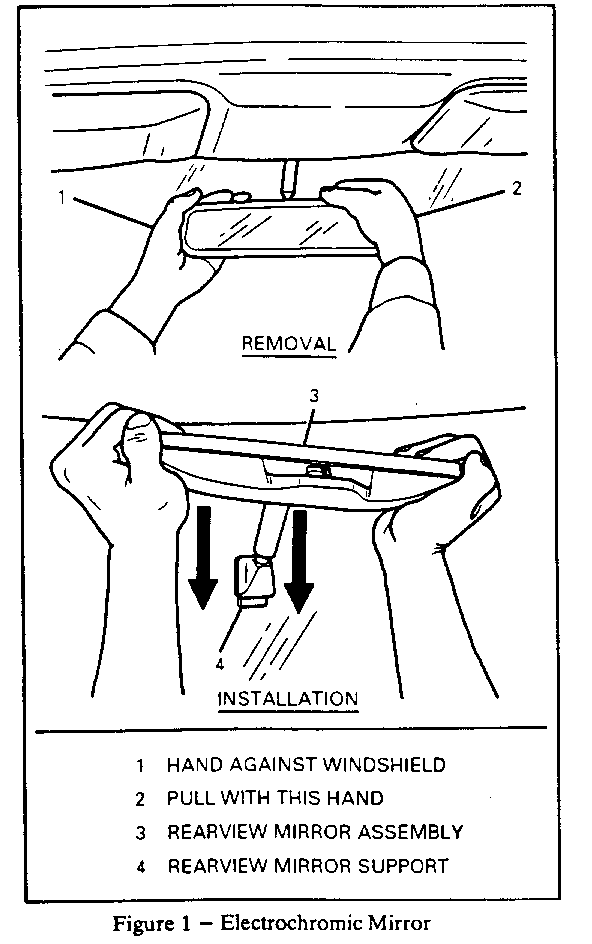
Refer to Figure 1
Remove or Disconnect
NOTICE: Do not use tools or other objects to pry mirror base or mirror away from windshield. Use of tools may damage mirror base, mirror or windshield.
1. Electrical connectors at rear of mirror assembly.
2. Twist mirror to one side and use one hand to support edge of mirror against windshield.
3. Use other hand to pull mirror away from windshield with a quick jerk.
Install or Connect
1. Position bottom of mirror base against windshield at top of support.
2. Slide base onto support keeping base parallel to windshield.
3. As base starts to engage, apply a force against base while maintaining a downward force until it snaps onto the support with an audible click; this operation will require at least 20 pounds of force.
4. Check to make sure mirror is securely attached to support by adjusting mirror in a normal up/down and side to side range.
5. Electrical connectors.
BREAKAWAY REARVIEW MIRROR
Breakaway rearview mirrors are designed to detach from the windshield in the event of an inflatable restraint deployment. Cadillac offers two different styles of rearview mirror; the Electrochromic, rearview mirror and the Conventional rearview mirror. Both styles of mirror attach to a support on the windshield, but break away in different manners. The Electrochromic mirror separates at the mirror support, while the Conventional mirror arm separates from the mirror base. Be sure to follow the appropriate procedure when servicing the rearview mirror.
ELECTROCHROMIC REARVIEW MIRROR
Refer to Figure 1
Remove or Disconnect
NOTICE: Do not use tools or other objects to pry mirror base or mirror away from windshield. Use of tools may damage mirror base, mirror or windshield.
1. Electrical connectors at rear of mirror assembly.
2. Twist mirror to one side and use one hand to support edge of mirror against windshield.
3. Use other hand to pull mirror away from windshield with a quick jerk.
Install or Connect
1. Position bottom of mirror base against windshield at top of support.
2. Slide base onto support keeping base parallel to windshield.
3. As base starts to engage, apply a force against base while maintaining a downward force until it snaps onto the support with an audible click; this operation will require at least 20 pounds of force.
4. Check to make sure mirror is securely attached to support by adjusting mirror in a normal up/down and side to side range.
5. Electrical connectors.
CONVENTIONAL REARVIEW MIRROR
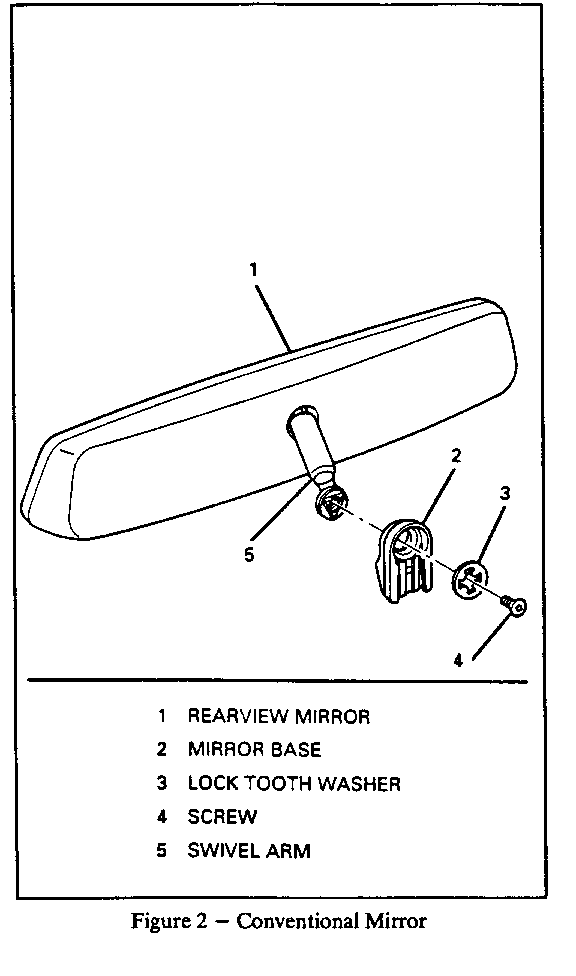
Refer to Figure 2
Remove or Disconnect
1. Set screw retaining mirror base to mirror support.
2. Lift mirror or base from mirror support.
Disassemble
Torx screw at rear of swivel arm.
Assemble
1. Lock tooth washer and mirror base to swivel arm.
2. Torx screw at rear of swivel arm. Tighten until snug.
Install or Connect
1. Mirror assembly to mirror support.
2. Set screw to retain mirror assembly.
BREAKAWAY REARVIEW MIRRORS
Breakaway rearview mirrors are designed to detach from the windshield in the event of an inflatable restraint deployment. Cadillac offers two different styles of rearview mirror; the Electrochromic rearview mirror and the Conventional rearview mirror. Both styles of mirror attach to a support on the windshield, but break away in different manners. The Electrochromic mirror separates at the mirror support, while the Conventional mirror arm separates from the mirror base. Be sure to follow the appropriate procedure when servicing the rearview mirror.
ELECTROCHROMIC REARVIEW MIRROR
Refer to Figure 1
Remove or Disconnect
NOTICE: Do not use tools or other objects to pry mirror base or mirror away from windshield. Use of tools may damage mirror base, mirror or windshield.
1. Electrical connectors at rear of mirror assembly.
2. Twist mirror to one side and use one hand to support edge of mirror against windshield.
3. Use other hand to pull mirror away from windshield with a quick jerk.
Install or Connect
1. Position bottom of mirror base against windshield at top of support.
2. Slide base onto support keeping base parallel to windshield.
3. As base starts to engage, apply a force against base while maintaining a downward force until it snaps onto the support with an audible click; this operation will require at least 20 pounds of force.
4. Check to make sure mirror is securely attached to support by adjusting mirror in a normal up/down and side to side range.
5. Electrical connectors.
CONVENTIONAL REARVIEW MIRROR
Refer to Figure 2
Remove or Disconnect
1. Set screw retaining mirror base to mirror support.
2. Lift mirror base from mirror support.
Disassemble
Torx screw at rear of swivel arm.
Assemble
1. Lock tooth washer and mirror base to swivel arm.
2. Torx screw at rear of swivel arm. Tighten until snug.
Install or Connect
1. Mirror assembly to mirror support.
2. Set screw to retain mirror assembly.
General Motors bulletins are intended for use by professional technicians, not a "do-it-yourselfer". They are written to inform those technicians of conditions that may occur on some vehicles, or to provide information that could assist in the proper service of a vehicle. Properly trained technicians have the equipment, tools, safety instructions and know-how to do a job properly and safely. If a condition is described, do not assume that the bulletin applies to your vehicle, or that your vehicle will have that condition. See a General Motors dealer servicing your brand of General Motors vehicle for information on whether your vehicle may benefit from the information.
