Key Identification and Usage
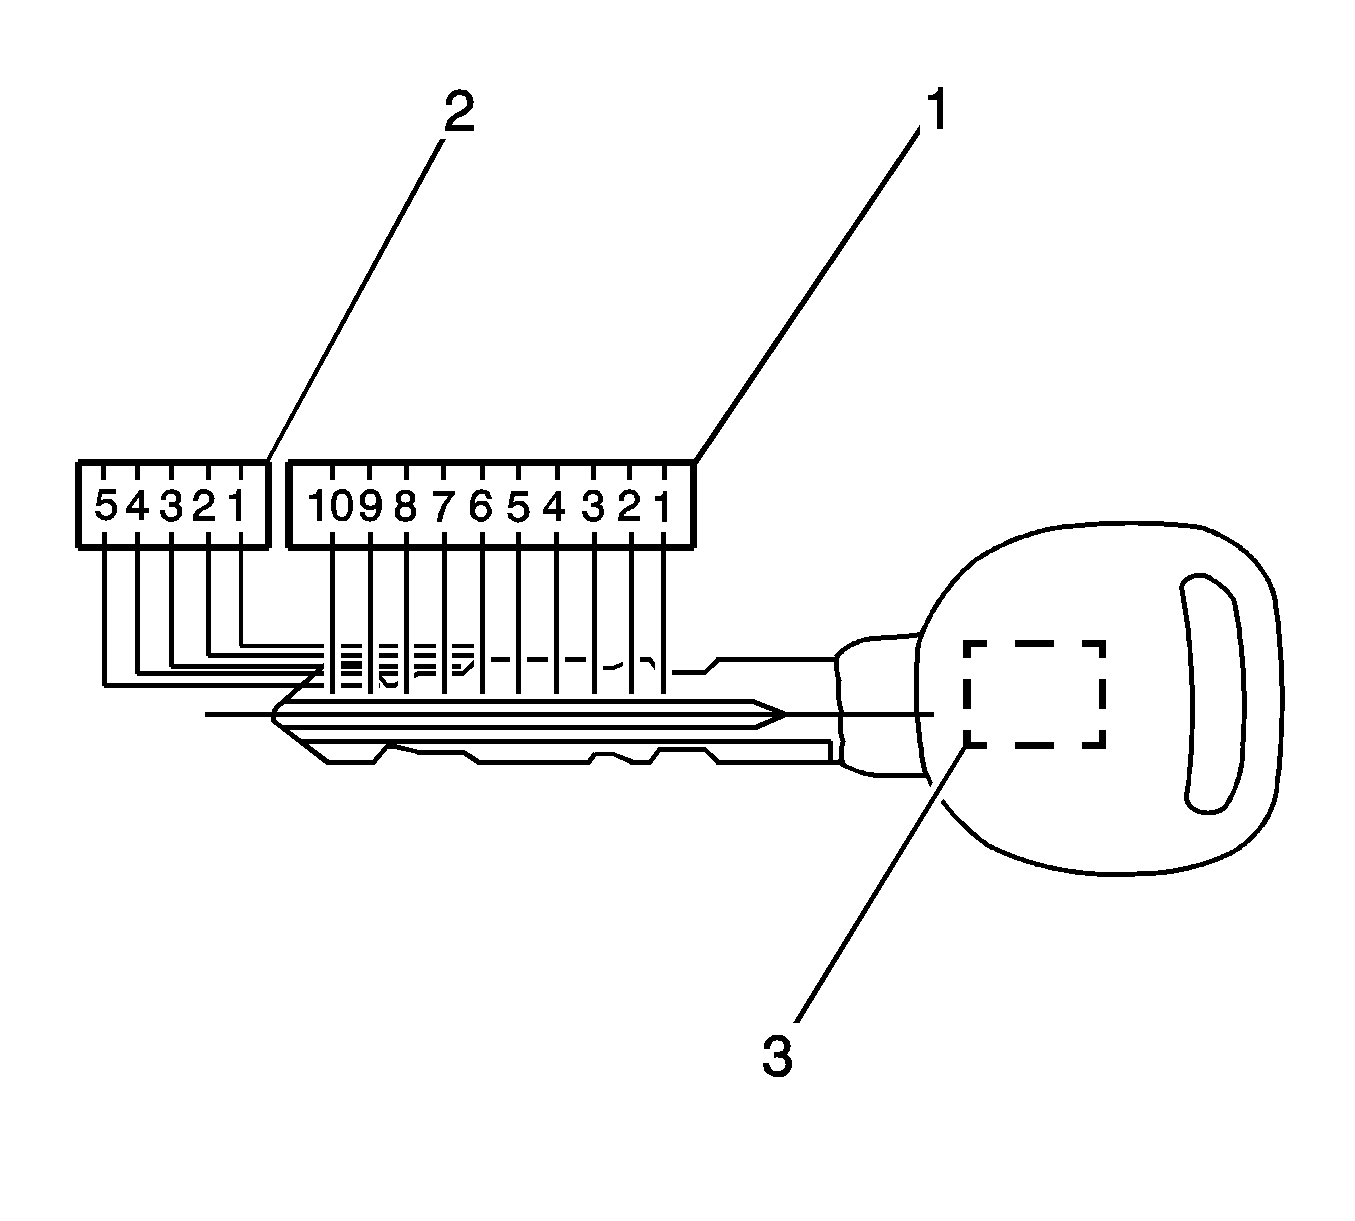
The keys are double sided and reversible. The master key and valet key contain transponders that are read by the theft deterrent system when the keys are used in the ignition. The keys have 10 cut positions (1) with 5 different depths (2).
Two master keys are supplied with the vehicle which contain a transponder (3). These keys will operate all of the locks on the vehicle.
Cutting Keys
The key code can be obtained by translating the 5-character identification code on the key tag or the original ignition lock cylinder. The keys have 10 cut positions (1) and 5 cut depths (2). Key cut positions are numbered 1 to 10,
counting from the head of the key to the tip. The key cut depths are 1 to 5. The master key contains a transponder (3). If the body control module (BCM) does not recognize a valid key transponder, the BCM will disable the vehicle. For programing
the keys to the vehicle, refer to
Programming Theft Deterrent System Components
in Theft Deterrent.
- Cut a blank key to the proper depth and sequence of each of the tumbler positions.
- Inspect the mechanical operation of the key in the lock cylinders in the doors, the ignition switch, the rear compartment lid and any storage compartments:
| • | Turn the key both directions in each lock cylinder. |
| • | Turn the key with each side of the key pointing upward in each lock cylinder. |
- If replacing a master key, program the key transponder to the vehicle. Refer to
Programming Theft Deterrent System Components
in Theft Deterrent.
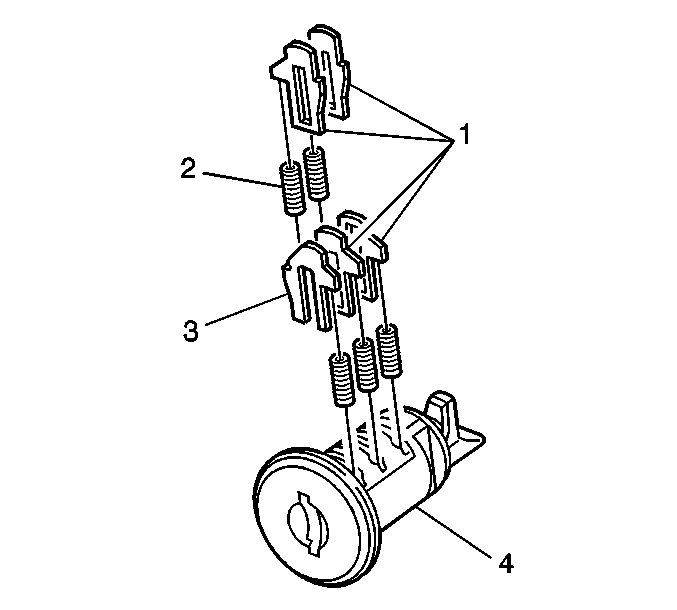
Lock Cylinder Tumblers
Each of the 5 key cut depths have a corresponding tumbler. The tumbler depth number (1-5) is stamped on the tumblers for identification.
Assembling and Coding the Ignition Lock Cylinder
Tools Required
J 41340
Lock Cylinder Staking and Holding Fixture
Important: If the key code cannot be obtained no identification code is available, proceed to step 1. If the key code is known or a new key code will be used, proceed to step 6.
Important: Be careful to observe and record each tumbler and it's relative position in the lock cylinder as the tumblers are removed.
- Remove all of the tumblers by rotating the lock cylinder so that the tumbler slots are facing down.
- Hold the lock cylinder close to a flat surface.
- Pull the lock cylinder side bar out with your fingers. It may be necessary to tap the lock cylinder on a hard surface to remove all of the tumblers.
- Determine the tumbler numbers and their respective positions. To determine the current key code perform the following steps:
| 4.1. | Starting with position (1) the open end of the lock cylinder, find and record the lowest level (tumbler number) that is visible. |
| 4.2. | Repeat the previous step for positions (2) through 10. |
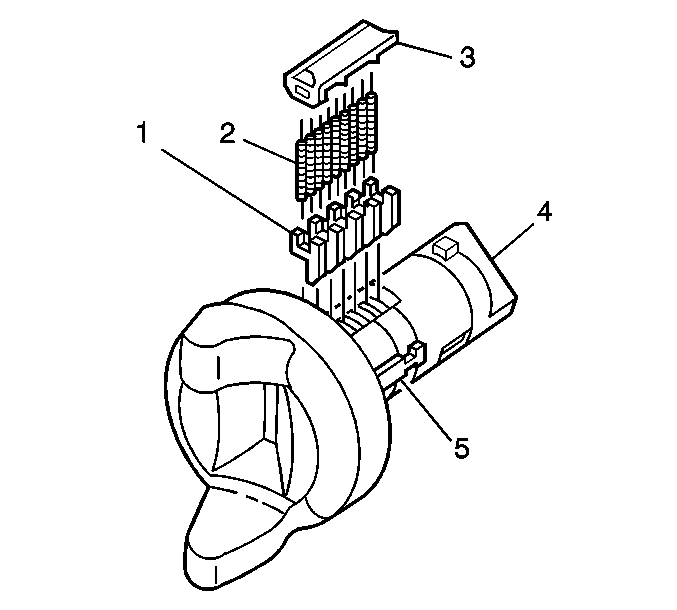
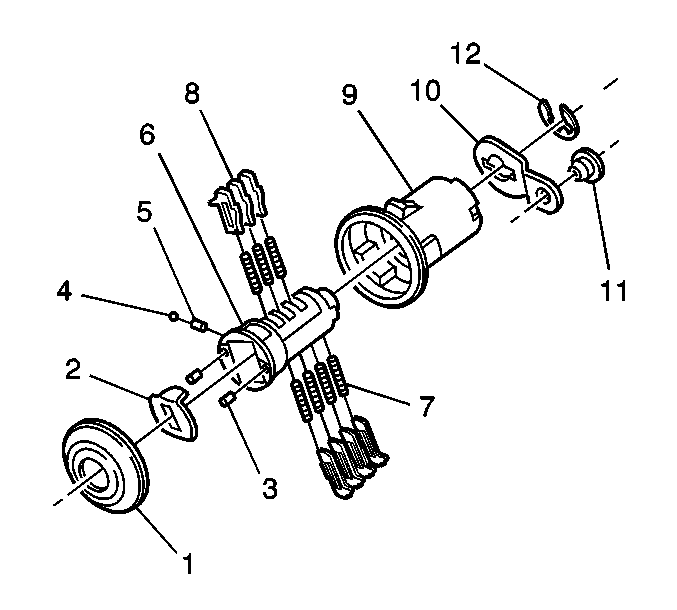
- Starting with position (1), insert the tumblers (2) into their corresponding slots in the coded
order.
- Using your fingers, pull out the side bar (8) until the tumblers fall completely into the lock cylinder.
- Insert one tumbler spring (3) above each tumbler (2).
- Lubricate the tumblers using Synthetic Multi Purpose W/PTFE Superlub GM P/N 12346241 or Canadian P/N 10953474.
- Insert the spring retainer (4) into the lock cylinder.
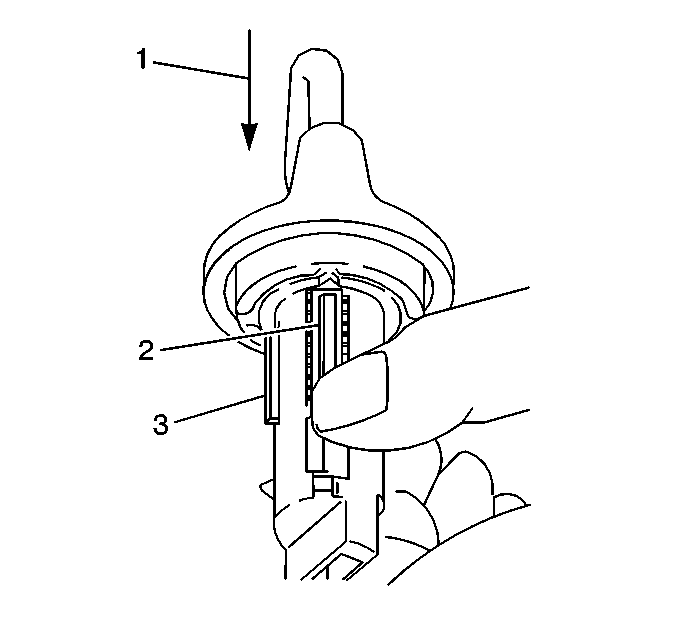
- Use a flat-bladed tool to firmly press the retainer (1) down until the lock cylinder is fully
seated in the lock cylinder.
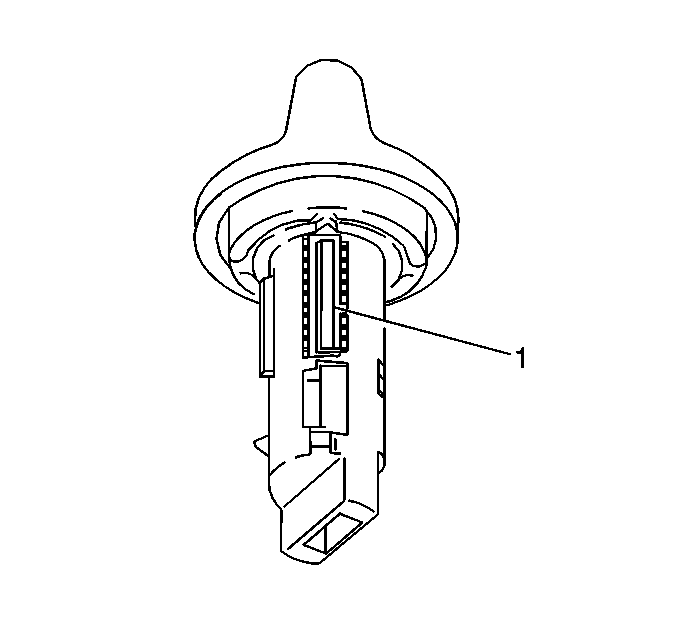
- Inspect for proper tumbler installation:
| 11.1. | Hold the spring retainer (2) in position. |
| 11.2. | Insert the key (1) into the lock cylinder. The side bar (3) should drop down to the level of the lock cylinder. If the side bar does NOT drop down to the level of the lock cylinder, proceed to the previous step 2. |
- Remove the key from the lock cylinder.
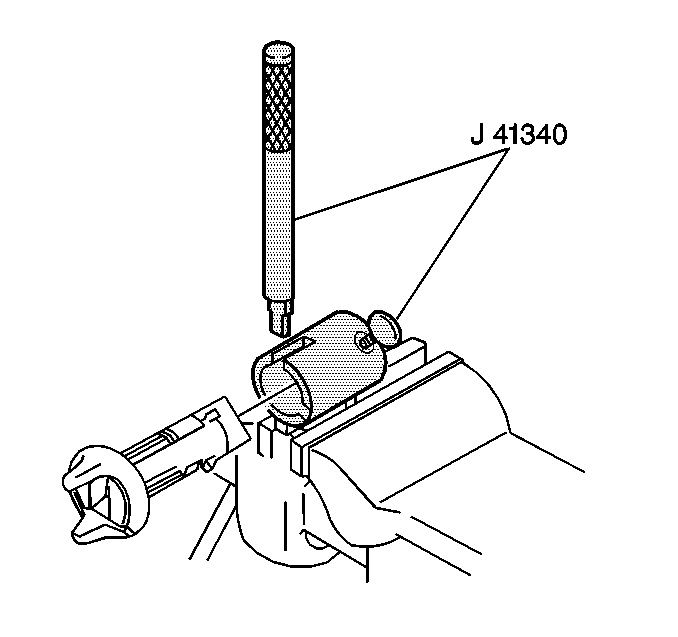
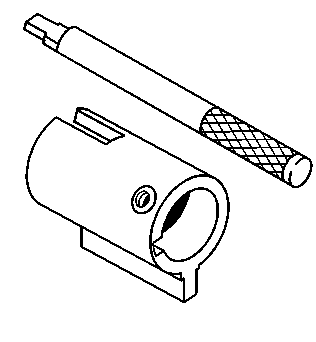
- Secure the lock cylinder in the
J 41340
.
| 13.1. | Inspect that the spring retainer is facing up and positioned directly under the punch slots. |
| 13.2. | Insert the lock cylinder completely into the
J 41340
until the lock cylinder bezel contacts the
J 41340
. |
| 13.3. | Tighten the
J 41340
holding screw. |
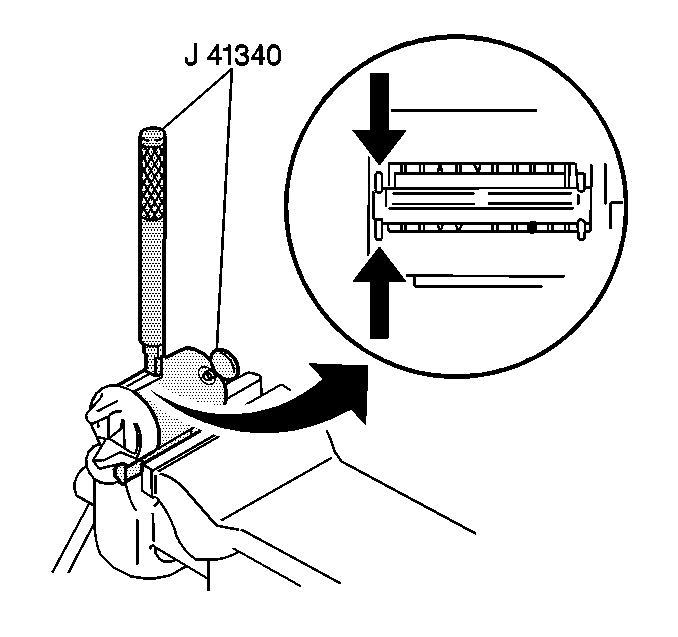
- Stake the bezel end of the spring retainer:
| 14.1. | Hold the flat side of the punch squarely against the face of the lock cylinder bezel. |
| 14.2. | Stake the lock cylinder metal over the spring retainer prong. |
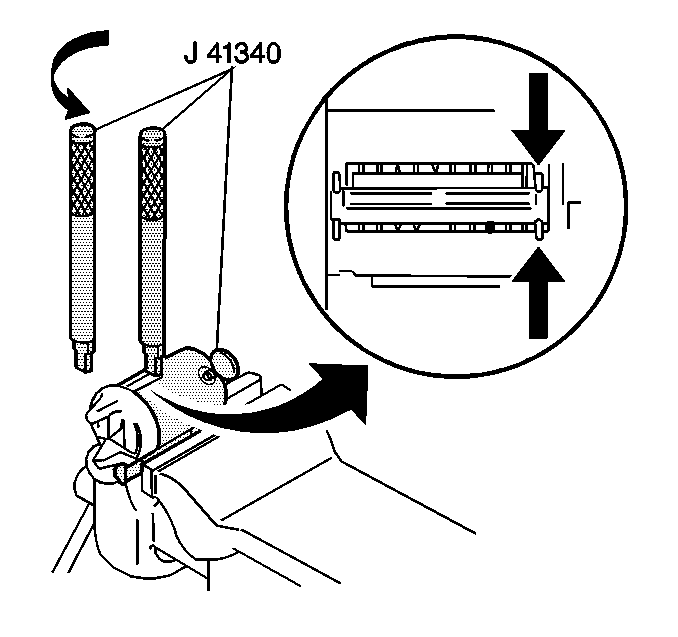
- Stake the opposite end of the spring retainer:
| 15.2. | Rotate the
J 41340
punch 180 degrees. |
| 15.3. | Hold the
J 41340
punch squarely against the end of the punch slot. |
| 15.4. | Stake the lock cylinder metal over the spring retainer prong. |
- Loosen the
J 41340
holding screw.
- Remove the lock cylinder from the
J 41340
.
- Inspect that the spring retainer is properly staked. Repeat staking as needed.
- Lubricate the lock cylinder retainer slot and the lock cylinder retainer with GM P/N 12345996 or equivalent.
- Orient the lock cylinder retainer to the tapered notch in the lock cylinder housing.
- Insert the ignition lock cylinder into the ignition lock cylinder housing.
- Inspect for proper ignition lock cylinder rotation using the key.
Assembling and Coding the Door Lock Cylinder
The door lock cylinder uses 7 tumblers (positions 3 through 9). The tumbler positions are staggered on both sides of the lock cylinder (5 on one side and 3 on the other).
Important: The lock cylinder tumblers are not self-retaining. Hold the tumblers in place when the key is not in the lock cylinder. Hold the lock cylinder tumblers (8) in place when performing this procedure.
- Hold the cylinder (6) so that the side with 5 tumbler openings are up.
- Insert 5 tumbler springs (7) into the 5 spring wells.
- Install the tumbler (8) for position 4 in the slot nearest to the front of the lock cylinder.
- Install the 3 remaining tumblers (8) for positions 6, 8 and 10 in the lock cylinder.
- Press the tumblers into place with light hand pressure.
- Insert the key into the lock cylinder (6). If the tumblers are not flush with the lock cylinder, remove the tumblers and perform the coding procedure again.
Important: Hold the tumblers in place before removing the key.
- Rotate the lock cylinder (6) so that the side with 3 tumbler openings are up.
- Insert 3 tumbler springs (7) into the 3 spring wells.
- Install the tumbler for position 5 into the slot nearest the front of the lock cylinder.
- Install the 2 remaining tumblers for positions 7 and 9 in the lock cylinder.
- Press the tumblers into place with light hand pressure.
- Insert the key into the lock cylinder (6). If the tumblers are not flush with the lock cylinder, remove the tumblers and perform the coding procedure again.
- Lubricate the tumblers using GM P/N 12346241 or equivalent.
- If necessary, perform the following steps to install the shudder door.
| • | Install the 2 plate springs (3) into the 2 spring wells in the head of the lock cylinder (6). |
| • | Press the shutter (2) into the lock cylinder until it snaps into place. |
- Insert the key into the lock cylinder (6). If the lock cylinder does not rotate in the lock cylinder housing, disassemble the lock cylinder and perform the coding procedure again.
- Partially remove the lock cylinder core to install the spring and ball.
- Place the detent spring (5) into the spring well located on the side of the lock cylinder (6).
- Apply the heavy grease to end of spring to retain the detent ball. Carefully place the detent ball (4) on the detent spring (5).
- Using a small flat-bladed tool to hold the ball in place. Simultaneously insert the lock cylinder core into the lock cylinder housing.
Caution: Wear safety glasses in order to avoid eye damage.
- Depress the detent ball and spring and insert the cylinder (6) into the lock cylinder housing (9).
- Insert the key into the lock cylinder (6). If the lock cylinder does not rotate in the lock cylinder housing, disassemble the lock cylinder and perform the coding procedure again.
- Install the lock pawl (10) to the lock cylinder (6).
- Install the lock pawl E-clip (12) in order to retain the lock pawl.
- Remove the key from the lock cylinder (5).
- Install the lock cylinder cap (1) by pressing the cap onto the lock cylinder with light hand pressure.
Assembling and Coding the Endgate Lock Cylinder
The endgate lock cylinder uses 7 tumblers positions 3 through 9. The tumbler positions are staggered on both sides of the lock cylinder 5 on one side and 3 on the other.
Important: The lock cylinder tumblers are not self-retaining. Hold the tumblers in place when the key is not in the lock cylinder. Hold the lock cylinder tumblers (8) in place when performing this procedure.
- Hold the cylinder (6) so that the side with 5 tumbler openings are up.
- Insert 5 tumbler springs (7) into the 5 spring wells.
- Install the tumbler (8) for position 4 in the slot nearest to the front of the lock cylinder.
- Install the 3 remaining tumblers (8) for positions 6, 8 and 10 in the lock cylinder.
- Press the tumblers into place with light hand pressure.
- Insert the key into the lock cylinder (6). If the tumblers are not flush with the lock cylinder, remove the tumblers and perform the coding procedure again.
Important: Hold the tumblers in place before removing the key.
- Rotate the lock cylinder (6) so that the side with 3 tumbler openings are up.
- Insert 3 tumbler springs (7) into the 3 spring wells.
- Install the tumbler for position 5 into the slot nearest the front of the lock cylinder.
- Install the 2 remaining tumblers for positions 7 and 9 in the lock cylinder.
- Press the tumblers into place with light hand pressure.
- Insert the key into the lock cylinder (6). If the tumblers are not flush with the lock cylinder, remove the tumblers and perform the coding procedure again.
- Lubricate the tumblers using GM P/N 12346241 or equivalent.
- If necessary, perform the following steps to install the shudder door.
| • | Install the 2 plate springs (3) into the 2 spring wells in the head of the lock cylinder (6). |
| • | Press the shutter (2) into the lock cylinder until it snaps into place. |
- Insert the key into the lock cylinder (6). If the lock cylinder does not rotate in the lock cylinder housing, disassemble the lock cylinder and perform the coding procedure again.
- Install the lock cylinder spring (9) to the lock cylinder.
- Install the lock cylinder spring retainer (8) to the lock cylinder.
- Remove the key from the lock cylinder (5).
- Install the lock cylinder cap (1) by pressing the cap onto the lock cylinder with light hand pressure.
Assembling and Coding I/P Storage Compartment Lock Cylinder
The instrument panel (I/P) storage compartment lock uses five tumbler positions 7-10 . The I/P storage compartment lock cylinder also uses a retainer tumbler. The retainer tumbler is not moved by the key. The purpose of the retainer tumbler is to
retain the lock cylinder in the lock. The retainer tumbler occupies the slot closest to the head of the I/P storage compartment lock cylinder and should come already installed in the cylinder.
- Hold the cylinder (4) so that the side with 5 tumbler openings is
facing up.
- Insert tumbler springs (2) into the 5 spring wells.
- Install the tumbler (1) for key cut position 7 into the slot nearest to the front of the lock cylinder.
- Install the 3 remaining tumblers for positions 8, 9 and 10 into the cylinder.
- Firmly press the tumblers until they snap in place.
- Insert the key into the lock cylinder (4). If the tumblers are not flush with the lock cylinder, remove the tumblers and perform the coding procedure again.
