WIND NOISE DIAG./CORRECTION (WIND/WHISTLE/ROAR/RUSH)

Subject: WIND NOISE DIAGNOSIS AND CORRECTION
Models Affected: 1982-1991 ALL MODELS
INTRODUCTION:
-------------- Drivers don't give much thought to how quiet it is inside their car - unless they're troubled by a wind noise.
Minimizing wind noise is one of the most important challenges facing design engineers. If customers feel their car has too much of it, it's up to you, the service technician, to investigate their concern. Most wind noises are caused by either leaking seals or misaligned body surfaces. The result is air, or wind, going where it shouldn't.
There are three basic types of wind noise: o Whistle o Roar o Rush
WIND WHISTLE:
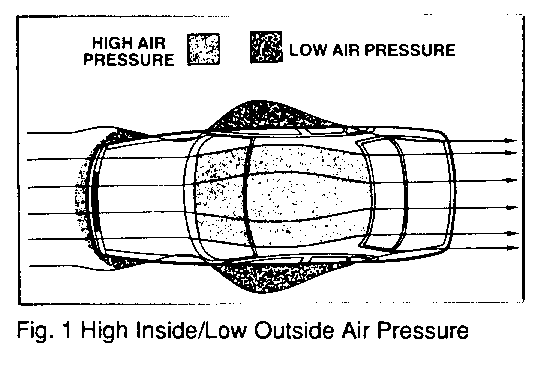
When moving at highway speeds, air pressure inside a vehicle becomes significantly greater than the air pressure outside, as shown in Figure
1. If there's a leak, the escaping air causes a hiss or whistle.
You don't have to look any further than a tire for an example of a similar condition. The air pressure inside the tire is more than the air pressure outside the tire.
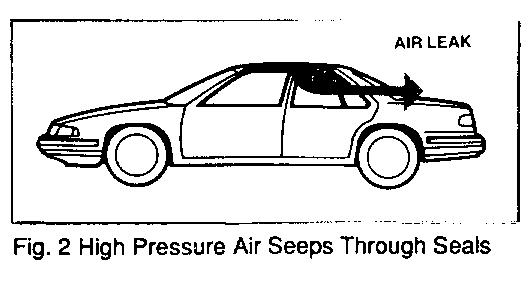
If the tire is punctured, the high pressure air inside the tire leaks out. A wind whistle is similar to the hiss of a leaky tire. High pressure air inside the car seeps out if all of the seals aren't tight. Refer to Figure 2.
WIND ROAR:
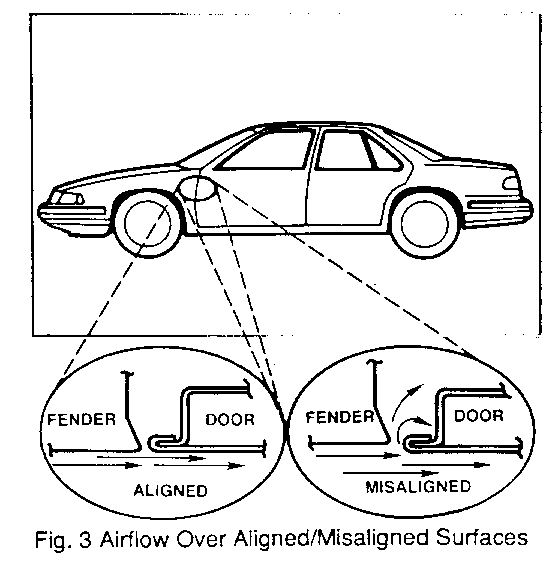
Wind roar is caused by air passing over or through an opening between two body surfaces.
The sound made by blowing across the top of an open bottle is similar to a wind roar. Air flowing across the top is interrupted or re- directed by the bottle.
Vehicles are carefully engineered so openings between body surfaces don't interfere with airflow.
If body surfaces aren't aligned properly, they can cause wind roar, as shown in Figure 3. You'll want to make adjustments so wind passes over these openings quietly.
WIND RUSH:
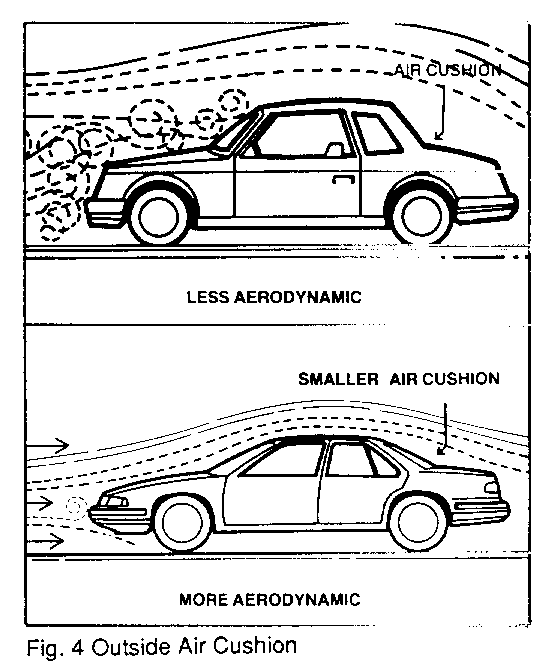
Wind rush is usually less irritating than wind roar or whistle.
As a vehicle moves, a cushion of air moves along with it. This cushion does a good job of insulating the inside of a car from the noise caused by air rushing over it.
The more aerodynamic a vehicle is, the less air is disrupted, and the smaller the cushion is. Refer to Figure 4.
Most drivers won't notice wind rush, but some do - especially if you've already repaired a whistle or roar condition, and they're listening for wind noise.
You may have done all you can short of changing the shape of the vehicle, and the customer still isn't satisfied. In this case, you or the service advisor may want to explain to the customer what's causing the noise and how you determined the cause.
However, before you tell your customer it's a wind rush problem, you should be confident it's not a whistle or roar that can be repaired.
DIAGNOSIS:
---------- Diagnosing wind noise conditions is basically a three-step process:
1. Customer Comments. 2. Road Test. 3. Shop Tests.
CUSTOMER COMMENTS:
The service advisor should get as many details about the problem as possible by asking a few basic but important questions.
First, where does the customer think the noise is coming from, and where is it loudest?
When does the noise occur? At what speed is it noticeable? Is the interior fan on HIGH, LOW or OFF? Are the windows UP or DOWN?
The customer should also be asked what the noise sounds like.
If the service advisor has obtained good information from the customer concerning the nature of the problem, verifying the condition should be easy.
ROAD TEST:
The next step in diagnosing a wind noise condition is to road test the vehicle to experience the customer complaint, and begin to pinpoint the noise area.
VISUAL INSPECTION:
Before going on the road test, give the vehicle a quick visual inspection. Look for obvious things such as misaligned components, loose fasteners, broken weld joints and sealer or adhesive skips. Weatherstrips may be torn, or trapped under garnish moldings or the passive restraint clevis.
If you find any of these conditions, don't make a repair yet - just note them, then listen for any noise they may be causing on the road test.
Bring masking tape, a screwdriver and a china marking or grease pencil on the road test.
RECREATE AND IDENTIFY THE CONDITION:
On the road test, use customer comments to recreate the conditions when the noise occurs.
The next step, is to identify the noise, is it internal or external? If you open a window and the noise gets louder, it's probably an external noise, caused by air passing over body panels, seams or openings.
If the wind noise can't be heard with a window lowered, the noise is internal. It's most likely a whistle caused by air leaving the inside of the vehicle through a seal or seam.
PINPOINTING EXTERNAL NOISES:
You can further pinpoint external wind noise by lowering one window at a time. If the noise is louder at a particular window, you can start pinpointing your diagnosis at that section of the car.
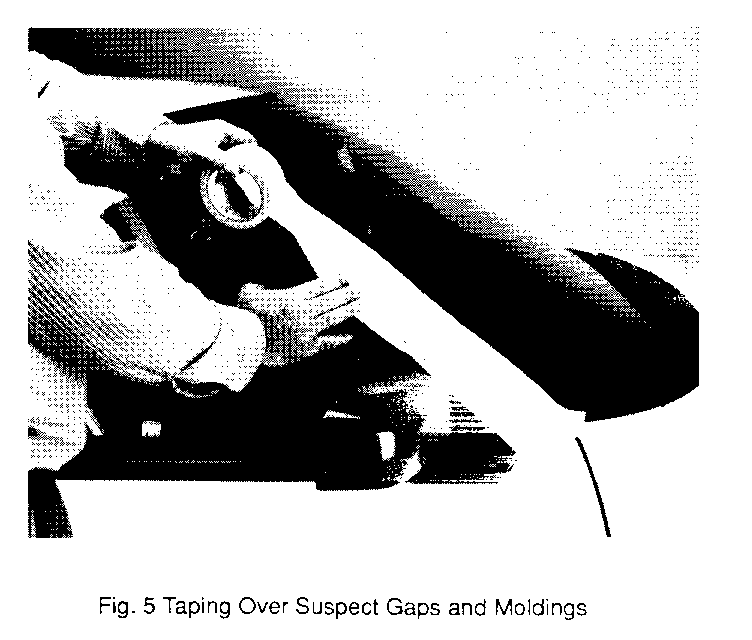
If an external wind noise location corresponds with a condition you noticed during your visual inspection, pull the vehicle over and make a temporary repair with the masking tape or the screwdriver.
Tape over gaps and moldings one at a time, starting with those that look suspect, and are in the area the noise is coming from, refer to Figure 5. When you tape over the area needing repair, the noise will go away.
PINPOINTING INTERNAL NOISES:
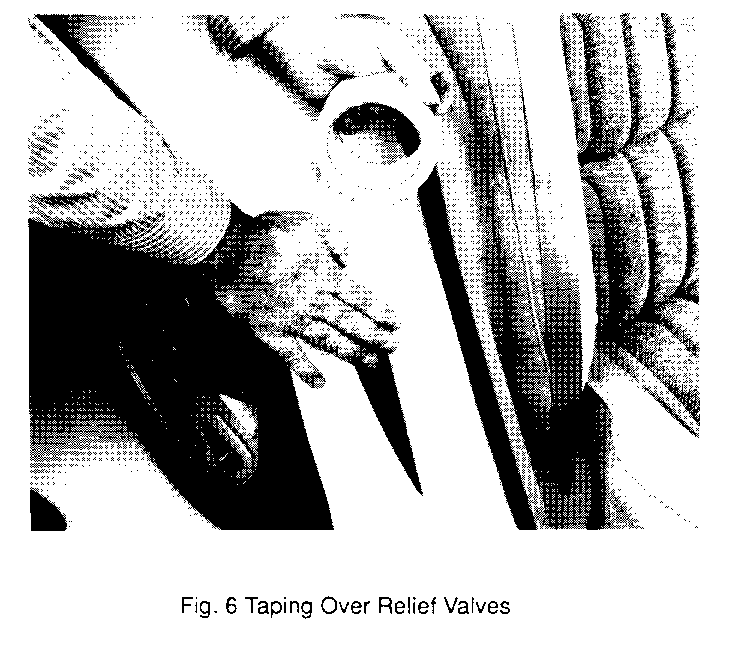
To help locate the source of internal wind noise, tape over the relief valves. Refer to Figure 6. This airflow restriction will cause additional air pressure to build up inside the vehicle.
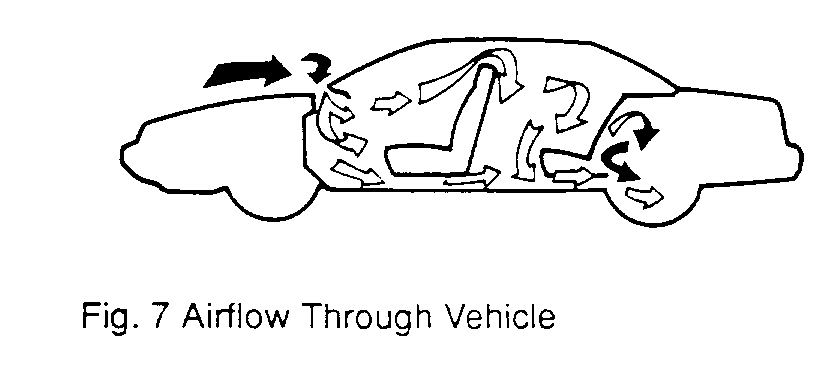
Air leaves the interior through these valves, as shown in Figure 7. By blocking them off, air pressure will build up and help reveal any weak spots in the seams or seals. The added pressure should make wind whistle leaks easier to hear.
If you suspect a whistle is coming from a particular seal, pull over and tape over that seal from the outside. If you taped over the leaking seal, the noise will be gone when you try to recreate it again. Once you make a temporary repair which eliminates a wind noise, you may make a second noise more noticeable.
SHOP TESTS:
If you have completed the road test and haven't been able to pinpoint the source of an internal wind noise, there are several additional diagnostic tests you can perform in the shop.
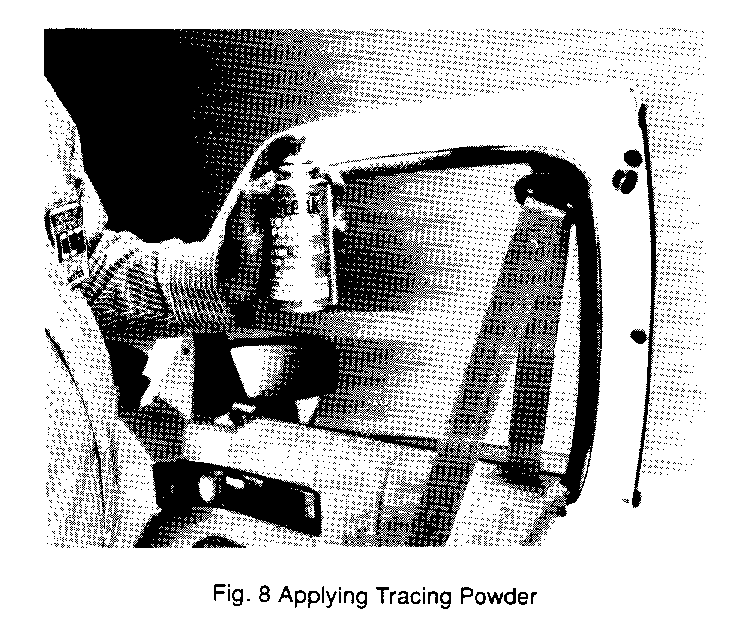
TRACING POWDER/CHALK: --------------------- One of the simplest and most effective checks for weatherstrip leaks is the tracing powder or chalk test.
First, clean the weatherstrip with solvent cleaner. Next, apply the powder or chalk to the weatherstrip's mating surface, as shown in Figure 8.
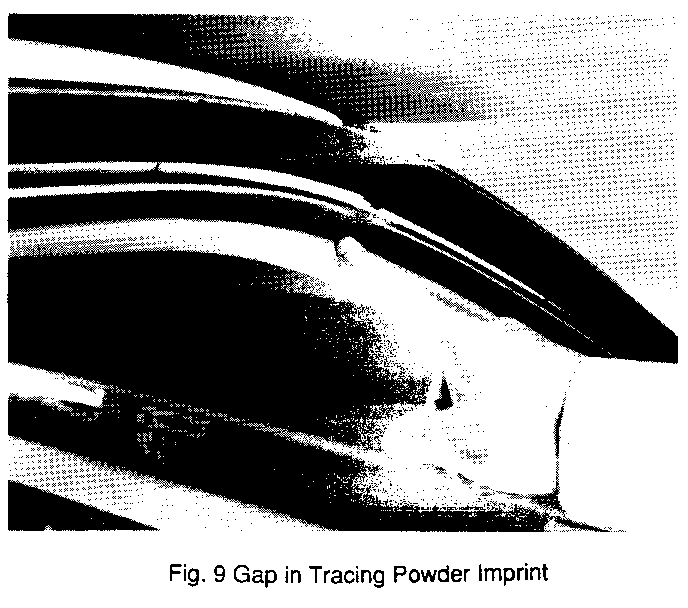
Press the panel against its mating surface firmly, without slamming, closing it completely. When you reopen it, there will be an imprint left whenever the weatherstrip made good contact with the mating surface. Gaps in the imprint indicate a poor seal. Refer to Figure 9.
SOAP BUBBLE:
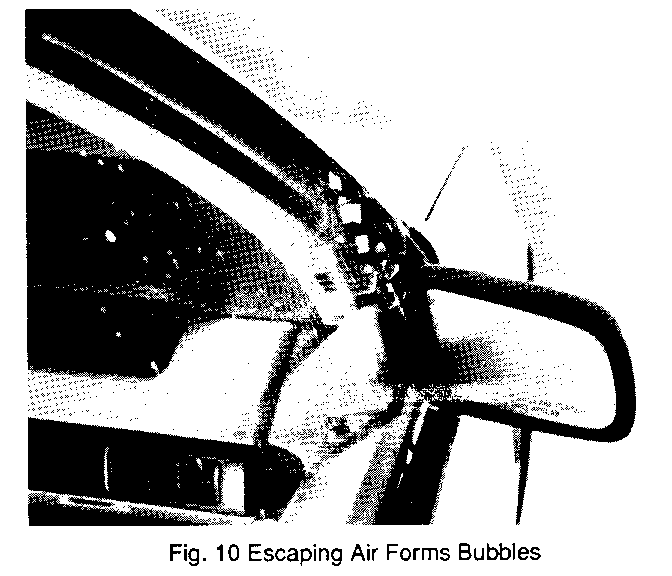
On the road test, you taped the pressure relief valves and shut the doors and windows to create higher pressure inside the vehicle. By turning the interior fan on HIGH, you can create a similar condition in the shop.
You can then spray a soapy solution along the outside of the suspected area. If air is escaping from an area, bubbles will form, as shown in Figure 10.
SONIC DETECTOR:
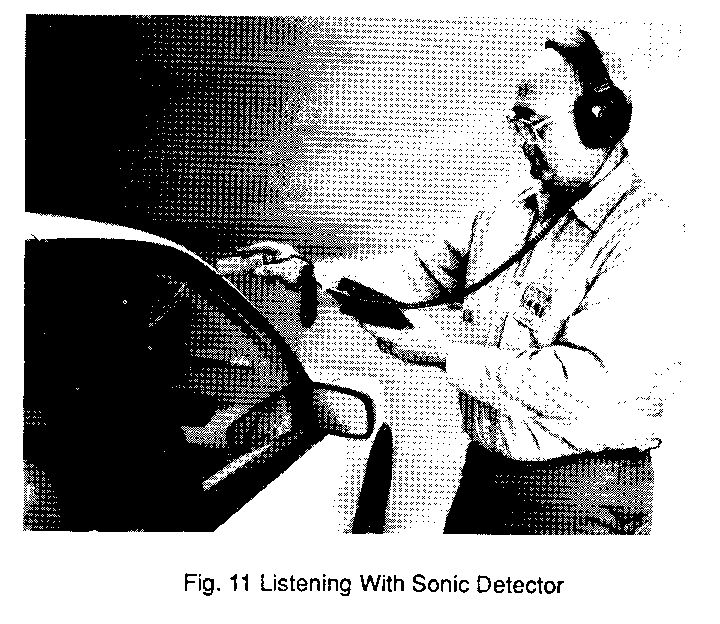
Another method which doesn't involve taping the relief valves and turning on the fan uses a sonic detector to pinpoint leaks.
Place the tone generator inside the vehicle and listen with the detector along the door and window seals, as shown in Figure 11.
REPAIRS:
-------- Repairs associated with external wind noise are usually straight forward. If panels are misaligned, or moldings, trim or other components are loose, just make the repair according to the shop manual procedure.
Repairing internal wind noise is also usually straightforward. After you've found the location of the leak, the appropriate repair should be apparent.
Check the appropriate service manual for the proper procedure if you're not sure how to adjust a component.
When adjusting a door, be sure not to create any gaps that may cause a new wind noise.
Some conditions can't be fixed by realigning components. If seals or weatherstripping need to be repaired, there are a variety of adhesive sealers and related products available. A convenient chart in the back of this bulletin lists some of the materials.
You should also be aware of any service bulletins or training materials that may be out on a vehicle you are working on. They can save you valuable time.
General Motors bulletins are intended for use by professional technicians, not a "do-it-yourselfer". They are written to inform those technicians of conditions that may occur on some vehicles, or to provide information that could assist in the proper service of a vehicle. Properly trained technicians have the equipment, tools, safety instructions and know-how to do a job properly and safely. If a condition is described, do not assume that the bulletin applies to your vehicle, or that your vehicle will have that condition. See a General Motors dealer servicing your brand of General Motors vehicle for information on whether your vehicle may benefit from the information.
