Circuit Description
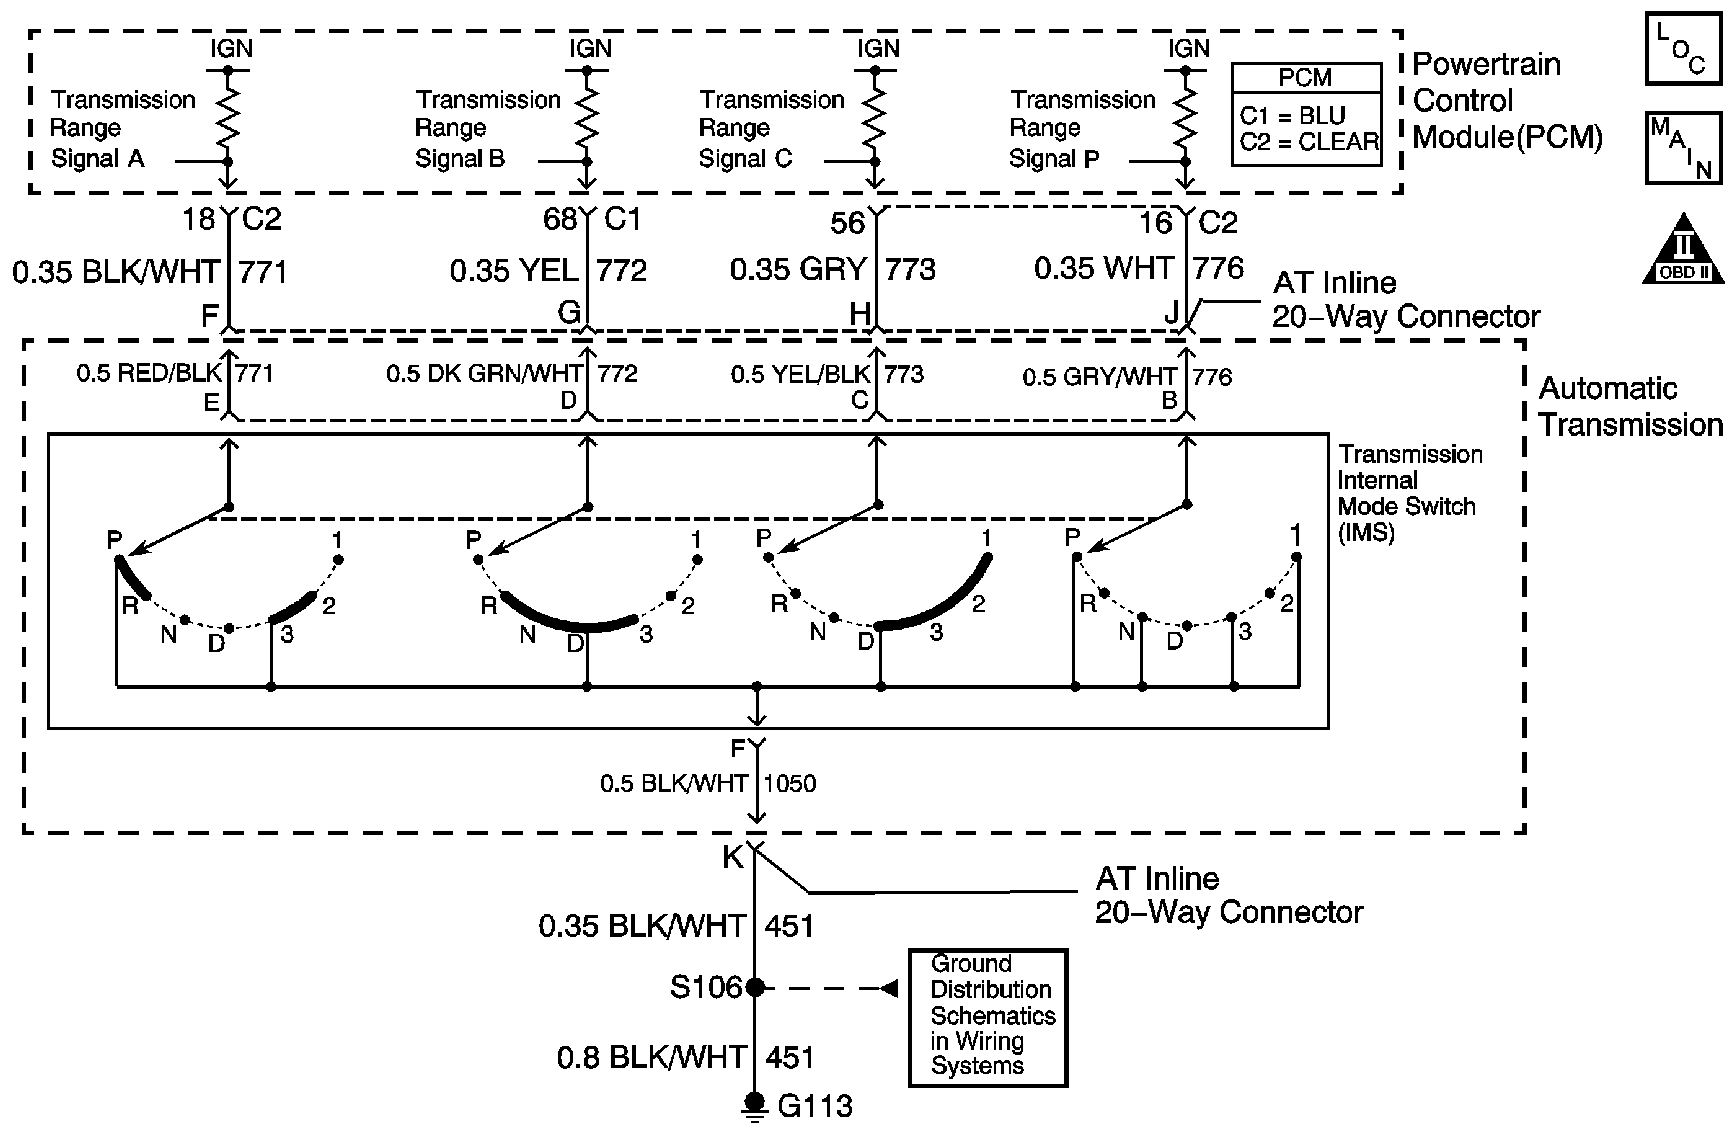
The transmission internal mode switch (IMS) is a sliding contact switch attached to the selector detent inside the transmission side cover. The 4 inputs to the PCM indicate the position of the transmission range selector. The input voltage level at the PCM is high, B+, when the IMS is open and low when the switch is closed to ground. The 4 input parameters represented are Signals A, B, C and P, Parity. Refer to Transmission Internal Mode Switch Logic .
Test Description
The numbers below refer to the step numbers on the diagnostic table.
-
HI values for all signals in all ranges indicates the ground circuit is OPEN.
-
With the 20-way connector disconnected, all signals should indicate HI.
-
If a circuit affects the other, this indicates a short between the 2 circuits.
-
This step tests the internal transmission harness. If no fault is found in the harness, the fault will be in the switch.
Step | Action | Value(s) | Yes | No |
|---|---|---|---|---|
1 |
Does each range selected match the scan tool IMS display? | -- | Go to Intermittent Conditions in Engine Controls - 3.4L | Go to Step 2 |
Does the IMS A/B/C/P display the specified values for each range? | HI/HI/HI/HI | Go to Step 12 | Go to Step 3 | |
Do the scan tool IMS A/B/C/P signals all indicate HI? | -- | Go to Step 4 | Go to Step 8 | |
4 |
Refer to Automatic Transmission Inline 20-Way Connector End View . Does the voltage measure ignition voltage at all four terminals? | -- | Go to Step 5 | Go to Step 9 |
Connect a fused jumper wire from terminal F of the J 44152 signal A circuit to ground while monitoring the scan tool IMS A/B/C/P parameter. Refer to Automatic Transmission Inline 20-Way Connector End View . When signal A circuit is grounded, do any other signal circuits indicate LOW? | -- | Go to Step 10 | Go to Step 6 | |
6 | Connect a fused jumper wire from terminal G of the J 44152 signal B circuit to ground while monitoring the scan tool IMS A/B/C/P parameter. Refer to Automatic Transmission Inline 20-Way Connector End View . When signal B circuit is grounded, do any other signal circuits indicate LOW? | -- | Go to Step 10 | Go to Step 7 |
7 | Connect a fused jumper wire from terminal H of the J 44152 signal C circuit to ground while monitoring the scan tool IMS A/B/C/P parameter. Refer to Automatic Transmission Inline 20-Way Connector End View . When signal C circuit is grounded, do any other signal circuits indicate LOW? | -- | Go to Step 10 | Go to Step 11 |
8 | Test the signal circuits of the IMS that did not indicate HI for a short to ground between the PCM and the AT Inline 20-way connector. Refer to Testing for Short to Ground and Wiring Repairs in Wiring Systems. Did you find and correct the condition? | -- | Go to Step 17 | Go to Step 16 |
9 | Test the signal circuits of the IMS that did not indicate ignition voltage for an open between the PCM and the AT Inline 20-way connector. Refer to Testing for Continuity and Wiring Repairs in Wiring Systems. Did you find and correct the condition? | -- | Go to Step 17 | Go to Step 16 |
10 | Test the affected signal circuits of the IMS for a shorted together condition between the PCM and the AT Inline 20-way connector. Refer to Circuit Testing and Wiring Repairs in Wiring Systems. Did you find and correct the condition? | -- | Go to Step 17 | Go to Step 16 |
Test the signal circuits of the IMS for an open or shorted condition between the AT Inline 20-way connector and the IMS. Refer to Circuit Testing in Wiring Systems. Did you find the condition? | -- | Go to Step 14 | Go to Step 15 | |
12 | Test the ground circuit of the IMS for an open between the AT Inline 20-way connector and the ground connection to the chassis. Refer to Testing for Continuity and Wiring Repairs in Wiring Systems. Did you find and correct the condition? | -- | Go to Step 17 | Go to Step 13 |
13 | Test the ground circuit of the IMS for an open between the AT Inline 20-way connector and the IMS. Refer to Testing for Continuity in Wiring Systems. Did you find the condition? | -- | Go to Step 14 | Go to Step 15 |
14 | Replace the automatic transmission wiring harness assembly. Refer to Wiring Harness Replacement . Did you complete the replacement? | -- | Go to Step 17 | -- |
15 | Replace the lever assembly-manual shaft detent with internal mode switch. Refer to Manual Shift Detent Lever with Shaft Position Switch Assembly Removal in Transmission Unit Repair Manual. Did you complete the replacement? | -- | Go to Step 17 | -- |
16 | Replace the PCM. Refer to Powertrain Control Module Replacement in Engine Controls - 3.4L. Did you complete the replacement? | -- | Go to Step 17 | -- |
17 |
Does each selected transmission range match the scan tool IMS display? | -- | System OK | Go to Step 1 |
