GM Service Manual Online
For 1990-2009 cars only
Table 1: Video Display Flashing Codes
Table 2: Video Display On-Screen Messages
Table 3: Menu Functions

Rear Video System Operation

The following section describes the operation of the video display and the video cassette player (VCP).

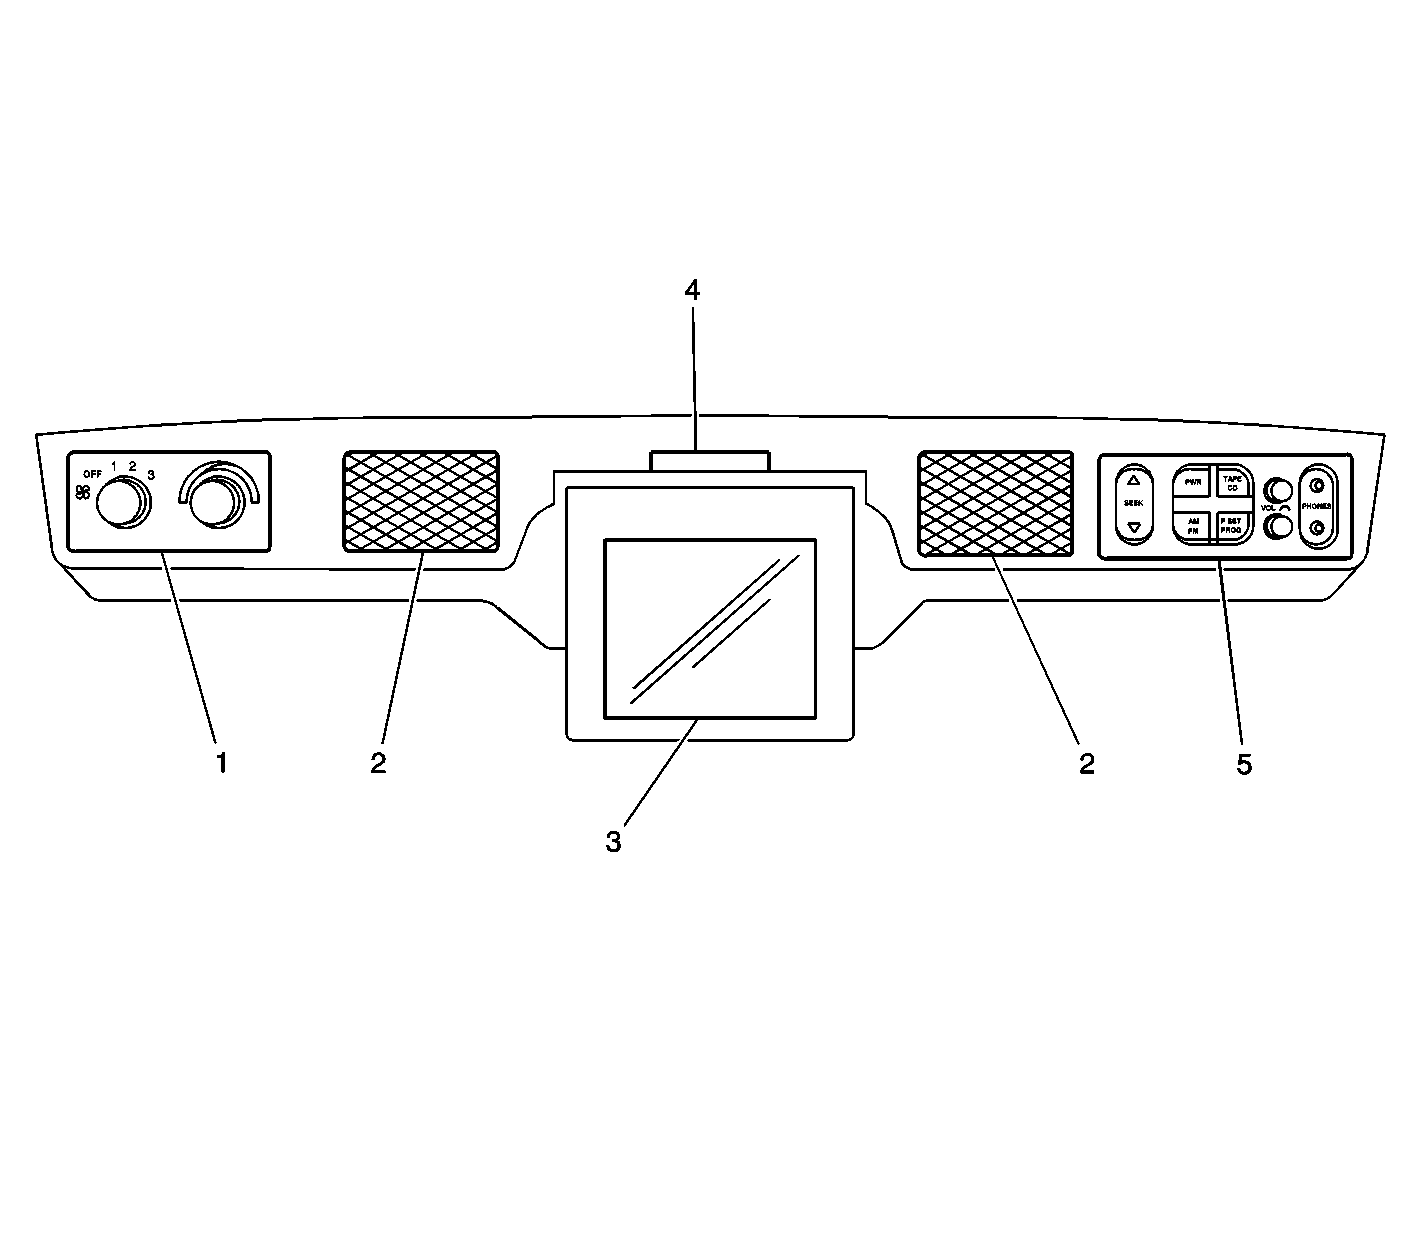
Overhead Console


Object Number: 728029  Size: LF
(1)Rear Climate Control
(2)Overhead Console Video Speakers
(3)Video Display
(4)Video Display Opto Sensor
(5)Rear Seat Audio (RSA) Module

The video screen, when not in use, stows in the overhead entertainment console. To view the screen, pull the video screen towards you and adjust its position for the best picture quality.

The video display screen backlighting turns on even if nothing is playing. The status indicator on the display is on if the rear video system operating status is OK. When the video display screen is moved to the stowed position, the screen turns off and the status indicator stays on. If the status indicator is on and flashing, the dew sensor or the temperature sensor has been activated.

Note that it is normal for the video screen and its housing to become warm to the touch. Use care when directly touching the video screen, as damage may result to it.

Video Cassette Player (VCP)


Object Number: 728044  Size: SH
(1)Auxiliary RCA Video Jacks
(2)Video Cassette Player (VCP)

The VCP can playback VHS-formatted video cassettes (T-30, T-60, T-120, T-160, or T-180). The VCP does not have a recording function.

The VCP can be controlled either by the buttons on its face, or by the infrared remote control. The VCP features include:

    • Four-head stereo for high-quality playback of VHS tapes.

       Important: The entertainment system is compatible only with tapes meeting the standards of the NTSC (National Television Standards Committee), the standard used primarily in the United States. Video tapes meeting other standards such as PAL and SECAM, which are found in parts of Canada and Europe may produce video that is only black and white or distorted. Do not use these tapes.

    • Two-speed playback of slow play (SP) and extended play (EP) video cassettes.
    • Two-step forward/reverse picture search for quick location of a desired video segment.
    • Dew sensor to warn of condensation in the player mechanism.
    • The VCP operates slower than a home VCP in modes other than play to conserve power.

       Important: Removing a video tape from the VCP when it is not in use, is recommended.

When the ignition switch is in the ACCESSORY or RUN position, the VCP powers up independent of the in-dash audio system, even if a video is not playing. As with any of your vehicle's other electrical features, this use can drain the battery if the engine is not running.

Video Cassette Player (VCP) Controls and Indicators


Object Number: 728036  Size: LF
(1)POWER Button
(2)STEREO L HI-FI R Indicators
(3)STOP/EJECT Button
(4)REW Button
(5)PLAY Button
(6)FF Button
(7)CST IN Indicator (Cassette Tape In)
(8)DEW Indicator

VCP Dew Sensor - DEW Indicator

When damage-causing moisture condensation is detected within the VCP, the dew sensor circuit automatically prevents the VCP from accepting or playing tapes. When the dew sensor has been activated the DEW indicator, located on the VCP, flashes.

To prevent damaging a video tape that is in the VCP when the DEW indicator is flashing, press EJECT and remove the tape. Then, be sure the VCP is on so it can warm up and dry any accumulated moisture. When the DEW indicator stops flashing, the VCP can return to full operation.

Playing a Video Cassette

  1. Press the PWR button (1) to turn on the VCP.
  2. Gently insert a video cassette (with the labeled side up) into the cassette compartment until it stops. Then, the VCP continues loading the tape, and the CST IN indicator (7) turns on. Prerecorded tapes automatically start playing.
  3. Press the PLAY button (5) on either the face of the VCP or on the remote control.

Ejecting and Resuming Playback

  1. Press the EJECT button (3) on the face of the VCP.
  2. The tape automatically unloads, the CST IN indicator (7) turns off, and the video cassette ejects.

Stopping and Resuming Playback

To stop a video cassette during playback, press the STOP button (3) on either the VCP or remote control. To resume playback, simply press the PLAY button (5).

Rewinding a Video Cassette (without viewing)

Press the STOP button (3) on either the VCP or remote control, and press the REW (rewind) button (4) on either the VCP or remote control.

Fast-Forwarding a Video Cassette (without viewing)

Press the STOP button (3) on either the VCP or remote control, and press the FF (fast forward) button (6) on either the VCP or remote control.

Forward-and Reverse-Search During Play

To forward-search a video while it is playing:

  1. Press the FF (fast-forward) button (6) on either the VCP or the remote control.
  2. • Pressing the FF button provides rapid advance of the tape.
    • Pressing the FF button during video play advances the tape less rapidly.
  3. When you find the desired video segment, press the PLAY button (5) on either the VCP or the remote control to resume play at normal speed.

To reverse-search a video while it is playing:

  1. Press the REW (rewind) button (4) on either the VCP or the remote control.
  2. • Pressing the REW button provides rapid rewind of the tape.
    • Pressing the REW button during video play rewinds the tape less rapidly.
  3. When you find the desired video segment, press the PLAY button (5) on either the VCP or the remote control to resume play at normal speed.

Stereo Playback

During stereo program playback, the L HI-FI R indicators (2) turn on green. Pressing the PLAY key during playback causes the VCP to enter auto-tracking mode. During the auto-tracking mode, pressing the PLAY key once more allows you to select the audio output (Stereo-L-R-Mono-Stereo).

Video Display Indicators

The video display is equipped with a red power indicator that illuminates continuously whenever the display is on. This indicator is designed to flash a code of one, two or three flashes if a fault condition occurs, sensed by a dew sensor or a temperature sensor. The following chart summarizes the indicator flashing codes, what each code means, and the resulting rear video system actions.

Video Display Flashing Codes

Indicator Flashes

Sensor Active

Rear Video System Actions

1

Dew Sensor

Activates when excessive dew occurs. If the system is running, the system displays the message Dew Threshold Exceeded, flashes the indicator, conducts a five second count down and shuts down. If the system is not running, it only flashes the indicator.

2

Cold Sensor

Activates when the sensor goes below 0° C. If the system is running, the system displays the message Cold Threshold Exceeded, flashes the indicator, conducts a five second count down and shuts down. If the system is not running, it only flashes the indicator.

3

Heat Sensor

Activates when the sensor goes above 60° C. If the system is running, the system displays the message Heat Threshold Exceeded, flashes the indicator, conducts a five second count down and shuts down. If the system is not running, it only flashes the indicator.

4

None

Signals the beginning of the diagnostic self-test mode.

Video Display On-Screen Messages

Message

Message Function

Play

Displayed when initiating the play mode.

Forward

Displayed when initiating the fast-forward mode.

Rewind

Displayed when initiating the rewind mode.

Stop

Displayed when initiating the stop mode.

Pause

Displayed when initiating the pause mode.

Mute

Displayed when initiating the mute mode.

Eject

Displayed when initiating the eject mode.

System On

Displayed when initiating the power on mode.

Volume

Displayed when initiating the adjusting of the volume.

AUX

Displayed when initiating the auxiliary mode.

AUX Idle

Displayed when there is not a valid AUX video input signal or VCP video input signal.

VCP

Displayed when initiating the VCP mode.

VCP Idle

Displayed when there is not a valid VCP video input signal. System then switches to the AUX mode.

Menu

Displayed when pressing the Menu button on the remote control.

The menu allows the user the ability to modify some of the tone settings and tracking. The menu system lists all of the options that the user can modify. A pointer is used to show the user the current selection that can be changed. The user changes the pointed selection by pressing the Menu Adjust arrow keys up or down. Pressing the Menu button highlights the selection; pressing the Menu Adjust arrow keys up or down modifies the selection. If the menu system is idle for ten seconds, it automatically exits.

System Off

Displayed when the ignition is turned off.

Standby

Displayed when system is shutting down.

Insert Tape and Repress Command

Displayed when a command is pressed and a tape has not been inserted into the VCP.

Error VCP Dew Active

Displayed when the VCP dew sensor detects excessive dew.

Dew Threshold Exceeded

Displayed when the dew threshold has been exceeded.

Cold Threshold Exceeded

Displayed when the cold temperature threshold has been exceeded.

Heat Threshold Exceeded

Displayed when the heat temperature threshold has been exceeded.

Menu Functions

Menu Selection

Menu Selection Function

Exit

Allows the user to exit the menu system.

Day/Night

Allows the user to switch between the day mode setting and the night mode setting for better viewing.

Fade

Allows the user to fade audio between the overhead speakers and the liftgate speakers.

Balance

Allows the user to control the audio balance between the left overhead/liftgate speakers and the right overhead/liftgate speakers.

Bass

Allows the user to modify the level of bass audio.

Mid

Allows the user to modify the level of midrange audio.

Treble

Allows the user to modify the level of treble audio.

Manual Tracking

Allows the user to manually control the tracking. This selection automatically disables the auto-tracking. This function exits the menu and displays Manual Tracking + or Manual Tracking - until it is idle. At that point, the on-screen message times out.

Restore Defaults

Allows the user to restore all the initial settings. This selection causes an exit from the menu system. The message Defaults Restored appears on the display.

Remote Control - VCP

VCP Remote Control


Object Number: 728040  Size: MH
(1)POWER Button
(2)MENU Button
(3)AUX Button
(4)MENU ADJ Arrows (Up, Down)
(5)FF (Fast Forward) Button
(6)PAUSE Button
(7)STOP Button
(8)EJECT Button
(9)PLAY Button
(10)REW (Rewind) Button
(11)VOLUME Arrows (Up, Down)
(12)VCP Button
(13)MUTE Button

Simply aim the remote control at the video display and press the desired function button. Be sure the remote batteries are not discharged, which may reduce sensitivity to receive signals from the remote control. Objects blocking the remote control infrared beam may prevent operation of the VCP.

Battery Installation and Replacement

The battery compartment is on the back of the remote control. To access them simply slide open the battery door. The remote uses two AAA dry-cell batteries.

Before using the remote control, be sure to check that the batteries are correctly installed. The positive (+) and negative (-) symbols on the batteries must match the symbols inside the battery compartment.

Care of the Video Cassette Player

    • A video cassette player (VCP) that is not cleaned regularly can cause reduced sound and video quality, ruined cassettes or a damaged mechanism.
    • Do not repeatedly load or unload a video cassette without playing it for a short time. Otherwise, the tape may slacken and become damaged.
    • Do not leave video cassettes in the VCP for long periods of time. This could damage the VCP or the tape.
    • Over time as the VCP playback heads become dirty, the video picture may become blurred, interrupted, or noisy. Once this occurs, the VCP likely requires thorough cleaning.
    • Regular cleaning of the tape heads using a common VHS cassette-style cleaner will increase tape life and reliability of the VCP.
    • To verify that cleaning is necessary, load and play several video tapes to see if the problem persists. If cleaning is required, use a cleaning cassette, available from consumer electronics outlets. Always follow the manufacturer's instructions.

Care of the Video Cassettes

Do not leave a video tape in the VCP overnight, or during hot or cold conditions. This may cause the tape to stick to the VCP heads which could damage the tape or VCP.

Do not directly touch the magnetic tape surface. Avoid exposing a video cassette to direct sunlight and keep it away from heat sources such as heater vents.

Avoid extreme environments such as high humidity, excessive vibrations or jarring, strong magnetic fields (from a speaker for example), and dust.

Important: Never insert a tape into the VCP if there is moisture on the tape.

Always place the video cassette back in its case after use.

Using Radio-Operated Communication Devices While Operating the VCP

Operating a mobile or permanently-mounted communication device in or near the vehicle while the VCP is on may cause objectionable video distortion. Examples of these communication devices are:

    • Cellular telephones
    • Scanners
    • CB radios
    • Walkie-talkies
    • Two-way radios
    • Mobile fax devices
    • Global positioning system (GPS) systems (excluding the OnStar® system)

In some cases, radio wave distortion may or may not be noticed at either the device or the entertainment system.

Therefore, whenever operating a communication device in or around the vehicle, it may be necessary to turn off the VCP, or operate the device outside and away from the vehicle.

Effects of Electromagnetic Interference (EMI) on the Video System

Almost all electric or electronic devices radiate energy in the form of radio waves, also known as EMI. EMI can be produced from such thing as common residential TV antennas, personal hair dryers, microwave ovens, utility power lines, and cellular phones (and other communication devices) in passing vehicles.

Not all devices produce the same level of EMI radiation - some very weak, some very strong. However, under the right circumstances, some devices may emit enough EMI that it affects the video entertainment system. However, in some cases EMI may not only cause objectionable video distortion, but may turn off the video cassette player (VCP). When this happens, simply turn on the VCP and resume playing. If the problem persists, check your surroundings for possible EMI sources, such as utility power lines. Wait until the vehicle is clear of the source and try it again.

Rear Video System Description

The video entertainment system augments the in-dash audio system with video and additional headphones for private listing enjoyment.

The video entertainment system is really two separate systems, audio and video, that can be operated independently of each other.

The video entertainment system consists of:

    • A video cassette player (VCP) housed in the console below the instrument panel
    • A separate infrared remote control to operate the video functions of the VCP
    • A video display in the overhead console

The audio system consists of rear seat audio (RSA) module.

The vehicle's regular in-dash audio system consists of the AM-FM stereo with cassette tape player, and the remote compact disc player. Without the video entertainment system option, audio from the in-dash system would only be available through the front and rear speakers, and the two headphone jacks in the rear seat audio (RSA) module.

Headphones and Jacks

The video entertainment system can support up to four headphones (two wired headphones and two wireless headphones). The rear seat audio (RSA) has two jacks. Any stereo headphone or earphone with and 1/8 inch male plug may be used. The wired headphones play rear seat audio if the RSA control is on. The wireless headphones may play either RSA audio or rear video audio. A switch on the headphone set allows the listener to switch from RSA audio to rear video audio.

Rear Speakers

Aside from the headphones, audio can be heard through the rear speakers only when:

    • The in-dash radio is being used, the video screen is latched, and the rear seat audio (RSA) power button is OFF.
    • The in-dash radio and rear seat audio (RSA) module are OFF, and the video screen is unlatched and the video source is in use.

Rear Video System Circuit Description

The rear video control signals route rear seat audio or rear video audio and control the system depending on the mode of operation. These modes and signal functions are described below.

Rear Video System Off Mode

Assumption:

    • The radio is off.
    • The rear seat audio (RSA) module is off.
    • The video display screen is up (stored) position.

When the ignition switch is turned to the ACC or RUN position, the radio, the video cassette player (VCP), the video display and the rear seat audio (RSA) module receive voltage; however, none of these components are active (or turned on).

Rear Video System On -- Blank Screen Mode

Assumption:

    • The ignition switch is in the ACC or RUN position.
    • The radio is off.
    • The rear seat audio (RSA) module is off.
    • The video display screen is down.
    • The video cassette player (VCP) is stopped.

When the video display screen is placed in the down (viewing) position, the opto switch inside the video display closes and turns on the backlight on the screen.

Rear Video System On -- VCP Playing Mode

Assumption:

    • The ignition switch is in the ACC or RUN position.
    • The radio is off.
    • The rear seat audio (RSA) module is off.
    • The video display screen is down.
    • The video cassette player (VCP) is playing.

The VCP sends a video image signal to the video display screen, and produces images.

The VCP also sends stereo audio channels to the video display. Then, the video display produces two outputs, one set with a low loudness level for headphone use, and another that is amplified for the rear speakers. The video display routes the video audio channels through the auxiliary module to the rear speakers.

Rear Video System On -- VCP and Radio Playing Mode

Assumption:

    • The ignition switch is in the ACC or RUN position.
    • The radio is on.
    • The rear seat audio (RSA) module is off.
    • The video screen is down.
    • The video cassette player (VCP) is playing.

When the auxiliary module senses that the radio is on, the rear speakers are muted.

Rear Video System On -- VCP, Radio and RSA Playing Mode

Assumption:

    • The ignition switch is in the ACC or RUN position.
    • The radio is on.
    • The rear seat audio (RSA) module is on.
    • The video screen is down.
    • The video cassette player (VCP) is playing.

The radio enables the rear seat audio (RSA) when the RSA module is ON. The RSA enabling circuit is sent to the RSA controls.

Rear Video System On -- VCP and RSA Playing Mode with the Radio Off

Assumption:

    • The ignition switch is in the ACC or RUN position.
    • The radio is off.
    • The rear seat audio (RSA) module is on.
    • The video screen is down.
    • The video cassette player (VCP) is playing.

The rear speakers are muted. The headphones play radio audio through one channel and video audio through the other channel.