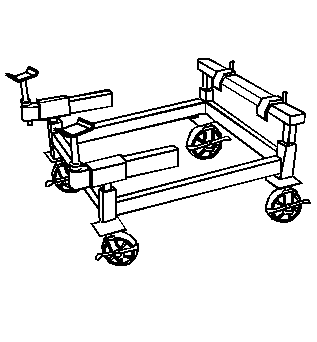
Tools Required
J 39580 Universal Engine Support Table
Removal Procedure
- Disconnect the battery ground (negative) cable. Refer to Battery Negative Cable Disconnection and Connection in Engine Electrical.
- Remove the throttle body air inlet duct. Refer to Air Cleaner Inlet Duct Replacement in Engine Controls-3.4L.
- Remove the cruise control cable from the engine and reposition the cable away from the engine. Refer to Cruise Control Cable Replacement in Cruise Control.
- Remove the accelerator control cable from the engine and reposition the cable away from the engine. Refer to Accelerator Control Cable Replacement in Engine Controls-3.4L.
- Drain the engine coolant from the cooling system. Refer to Cooling System Draining and Filling in Engine Cooling.
- Disconnect the radiator hoses from the engine. Refer to Radiator Inlet Hose Replacement and Radiator Outlet Hose Replacement in Engine Cooling.
- Disconnect the heater hoses from the engine. Refer to Heater Inlet Hose Replacement and Heater Outlet Hose Replacement in HVAC.
- Remove the engine mount struts. Refer to Engine Mount Strut Replacement - Left Side or Engine Mount Strut Replacement - Right Side .
- Disconnect the fuel lines from the fuel rail. Refer to Fuel Hose/Pipes Replacement - Engine Compartment in Engine Controls-3.4L.
- Remove the engine wiring harness connectors.
- Remove the vacuum hoses from the engine.
- Remove the vacuum brake booster hose. Refer to Vacuum Brake Booster Check Valve and/or Hose Replacement in Hydraulic Brakes.
- Remove the automatic transaxle range selector cable. Refer to Range Selector Lever Cable Replacement in Automatic Transaxle-4T65-E.
- Raise and support the vehicle. Refer to Lifting and Jacking the Vehicle in General Information.
- Drain the engine oil. Refer to Engine Oil and Oil Filter Replacement .
- Remove the A/C compressor bolts and position the A/C compressor aside. Refer to Air Conditioning Compressor Replacement in HVAC.
- Remove the wiring harness grounds.
- Remove the three-way catalytic converter exhaust pipe from the engine right side exhaust manifold. Refer to Catalytic Converter Replacement in Engine Exhaust.
- Remove the front tires and wheels. Refer to Tire and Wheel Removal and Installation .
- Remove the engine splash shields. Refer to Engine Splash Shield Replacement in Body Front End.
- Remove the stabilizer shaft links from the lower control arms. Refer to Stabilizer Shaft Link Replacement in Front Suspension.
- Remove the tie rod ends from the steering knuckles. Refer to Steering Knuckle Replacement in Front Suspension.
- Remove the lower ball joints from the knuckles. Refer to Lower Control Arm Ball Joint Replacement in Front Suspension.
- Remove the transaxle cooler lines and bracket from the transaxle. Refer to Automatic Transmission Oil Cooler Hose Replacement in Automatic Transaxle-4T65-E.
- Disconnect the drive axles from the transaxle. Refer to Wheel Drive Shaft Replacement in Drive Axle.
- Secure the drive axles to the steering knuckle/struts.
- Remove the intermediate shaft from the steering gear.
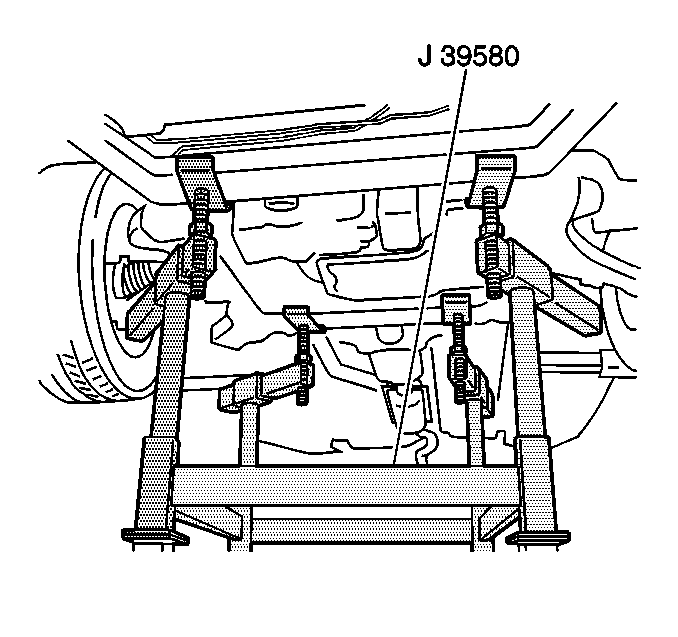
- Lower the vehicle until the frame contacts the transaxle table J 39580 .
- Remove the frame bolts. Refer to Frame Replacement in Frame and Underbody.
- Raise the vehicle in order to separate the powertrain/frame from the vehicle.
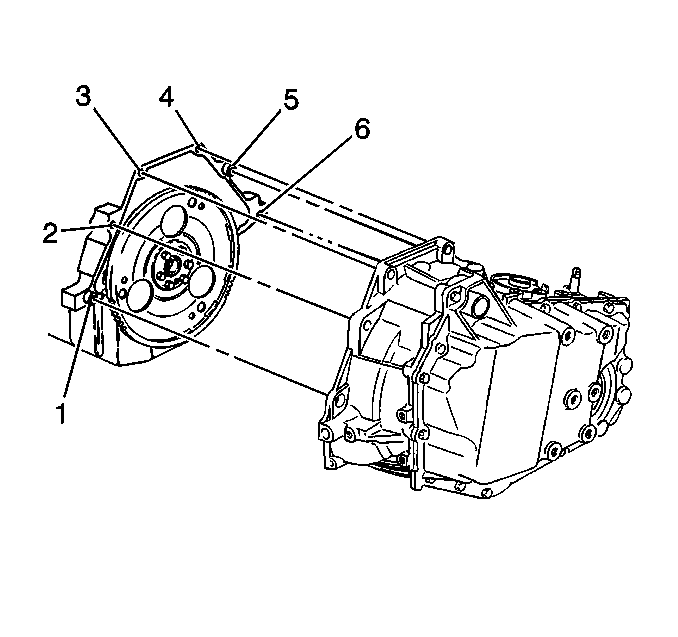
- Remove the engine-to-transaxle bolts (3, 4, 5 and 6) and studs (1 and 2).
- Remove the engine flywheel to torque converter bolts. Refer to Flywheel to Torque Converter Bolt Replacement in Automatic Transaxle-4T65-E.
- Remove the engine from the transaxle/frame to the engine stand.
Caution: In order to avoid possible injury or vehicle damage, always replace the accelerator control cable with a NEW cable whenever you remove the engine from the vehicle.
In order to avoid cruise control cable damage, position the cable out of the way while you remove or install the engine. Do not pry or lean against the cruise control cable and do not kink the cable. You must replace a damaged cable.Important: Relief the fuel pressure. Refer to Fuel Pressure Relief in Engine Controls-3.4L.
Caution: Failure to disconnect the intermediate shaft from the rack and pinion steering gear stub shaft can result in damage to the steering gear and/or intermediate shaft. This damage may cause loss of steering control which could result in an accident and possible personal injury
Installation Procedure
- Install the engine to the transaxle/frame from the engine stand.
- Install the engine-to-transaxle bolts (3, 4, 5 and 6) and studs (1 and 2).
- Install the engine flywheel to torque converter bolts. Refer to Flywheel to Torque Converter Bolt Replacement in Automatic Transaxle-4T65-E.
- Position the transaxle table with the powertrain/frame under the vehicle.
- Lower the vehicle until the body contacts the frame.
- Install the NEW frame bolts. Refer to Frame Replacement in Frame and Underbody.
- Raise and support the vehicle. Refer to Lifting and Jacking the Vehicle in General Information.
- Remove the transaxle table.
- Install the intermediate shaft to steering gear.
- Install the drive axles to the transaxle. Refer to Wheel Drive Shaft Replacement in Drive Axle.
- Install the transaxle cooler lines and bracket to the transaxle. Refer to Automatic Transmission Oil Cooler Hose Replacement in Automatic Transaxle-4T65-E.
- Install the A/C compressor. Refer to Air Conditioning Compressor Replacement in HVAC.
- Install the engine oil filter.
- Install the lower ball joints to the knuckles. Refer to Lower Control Arm Ball Joint Replacement in Front Suspension.
- Install the tie rod ends to the steering knuckles. Refer to Steering Knuckle Replacement in Front Suspension.
- Install the stabilizer shaft links to the lower control arms. Refer to Stabilizer Shaft Link Replacement in Front Suspension.
- Install the inner fender splash shield. Refer to Engine Splash Shield Replacement in Body Front End.
- Install the front tires and wheels. Refer to Tire and Wheel Removal and Installation in Tires and Wheels.
- Install the three-way catalytic converter exhaust pipe to the engine right side exhaust manifold. Refer to Catalytic Converter Replacement in Engine Exhaust.
- Install the wiring harness grounds.
- Lower the vehicle
- Install the automatic transaxle range selector cable. Refer to Range Selector Lever Cable Replacement in Automatic Transaxle-4T65-E.
- Install the vacuum brake booster hose. Refer to Vacuum Brake Booster Check Valve and/or Hose Replacement in Hydraulic Brakes.
- Install the vacuum hoses to the engine.
- Install the engine wiring harness connectors.
- Install the fuel lines to the fuel rail. Refer to Fuel Hose/Pipes Replacement - Engine Compartment in Engine Controls.
- Install the throttle body bracket and cables. Refer to Accelerator Control Cable Replacement in Engine Controls.
- Install the engine mount strut. Refer to Engine Mount Strut Replacement - Left Side or Engine Mount Strut Replacement - Right Side .
- Connect the heater hoses to the engine. Refer to Heater Inlet Hose Replacement and Heater Outlet Hose Replacement in HVAC Systems with A/C - Manual.
- Connect the radiator hoses to the engine. Refer to Radiator Inlet Hose Replacement and Radiator Outlet Hose Replacement in Engine Cooling.
- Fill the cooling system with engine coolant. Refer to Cooling System Draining and Filling in Engine Cooling.
- Adjust the transaxle fluid level. Refer to the following information:
- Fill the engine with oil. Refer to Engine Oil and Oil Filter Replacement .
- Install the accelerator control cable to the engine. Refer to Accelerator Control Cable Replacement in Engine Controls-3.4L.
- Install the cruise control cable to the engine. Refer to Cruise Control Cable Replacement in Cruise Control.
- Install the throttle body air inlet duct. Refer to Air Cleaner Inlet Duct Replacement in Engine Controls-3.4L.
- Connect the battery ground (negative) cable. Refer to Battery Negative Cable Disconnection and Connection in Engine Electrical.
- Perform the CKP system variation learn procedure. Refer to Crankshaft Position System Variation Learn in Engine Controls-3.4L.
- Inspect for proper fluid levels and possible fluid leaks.
Notice: Use the correct fastener in the correct location. Replacement fasteners must be the correct part number for that application. Fasteners requiring replacement or fasteners requiring the use of thread locking compound or sealant are identified in the service procedure. Do not use paints, lubricants, or corrosion inhibitors on fasteners or fastener joint surfaces unless specified. These coatings affect fastener torque and joint clamping force and may damage the fastener. Use the correct tightening sequence and specifications when installing fasteners in order to avoid damage to parts and systems.
Tighten
Tighten the engine-to-transaxle bolts (3, 4, 5 and 6) and studs (1 and
2) to 75 N·m (55 lb ft).
Caution: When installing the intermediate shaft make sure that the shaft is seated prior to pinch bolt installation. If the pinch bolt is inserted into the coupling before shaft installation, the two mating shafts may disengage. Disengagement of the two mating shafts will cause loss of steering control which could result in personal injury.
| • | Approximate Fluid Capacities in Maintenance and Lubrication |
| • | Fluid and Lubricant Recommendations in Maintenance and Lubrication |
Caution: In order to avoid possible injury or vehicle damage, always replace the accelerator control cable with a NEW cable whenever you remove the engine from the vehicle.
In order to avoid cruise control cable damage, position the cable out of the way while you remove or install the engine. Do not pry or lean against the cruise control cable and do not kink the cable. You must replace a damaged cable.