Boom or Drone Noise at 2100 rpm or About 120 km/h (75 mph) (Inspect and Clean Torque Tube Mount or Install Dampener/Mount Kit)

| Subject: | Boom or Drone Noise at 2100 rpm or About 120 km/h (75 mph) (Inspect and Clean Torque Tube Mount or Install Dampener/Mount Kit) |
| Models: | 2002-2004 Buick Rendezvous AWD |
| 2005 Buick Rendezvous AWD (w/LA1 Only) |
| 2002-2005 Chevrolet Venture AWD |
| 2002-2003 Oldsmobile Silhouette AWD |
| 2002-2005 Pontiac Aztek AWD, Montana AWD |
This bulletin is being revised to add a corrective action, one illustration and warranty information. Please discard Corporate Bulletin Number 04-04-17-001A. (Section 04 - Driveline/Axle).
Condition
Some customers may comment on a noise or vibration that can be heard centered at or around 2100 RPM. This usually occurs at about 120 km/h (75 mph) in 4th gear, but the sound may be audible in all gears when at 2100 RPM.
Cause
The central torque tube mount, dampener and bushing may be allowing noise and/or engine vibration to transfer to the body at the mount point.
Correction #1
Important: ALWAYS inspect and if required perform Correction #1 BEFORE going on to Correction #2.

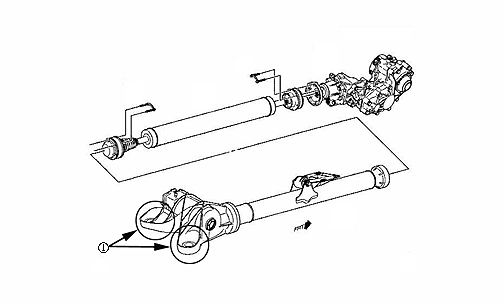
Vehicles that have been operated on dirt roads or in loose dirt may experience a condition called "mud packing". If a large quantity of dirt accumulates on the center torque-tube mount, noise and/or vibration may be transmitted to the passenger compartment. The illustration above highlights the areas of concern within the circles. Please inspect and thoroughly clean the areas indicated if required. If a quantity of dirt was found on the mount, please road test the vehicle and confirm that the boom or drone noise has been corrected. If the noise remains, continue with Correction #2.
Correction #2
A kit has been developed that includes a revised torque-tube mount, spacing washer and a new dampener. Use the procedure below to install these revised parts.
- Raise and suitably support the vehicle.
- Place a jackstand under the rear torque-tube near the coupling. Place the jackstand to suitably support the driveshafts.
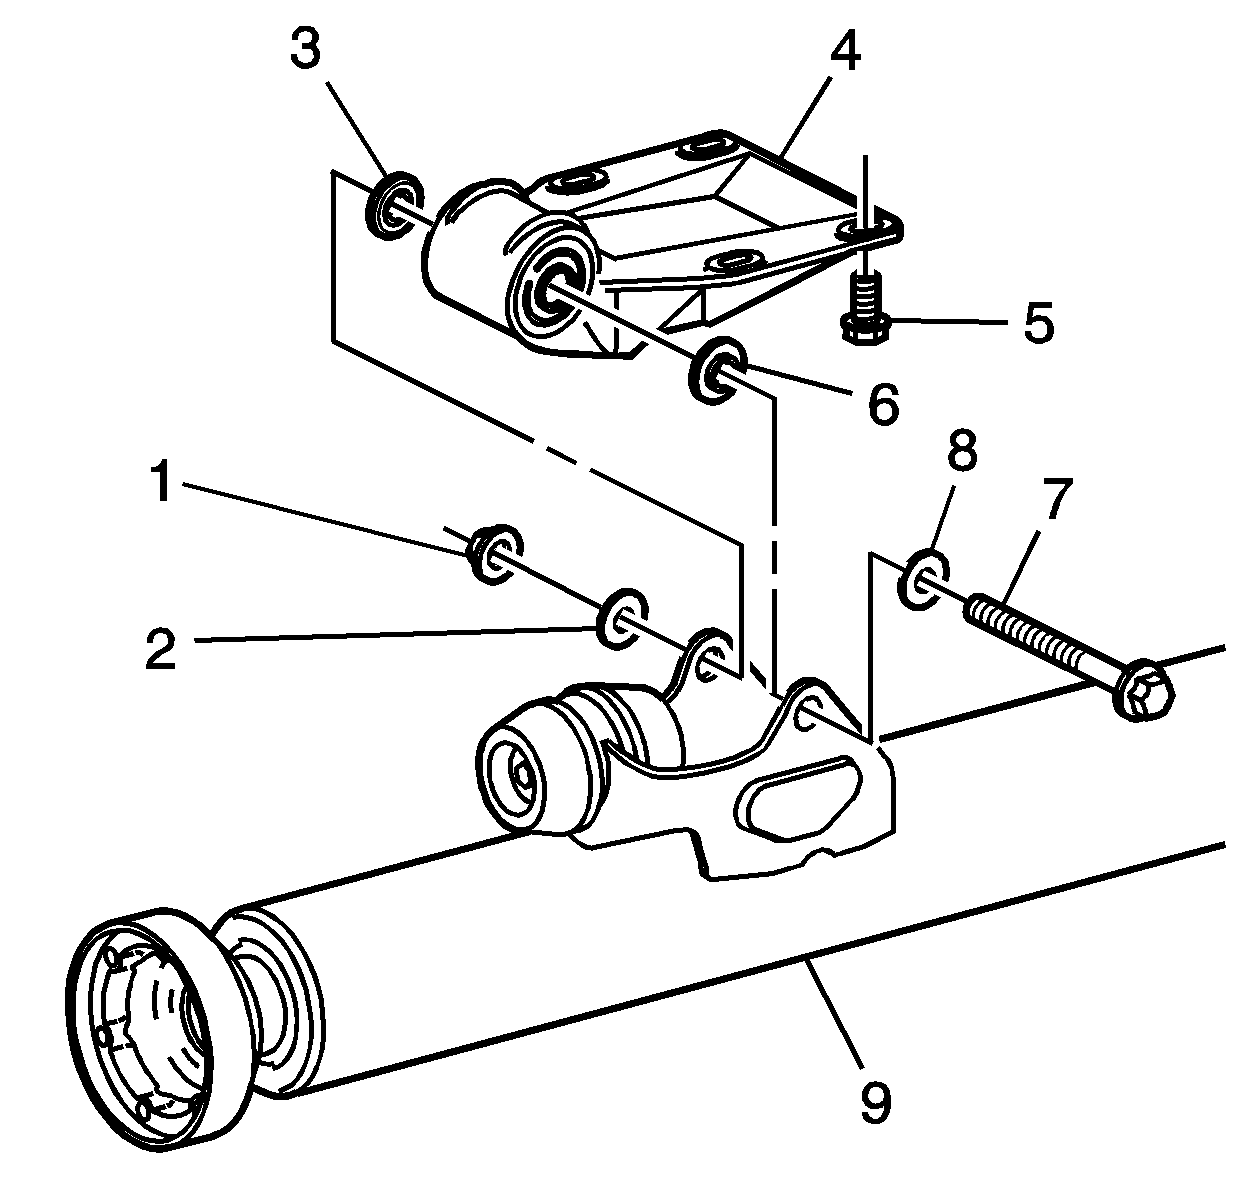
- Loosen the throughbolt (7) holding the torque tubes to the mount until the nut comes off the bolt. This is a T-47 TORX® bolt with a nut (3) on the other end. You will need to hold both ends of the fastener in order to remove the nut. Do not remove the bolt at this point.
- Remove the four bolts (5) retaining the torque tube mount (4) to the floorpan of the vehicle.
- Now that the mount is loose, you will be able to slightly raise the torque tubes (9). This will allow you to remove the throughbolt from the mount by pulling it out over the gas tank. It will require some force to remove the throughbolt, but it should come out with just hand pressure.
- Remove the center torque tube mount.
- Slightly lower the driveshaft. Remove the mass dampener halves from the welded on bracket of the rear torque tube. The dampener is retained by one bolt and nut through the center of the dampener.
- The original dampener (bolt) runs through a small captured bushing/sleeve in the bracket. Remove the captured bushing from the bracket as the rear half of the new dampener will directly insert into the bracket hole.
- Install the new dampeners to the torque tube bracket. The threaded bushing is the rear most half. Install the front half of the dampener, then place (if required) the included washer(s) on top of the dampener, then place the bolt through the washer and dampener halves.
- Place the revised center torque tube mount in position above the torque tubes.
- Install the torque tube to bracket through bolt with the TORX® head facing the gas tank.
- Raise the torque tubes slightly and install the four torque tube mount to body fasteners.
- Remove the supporting jackstand and lower the vehicle.
Important: You must support the torque tubes near the central torque tube coupling. Do not let the shafts hang under their own weight.

Important: Do not let the nut fall into the welded on bracket of the torque tube. If the loose nut is allowed to remain, it may cause a rattle audible in the passenger compartment.
Important: The 3 kits vary in the number of washers included. No washers are included in the Aztek kit, one in the Rendezvous kit, and two in the kit for the mini-vans. For the mini-vans, the two washers are stacked together under the bolt head.
Tighten
Tighten the dampener retaining bolt to 55 N·m (41 lb ft).
Notice: You MUST install the throughbolt with the head of the fastener facing the gas tank. In a collision, the rounded low profile of this fastener presents less chance of damage to the gas tank.
Tighten
Tighten the torque tube to bracket throughbolt to 64 N·m (47 lb ft).
Tighten
Tighten the torque tube mount to body bolts to 55 N·m (41 lb ft).
Parts Information
Part Number | Description |
|---|---|
88964153 | Kit - Dampener/Mount (Rendezvous) |
88964152 | Kit - Dampener/Mount (Aztek) |
88964151 | Kit - Dampener/Mount (Venture, Montana, Silhouette) |
Warranty Information
For vehicles repaired under warranty, use:
Labor Operation | Description | Labor Time |
|---|---|---|
F9711* | Clean Torque Tube Mount and Road Test | 0.5 hr |
F9702* | Torque Tube Bushing Kit - Install | 0.8 hr |
*This labor operation number is for bulletin use only. This number will not be published in the Labor Time Guide. | ||
