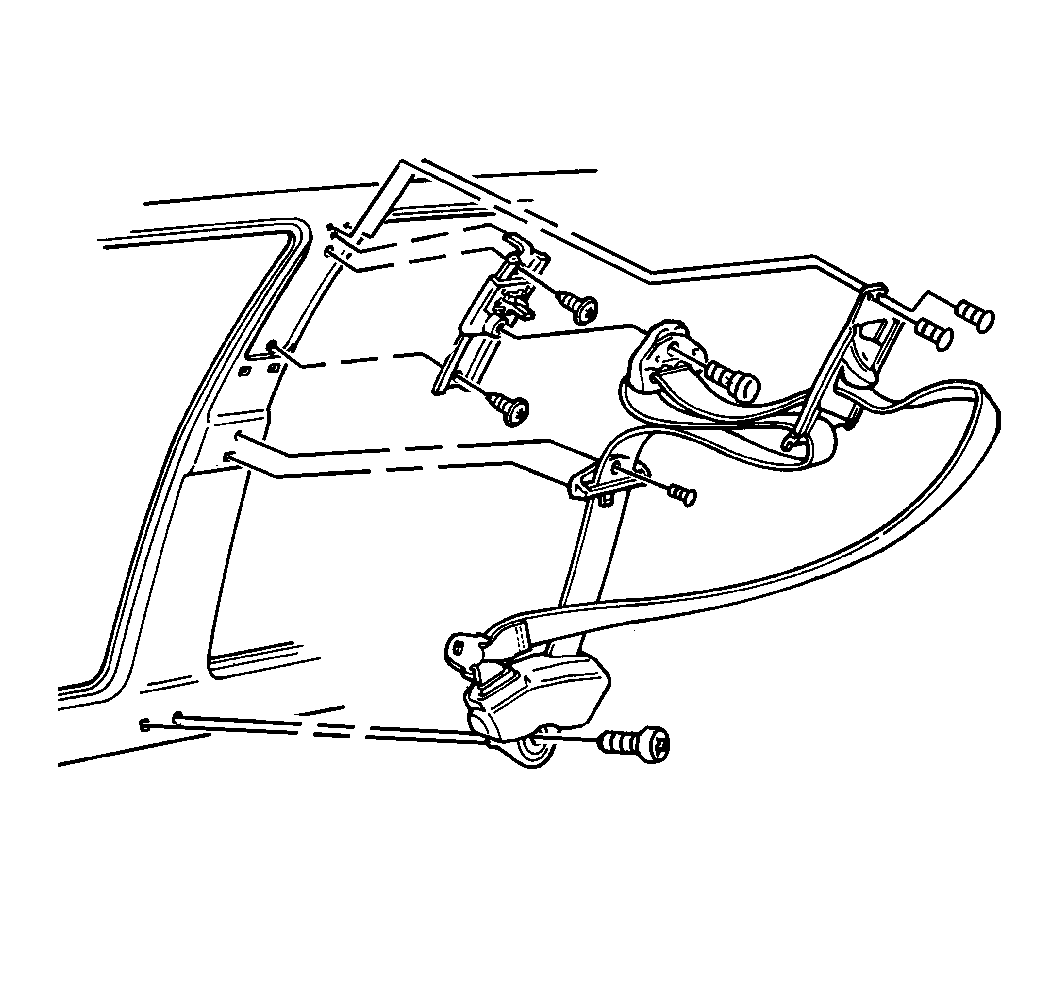
Removal Procedure
- Remove the center pillar trim. Refer to Center Pillar Garnish Molding Replacement in Interior Trim.
- Remove the fasteners and slide track.
- Remove the anchor bolt and guide loop.
- Remove the fastener and intermediate guide.
- Remove the carpet retainer.
- Move the seat full forward in order to remove the anchor bolt.
- Remove the dual retractor.
- Remove the fasteners from the shoulder belt guide adjustment bracket assembly.
- Remove the shoulder belt guide adjustment bracket assembly.
Caution: The seat belt assembly and/or bracket assembly must be replaced as a unit only. Do not substitute parts for any reason, or personal injury could result.
Installation Procedure
- Install the shoulder belt guide bracket assembly and the fasteners into the center pillar near the roof.
- Install the anchor bolt for the dual retractor into center pillar at the rocker.
- Install the anchor bolt for the guide loop into the bracket assembly.
- Install the slide track and the 2 fasteners.
- Install the intermediate guide and fastener.
- Install the center pillar trim. Refer to Center Pillar Garnish Molding Replacement in Interior Trim.
Notice: Use the correct fastener in the correct location. Replacement fasteners must be the correct part number for that application. Fasteners requiring replacement or fasteners requiring the use of thread locking compound or sealant are identified in the service procedure. Do not use paints, lubricants, or corrosion inhibitors on fasteners or fastener joint surfaces unless specified. These coatings affect fastener torque and joint clamping force and may damage the fastener. Use the correct tightening sequence and specifications when installing fasteners in order to avoid damage to parts and systems.
Tighten
Tighten the fasteners to 25 N·m (19 lb ft)
Tighten
Tighten the bolt to 42 N·m (31 lb ft).
Tighten
Tighten the bolt to 42 N·m (31 lb ft).
Important: When installing slide track, care must be taken to engage the head of the guide loop into the socket on the back of the slide track (5 positions of adjustment are provided). After the trim is installed a check should be made to see if the slide track locks into all 5 positions.
Tighten
Tighten the two fasteners to 1.9 N·m (16 lb in).
Tighten
Tighten the intermediate guide fastener to 1.9 N·m (16 lb in).
