Air Cleaner Assembly Replacement VIN K
Removal Procedure
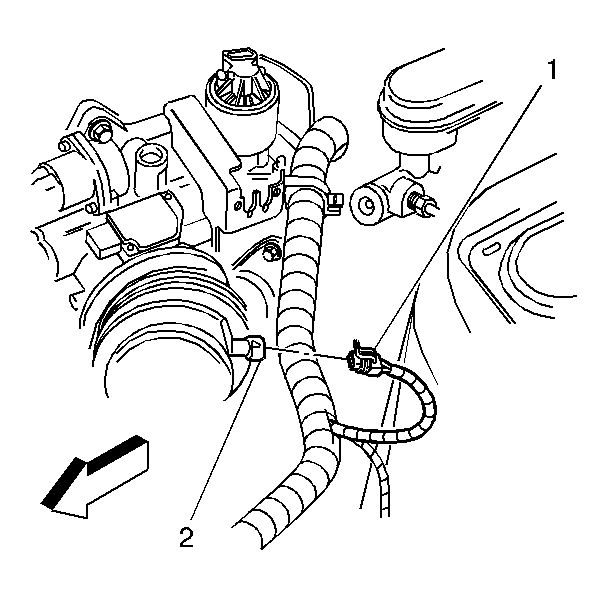
- Remove the IAT sensor connector (1) from the IAT sensor (2).
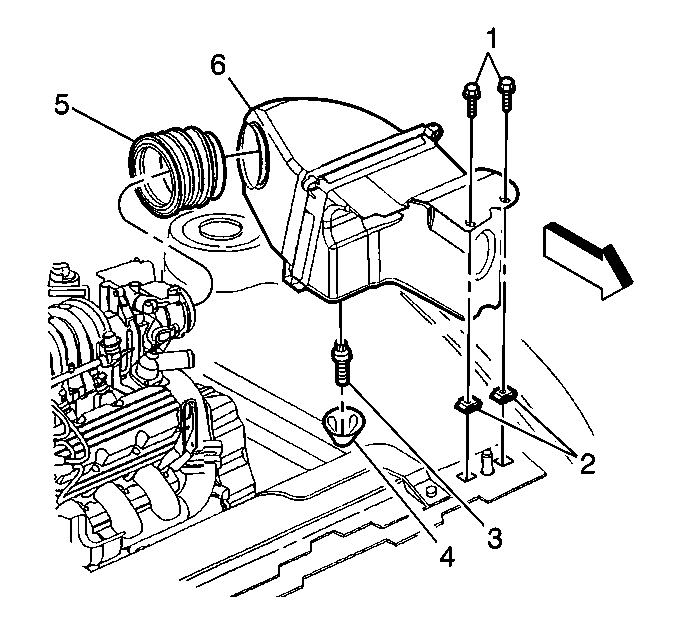
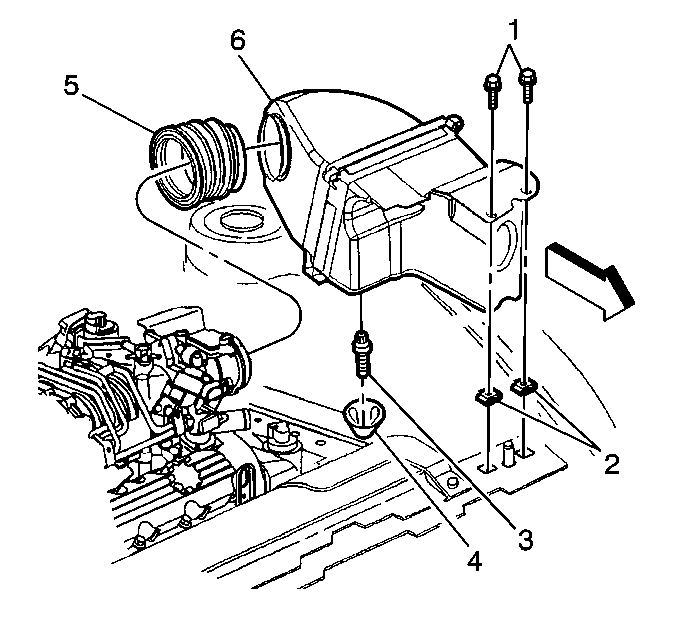
- Loosen the intake air duct (5) from the Mass Air Flow Sensor end of the air cleaner intake duct.
- Remove the intake air duct from the throttle body.
- Remove the screws from the air cleaner cover.
- Remove the rear half of the air cleaner assembly (6).
- Inspect air cleaner element.
- Remove any loose debris that may be found laying in the base of the air cleaner.
- Pivot the air cleaner (6) and air cleaner intake duct (5) assembly toward the front of the vehicle.
- Remove the bolts from the front half of the air cleaner assembly (1).
- Remove the front half of the air cleaner assembly.
Installation Procedure
- Install the air cleaner assembly to the radiator support with the bolts (1).
- Install a new air cleaner element into the air cleaner assembly (6).
- Pivot the rear half of the air cleaner cover (6) and air cleaner intake duct (5) assembly down until the cover engages in the air cleaner base.
- Install the air cleaner intake duct (5) over the throttle body, being careful to ensure that the air cleaner intake duct is secure around the entire outer edge of the throttle body.
- Install the screws from the air cleaner cover.
- Connect the IAT sensor connector (1) to the IAT sensor (2).
Notice: Use the correct fastener in the correct location. Replacement fasteners must be the correct part number for that application. Fasteners requiring replacement or fasteners requiring the use of thread locking compound or sealant are identified in the service procedure. Do not use paints, lubricants, or corrosion inhibitors on fasteners or fastener joint surfaces unless specified. These coatings affect fastener torque and joint clamping force and may damage the fastener. Use the correct tightening sequence and specifications when installing fasteners in order to avoid damage to parts and systems.
Tighten
Tighten the bolts to 4 N·m (35 lb in).
Important: The outlet of the air cleaner assembly and the intake air cleaner intake duct must be lined up to the throttle body when completely installed. Misalignment may cause incorrect air flow readings resulting in MIL illumination or a driveabilty concern.
Tighten
Tighten the clamp assembly to 2 N·m (18 lb in).
Tighten
Tighten the screws to 2 N·m (18 lb in).
Air Cleaner Assembly Replacement VIN 1
Removal Procedure
- Remove the IAT sensor connector (1) from the IAT sensor (2).
- Loosen the air cleaner intake duct (5) from the Mass Air Flow Sensor end of the intake air duct.
- Remove the air cleaner intake duct from the throttle body.
- Remove the screws from the air cleaner cover.
- Remove the rear half of the air cleaner assembly (6).
- Inspect air cleaner element.
- Remove any loose debris that may be found laying in the base of the air cleaner.
- Pivot the air cleaner (6) and air cleaner intake duct (5) assembly toward the front of the vehicle.
- Remove the bolts from the front half of the air cleaner assembly (1).
- Remove the front half of the air cleaner assembly.
Installation Procedure
- Install the air cleaner assembly to the radiator support with the bolts (1).
- Install a new air cleaner element into the air cleaner assembly (6).
- Pivot the rear half of the air cleaner cover (6) and air cleaner intake duct (5) assembly down until the cover engages in the air cleaner base.
- Install the air cleaner intake duct (5) over the throttle body, being careful to ensure that the air cleaner intake duct is secure around the entire outer edge of the throttle body.
- Install the screws from the air cleaner cover.
- Connect the IAT sensor connector (1) to the IAT sensor (2).
Notice: Use the correct fastener in the correct location. Replacement fasteners must be the correct part number for that application. Fasteners requiring replacement or fasteners requiring the use of thread locking compound or sealant are identified in the service procedure. Do not use paints, lubricants, or corrosion inhibitors on fasteners or fastener joint surfaces unless specified. These coatings affect fastener torque and joint clamping force and may damage the fastener. Use the correct tightening sequence and specifications when installing fasteners in order to avoid damage to parts and systems.
Tighten
Tighten the bolts to 4 N·m (35 lb in).
Important: The outlet of the air cleaner assembly and the air cleaner intake duct must be lined up to the throttle body when completely installed. Misalignment may cause incorrect air flow readings resulting in MIL illumination or a driveabilty concern.
Tighten
Tighten the clamp assembly to 2 N·m (18 lb in).
Tighten
Tighten the screws to 2 N·m (18 lb in).
