SERVICE MANUAL UPDATE SEC. 8B MECH./VISUAL HEADLAMP AIMING

SUBJECT: SERVICE MANUAL UPDATE - NEW MECHANICAL AND VISUAL HEADLAMP AIMING PROCEDURES
MODELS/YEARS: 1991 CUTLASS CIERA AND CUTLASS CRUISER MODELS
This service bulletin cancels and supersedes all glove box literature regarding headlamp aiming on 1991 Cutlass Ciera and Cutlass Cruiser models.
The headlamp aim on the vehicles covered in this bulletin has been certified to be within the manufacturer's specification at the assembly plant with an "Electronic Headlamp Beam Aim System". These headlamps will not require any readjustment at the time of dealer delivery or during pre-delivery inspection (PDI). If there is a concern expressed by a customer about headlamp aim, the preferred method to check or correct aim is by the visual aiming equipment or screen aiming method as identified in this bulletin. If headlamps can not be aimed by the screen aiming method or visual aiming equipment, use the (optional) mechanical headlamp aiming method described in this bulletin.
VISUAL HEADLAMP AIMING PROCEDURE (PREFERRED METHOD)
All equipment for testing headlamps must comply with the SAE recommended practice for headlamp inspection equipment.
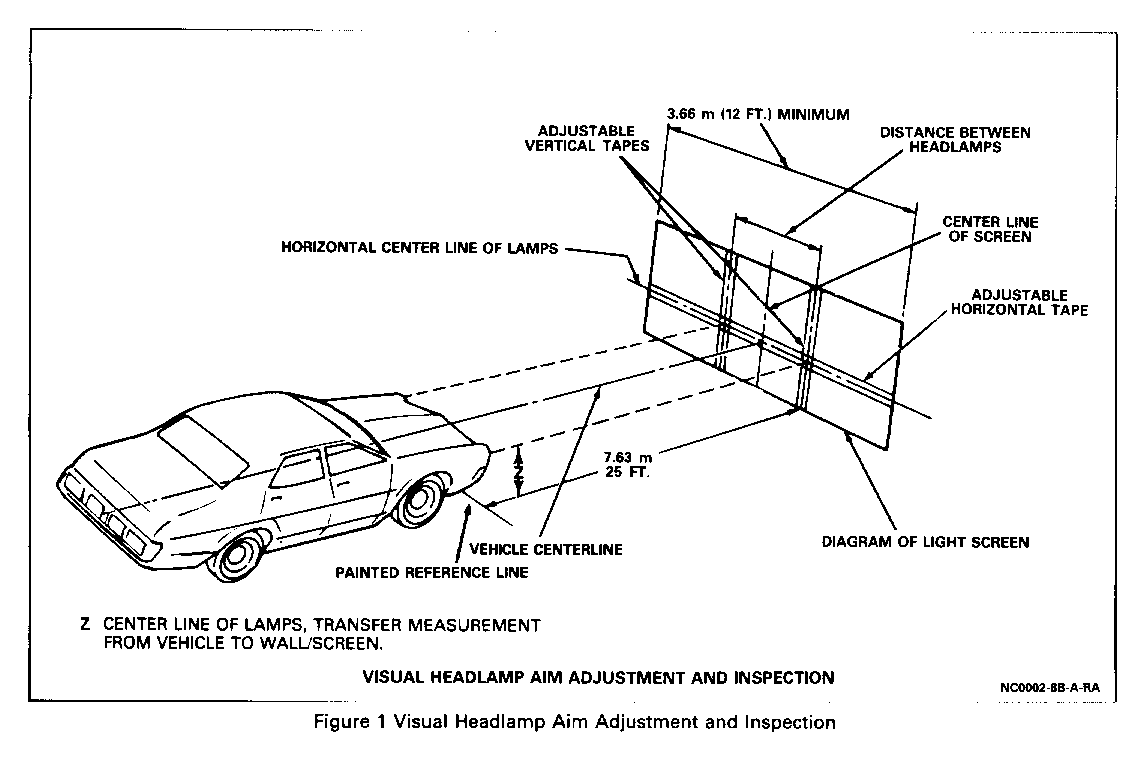
Visual Aiming Equipment: If visual aiming equipment is used, it shall give results equivalent to those obtained using the screen procedure (Figure 1). It shall be in good repair and adjustment, and shall be used in accordance with the manufacturer's instructions. The aiming equipment, using a photoelectric cell or cells to determine aim, should also have a visual screen upon which the beam pattern is projected proportional to its appearance and aim on a screen at 25 feet. Such visual screen shall be plainly visible to the operator and should have horizontal and vertical reference lines to permit visual appraisal of the headlamp beam.
Headlamp Aiming By The Screen Method: First, position the vehicle so that it is square with the screen and with the front of the headlamps directly over a reference line which has been painted on the floor.
Next, locate the center line on the aiming screen so that it is in line with the center of the vehicle. This can be done as shown in Figure 1 by sighting through the center of the rear window and over the hood center - have vehicle moved or move center line on screen or move whole screen until it is in alignment with these two points.
To determine hood center, mark the center of the front and rear windows with narrow tape. Use these "sights" to locate the center line of the vehicle.
Aiming Area Required: It is desirable to have a specific aiming area in a darkened location. This should be sufficient for the vehicle and an additional 25 feet measured from face of lamps to the front of the visual screen.
The floor on which the vehicle rests must be flat with the bottom of the screen. If the floor is not level, compensate.
Aiming Screen: if a screen is used, it should be 5' high by 12' wide with a matte white surface well shaded from outside light, and properly adjusted to the floor on which the vehicle stands. Provisions may be made for moving the screen so that it can be aligned parallel with the rear axle so a horizontal line drawn perpendicular from the center line of the screen will pass an equal distance midway between the two headlamps.
The screen shall be provided with a vertical center line, two laterally adjustable vertical tapes and one vertically adjustable horizontal tape.
If a regular commercial aiming screen is not available, the screen may consist of a vertical wall having clear uninterrupted area approximately 6' high by 12' wide. The surface should be finished with a washable non-gloss white paint.
After the aiming screen has been set up in its permanent location, it is necessary to paint a reference line on the floor directly under the lens of the lamps to indicate the proper location of the headlamps when they are being aimed.
Important: For each vehicle checked, the horizontal line or tape must be adjusted. Same model and year vehicles will have different standing height for the headlamps.
HEADLAMP AIMING - SCREEN METHOD:
Headlamp aiming by the screen method requires a level floor (or leveling pads) area in a darkened location, sufficient for the vehicle and an additional 25 feet from lamps to screen. The vehicle MUST be located accurately in front of the screen. Refer to "Visual Headlamp Aiming Procedure (Preferred)" in this bulletin for details about setting up this test properly. Preparation of the vehicle is similar to the mechanical headlamp aiming method.
Upper Beam Replaceable Bulb (Type 9005 (HB3) Used Above)
EQUIPMENT: Marked screen and adequate test area.
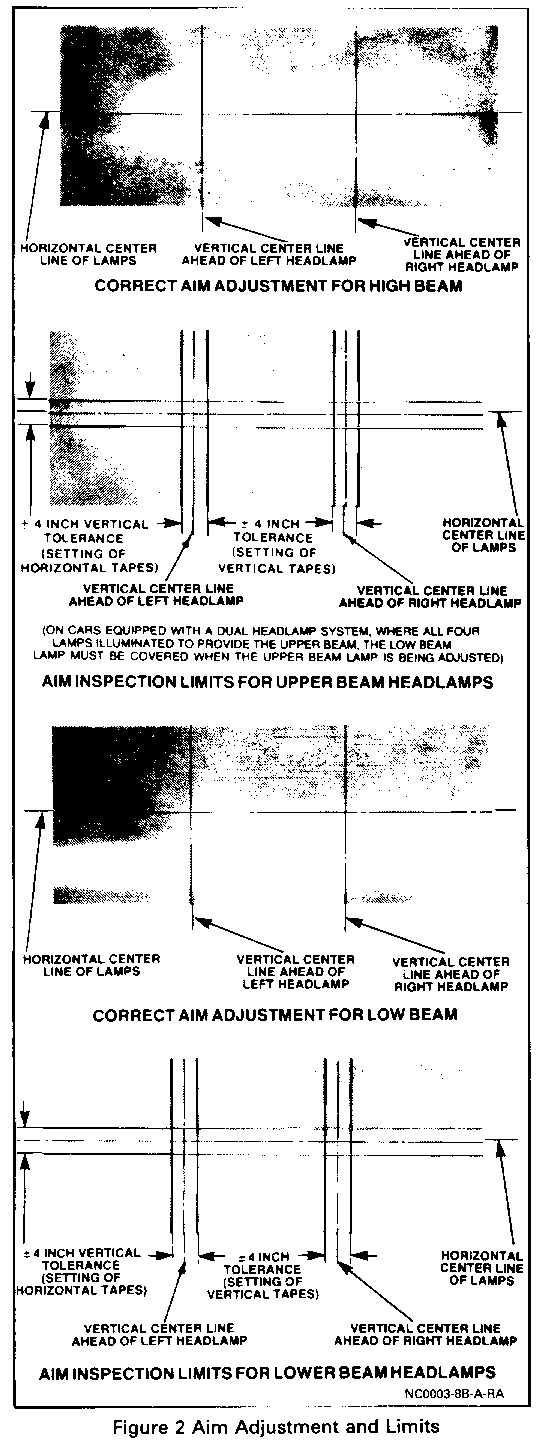
PROCEDURE: With the vehicle properly located and loaded, switch headlamps to upper beam and observe center of high intensity zone on the screen.
ADJUST HEADLAMP:
If center is Horizontally more than: o 102mm (4 inches) RIGHT of straight ahead. o 102mm (4 inches) LEFT of straight ahead. OR Center is Vertically more than: o 102mm (4 inches) ABOVE the horizontal line. o 102mm (4 inches) BELOW the horizontal line.
Low Beam Replaceable Bulb (Type 9005 (HB3) And Type 9006 (HB4) Together)
EQUIPMENT: Marked screen and adequate test area.
PROCEDURE: With vehicle properly located and loaded, switch headlamps to low beam and observe left and top edges of high intensity zone on the screen.
ADJUST HEADLAMP:
If left edge is Horizontally more than: o 102mm (4 inches) LEFT of straight ahead. o 102mm (4 inches) RIGHT of straight ahead. OR Top edge is Vertically more than: o 102mm (4 inches) ABOVE the horizontal line. o 102mm (4 inches) BELOW the horizontal line.
important: Always inspect the following sealed beam and replaceable bulb headlamps on "low beam" only. Replaceable bulb headlamps with Type 9006 (HB4) alone or in combination with Type 9005 (HB3).
MECHANICAL HEADLAMP AIMING PROCEDURE (OPTIONAL METHOD)
The headlamps must be aimed for proper illumination of the road. Headlamp aim should be checked: when a new assembly is installed, or if service or repairs to the front end area have (or may have) disturbed the headlamps or their mountings. Headlamp focus is set when the unit is made; no adjustment for focus is necessary or possible.
Note: Some state and local laws specify requirements for headlamp aim; these laws must be followed.
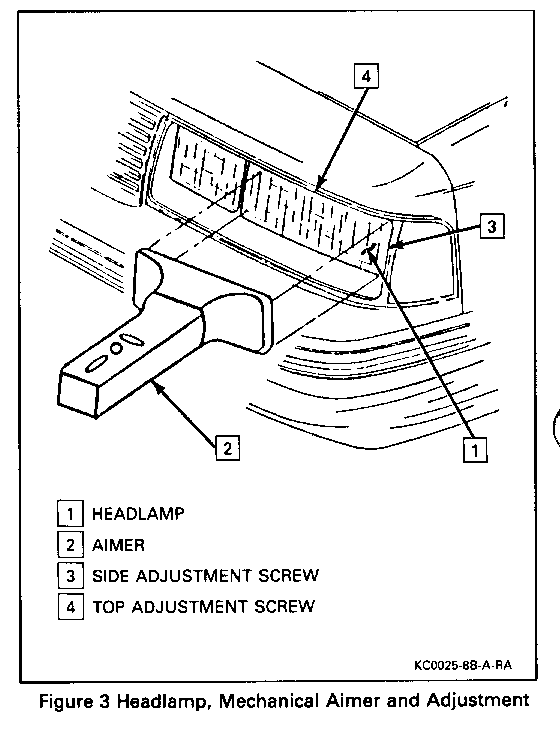
1. Prepare the vehicle. (See Figure 3) A. Make sure all other components are in place, if other service has been done on the vehicle. B. Place the vehicle on a level surface. C. Stop all other work on the vehicle. D. Make sure the vehicle has 1/2 tank of fuel or less. E. Deflate any manual air shocks. F. Be sure tires are inflated to the proper air pressure. G. If the vehicle regularly carries heavy loads or tows a trailer, these loads (or an equivalent amount of weight) should be installed.
2. If the floor is not level, adjust the aimers for floor slope.
3. Select the proper adapter.
4. Set the adjustment rods to the numbers shown on the front of the headlamp capsule.
5. Attach adapter to the aimer.
6. Attach the aimers to the headlamp capsule, making sure the adjustment rods are contacting the aiming pads.
7. Aim headlamps according to the aiming tool manufacturer's instructions.
Horizontal aim is done by an adjusting screw on the outer side of the headlamp assembly. Vertical aim is done by an adjusting screw in the top center of the assembly.


General Motors bulletins are intended for use by professional technicians, not a "do-it-yourselfer". They are written to inform those technicians of conditions that may occur on some vehicles, or to provide information that could assist in the proper service of a vehicle. Properly trained technicians have the equipment, tools, safety instructions and know-how to do a job properly and safely. If a condition is described, do not assume that the bulletin applies to your vehicle, or that your vehicle will have that condition. See a General Motors dealer servicing your brand of General Motors vehicle for information on whether your vehicle may benefit from the information.
