WHINE NOISE IN PASSENGER COMPARTMENT (INSTALL BRACKET)

WHINE NOISE IN PASSENGER COMPARTMENT (INSTALL BRACKET KIT)
VEHICLES AFFECTED: 1985-1988 N MODELS EQUIPPED WITH A 3.0L ------------------ V-6 ENGINE (VIN
A minor whine type noise may be heard in the passenger compartment of 1985 - 1988 N models equipped with a 3.0L V-6 engine. This whine, usually most noticeable at approximately 3000 revolutions per minute (rpm), is a result of engine oil pump to front cover alignment which can excite a resonance in the rear engine mount to engine bracket. This resonance can be transmitted to the passenger compartment as a whine.
Vehicles exhibiting this condition can be repaired by installing a new right rear engine mount to engine bracket kit as described in the following service procedure.
Part is currently available from GMSPO under the following part number:
12340523 Bracket Kit - Right Rear Engine Mount to Engine
Bracket Kit contains:
- Right rear engine mount to engine bracket - Stud - Nut
Notice: As in any service procedure, diagnostics are the key to an effective repair. Before performing the following procedure refer to P.S.B. 87- 630-106. (Engine Buzz or Whine Due to Loose Engine Mounting Bolt - 1987 'N' Cars with 3.0L Engine) and to page 16 of the November 1985 Service Guild.
SERVICE PROCEDURE:
Tools required: J 28467 Engine Support Fixture
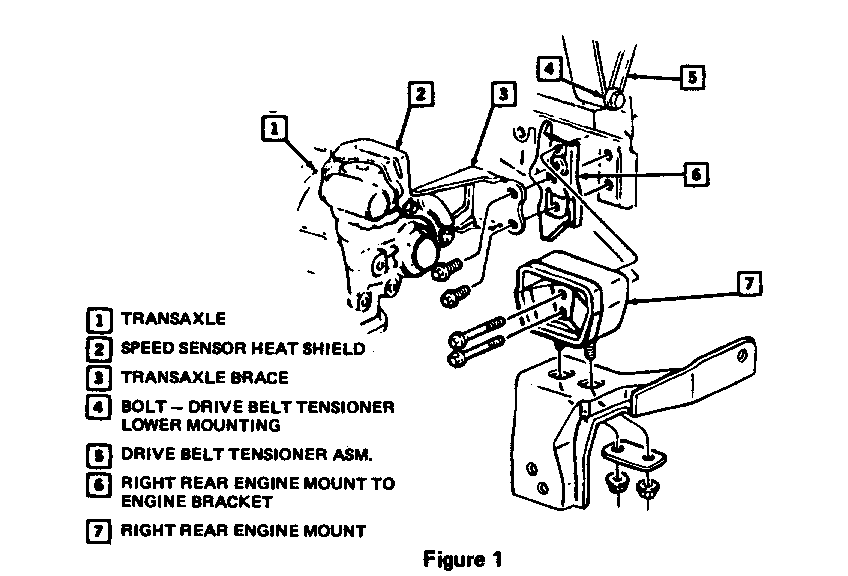
REMOVAL OF ORIGINAL RIGHT REAR ENGINE MOUNT TO ENGINE BRACKET (Figure 1):
1. Disconnect negative battery cable.
2. Install J 28467 engine support fixture.
3. Raise car and suitably support. See Section 0A in service manual.
4. Remove righthand drive axle assembly
5. Remove right rear engine mount (No. 7)
6. Remove speed sensor heat shield (No. 2) and transaxle brace (No. 3).
7. Remove right rear engine mount to engine bracket (No. 6)
8. Remove bolt from lower mounting hole of drive belt tensioner assembly (No. 4).
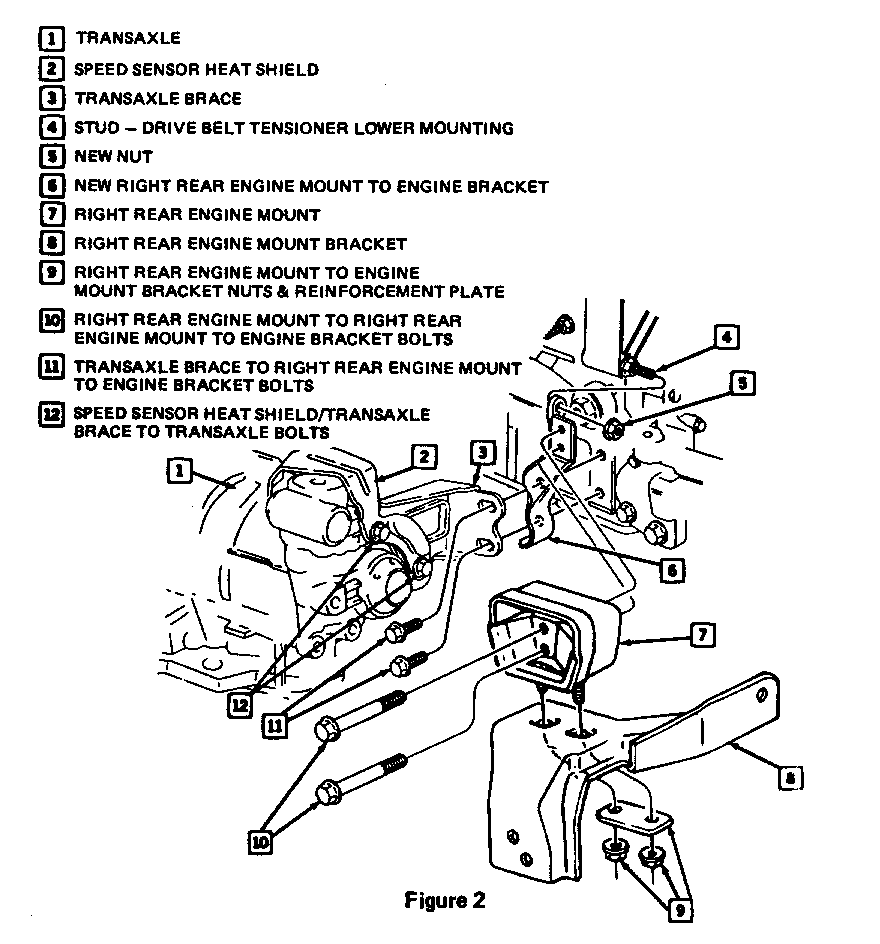
INSTALL NEW RIGHT REAR ENGINE MOUNT TO ENGINE BRACKET KIT (Figure 2):
1. Install long end of new stud (No. 4) in lower mounting hole of drive belt tensioner assembly. Tighten stud to 50 N.m (38 lbs. ft.).
2. Install new right rear engine mount to engine bracket (No. 6) into position.
3. Install new nut (No. 5) on drive belt tensioner assembly stud. Tighten nut to 45 N.m (34 lbs. ft.).
4. Install right rear engine mount (No. 7). Hand start two bolts (No. 10) and two nuts and reinforcement plate (No. 9). DO NOT TIGHTEN YET.
5. Install transaxle brace (No. 3) and speed sensor heat shield (No. 2) to transaxle. Hand start bolts. (No. 12). DO NOT TIGHTEN
6. Install transaxle brace to right rear engine mount to engine bracket bolts (No. 11). Tighten to 95 N.m (70 lbs. ft.).
7. Tighten the right rear engine mount to right rear engine mount to engine bracket bolts (No. 10) to 50 N.m (38 lbs. ft.)
8. Tighten speed sensor heat shield and transaxle brace to transaxle bolts (No. 12) to 50 N.m (38 lbs. ft.)
9. Tighten right rear engine mount to rear engine mount bracket nuts No. 9) to 24 N.m (18 lbs. ft.)
10. Install righthand drive axle assembly; wheel and tire assembly.
11. Remove J 28467 engine support fixture.
12. Connect negative battery cable.
General Motors bulletins are intended for use by professional technicians, not a "do-it-yourselfer". They are written to inform those technicians of conditions that may occur on some vehicles, or to provide information that could assist in the proper service of a vehicle. Properly trained technicians have the equipment, tools, safety instructions and know-how to do a job properly and safely. If a condition is described, do not assume that the bulletin applies to your vehicle, or that your vehicle will have that condition. See a General Motors dealer servicing your brand of General Motors vehicle for information on whether your vehicle may benefit from the information.
