SPECIAL POLICY: TEMPORARY REDUCTION/POWER STRG.-COLD

MODELS: CHEVROLET: 1985-88 Celebrity and Cavalier, 1987-88 Corsica and Beretta and 1985 Citation
PONTIAC: 1985-1988 6000, Sunbird, Grand Am and 1987-88 Bonneville
OLDSMOBILE: 1985-88 Firenza, Cutlass Ciera and Cutlass Calais, 1986-88 Eighty-Eight, Ninety-Eight, Toronado and 1987-88 Trofeo
BUICK: 1985-88 Skyhawk, 1985 and 1987-88 Skylark, 1985 Regal Somerset, 1986 Somerset, 1985-88 Century, 1986-88 LeSabre, Electra/Park Avenue and Riviera
CADILLAC: 1985-86 Cimarron 1986-88 DeVille, Fleetwood, Eldorado, and Seville 1986-87 Limousine
TO ALL GENERAL MOTORS DEALERS:
This bulletin is being issued to supplement bulletin 88-3-108 dated January 1988. The vehicles listed below are equipped with power steering and may exhibit a temporary reduction of power steering assist when the vehicle is started cold. After a short period of engine operation, full assist is restored.
VEHICLES INVOLVED
Involved are all 1985-87 above listed vehicles and 1988 models with the following VIN breakpoints: Up To And Year Carline Model Plant From Including ---- ------- ----- ----- ---- --------- 1988 Chevrolet Celebrity Framingham SOP JG108701 Celebrity Ste. Therese SOP J2135649 Celebrity Oklahoma City SOP J6181328 Corsica/Beretta Linden SOP JE509735 Corsica/Beretta Wilmington SOP JY525519 Cavalier Lordstown SOP J7158411 Cavalier Janesville SOP JJ184475 Pontiac 6000 LE Oshawa #1 SOP J9236368 6000 SE Oshawa #1 SOP J9238041 6000 SE Tarrytown SOP JT218901 6000 Tarrytown SOP JT223649 6000 STE Oklahoma City SOP J6200116 Grand Am Lansing SOP JC700906 Sunbird Lordstown SOP J7540419 Bonneville Willow Run SOP JW247515 Oldsmobile Firenza Leeds SOP JK308724 Cutlass Calais Lansing SOP JM248595 Cutlass Ciera Framingham SOP JG306227 Oshawa #1 SOP J9365964 Ste. Therese SOP J2337334 Eighty-Eight Wentzville SOP J1830515 Willow Run SOP JW365319 Ninety-Eight Wentzville SOP J1327171 Orion SOP J4331110 Toronado & Trofeo Hamtramck SOP JU306708 Buick Skyhawk Leeds SOP JK420909 Skylark Lansing SOP JMO28119 Century Tarrytown SOP JT428989 Oklahoma City SOP J6426495 LeSabre Buick City SOP JH469801 w/F41 SOP JH507159 less F41 Electra/ Park Avenue Wentzville SOP J1669604 Riviera Hamtramck SOP JU405112 less FE3 SOP JU405229 w/FE3 Cadillac Cimarron Janesville SOP JJ504243 DeVille,Fleetwood Orion SOP J4302418 Eldorado Hamtramck SOP JU610281 Eldorado with Touring Suspension (option Code FE2) Hamtramck SOP JU610454 Seville Hamtramck SOP JU808825 Seville with Touring Suspension (option FE2) Hamtramck SOP JU808969
SPECIAL POLICY ADJUSTMENT
This special policy covers the condition described above for a period of five (5) years or 80,000 km, whichever occurs first, from the date the vehicle was originally placed in service. Correction will consist of installation of a seal service kit.
This "Special Policy Adjustment Bulletin" should be filed in the three ring binder previously furnished to dealers by General Motors.
REIMBURSEMENT
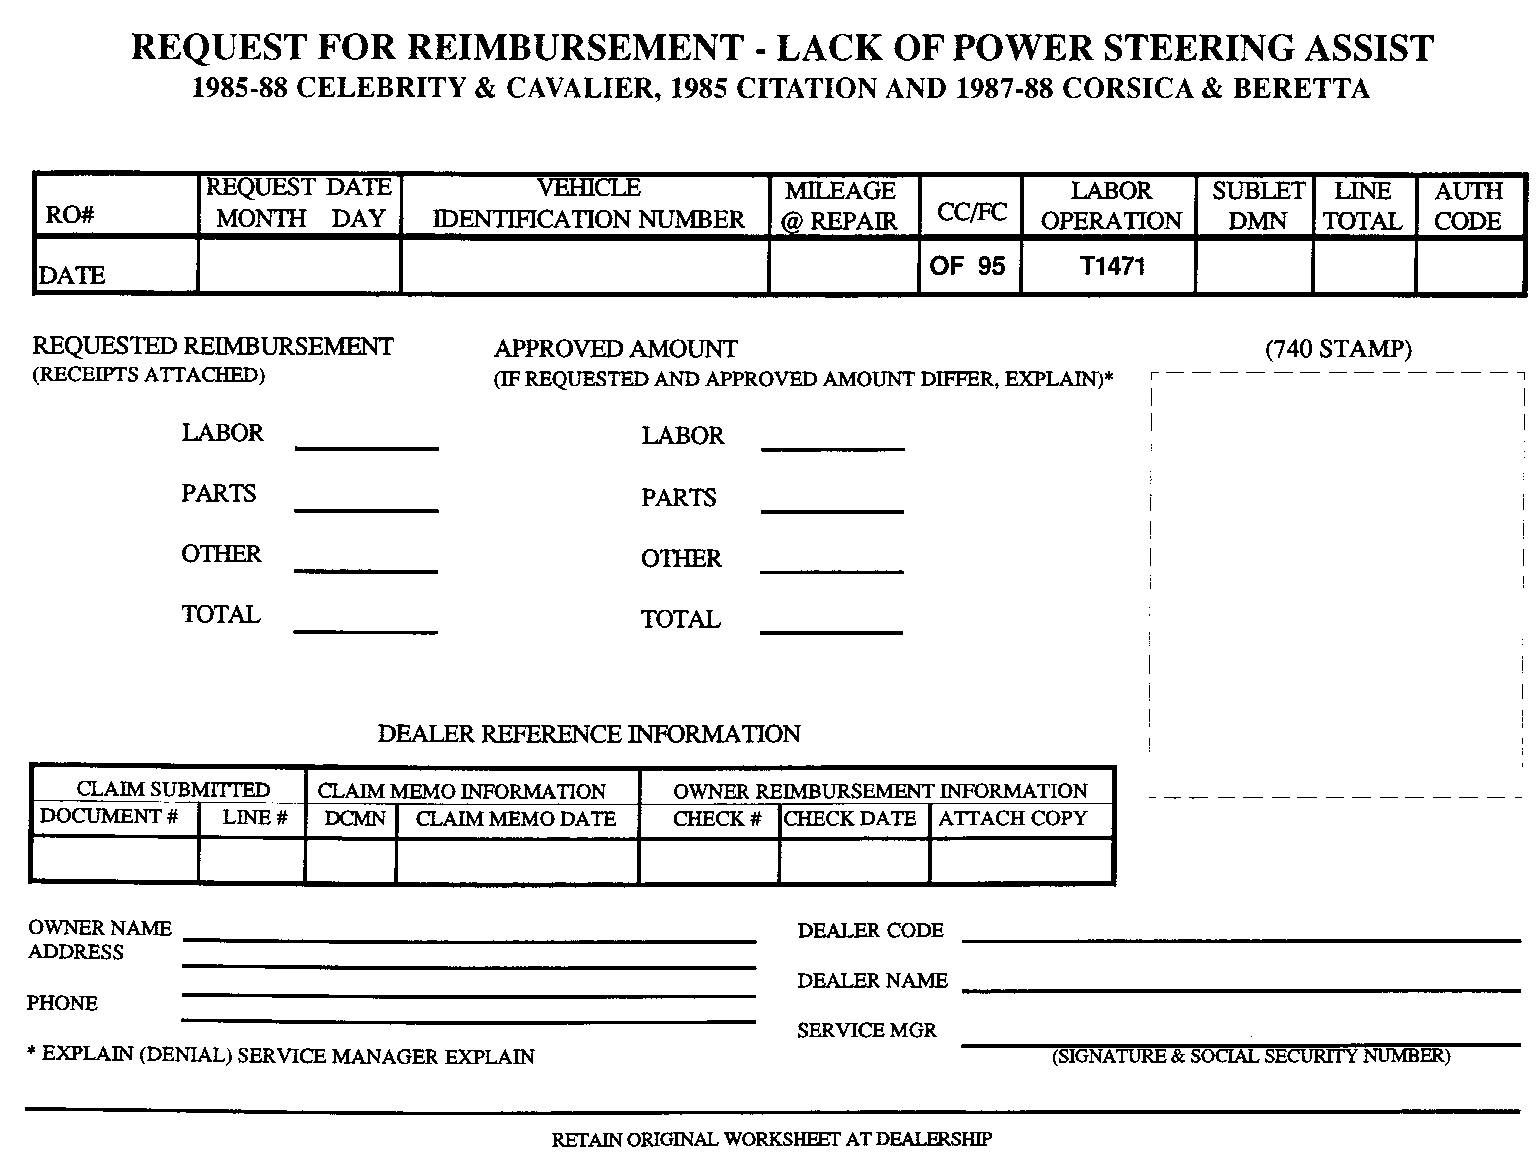
Customer claims for reimbursement on previously paid repairs to correct a temporary reduction of power steering assist when cold condition, are to be submitted according to the instructions included with this bulletin. Owners must submit original documentation that reasonably confirms the amount of unreimbursed repair expenses, a description of the repair, the date of the repair, and the person or entity performing the repair.
PARTS INFORMATION
Parts required should be ordered through regular channels as follows:
Quantity/ Part Number Description Vehicle ----------- ----------- ------- 26010340 Seal Service Kit 1
SERVICE PROCEDURE
See instruction sheets attached to this bulletin for installation of Seal Service Kit. Special tools required for this repair (previously furnished to dealers) are as follows:
- J37090 Pinion and Valve Ring Protector - J29822 Pinion Seal Installer - J29810 Stub Shaft Seal Protector
In the unlikely event the Seal Service Kit does not correct the condition, installation of a short gear assembly may be necessary. AUTHORIZATION WILL BE REQUIRED FOR INSTALLATION OF A SHORT GEAR ASSEMBLY. Order parts from the appropriate service parts catalogue and follow service procedure in applicable service manual.
RETURN OF STEERING GEAR ASSEMBLIES
To assure proper payment for work performed for short gear installation under this special policy program, the following must be supplied with the returned assemblies:
- A copy of the repair order including the VIN and the labour operation performed
- The dealer code of the dealer performing the service
Steering gear assemblies returned for reasons other than this special policy need not include the above information.
WARRANTY CLAIM INFORMATION
A. SEAL SERVICE KIT INSTALLATION
When performing the installation as outlined in this bulletin, submit a warranty claim for credit as follows:
Failed Labour Parts Part Parts Operation Time Net Item Count Number Amount Number Description Allow. Amount ----- ------ ------ ------ ------------ ------ ------ 1 26010340 * * T1463 Install Seal Kit * $9.07***
* Select the appropriate time allowance for power steering gear assembly R & R (operation number E9720) from the applicable Labour Time Guide Fiche.
* * Enter the Dealer Net Price (in effect at the time of repair), Plus 30% for the Seal Service Kit Part No. 26010340.
*** the $9.07 identified in the "Net Item Amount" column represents the cost plus 30% of power steering fluid used in conjunction with these repairs.
Authorization is not required for claims meeting the criteria outlined in this bulletin.
B. REPLACEMENT GEAR INSTALLATION
In the unlikely event that the Seal Service Kit does not correct the condition, a replacement gear may need to be installed. Submit a warranty claim for credit as follows:
Failed Labour Parts Part Parts Operation Time Net Item Count Number Amount Number Description Allow. Amount ----- ------ ------ ------ ------------ ------ ------- 1 **** ** T1477 Install Short * $9.07*** Replacement Gear
* Select the appropriate time allowance for power steering short gear replacement (Operation Number E9730) from the applicable Labour Time Guide Fiche.
* * Enter the Dealer Net Price (in effect at the time of repair), Plus 30% for the Replacement Steering Gear Assembly.
* * *the $9.07 identified in the "Net Item Amount" column represents the cost plus 30% of power steering fluid used in conjunction with these repairs.
**** Enter the part number for the Replacement Steering Gear Assembly.
Authorization is required for all claim submissions which fall into the gear replacement category.
C. OWNER REIMBURSEMENT
Claims for customer reimbursement of previously paid repairs are to be submitted as a Net Item Dollar Amount on a warranty claim as follows:
Labour Net Item Operation Dollar Number Amount ------ ------ T1303 $xx.xx
Authorization is required on all claim submissions which fall into the Owner Reimbursement category. This labour operation is to be used for owner reimbursement only.
INSTRUCTION SHEET
FOR EFFECTIVE REPAIR, USE ALL PARTS IN KIT REGARDLESS OF ORIGINAL CONDITION.
SERVICE PROCEDURE FOR INSTALLING "SPECIAL" VALVE BODY RINGS ON RACK AND PINION ASSEMBLIES WITH HARD STEERING ON INITIAL START-UP READ INSTRUCTIONS COMPLETELY AND CAREFULLY BEFORE PROCEEDING.
Some complaints about the power steering system on initial start up may be reported as:
Reduced power stcering assist when parking. Increased steering effort.
For further information, refer to the "Steering Diagnosis" section in vehicle service manual.
Tools Required:
J 37090 Pinion and Valve Ring Protector J 29822 Pinion Seal Installer J 29810 Stub Shaft Seal Protector
A. Remove rack and pinion assembly from car.
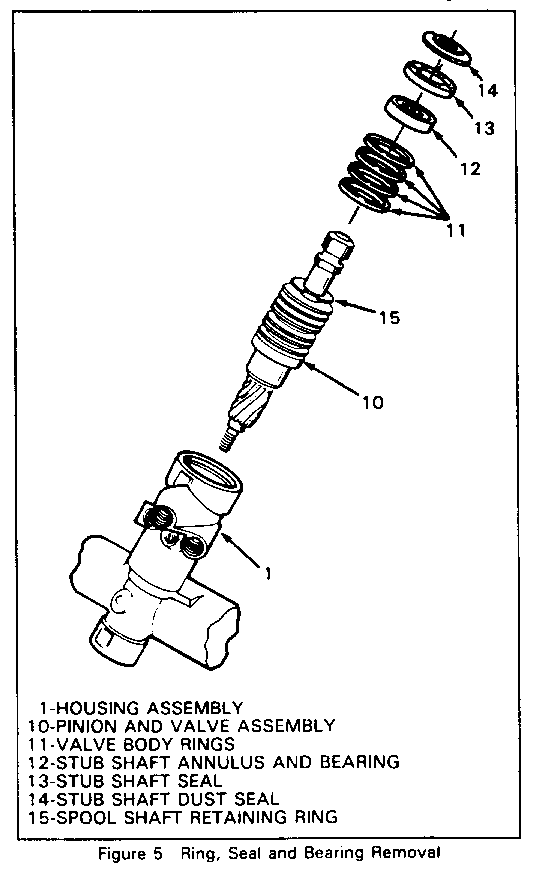
B. Valve removal:
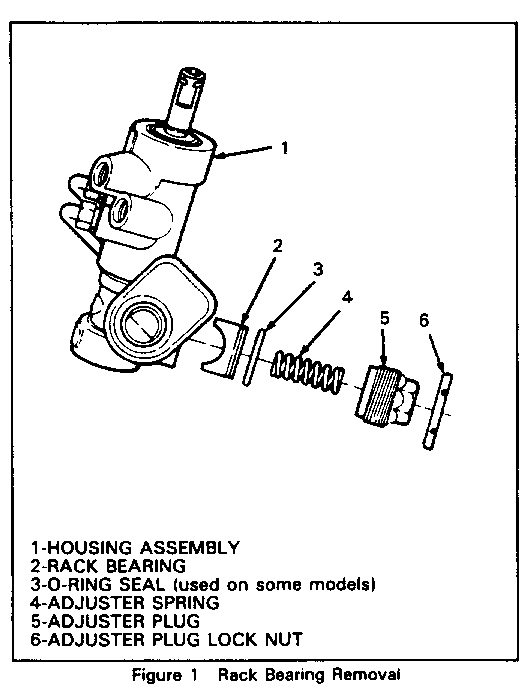
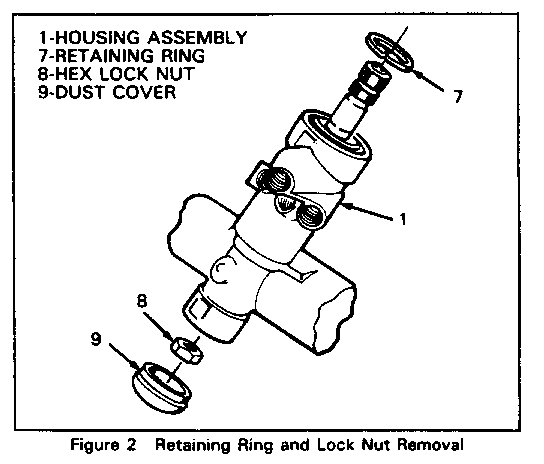
1. Remove adjuster plug lock nut from adjuster plug. 2. Remove adjuster plug from housing. 3. Remove adjuster spring, rack bearing and O-ring if required. 4. Drain power steering fluid from gear. (Rotate stub shaft allowing rack to travel corner to corner for removal.) 5. Remove retaining ring from housing. 6. Remove dust cover from housing. 7. While holding the stub shaft, remove lock nut from pinion.
Important
If stub shaft is not held, damage to the pinion teeth will occur.
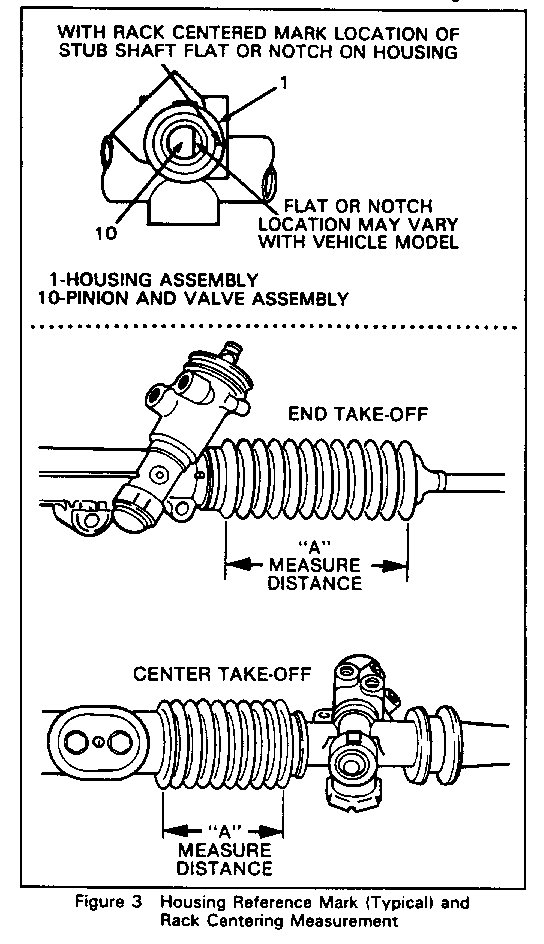
8. With gear centered, mark location of stub shaft flat or notch on housing and measure distance "A" indicated in Figure 3 for your specific vehicle; this will aid in proper reassembly.
Important
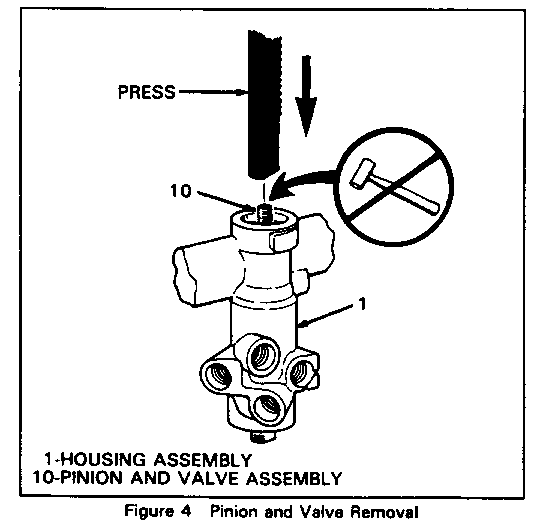
DO NOT hammer or pound on pinion and valve assembly, this could cause damage or loosen the drive pin.
9. Use an arbor press to press on threaded end of pinion until it is possible to remove the pinion and valve assembly from housing. Just before removal of pinion and valve assembly ftom housing, mark second location of stub shaft flat or notch on housing. The second mark is used to position flat or notch prior to reassembly.
10. Remove stub shaft dust seal, stub shaft seal, stub shaft bearing annulus assembly, pinion and valve assembly, with spool, shaft retaining ring, and valve body rings attached.
11. Remove valve body rings from pinion and valve assembly.
Important
Use care when removing rings from valve assembly to prevent damage to valve assembly.
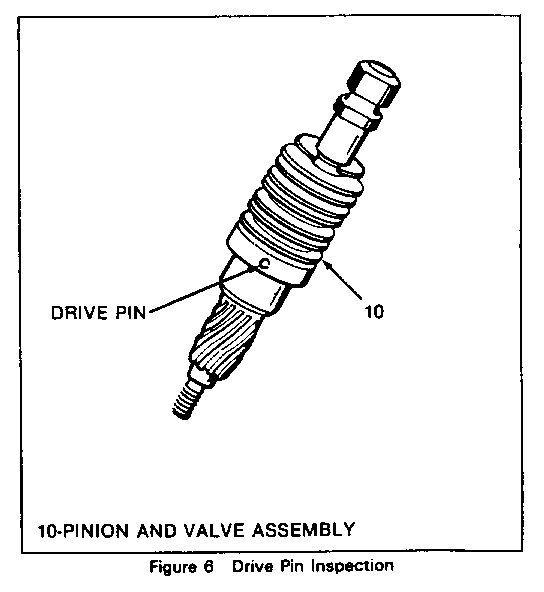
12. Thoroughly clean valve assembly ring grooves.
Inspect
Inspect pinion and valve assembly for nicks or loose drive pin. If a loose drive pin is found, replace the gear assembly.
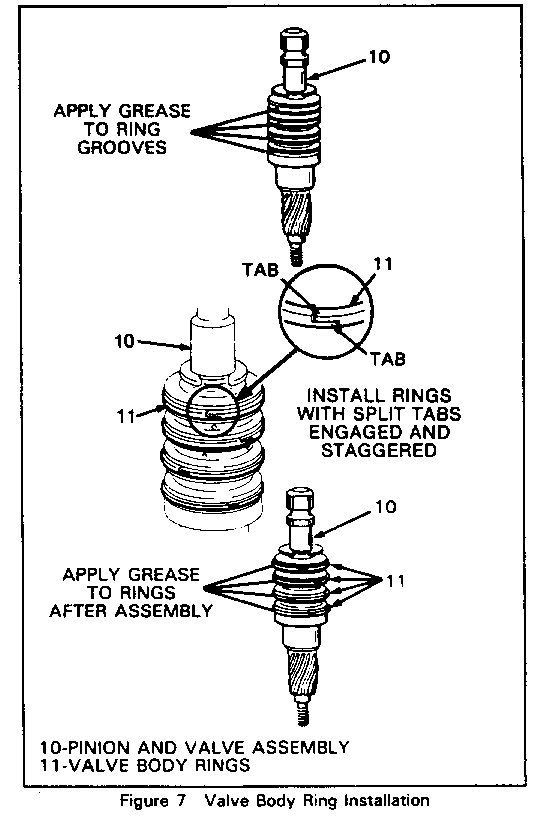
C. Install new split rings onto the valve assembly as follows:
Important
Valve assemblies and housings are NOT interchangeable. The same valve assembly MUST be reinstalled or rack and pinion assembly must be replaced.
Important
Apply a liberal quantity of grease supplied in kit, in each ring groove and to new valve body rings when installed to hold rings in position. (See Figure 7.)
1. Install new valve body rings to pinion and valve assembly. (Care must be taken not to cut rings at installation.)
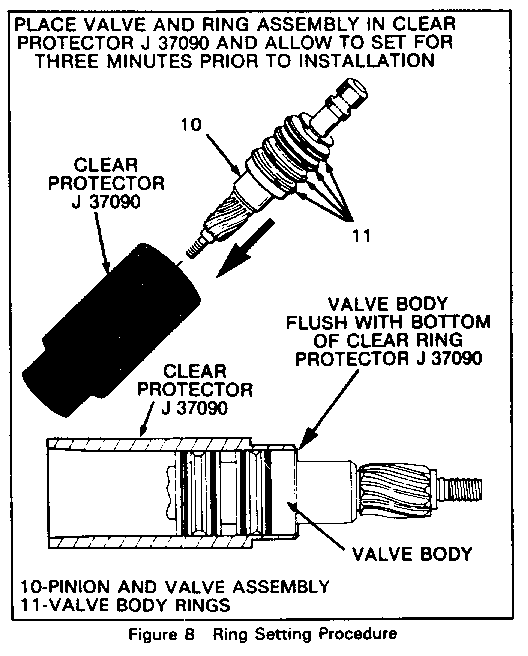
2. Place pinion and valve assembly into clear pinion and valve assembly ring protector J 37090. (Be sure to use only the clear protector.) Allow to set for approximately three minutes while continuing installation preparation. This allows the valve rings to be properly sized.
3. Position valve assembly in protector so that valve body is flush with bottom of clear protector. (See Figure 8.)
Inspect
Inspect valve body rings for cuts, nicks or other damage, proper seating of rings in grooves and engagement of split tabs.
4. Rack must be centered in housing. (See Figure 3 on page 2.)
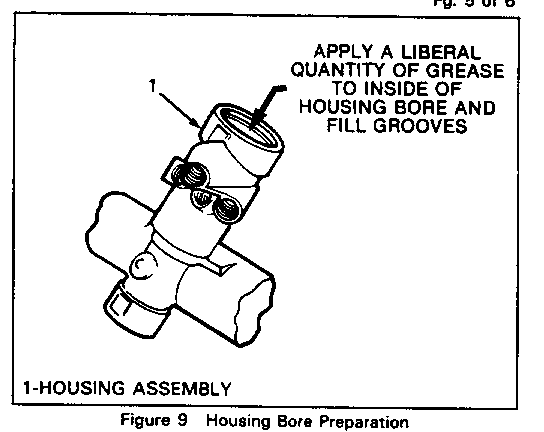
5. Wipe housing bore clean of any foreign material.
Important
Apply a liberal quantity of grease to the valve housing bore. Be sure to fill grooves with grease. This will ease reassembly of valve into housing.
Inspect
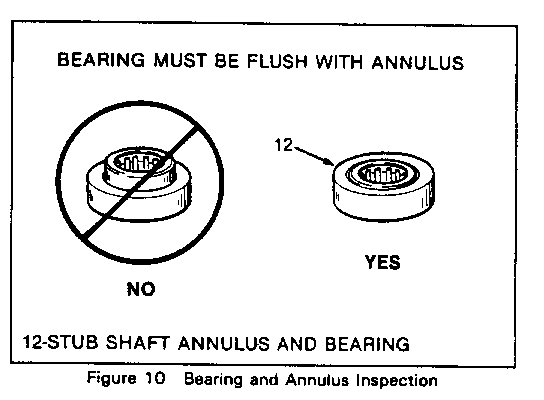
Inspect stub shaft bearing annulus for flatness and damage. Clean before reassembly.
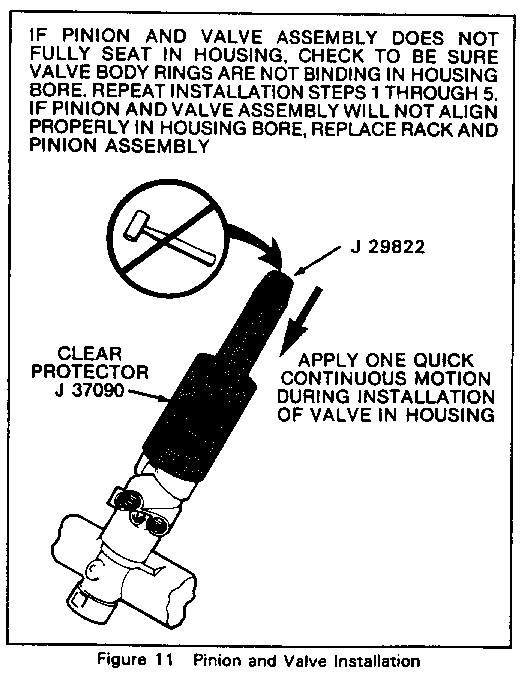
6. Align stub shaft flat or notch with second mark on housing made during disassembly. (See step 9 on page 2.) Install pinion and valve assembly with spool shaft retaining ring, and valve body rings included, into housing using J 37090 to prevent damage to valve rings during assembly.
Important
Set pinion and valve assembly onto housing using J 37090. Use J 29822 pinion seal installer to push assembly into housing bore. DO NOT hammer or use excessive force. If pinion and valve assembly does not fully seat in housing, check to be sure valve body rings are not binding in housing bore. Check rings for cuts or damage. Repeat installation steps 1 through 5.If pinion and valve assembly will not align properly in housing bore, replace rack and pinion assembly.
Inspect
When pinion and valve assembly is fully seated, flat or notch in stub shaft and first mark on housing must line up while the rack is centered in the housing. Refer to measurement "A" to verify proper rack position. (See Figure 3.)
7. While holding the stub shaft, thread lock nut onto pinion and torque to 35 N-m (26 Lbs. Ft.).
Important
If the stub is not held, damage to the pinion teeth will occur.
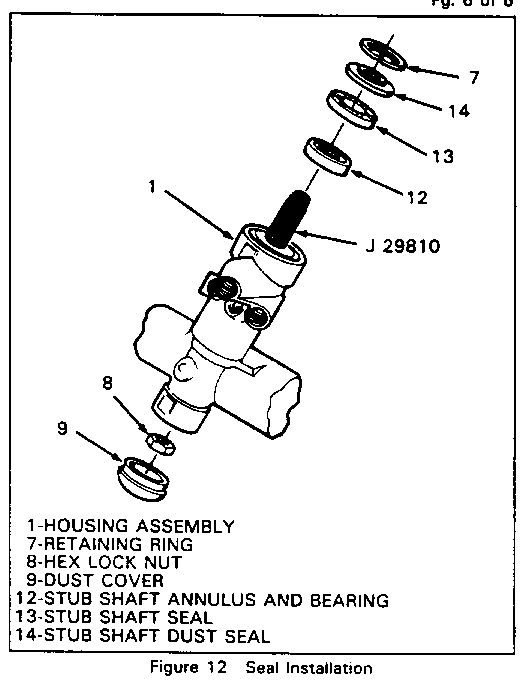
8 Install dust cover to housing.
9. Install stub shaft bearing annulus onto stub shaft.
10. Place seal protector J 29810 onto stub shaft.
11. Install stub shaft seal and stub shaft dust seal over protector and into housing. (Apply a small quantity of grease between seals and on top of dust seal.)
12. Install retaining ring into groove in housing.
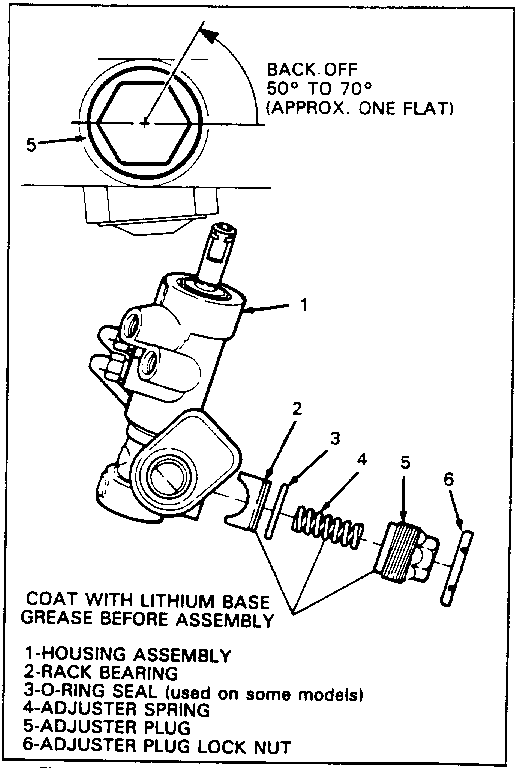
13. Coat rack bearing, adjuster spring and adjuster plug with lithium base grease and install in housing. (See Figure 14.)
Adjust
With rack centered in the housing, turn adjuster plug clockwise until it bottoms in the housing, then back off 50 DEG to 70 DEG (approx. one flat). Check torque on pinion. Maximum pinion preload torque is 1.8 N-m (16 Lbs. In.).
14. Install adjuster plug lock nut to adjuster plug. Tighten firmly against housing while holding adjuster plug stationary.
15. Install rack and pinion assembly into car. (Use appropriate service manual.)
Important
Flush power steering system (hoses, reservoir and cooler lines) with power steering fluid - GM Part #1050017 (or equivalent meeting GM Specification #9985010). Disconnect return line at pump reservoir. (Refer to bleeding procedure in vehicle service manual.) Be sure pump reservoir fluid level is maintained during the flush procedure.
16. Reconnect return line at pump reservoir.
17. Fill with power steering fluid.
18. Bleed air from system.
Inspect
Inspect for leaks.
19. Check toe angle and reset if necessary.
General Motors bulletins are intended for use by professional technicians, not a "do-it-yourselfer". They are written to inform those technicians of conditions that may occur on some vehicles, or to provide information that could assist in the proper service of a vehicle. Properly trained technicians have the equipment, tools, safety instructions and know-how to do a job properly and safely. If a condition is described, do not assume that the bulletin applies to your vehicle, or that your vehicle will have that condition. See a General Motors dealer servicing your brand of General Motors vehicle for information on whether your vehicle may benefit from the information.
