Circuit Description
This DTC is set when the body control module (BCM) is in the learn mode. The scan tool shows the Passlock™ signal toggle under the following conditions:
| • | When the BCM is in the learn mode |
| • | The ignition switch is cycled |
Conditions for Setting the DTC
All of the following conditions must be met:
| • | The Passlock™ option is enabled. |
| • | Ignition 0 is inactive. |
| • | The Passlock™ key code has not been learned. |
Action Taken When the DTC Sets
| • | The BCM stores the DTC B3031 in the BCM memory. |
| • | The vehicle will not start. |
Conditions for Clearing the DTC
| • | The BCM goes to sleep and reinitializes with the fault cleared. |
| • | All of the BCM history codes will be cleared after 100 ignition cycles (from OFF to RUN) with no current codes active during the 100 ignition cycles. |
| • | A scan tool is used. |
Diagnostic Aids
| • | If a new BCM or ignition switch has been installed in the vehicle, this DTC will set. |
| • | When the diagnostics direct you to take the electrical measurements at the junction blocks, refer to Power Distribution Schematics in Wiring Systems for terminal assignments of the wiring harness junction blocks. |
| • | If the DTC is a history DTC, the problem may be intermittent. Perform the tests shown while wiggling the wiring and connectors. This action often causes the malfunction to appear. |
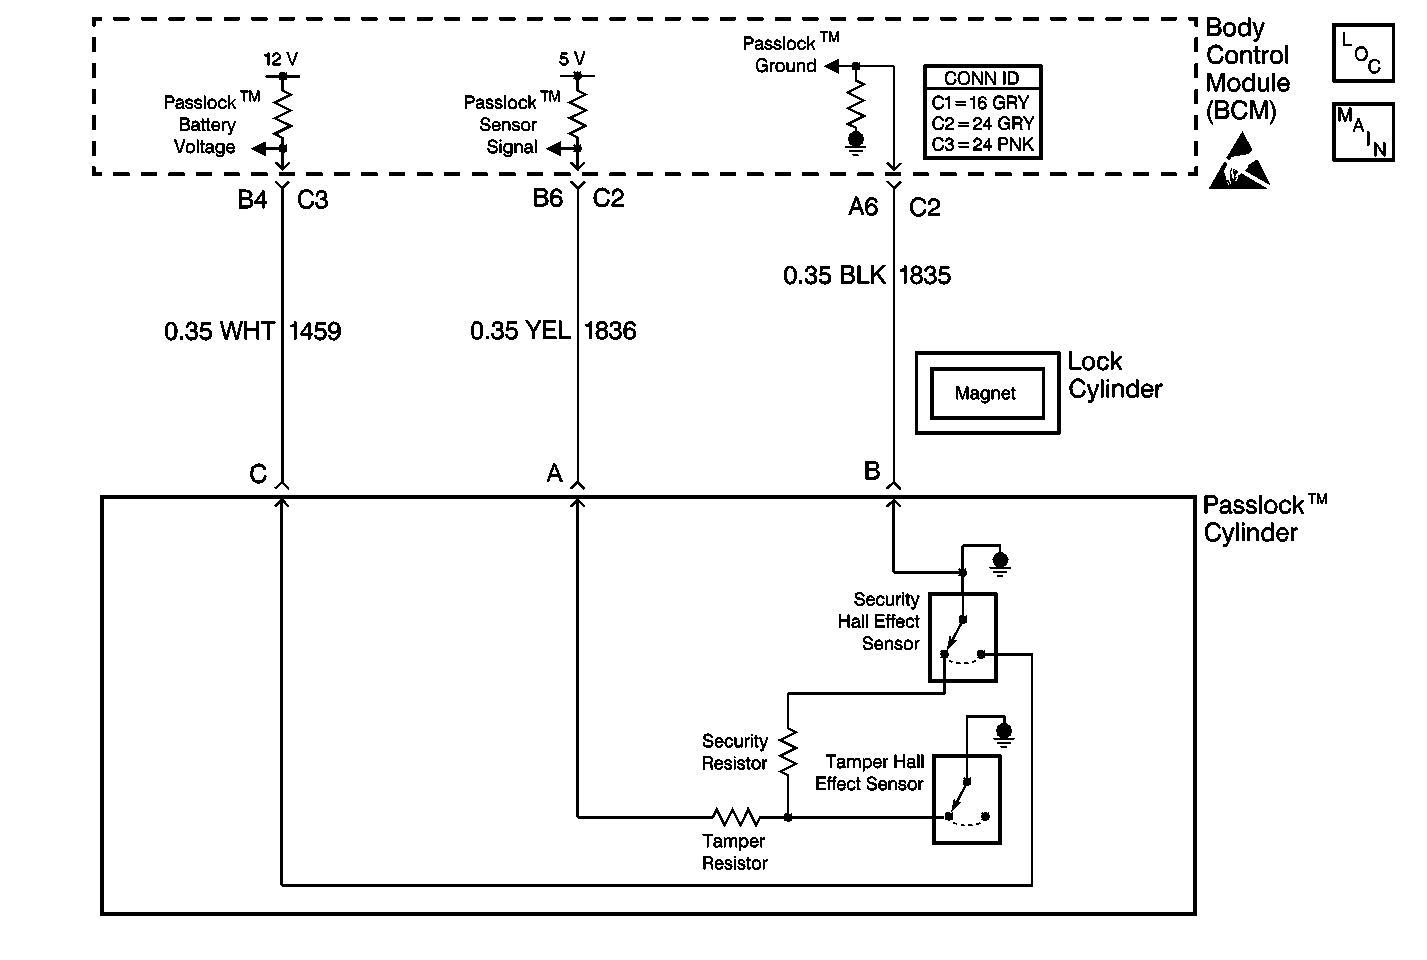
Test Description
The numbers below refer to the numbers on the diagnostic table.
-
This step determines if the scan tool is reading that the BCM is sending the proper voltage.
-
This step determines if the BCM is actually sending the proper voltage.
-
This step determines if a short to ground exists between the BCM and the Passlock® sensor.
-
This step determines if an open in CKT 1459 exists between the BCM and the Passlock® sensor.
-
This step determines if a short to ground or open exists within the Passlock® sensor.
-
This step determines if a short to the battery exists in CKT 1835 between the BCM and the Passlock® sensor.
-
This step determines if a short to ground exists in CKT 1835 between the BCM and the Passlock® sensor.
-
This step determines if an open exists in CKT 1835 between the BCM and the Passlock® sensor.
-
This step determines if the proper voltage exists between terminal A and terminal B of the Passlock® sensor.
-
This step determines if an open exists in CKT 1836 between the BCM and the Passlock® sensor.
Step | Action | Value(s) | Yes | No | ||||
|---|---|---|---|---|---|---|---|---|
1 | Was the theft deterrent diagnostic system check performed? | -- | Go to Step 2 | |||||
Is the Passlock® DATA VOLTAGE reading equal to the specified value? | 5 V | Go to Step 3 | Go to Step 29 | |||||
3 | Inspect for a poor connection at the Passlock® sensor connector. Was a poor connection found? | -- | Go to Step 4 | Go to Step 5 | ||||
4 | Repair the poor connection. Refer to Wiring Repairs in Wiring Systems. Is the repair complete? | -- | Go to Step 29 | -- | ||||
Is the measured voltage equal to the specified value? | B+ | Go to Step 13 | Go to Step 6 | |||||
Is the measured resistance equal to the specified value? | ∞ | Go to Step 8 | Go to Step 7 | |||||
7 | Repair the short to ground in CKT 1459 between the Passlock® sensor connector terminal C and the BCM connector C3 terminal B4. Refer to Wiring Repairs in Wiring Systems. Is the repair complete? | -- | Go to Step 29 | -- | ||||
Use the J 39200 in order to measure the resistance in CKT 1459 between the Passlock® sensor connector terminal C and the BCM connector C3 terminal B4. Is the measured resistance equal to the specified value? | 0 ohms | Go to Step 10 | Go to Step 9 | |||||
9 | Repair the open in CKT 1459 between the Passlock® sensor connector terminal C and the BCM connector C3 terminal B4. Refer to Wiring Repairs in Wiring Systems. Is the repair complete? | -- | Go to Step 29 | -- | ||||
Is the measured voltage equal to the specified value? | B+ | Go to Step 11 | Go to Step 28 | |||||
11 | Inspect for a poor connection at the BCM connector C3. Was a poor connection found? | -- | Go to Step 12 | Go to Step 28 | ||||
12 | Repair the poor connection at the BCM connector C3. Refer to Wiring Repairs in Wiring Systems Is the repair complete? | -- | Go to Step 29 | -- | ||||
13 |
Is the measured voltage equal to the specified value? | B+ | Go to Step 22 | Go to Step 14 | ||||
Is the measured voltage equal to the specified value? | 0 V | Go to Step 16 | Go to Step 15 | |||||
15 | Repair the short to B+ in CKT 1835 between the Passlock® sensor connector terminal C and the BCM connector C2 terminal A6. Is the repair complete? | -- | Go to Step 29 | -- | ||||
Is the measured resistance equal to the specified value? | ∞ | Go to Step 18 | Go to Step 17 | |||||
17 | Repair the short to ground in CKT 1835 between the Passlock® sensor connector terminal B and the BCM connector C2 terminal A6. Is the repair complete? | -- | Go to Step 29 | -- | ||||
Use the J 39200 in order to measure the resistance in CKT 1835 between the Passlock® sensor connector terminal B and the BCM connector C2 terminal A6. Is the measured resistance equal to the specified value? | 0 ohms | Go to Step 20 | Go to Step 19 | |||||
19 | Repair the open in CKT 1835 between the Passlock® sensor connector terminal C and the BCM connector C2 terminal A6. Is the repair complete? | -- | Go to Step 29 | -- | ||||
20 | Inspect for a poor connection at the BCM connector C2 terminal A6. Was a poor connection found? | -- | Go to Step 21 | Go to Step 28 | ||||
21 | Repair the poor connection at the BCM connector C2 terminal A6. Refer to Wiring Repairs in Wiring Systems. Is the repair complete? | -- | Go to Step 29 | -- | ||||
Is the measured voltage equal to the specified value? | 5 V | Go to Step 27 | Go to Step 23 | |||||
Is the measured resistance equal to the specified vlue? | 0 ohms | Go to Step 25 | Go to Step 24 | |||||
24 | Repair the open in CKT 1836 between the Passlock® sensor connector terminal A and the BCM connector C2 terminal B6. Is the repair complete? | -- | Go to Step 29 | -- | ||||
25 | Inspect for a poor connection at the BCM connector C2 terminal B6. Was a poor connection found? | -- | Go to Step 26 | Go to Step 28 | ||||
26 | Repair the poor connection at the BCM connector C2 terminal B6. Refer to Wiring Repairs in Wiring Systems. Is the repair complete? | -- | Go to Step 29 | -- | ||||
27 | Replace the Passlock® sensor. Is the repair complete? | -- | Go to Step 29 | -- | ||||
28 | Replace the BCM. Refer to the following procedures:
Is the repair complete? | -- | Go to Step 29 | -- | ||||
29 | Clear the DTCs from the memory. Are the DTCs cleared from the memory? | -- | -- |
