Built-In Hydrometer
On top of the maintenance-free battery is a built-in temperature compensated hydrometer. Use the hydrometer with the following diagnostic procedure.
When observing the hydrometer, make sure that the battery has a clean top. A light may be required in some poorly lighted areas.
Under normal operation, one of the three indications can be observed:
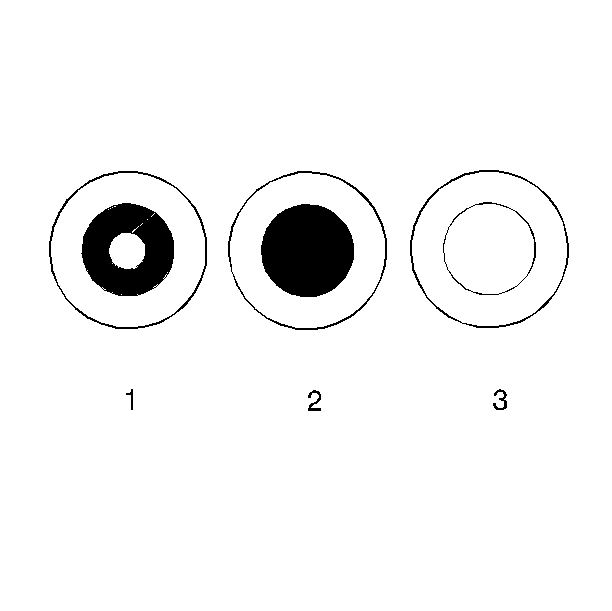
| • | GREEN DOT VISIBLE (1): Any green appearance in the hydrometer is interpreted as a green dot and the battery is ready for testing. |
| • | DARK; GREEN DOT NOT VISIBLE (2): If the green dot cannot be seen, and a cranking complaint exists, proceed to Diagnosis for further testing. Also inspect the charging and electrical systems. |
| • | CLEAR OR LIGHT YELLOW DOT (3): A clear or light yellow dot means the fluid level is below the bottom of the hydrometer and is too low for diagnosis. This may have been caused by excessive or prolonged charging, a broken case, excessive or prolonged charging, a broken case, excessive tipping or normal battery wear out. A battery in this condition indicates high charging voltages caused by a faulty charging system. Therefore, you must inspect the charging and electrical systems. Replace the battery if a cranking complaint exists and the battery has a yellow or clear hydrometer. |
Battery Testing
Use the following procedure in order to test batteries:
- VISUAL INSPECTION: Inspect for oblivious damage, such as a cracked or broken case or cover, that could permit loss of electrolyte. If you see obvious damage, replace the battery. Determine the cause of damage and correct as needed. If not, proceed to step 2.
- HYDROMETER CHECK

| • | GREEN DOT VISIBLE: See Load Test. |
| • | DARK, GREEN DOT NOT VISIBLE: Charge the battery as outlined under Battery Charging, and proceed to Load Test. |
| • | CLEAR OR YELLOW DOT: If the hydrometer is clear or light yellow, the battery is low on electrolyte. Replace the battery. |
Load Test
- Load testing requires use of battery side terminal adapters (AC Delco part number ST-1201, GM part number 12303040 or equivalent) in order to ensure good connections. Do not load test a frozen battery. Replace the battery instead.
- Use a voltmeter in order to check voltage across terminals. With all loads off, and the green dot showing in the hydrometer, voltage should be 12 volts or higher. If voltage is not 12 volts or higher, replace the battery.
- With the voltmeter still attached, connect a battery load tester across the battery terminals.
- If the battery has been on charge, apply a 300 ampere load for 15 seconds in order to remove surface charge from the battery. Remove the load.
- Wait 15 seconds in order to let the battery recover. Apply the specified load located on the battery label or refer to Battery Usage . Read voltage after 15 seconds, then remove the load.
- If voltage does not drop below the minimum listed, the battery is good. Return the battery to service.
- If voltage drops below the minimum listed, replace the battery.
Important: Do not complete the following step if the battery has not been recently charged.
Important: Estimate the battery temperature by feel and by the temperature the battery has been exposed to for the proceeding few hours.
Estimated Temperature | Minimum Voltage |
|---|---|
70°F (21°C) | 9.6 |
50°F (10°C) | 9.4 |
30°F (0°C) | 9.1 |
15°F (-10°C) | 8.8 |
0°F (-18°C) | 8.5 |
0°F (Below -18°C) | 8.0 |
