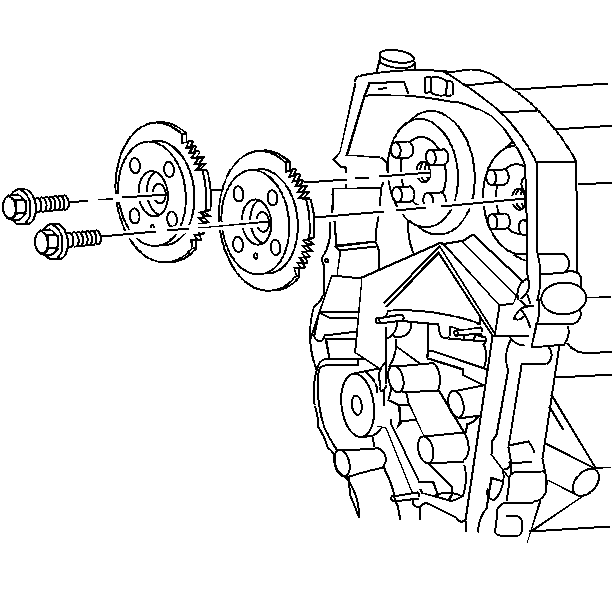
- Install the camshaft sprockets.
Sprockets are identical and interchangeable.
- Clean the old sealer off of the bolts with a wire brush.
- Clean the threaded hole in the camshaft with a nylon bristle brush.
- Coat the camshaft bolts with Adhesive/Sealant Compound GM P/N 12345493
or equivalent.
Notice: Use the correct fastener in the correct location. Replacement fasteners
must be the correct part number for that application. Fasteners requiring
replacement or fasteners requiring the use of thread locking compound or sealant
are identified in the service procedure. Do not use paints, lubricants, or
corrosion inhibitors on fasteners or fastener joint surfaces unless specified.
These coatings affect fastener torque and joint clamping force and may damage
the fastener. Use the correct tightening sequence and specifications when
installing fasteners in order to avoid damage to parts and systems.
- Install the camshaft
sprocket bolts and washers while holding the sprockets with J 39579
.
Tighten
Tighten the bolts to 70 N·m (52 lb ft).
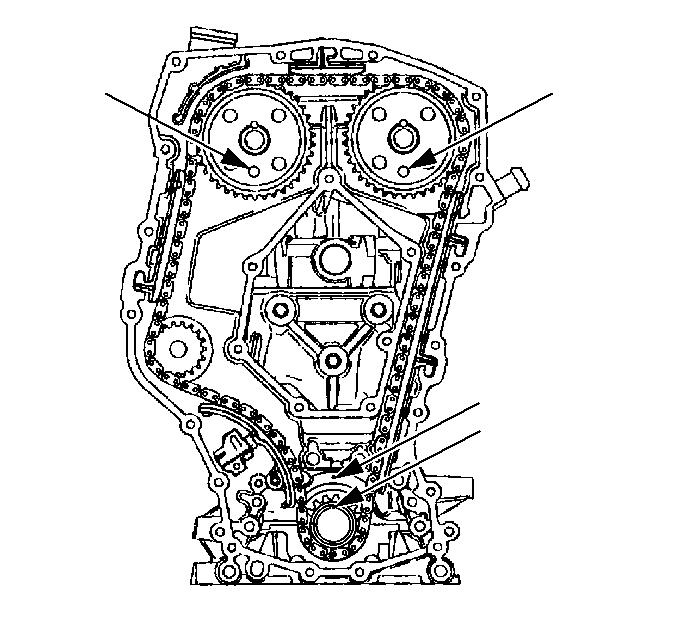
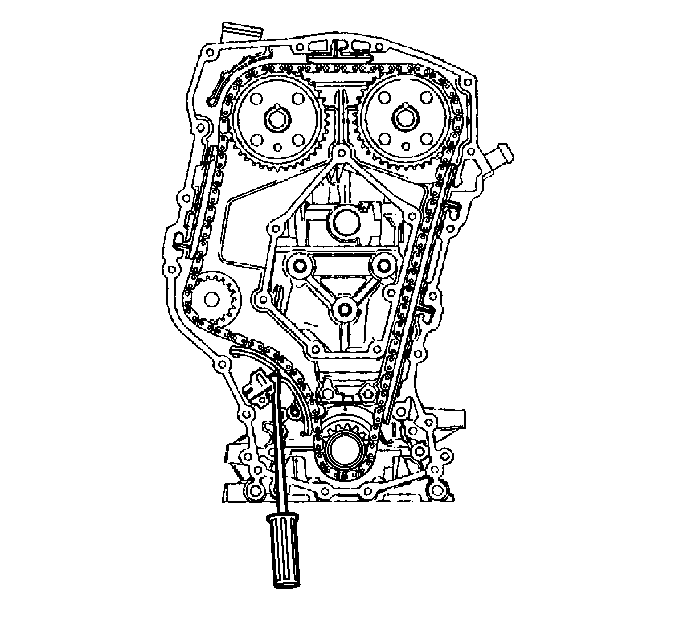
Important: Ensure that the camshaft sprocket alignment pins are in the cylinder
block and the timing chain housing, prior to installing the timing chain housing.
The camshaft sprocket alignment pins ensure proper chain housing and front
cover location for correct front oil-seal-to-crankshaft alignment.
- Install J 36008-A
through
holes in the camshaft sprockets and into holes in the timing chain housing.
This will position the camshaft for correct timing.
- Use the following steps if the camshafts are out of position and
must be rotated more than 1/8 turn to install the alignment dowel pins:
| | Notice: Failure to follow this procedure could result in severe engine damage.
|
| 7.1. | The crankshaft must be rotated 90 degrees clockwise off of TDC
to give the valves adequate clearance to open. |
| 7.2. | Once the camshafts are in position and the dowels are installed,
rotate the crankshaft counter-clockwise back to TDC. |
Notice: Do not rotate the crankshaft clockwise to TDC. Valve or piston damage
could occur.
Important: The timing chain and crankshaft sprocket must be put on in a specific
direction for chain noise and wear considerations. The surfaces that were
marked during removal should be showing when the chain and crankshaft sprocket
are installed.
- Install the timing chain over the exhaust camshaft sprocket around the
coolant pump sprocket and around the crankshaft sprocket.
- Remove the alignment dowel pin from the intake camshaft. Use J 39579
in order to rotate the
intake camshaft sprocket counter-clockwise enough to allow the timing chain
to slide over the intake camshaft sprocket.
- Release J 39579
.
The length of the chain between the two camshaft sprockets will tighten.
- If properly timed the intake camshaft alignment dowel pin will
slide in easily. If the dowel pin does not fully index, the camshafts are
not timed correctly and the procedure must be repeated.
- Leave the alignment dowel pins installed.
- The keyway on the crankshaft and the mark on the cylinder block
should be aligned, with the slack removed from the chain between the intake
camshaft sprocket and the crankshaft sprocket. If the mark and keyway are
not aligned, move the chain on tooth forward or rearward; remove the slack
and recheck marks.
- Use the following steps in order to reload the timing chain tensioner
assembly to its zero position:
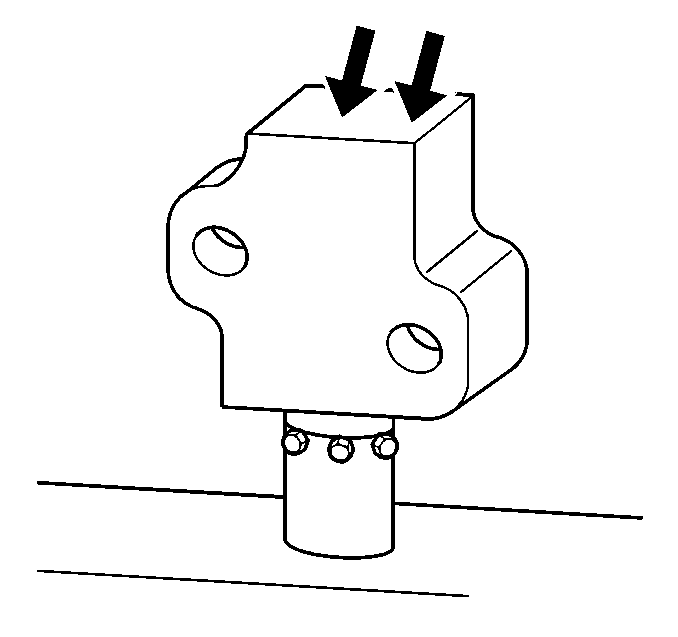
- Reload the timing chain
tensioner.
| 15.1. | Assemble the tensioner plunger and the tensioner body. |
| 15.2. | With the tensioner plunger fully extended, turn the tensioner
and tensioner body upside down on a bench or other flat surface. |
| 15.3. | With the plunger face against the workbench, press firmly on the
bottom of the tensioner body. |
| 15.4. | Compress the plunger until it is seated flush in the tensioner. |
- Install the tensioner
body and plunger to the timing chain housing.
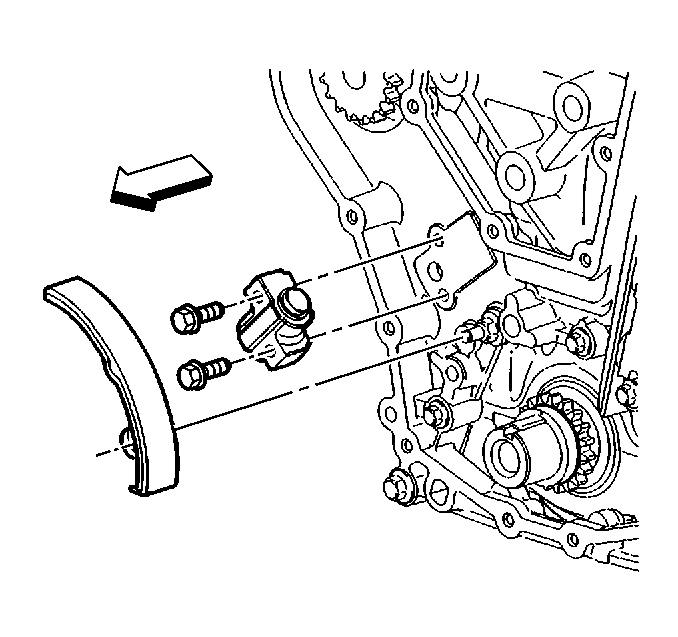
- Install the timing chain tensioner shoe on the stud.
- Apply hand pressure to the timing chain tensioner shoe until the
locking tab seats in the groove in the stud.
- Install the timing chain tensioner bolts. Do not over tighten.
Tighten
Tighten the bolts to 10 N·m (89 lb in).
- Release the timing chain
tensioner plunger.
Important: If the timing chain tensioner is not released from the installation
position, engine damage will occur when the engine is started.
- Using a flat blade screwdriver or a similar tool, press firmly
against the face of the timing chain tensioner plunger.
- Press the plunger until it releases against the back of the timing
chain tensioner shoe.
- Use care to avoid scratching or gouging the tensioner plunger
face.
- Remove the J 36008-A
from the camshaft sprockets.
Notice: The timing chain on the LD9 (VIN T) Twin Cam Engine is not
to be replaced with the timing chain from any other model year. The timing
sprockets are different on the Twin Cam engine and the shape of the links
matches the sprockets. Engine damage may result if the wrong timing chain
is used. The timing chain and the crankshaft sprocket must be marked so that
they are reinstalled in the same side facing out at the time of reassembly.
- Rotate the crankshaft clockwise two full rotations. Align the crankshaft
keyway with the mark on the cylinder block and reinstall the alignment dowel
pins. The alignment dowel pins will slide in easily if the engine is timed
correctly.
- Install the timing chain guides.
